Connecting workload VMs to Google Cloud NetApp Volumes
Google Cloud NetApp Volumes speeds up the deployment of cloud-based applications through rapid provisioning of shared file services and storage management features. Connecting NetApp Volumes to VMware Engine lets you mount NetApp Volumes volumes from within the guest OS of your workload virtual machines (VMs).
Here are some common use cases for using NetApp Volumes with VMware Engine:
- Virtual desktop infrastructure (VDI)
- Creating VM home directories
- Setting up file services
- Shared file storage for applications and databases
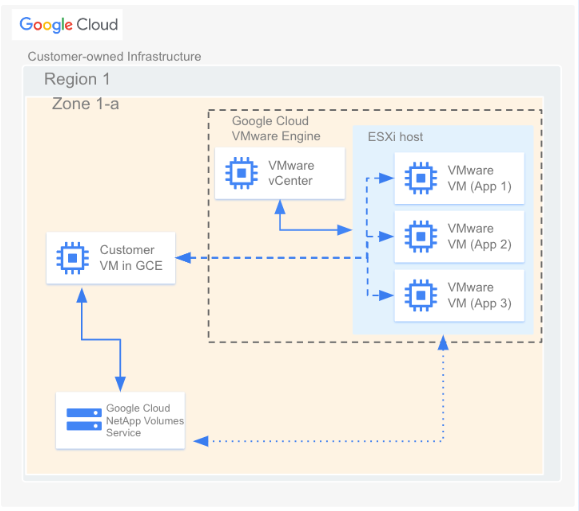
Additionally, VMs in Compute Engine and Google Cloud VMware Engine can both mount the same volumes. Here's a diagram that shows Google Cloud NetApp Volumes being used with VMware Engine and Compute Engine:
Before you begin
The steps in this document assume that you have done the following:
- Created a Storage Pool with the chosen location, service level, capacity, data encryption, and AD policy.
- Created a Volume in a pre-existing storage pool with the selected parameters (like allocated capacity and protocol type) in a given region. You can use NFSv3, NFSv4, or SMB volumes for the connection described in this document.
- Created a private cloud in the same region as your volume.
Get VPC network details
When creating a peering connection between VMware Engine and NetApp Volumes, you need some details about the VPC network used by NetApp Volumes. To get these details, do the following:
- Access the Google Cloud console.
- Select the Google Cloud project containing your NetApp Volumes volume.
Go to VPC network > VPC network peering.
Select the peering connection created in NetApp Volumes for your project. The connection is named
sn-netapp-prod.You might see multiple peering connections with the same name if you have more than one peered VPC network. The person who set up the VPC Network Peering connections can help you determine which connection to use for VMware Engine.
Copy the Peered VPC network and Peered project ID fields, which begin with netapp and end with -tp, respectively.
Create a peering connection for legacy networks
To establish a connection between VMware Engine and NetApp Volumes service, make a one-time peering between tenant host projects. If your VMware Engine project and private clouds were created before Nov 12, 2023, you are using an earlier version of the VMware Engine network. For environments using an earlier version of VMware Engine network, do the following:
- Access the Google Cloud console.
- From the Dashboard, click Private connections.
- Click Create.
- In Private connection name, provide a name for your peering, for
example,
peering-2-netapp-volumes. - In VMware Engine network, specify the VMware Engine network you
want to peer, for example,
us-central1-default. - For Private connection type, select Third party service.
- In Peered project ID, enter the peered project ID of the NetApp Volumes that contains your volume.
- In Peered VPC network, enter the name of the peered VPC network that volume is in.
- Click Create.
Expect the VPC peering status of your new private connection to stay in the Inactive state for up to 72 hours while VMware Engine services and validates the peering request.
Create a peering connection
If your VMware Engine project and private clouds were created after Nov 12, 2023, do the following. For more information on how to create VPC peerings for such environments, see Peer a VPC network.
- Access the Google Cloud console.
- From the main navigation, click VPC Network peerings.
- Click Create.
- In the Name field, provide a name for your networking peering. For
example,
peering-2-netapp-volumes. - In the VMware Engine network section, keep the default "In current
project" selected. Specify the VMware Engine network you want to
peer, for example
ven1. - For Peering, select Third-party Service.
- In the Service tenant project ID field, enter the peered project ID of the Google Cloud project containing your volume.
- In the Service tenant VPC name field, enter the name of the peered VPC network your volume is in.
- In the Route exchange section, keep the default settings.
- Click Create.
After creating, contact NetApp Volumes Support and request that peering be completed between your NetApp Volumes project and VMware Engine. It might take up to 72 hours to complete the peering request.
Mount a volume
Once the peering status is listed as Active, you can mount your cloud volume. Perform the mounting process from within the guest OS of your VMware VM.
To mount an NFS volume, do the following:
In the Google Cloud console, go to NetApp Volumes > Volumes.
Click the NFS volume for which you want to mount NFS exports.
Go to the right, click More more_vert, and then click Mount Instructions.
Follow the instructions in the Mount Instructions for NFS window that appears. The mounting instructions might be slightly different depending on which NFS protocol you have configured for the volume.
To mount an SMB volume, do the following:
In the Google Cloud console, go to NetApp Volumes > Volumes.
Click the SMB volume for which you want to map an SMB share.
Go to the right, click More more_vert, and then click Mount Instructions.
Follow the instructions in the Mount Instructions for SMB window that appears.
After you mount your volume, you can manage the volume using the standard interfaces described by Edit a volume.