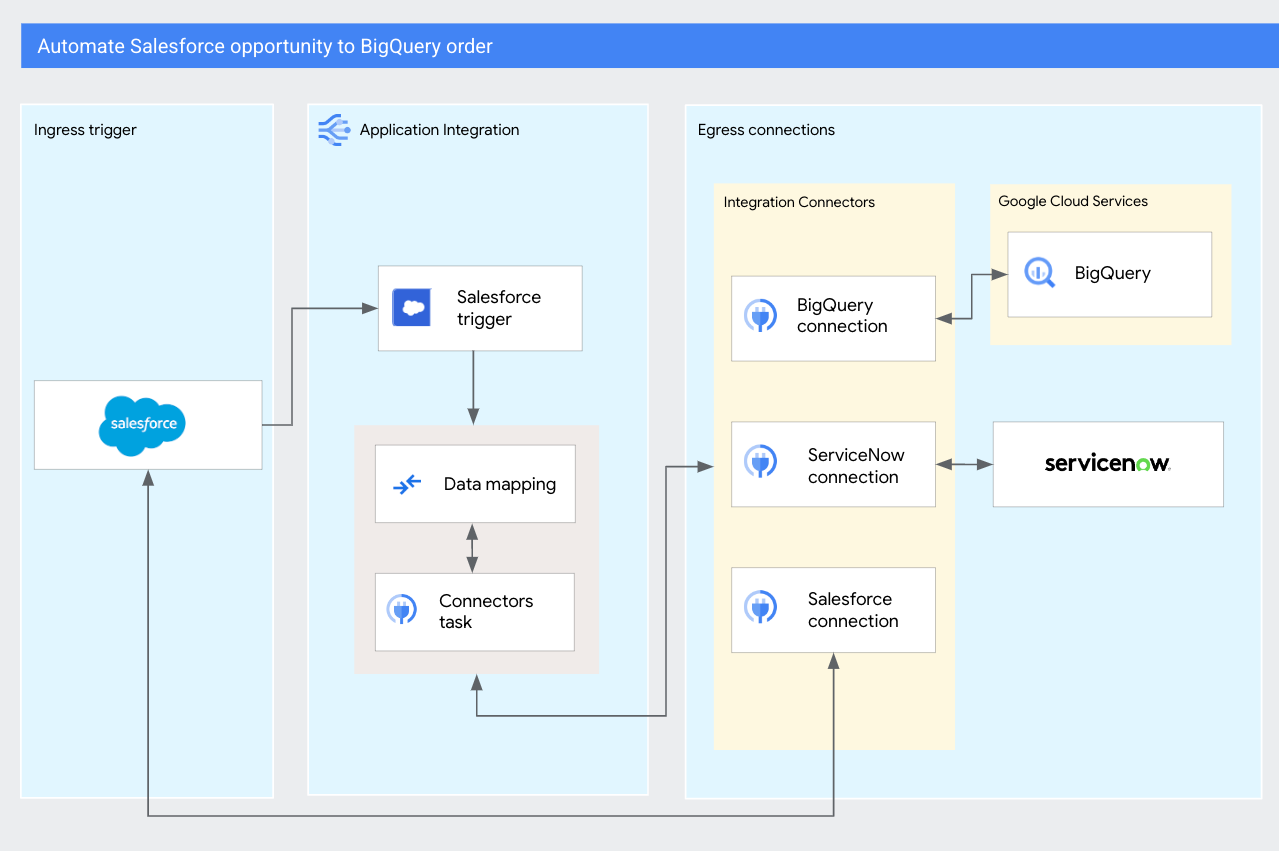
This tutorial describes a use case on how you can use Application Integration to automate an order management flow between a customer relationship management (CRM) application and an enterprise resource planning (ERP) application.
Overview
Business enterprises use various CRM and ERP applications to create, process, manage, and maintain sales orders. Each of these applications is handled by different teams or organizations, and ensuring that the order is constantly tracked while providing timely customer updates is a challenge.
In this tutorial, you'll create an integration that uses a Salesforce trigger to subscribe to a new opportunity event in Salesforce. When a new opportunity is created, the integration will retrieve additional opportunity details, such as the account ID and name. These details are checked in a BigQuery table to create and update the opportunity with a tracking order number. During validation, if the account information doesn't exist in BigQuery, the integration will automatically create a new entry in both the BigQuery table and the attached ServiceNow instance using Integration Connectors.
Objectives
This tutorial shows you how to complete the following tasks in your integration:
- Set up Salesforce Trigger to invoke your integration.
- Add and configure Connectors tasks for Salesforce, BigQuery, and ServiceNow connections.
- Add and configure data mapping tasks to extract and map opportunity details.
Costs
In this tutorial, you use the following billable components of Google Cloud:
The instructions in this tutorial are designed to keep your resource usage within the limits of Google Cloud's Always Free tier.
When you finish the tasks that are described in this document, you can avoid continued billing by deleting the resources that you created. For more information, see Clean up.
Before you begin
- Sign in to your Google Cloud account. If you're new to Google Cloud, create an account to evaluate how our products perform in real-world scenarios. New customers also get $300 in free credits to run, test, and deploy workloads.
-
In the Google Cloud console, on the project selector page, select or create a Google Cloud project.
-
Make sure that billing is enabled for your Google Cloud project.
-
Enable the BigQuery API.
-
Create a service account:
-
In the Google Cloud console, go to the Create service account page.
Go to Create service account - Select your project.
-
In the Service account name field, enter a name. The Google Cloud console fills in the Service account ID field based on this name.
In the Service account description field, enter a description. For example,
Service account for quickstart. - Click Create and continue.
-
Grant the following roles to the service account: BigQuery Data Editor (
roles/bigquery.dataEditor), BigQuery Read Session User (roles/bigquery.readSessionUser), Secret Manager Viewer (roles/secretmanager.viewer), Secret Manager Secret Accessor (roles/secretmanager).To grant a role, find the Select a role list, then select the role.
To grant additional roles, click Add another role and add each additional role.
- Click Continue.
-
Click Done to finish creating the service account.
-
-
In the Google Cloud console, on the project selector page, select or create a Google Cloud project.
-
Make sure that billing is enabled for your Google Cloud project.
-
Enable the BigQuery API.
-
Create a service account:
-
In the Google Cloud console, go to the Create service account page.
Go to Create service account - Select your project.
-
In the Service account name field, enter a name. The Google Cloud console fills in the Service account ID field based on this name.
In the Service account description field, enter a description. For example,
Service account for quickstart. - Click Create and continue.
-
Grant the following roles to the service account: BigQuery Data Editor (
roles/bigquery.dataEditor), BigQuery Read Session User (roles/bigquery.readSessionUser), Secret Manager Viewer (roles/secretmanager.viewer), Secret Manager Secret Accessor (roles/secretmanager).To grant a role, find the Select a role list, then select the role.
To grant additional roles, click Add another role and add each additional role.
- Click Continue.
-
Click Done to finish creating the service account.
-
Prepare your environment
Verify Salesforce user setup
This tutorial assumes that you have an existing Salesforce developer account with the required user setup and permission set. Verify that your account has Change Data Capture (CDC) enabled. For information about creating a new account, see Set up an integration user.
Set up BigQuery dataset and table
For this tutorial, you must set up a BigQuery dataset and create two tables to store the Salesforce opportunity details and the ServiceNow account information.
Set up BigQuery dataset
To set up the BigQuery dataset, do the following:
- Go to the BigQuery page in the Google Cloud console.
- Click the Explorer panel and select the project that you're using for this tutorial.
- Expand (Actions) and select Create dataset.
- Configure the following details in the Create dataset page:
- Dataset ID: Enter
Demo_order_dataset. - Location type > Region: Choose the
us-central1 (lowa)region.
- Dataset ID: Enter
- Click Create dataset.
The new Demo_order_dataset dataset should now appear in your project in the Explorer panel.
Set up BigQuery tables
To create the BigQuery tables, do the following:
- In the Explorer panel, click and open the created
Demo_order_datasetdataset. - Perform the following steps to create an empty Orders table to store the Salesforce opportunity details:
- Click Create table.
- In the Destination section, enter
Ordersas the table name. - In the Schema section, click Edit as text and paste the following JSON schema definition:
[ { "name": "order_number", "type": "STRING", "mode": "NULLABLE", "description": "Salesforce order number" }, { "name": "order_status", "type": "STRING", "mode": "NULLABLE", "description": "Sale order status" }, { "name": "tracking_number", "type": "INTEGER", "mode": "NULLABLE", "description": "Salesforce tracking number" } ] - Click Create table.
- Perform the following steps to create an empty Accounts table to store the Salesforce account details:
- Click Create table.
- In the Destination section, enter
Accountsas the table name. - In the Schema section, click Edit as text and paste the following JSON schema definition:
[ { "name": "account_id", "type": "STRING", "mode": "NULLABLE", "description": "Account ID for the opportunity" }, { "name": "name", "type": "STRING", "mode": "NULLABLE", "description": "Account name for the opportunity" } ] - Click Create table.
The new
OrdersandAccountstables should now appear in your Demo_order_dataset dataset in the Explorer panel.
Verify ServiceNow instance
This tutorial uses a ServiceNow free Personal Developer Instance (PDI). You can either use your existing ServiceNow instance or create a new one. Verify that your instance is active and note down its instance URL. For more information about PDI, see ServiceNow PDI documentation.
Configure connections
For this tutorial, you must configure the following connections in Integration Connectors:
- Salesforce connection
- Configure a Salesforce connection in Integration Connectors. For information on configuring a Salesforce connector, see Salesforce connector.
- BigQuery connection
- Configure a BigQuery connection in Integration Connectors to get, update, and validate order and account details in the Demo_order_dataset dataset. For information on configuring a BigQuery connector, see BigQuery connector.
- ServiceNow connection
- Configure a ServiceNow connection in Integration Connectors using your instance URL to create and retrieve account details in ServiceNow. For information on configuring a ServiceNow connector, see ServiceNow connector.
Create integration
To create a new integration, perform the following steps:
- In the Google Cloud console, go to the Application Integration page.
- In the navigation menu, click Integrations. The Integrations List page appears.
- Click Create integration and provide the following details in the Create Integration page:
- Integration name: Enter
opportunity-to-order-integration. - Description: Enter
Demo integration created for tutorial. - Region: Select
us-central1from the list of supported regions. - Click Create to open the integration editor.
- Integration name: Enter
Set up integration trigger
Once you have successfully created your integration, you can add and configure an integration trigger that invokes the integration for an identified event.
For this tutorial, a Salesforce trigger is used to invoke the integration for every new opportunity that is created in the Salesforce instance. To add and configure a Salesforce trigger in your opportunity-to-order-integration integration, do the following:
- In the integration editor, click Triggers to display a list of available triggers.
- Click and place the Salesforce trigger element in the integration editor.
- Select the Salesforce trigger element on the designer canvas to open the Salesforce trigger configuration pane.
- Configure the following fields under Trigger Input:
- Event type: Select Change Data Capture (CDC) from the drop-down list.
- Salesforce instance configuration: Click the + Add new Salesforce instance configuration option from the drop-down list.
In the Add Salesforce instance configuration dialog, do the following:
- Salesforce instance connection name: Enter a connection name for the Salesforce instance. For example,
test. - Salesforce domain: Enter your Salesforce domain name. You can find this information from your Salesforce account > View profile page.
- Authentication profile: Select an authentication profile. If you don't have an authentication profile, create a new profile. For information, see Create a new authentication profile.
- Click Add.
- Salesforce instance connection name: Enter a connection name for the Salesforce instance. For example,
- Salesforce channel configuration: Click the + Add new Salesforce channel configuration option from the drop-down list.
In the Add Salesforce channel dialog, do the following:
- Salesforce object name: Enter
Opportunity. - Click Add.
- Salesforce object name: Enter
- Operation: Select Create from the drop-down list
Changes to the properties are saved automatically.
Map trigger payload to Salesforce connector
When the integration is invoked using the Salesforce trigger, you extract the opportunity ID and map it to a Salesforce connector to retrieve additional details of the opportunity.
Connect to the Salesforce account
Perform the following steps to add and configure a Connectors task to retrieve the opportunity details using the Salesforce connection:
- In the integration editor, click Tasks to display a list of available tasks.
- Click and place the Connectors element in the integration editor.
- Select the Connectors task element on the designer to view the Connectors task configuration pane.
- Click and rename the Connectors label to
Fetch Salesforce Data. - Click Configure connector.
- Do the following in the Connectors Task Editor page:
- Under Select connection, choose the
us-central1region. - Select your Salesforce connection from the list of available connections.
- Click Next.
- Under Type, choose Entities.
- Under Set entities/actions, select Opportunity from the list of available entities and then select Get as the Operation.
- Click Done to complete the connection configuration and close the pane.
- Under Select connection, choose the
Extract and map opportunity ID
A Data Mapping task is used to map and extract the opportunity details between that Salesforce trigger and the Salesforce connector.
To add and configure the data mapping in your integration, do the following:
- In the integration editor, click Tasks to display a list of available tasks.
- Click and place the Data Mapping element in the integration editor.
- Select the Data Mapping element on the designer to view the task configuration pane.
- Click and rename the Data Mapping task to
Map to opportunity ID. - Click Open Data Mapping Editor.
The Data Mapping Editor lets you map input variables to the desired output variables, using the available transformation functions. The output is then available as a variable to any other integration task or trigger. For more details on mapping variables, see Add a mapping.
- Map the trigger —
SalesforceTriggerCdcRecordID—output variable to the auto-generated connector—entityId(Fetch Salesforce Data)—input variable.Once your mapping is complete, close the pane. Any changes will be autosaved.
- Add an edge connection from the Salesforce trigger to the Map to opportunity ID task.
- Add an edge connection from the Map to opportunity ID task to the Fetch Salesforce Data connector.
Validate Salesforce account in BigQuery table
Once you retrieve all the opportunity details from the Salesforce connector, you extract and map the account ID associated with the opportunity, and validate its existence in your BigQuery table.
Connect to the BigQuery table
Perform the following steps to configure a Connectors task that reads the BigQuery Accounts tables using the BigQuery connection:
- In the integration editor, click Tasks to display a list of available tasks.
- Click and place the Connectors element in the integration editor.
- Click the Connectors task element on the designer to view the Connectors task configuration pane.
- Click and rename the Connectors to
Check account in BigQuery. - Click Configure connector.
- Do the following in the Connectors Task Editor page:
- Under Select connection, choose the
us-central1region. - Select your BigQuery connection from the list of available connections.
- Click Next.
- Under Type, choose Entities.
- Under Set entities/actions, select accounts from the list of available entities and then select List as the Operation.
- Click Done to complete the connection configuration and close the pane.
- Under Select connection, choose the
- Add an edge connection from the Fetch Salesforce Data connector to the Check account in BigQuery connector.
Extract and validate Salesforce account ID
To extract, map, and validate the account ID of the opportunity, do the following:
- In the integration editor, click Tasks to display a list of available tasks.
- Click and place the Data Mapping element in the integration editor.
- Click the Data Mapping element on the designer to view the task configuration pane.
- Click and rename the Data Mapping task to
Check account. - Click Open Data Mapping Editor.
- Click + Add new variable and create the following output variables:
Output variable name Data type sf_account_idSTRINGsf_account_nameSTRINGaccount_existsBOOLEAN - Create the following mapping between the Salesforce connector payload variable and the local variable:
Input Output connectorOutputPayload ( Fetch Salesforce Data) .GET_PROPERTY("AccountId")sf_account_idconnectorOutputPayload ( Fetch Salesforce Data) .GET_PROPERTY("Name")sf_account_nameconnectorOutputPayload (Check account in BigQuery) .FILTER(~obj1 -> ~obj1 .GET_PROPERTY("account_id") .TO_STRING() .EQUALS(sf_account_id) ) .SIZE() .EQUALS("1")account_existsOnce your mapping is complete, close the pane. Any changes will be autosaved.
- Add an edge connection from the Check account in BigQuery connector to the Check account task.
Create new BigQuery account
Once you have validated the Salesforce account in BigQuery, and if the account doesn't exist, do the following to create a new account in BigQuery. You also use the same information to create an account in ServiceNow.
Add account to BigQuery
Perform the following steps to configure a Connectors task that creates a new entity in the BigQuery Accounts table:
- In the integration editor, click Tasks to display a list of available tasks.
- Click and place the Connectors element in the integration editor.
- Click the Connectors task element on the designer to view the Connectors task configuration pane.
- Click and rename the Connectors to
Create account in BigQuery. - Click Configure connector.
- Do the following in the Connectors Task Editor page:
- Under Select connection, choose the
us-central1region. - Select your BigQuery connection from the list of available connections.
- Click Next.
- Under Type, choose Entities.
- Under Set entities/actions, select accounts from the list of available entities and then select Create as the Operation.
- Click Done to complete the connection configuration and close the pane.
- Under Select connection, choose the
Create a new ServiceNow account
Perform the following steps to configure a Connectors task that adds a new account to your ServiceNow instance:
- In the integration editor, click Tasks to display a list of available tasks.
- Click and place the Connectors element in the integration editor.
- Click the Connectors task element on the designer to view the Connectors task configuration pane.
- Click and rename the Connectors to
Create account in ServiceNow. - Click Configure connector.
- Do the following in the Connectors Task Editor page:
- Under Select connection, choose the
us-central1region. - Select your BigQuery connection from the list of available connections.
- Click Next.
- Under Type, choose Entities.
- Under Set entities/actions, select system_user from the list of available entities and then select Create as the Operation.
- Click Done to complete the connection configuration and close the pane.
- Under Select connection, choose the
Transform and map account details
To transform the account details and map it to the BigQuery and ServiceNow connectors, do the following:
- In the integration editor, click Tasks to display a list of available tasks.
- Click and place the Data Mapping element in the integration editor.
- Click the Data Mapping element on the designer to view the task configuration pane.
- Click and rename the Data Mapping task to
Mapping for Account Creation. - Click Open Data Mapping Editor.
- Click + Add new variable and create the following input variables:
Input variable name Data type new_BQaccountJSONnew_SNaccountJSON - Create the following mapping to map the Salesforce account ID and name to the BigQuery table:
Input Output new_BQaccount .SET_PROPERTY( sf_account_id, "account_id" ) .SET_PROPERTY( sf_account_name, "name" )connectorInputPayload (Create account in BigQuery)new_SNaccount .SET_PROPERTY( sf_account_id, "sys_id" ) .SET_PROPERTY( sf_account_name, "first_name" )connectorInputPayload (Create account in ServiceNow)Once your mapping is complete, close the pane. Any changes will be autosaved.
- Add an edge connection from the Mapping for Account Creation task to the Create account in BigQuery connector.
- Add an edge connection from the Mapping for Account Creation task to the Create account in ServiceNow connector.
Create new order in BigQuery
Do the following to generate an order number and add it in BigQuery.
Add order to BigQuery
Perform the following steps to configure a Connectors task that creates a new entity in the BigQuery Orders table:
- In the integration editor, click Tasks to display a list of available tasks.
- Click and place the Connectors element in the integration editor.
- Click the Connectors task element on the designer to view the Connectors task configuration pane.
- Click and rename the Connectors to
Create order in BigQuery. - Click Configure connector.
- Do the following in the Connectors Task Editor page:
- Under Select connection, choose the
us-central1region. - Select your BigQuery connection from the list of available connections.
- Click Next.
- Under Type, choose Entities.
- Under Set entities/actions, select Orders from the list of available entities and then select Create as the Operation.
- Click Done to complete the connection configuration and close the pane.
- Under Select connection, choose the
Generate order and map to BigQuery
- In the integration editor, click Tasks to display a list of available tasks.
- Click and place the Data Mapping element in the integration editor.
- Click the Data Mapping element on the designer to view the task configuration pane.
- Click and rename the Data Mapping task to
Mapping for Order Creation. - Click Open Data Mapping Editor.
- Click + Add new variable and create the following variable:
Variable name Data type order_numberSTRING - Create the following mapping to generate a new order number and map the order details to the BigQuery connector:
Input Output GENERATE_UUID() .SPLIT("-") .GET("0")new_order_number"{}" .TO_JSON() .SET_PROPERTY( connectorOutputPayload ( Fetch Salesforce Data) .GET_PROPERTY("DeliveryInstallationStatus__c") , "order_status" ) .SET_PROPERTY( connectorOutputPayload ( Fetch Salesforce Data) .GET_PROPERTY("TrackingNumber__c") , "tracking_number" ) .SET_PROPERTY( new_order_number , "order_number" )connectorInputPayload (Create Order in BigQuery)Once your mapping is complete, close the pane. Any changes will be autosaved.
- Add an edge connection from the Create account in BigQuery connector to the Mapping for Order Creation task.
- Add an edge connection from the Create account in ServiceNow connector to the Mapping for Order Creation task.
- Add an edge connection from the Mapping for Order Creation task to the Create Order in BigQuery connector.
Update Salesforce opportunity
Once you have generated the new order number, you update the source Salesforce opportunity
Configure the Salesforce connector
Perform the following steps to configure a Connectors task that updates the existing Salesforce opportunity:
- In the integration editor, click Tasks to display a list of available tasks.
- Click and place the Connectors element in the integration editor.
- Click the Connectors task element on the designer to view the Connectors task configuration pane.
- Click and rename the Connectors to
Update Salesforce. - Click Configure connector.
- Do the following in the Connectors Task Editor page:
- Under Select connection, choose the
us-central1region. - Select your Salesforce connection from the list of available connections.
- Click Next.
- Under Type, choose Entities.
- Under Set entities/actions, select Opportunity from the list of available entities and then select Update as the Operation.
- Click Done to complete the connection configuration and close the pane.
- Under Select connection, choose the
Map order number to Salesforce
- In the integration editor, click Tasks to display a list of available tasks.
- Click and place the Data Mapping element in the integration editor.
- Click the Data Mapping element on the designer to view the task configuration pane.
- Click and rename the Data Mapping task to
Mapping to update opportunity. - Click Open Data Mapping Editor.
- Create the following mapping to update the Salesforce opportunity:
Input Output "{}" .TO_JSON() .SET_PROPERTY( new_order_number , "OrderNumber__c" )connectorInputPayload (Update Salesforce)entityId ( Fetch Salesforce Data)entityId (Update Salesforce )"'" .CONCAT(entityId ( Fetch Salesforce Data)) .CONCAT("'")filterClause (Update Salesforce )Once your mapping is complete, close the pane. Any changes will be autosaved.
- Add an edge connection from the Create Order in BigQuery connector to the Mapping to update opportunity task.
- Add an edge connection from the Mapping to update opportunity task to the Update Salesforce connector.
Add edge condition
An edge condition lets you specify the conditions that must be met for control of an integration to pass to the task connected by the edge. Now that you have added and configured and the required tasks, you can add an edge condition to define the flow of the integration.
The following edge condition controls the flow of the integration based on the validation of the account information:
- Add an edge connection from the Check account task to the Mapping for Account Creation task with the following edge condition:
$account_exists$ = False
- Add another edge connection from the Check account task to the Mapping for Order Creation task with the following edge condition:
$account_exists$ = True
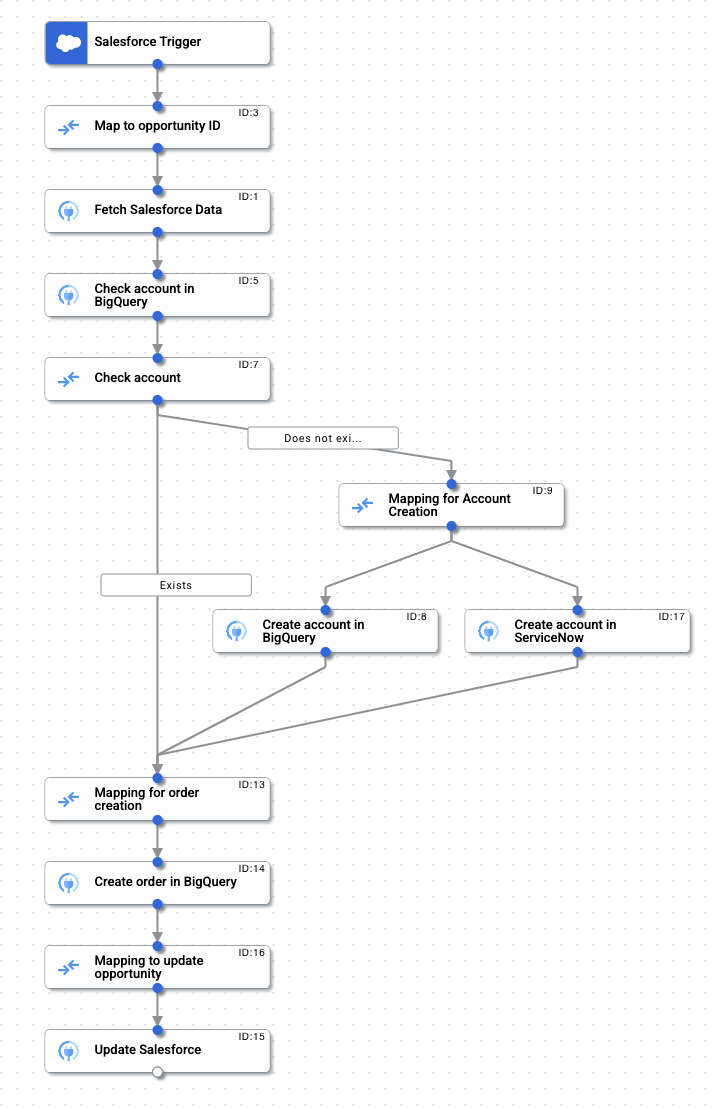
Sample integration flow
The following figure shows a sample layout of the integration created using this tutorial.
Publish and test the integration
To publish the integration click Publish in the integration editor toolbar.
Upon successfully publishing your integration, you can view and inspect the execution logs of the published integration. To view logs, click ![]() View execution logs for this integration. The Execution Logs page appears.
View execution logs for this integration. The Execution Logs page appears.
Test case 1: To check if an order number is created for a new account ID
Test the integration by logging in to the Salesforce instance and creating a new opportunity. You must create the opportunity in a new account or an account that doesn't exist in your BigQuery table.
To verify the success of your integration:
- Go to the BigQuery page.
- Open the Accounts table and check to confirm the insertion of the new opportunity account ID.
- Open the Orders table and check to confirm the insertion of the new order details.
- Go to your ServiceNow instance.
- Check to confirm if a new account is added to your instance containing the same Salesforce opportunity account ID.
- Open Salesforce.
- Check to confirm if the opportunity is updated with the new order number.
Test case 2: To check if an order number is created for an existing account ID in BigQuery
Test the integration by logging in to the Salesforce instance and creating a new opportunity. You must create the opportunity in an existing account that also exists in your BigQuery table.
To verify the success of your integration:
- Go to the BigQuery page.
- Open the Accounts table and check to confirm that NO new account ID is inserted.
- Open the Orders table and check to confirm the insertion of the new order details.
- Open Salesforce.
- Check to confirm if the opportunity is updated with the new order number.
Clean up
To avoid incurring charges to your Google Cloud account for the resources used in this tutorial, unpublish the integration and delete the connections created in Integration Connectors.
- To unpublish this integration, click Unpublish in the integration editor toolbar. See Delete integrations for more information.
- For information about how to delete a connection, see Manage connectors.