Repairing network hardware at scale with SRE principles
James O’Keeffe
Senior Site Reliability Engineer
To support our Google Cloud customers, we run a complex global network that depends on multiple providers and a lot of hardware. Google network engineering uses a diverse set of vendor equipment to route user traffic from an internet service provider to one of our serving front ends inside a GCP data center. This equipment is proprietary and made by external networking vendors such as Arista, Cisco and Juniper. Each vendor has distinct operational methods, configurations and operational consoles.
With hundreds of distinct components utilized across our global network, we routinely deal with hardware failures—for example, a failed power supply, line card or control plane card. The complexity of today’s cloud networks means that there are a huge number of places where failure can occur. When we first began building and operating our own data centers, Google had a team of engineers, network engineers and site reliability engineers (SREs) who performed fault detection, mitigation and repair work on these devices, using manual processes guided by a ticket system. Google’s SRE principles are prescriptive, and aim to guide developers and operations teams toward better systems reliability. As with DevOps, avoiding toil—the manual tasks that can eat up too much time—is an essential goal.
We realized after becoming familiar with common hardware problems that any ticket type that we encountered repeatedly and that follows a predetermined sequence of steps can easily be automated. Our team created a list of playbooks over time that detailed steps of how to deal with each hardware failure scenario, taking into account relevant software and hardware bugs and typical steps to resolution. Each playbook is used when an alert is received. Given that we already knew in advance how to deal with each issue as it arose, it made sense to automate the work. Here’s how we did it.
Building the automation interface
“In the old way of doing things, we treat our servers like pets, for example, Bob the mail server. If Bob goes down, it’s all hands on deck. The CEO can’t get his email and it’s the end of the world. In the new way, servers are numbered, like cattle in a herd. For example, www001 to www100. When one server goes down, it’s taken out back, shot, and replaced on the line.”
-Randy Bias
The above quote describes a classic engineering scenario often applied within SRE: "Pets vs. cattle," which describes a way of looking at data center hardware as either individual components or a herd of them. The two categories of equipment can be described as follows:
Pet:
An individual device you work on. You're familiar with all of its particular failure modes.
When it gets sick, you come to the rescue.
Cattle:
A fleet of devices with a common interface.
You manage the "herd" of devices as a group.
The common interface lets you perform the same basic operations on any device, regardless of its manufacturer.
The error qualifier in Go simply means that the function returns an error object if it fails. The underlying code implementing this interface for a Juniper line card varies significantly from implementation on the Cisco line card, but the caller of the function is insulated from the implementation. The upper level code imports the library, and when it operates on a line card, it can only perform one of those three actions we specified above.
We then realized that we could apply the same interface to many hardware components—for example, a fan. For certain vendors, the Online() and Offline() functions did nothing, because those vendors didn't support turning a fan off, so we just used the interface to check the status.
Building upon this line of thought, we realized that we could generalize this interface to define a common interface for all hardware components within a device.
By structuring the code this way, anyone can add a device from a new vendor. Moreover, anyone can add any type of new component as a library. Once the library implements this common interface, it can be registered as a handler for that specific vendor and component.
Deciding what to automate
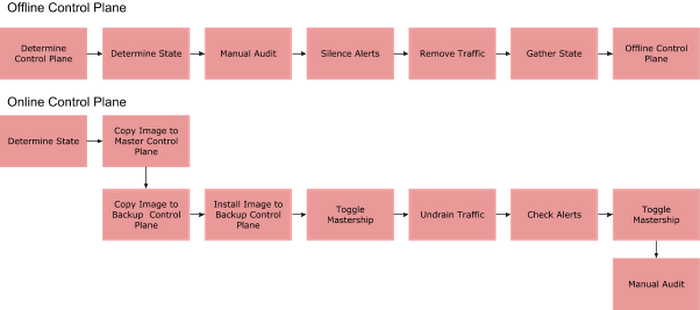
The system needed to interact with humans at various stages of the automation. To decide what to automate, we drew a flow chart of the normal human-based repair sequence and drew boxes around stages we believed we could replace with automation. We used the task of replacing a vendor control plane board as an example. Many of the steps have self-explanatory names, but these are definitions of some of the more complex ones:
Determine control plane: Find faulty control plane unit.
Determine state: Is it the master or the backup?
Copy image to control plane: Copy the appropriate software image to the master control plane.
Offline control plane: Send the backup control plane offline.
Toggle mastership: Make the replaced control plane the new master.


When we needed to carry out this workflow, a Google network engineer performed each step in Figure 1, with the exception of pulling out and replacing the failed control plane, which was performed by someone on-site at a data center location.
Once we had defined this task, we created an automated workflow. The goal of the new system was to provide a UI for our hardware engineers in a data center that allowed them to perform one of those operations at a specific time under specific conditions and with various automated safety checks, followed by an entire device audit at the end of the operation. Previously, a human had performed all of these steps, but now a human only needed to perform the step “hardware gets replaced” in Figure 2—the hardware replacement.


Automation, before and after


You can see in Figure 3 what the system looked like after automation. Before automating this workflow, there would have been a lot of manual work. When an alert initially came in, an engineer would have stopped traffic to the device, and offlined by hand the bad component. Our network operations center (NOC) team would then work with the vendor—for example, Juniper or Cisco— to get a replacement part on-site. Next, we would file a change request in our change management system, noting the date of the operation.
On the day of the operation:
The data center technician would click “start” on the change management system to begin the repair.
Our system picks up this change and is ready to begin the repair.
The technician clicks “start” on our UI.
An “offline” state machine starts proceeding through the various steps to take the component offline safely.
The UI notifies the user each step of the way.
Once the state machine has completed, it notifies the technician, who can safely replace the component.
Once the component is replaced and re-cabled, the technician returns to the UI and begins the “online” state machine, which safely returns the component into production.
When we reviewed our original automation design, we noticed there would be a lot of work involved in building the various systems needed to implement the automated workflow. To facilitate collaboration, we created ticket items for each component of the system, so multiple engineers could work on the project in parallel.
Automation lessons learned
We used an iterative approach in our planning and execution. We first focused on replacing the line card for one vendor, then moved on to multiple vendors and multiple components. Due to the modular design of the code base and the interacting systems, adding more modules and scaling the code horizontally was easy.
For example, adding a new library that handled fan replacements meant simply creating the code to handle this and ensuring it implemented the above interface. Then it registered itself in the main function.
We had the option to extend or repurpose existing automation systems owned by our software management teams to meet our needs. We had to carefully consider whether to use those systems or build our own, potentially duplicating work if we chose the latter. Ultimately, we built our own automation because the other systems were understaffed. Trying to extend their tools would have disrupted other teams' project work and delayed our own project.
What worked well
Leveraging multiple engineers to automate our internal part of the workflow allowed us to take the project from design to implementation within a short period—about one year.
What didn't
We haven't yet fully automated our hardware replacement workflow. Doing so involves troubleshooting hardware issues with vendors and persuading them that each individual failure merits a device or component replacement. We work around this gap in our automation by keeping spares on site for use with our repair automation, and handling the vendor workflow portion of the process separately and mostly manually through our NOC. We are currently working toward a fully automated vendor interaction with our vendor partners.
Measuring automation success
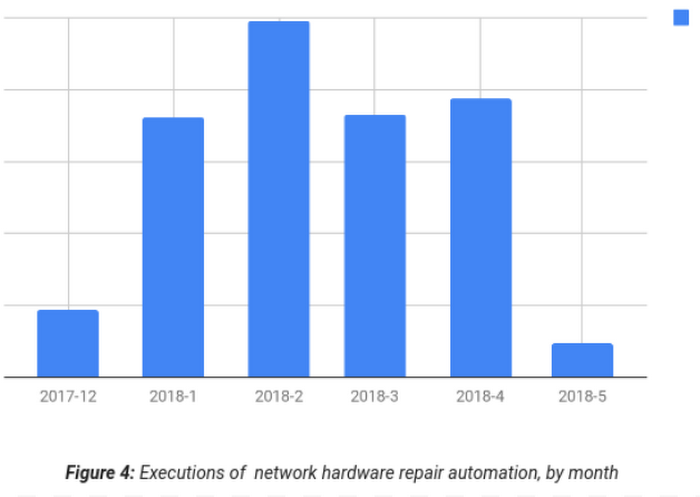
We can measure the hours our automation saves engineers using Google's production change logging service, which all internal tools use to record changes made to the production environment. The service logs changes made by tools manually invoked by engineers as well as tools that provide end-to-end automation without manual input. Thus we can compare how long each network repair action used to take when performed manually vs. the number of repair actions that are undertaken by today's fully automated system. These two data sets allow us to calculate the total time savings from automation. As shown in Figure 4, network hardware repair automation saves us hundreds of hours every month.


Tips for reducing toil through automation
While strategies for eliminating toil must be tailored to your individual environment and use cases, some approaches are universal. Based upon our own experience eliminating toil by automating network repair tasks, we recommend the following:
Measure your toil.
Tackle the biggest sources of toil first, and don't try to solve all problems at once.
Carefully consider whether to enhance existing tools or build new ones. Even if you can partially repurpose another team's work, would creating a tool from scratch actually make more sense cost- or resource-wise?
Take a design-driven approach. Iterate on the design, starting small and iterating quickly. Don't try to design the perfect approach from the start.
Measure your time savings to determine your return on investment.


