Rapid cloud foundation buildout and workload deployment using Terraform
Kelly Dodson
Cloud Technical Resident
Nancy Liu
Technical Solutions Engineer
Last year, we released the Cloud Foundation Toolkit, open source templates that help you quickly build a strong cloud foundation according to best practices. These modules are available for both the Terraform infrastructure-as-code framework, as well as our own Cloud Deployment Manager.
This blog post will detail building a secure cloud foundation using the Cloud Foundation Toolkit Terraform example foundation. From there, we will explore how to deploy a microservices demo application onto the foundation using Terraform. After reading this content, we hope you learn how to accomplish the following:
Reduce the time required to build out an enterprise cloud foundation to less than one day following Google best practices
Use your cloud foundation by deploying a demo Google Kubernetes Engine (GKE) workload onto the foundation using Terraform
Deploy a GKE cluster at the highest level of security based on Google expert recommendations (IAP with TCP forwarding bastion host)
Getting started
To get started with using the Cloud Foundation Toolkit, first you need to understand Terraform and Linux command line basics. Then, you will need to make sure you have the following prerequisites.
Prerequisites:
A GCP Organization
A GCP Billing Account
Ability to create Cloud Identity / G Suite groups
Linux command line access with the following installed and configured:
Building out a cloud foundation
First, you will need to clone the Terraform example foundation repository.
Git clonehttps://github.com/terraform-google-modules/terraform-example-foundation.git
This repo contains several distinct Terraform projects each within their own directory that must be applied separately, but in sequence. Each of these Terraform projects are to be layered on top of each other, running in the following order.
0-bootstrap: The purpose of this step is to bootstrap a GCP organization, creating all the required resources & permissions to start using the Cloud Foundation Toolkit (CFT). This step also configures Cloud Build & Cloud Source Repositories for foundations code in subsequent stages.
1-org: The purpose of this step is to set up top level shared folders, monitoring & networking projects, organization-level logging, and set baseline security settings through organizational policy.
2-environments: The purpose of this step is to set up environments, such as development (“dev”) and production (“prod”) environments, within the GCP organization.
3-networks: The purpose of this step is to set up shared VPCs with default DNS, NAT, Private Service networking, and baseline firewall rules.
4-projects: The purpose of this step is to set up folder structure and projects for applications, which are connected as service projects to the shared VPC created in the previous stage.
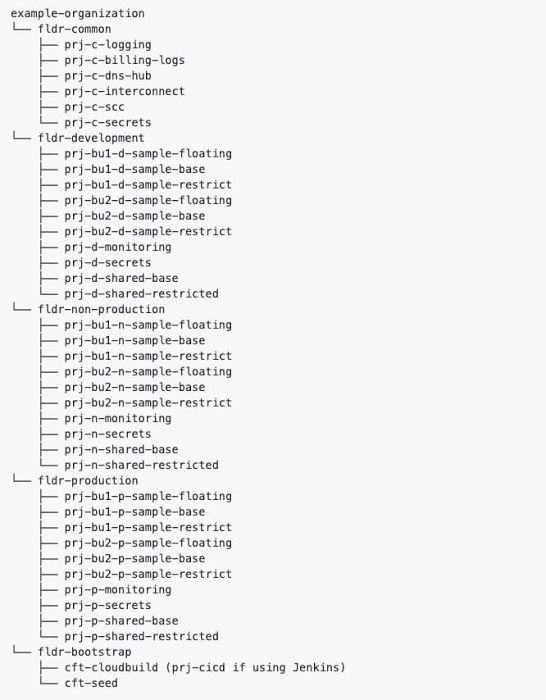
You will need to follow the instructions on the Terraform example foundation repository’s README.md files in order to apply each directory in sequence. The successful completion of each step is required before you can move on to the next step in the sequence.
After you have successfully completed all of the foundational steps in sequence, your organization’s structure should look similar to the diagram below:
Deploy first workload: Microservices demo application
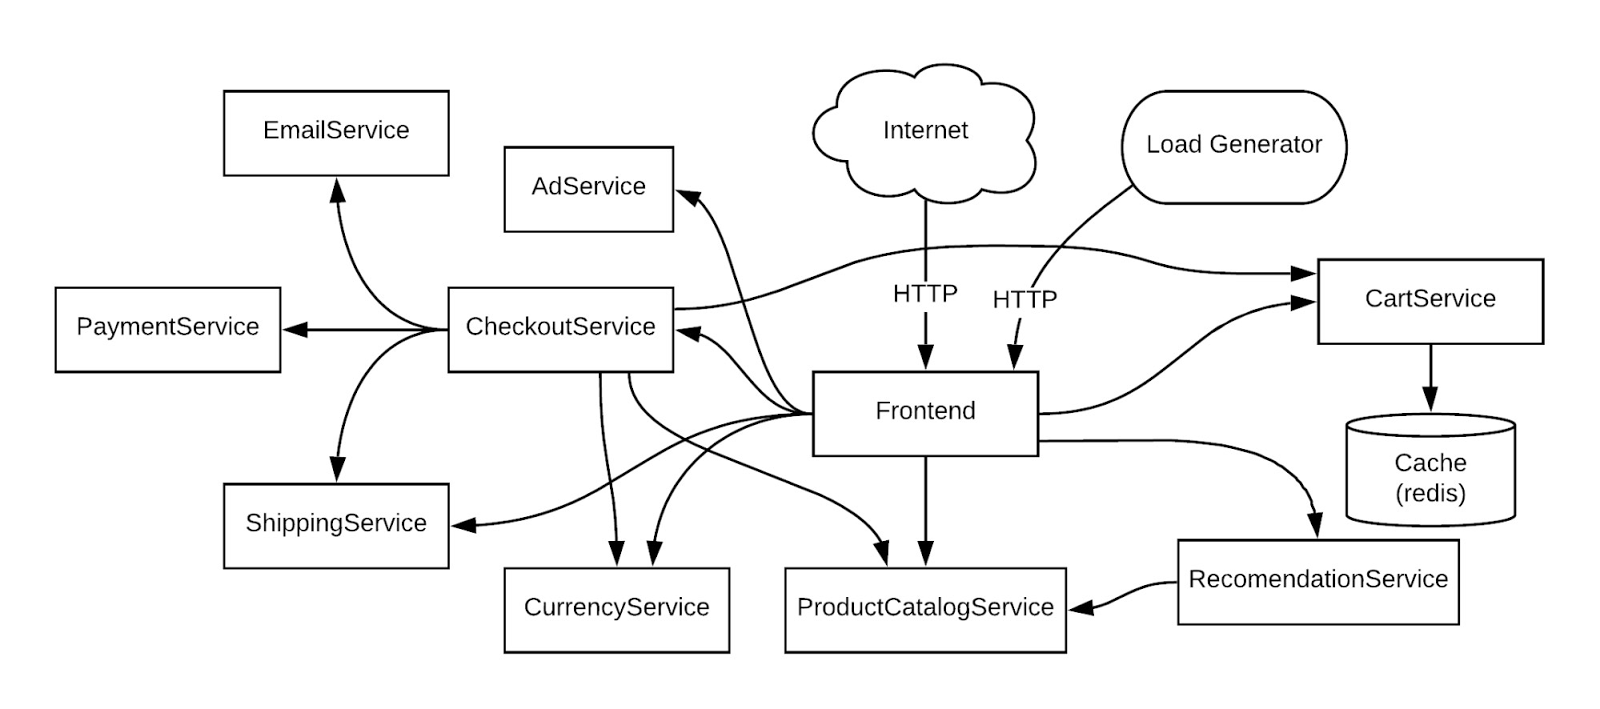
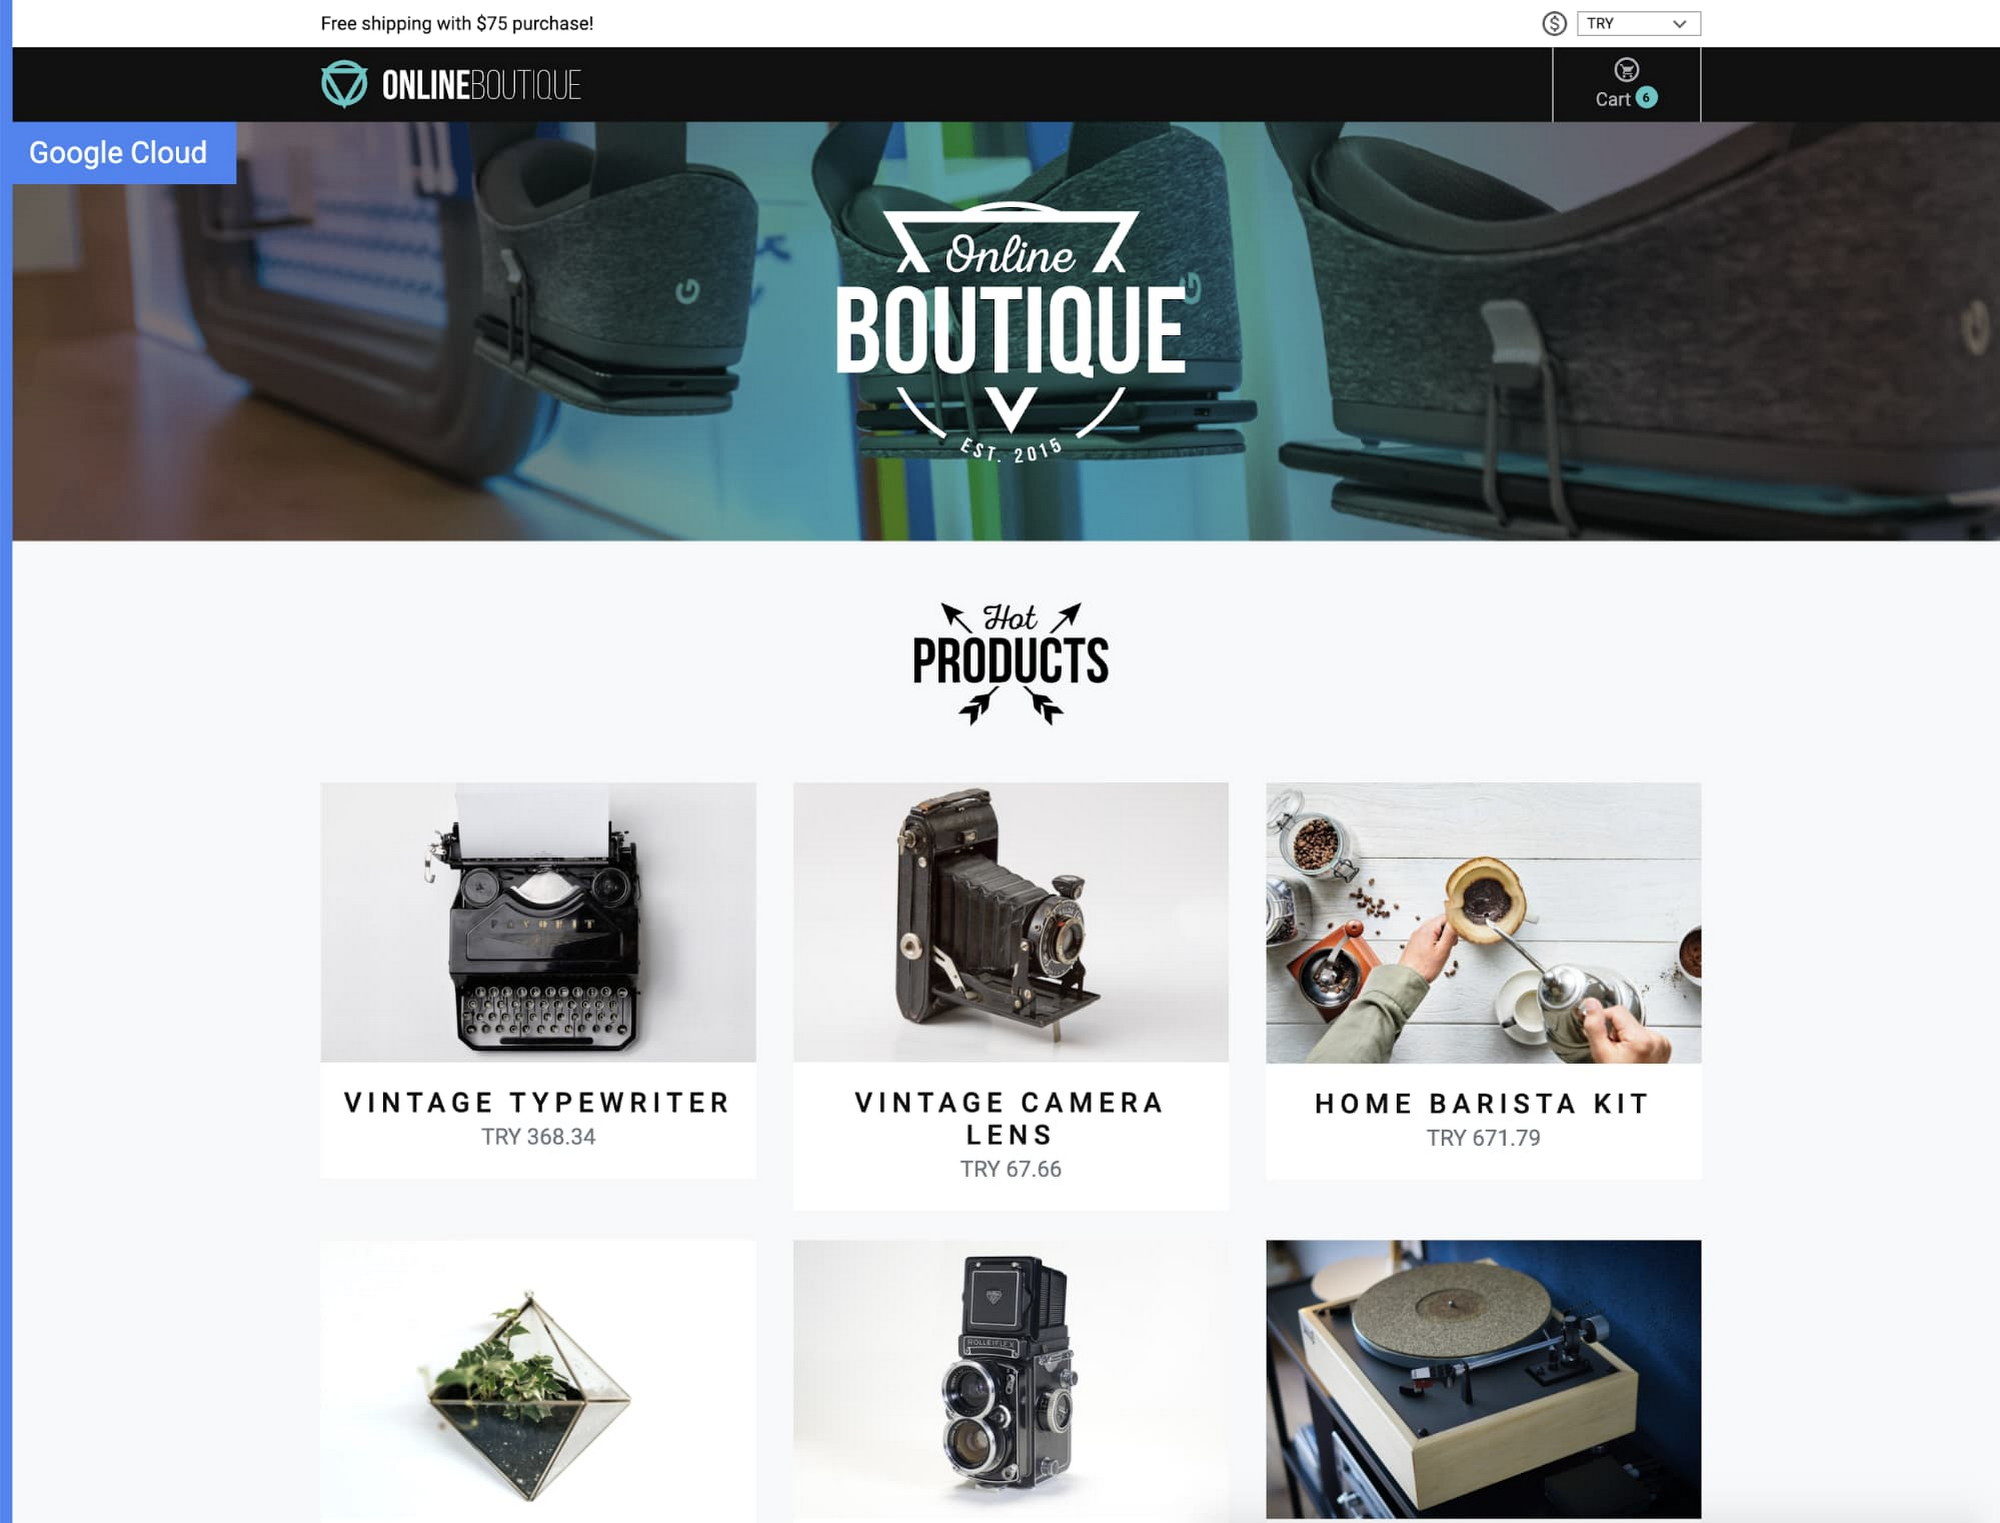
Now that you have a solid cloud foundation, you can deploy your first workload. This blog post will provide instructions on how to deploy the Online Boutique microservices demo application on a GKE private cluster. The demo application is a web-based e-commerce app.
Creating the private cluster (safer access with IAP Bastion Host) via Terraform
For restricted access to the control plane of your GKE cluster, it is highly recommended to use IAP with TCP forwarding to access a Bastion host (GCE Virtual Machine) within a private, authorized IP range.
The instructions to do so have been copied here for your convenience, referencing the Safer Cluster Access with IAP Bastion Host repository— additional context and minor adjustments have been made in preparation for installing a microservices demo, outlined in the next section. Please follow these steps to automate the creation of a hardened Private Cluster through a bastion host utilizing IAP without an external IP address:
Choose a project that was created in the foundation (or create your own project using one of the 4-projects modules) to contain your GKE cluster. For this step, we recommend that you keep Terraform files in a new folder and configure a new, separate Terraform backend. See this article for more information about managing Terraform state.
You will be using the network set up in step 3-networks above.
Enable optional firewall rules in your shared VPC by modifying your 3-networks/envs/dev/main.tf and adding the following:
optional_fw_rules_enabled = truenat_enabled = trueEnsure that you have enabled the following APIs enabled in your project, by adding
activate_apis = ["container.googleapis.com", "iap.googleapis.com"]Take note of the network project id in this step (for example in order to attach the cluster to `dev` environment base Shared VPC, `terraform output dev_base_host_project_id`).
Clone the terraform-google-kubernetes-engine repo by running
git clonehttps://github.com/bharathkkb/example-foundations-safer-clusterCreate a
terraform.tfvarsto provide values forproject_id,network_project_id,bastion_members. Optionally override any variables if necessary (if attaching to a different SVPC other than the `dev` environment base Shared VPC, parameters like network_name, subnet_name, ip_range_pods_name, ip_range_services_name may need to be overridden).Run
terraform initto get the plugins, thenterraform applyto apply the build.
By default, global access isn’t enabled for the control plane’s private endpoint upon creation of a private cluster. It is important to make the cluster private, preventing nodes from being exposed to the Internet— in this example, we select a private endpoint for the control plane while providing a CIDR block of the bastion host subnet. This way, the control plane is reachable only by whitelisted CIDRs, by nodes within your cluster's VPC, and by Google's internal production jobs that manage your control plane.
Now that you have deployed a private, safer GKE cluster with no client access to the public endpoint while creating a bastion host GCE VM in the same network (which you will use to access the cluster’s control plane), please continue to the next section to deploy a microservices application.
Deploy the Online Boutique onto your GKE cluster
Online Boutique consists of a 10-tier microservices application. The following instructions utilize pre-built container images in order to quickly deploy the release manifest directly to an existing cluster. Please follow these steps in continuation from the initial Safer Cluster steps:
1. SSH to the Bastion Host while port forwarding to the bastion host through an IAP tunnel. The command with the right parameters will be displayed by runningterraform output bastion_ssh_command.gcloud beta compute ssh $BASTION_VM_NAME --tunnel-through-iap --project $PROJECT_ID --zone $ZONE -- -L8888:127.0.0.1:8888Note: Make sure this is running in the background for the following steps.
You can now run kubectl commands through the proxy. An example command will be displayed as the Terraform output bastion_kubectl_command
2. Clone the microservices-demo repo by running git clone https://github.com/GoogleCloudPlatform/microservices-demo.git
Change your directory to /microservices-demo/release/
3. Generate a kubeconfig file with the appropriate credentials and endpoint information to access the cluster. The command with the right parameters will be displayed by running terraform output get_credentials_command
gcloud container clusters get-credentials --project $PROJECT_ID --region $REGION --internal-ip safer-cluster-iap-bastion
4. Deploy the app. A number of services shown within the “kubernetes-manifests” folder will be created automatically:
HTTPS_PROXY=localhost:8888 kubectl apply -f ./release/kubernetes-manifests.yaml

HTTPS_PROXY=localhost:8888 kubectl get pods
HTTPS_PROXY=localhost:8888 kubectl get service/frontend-external
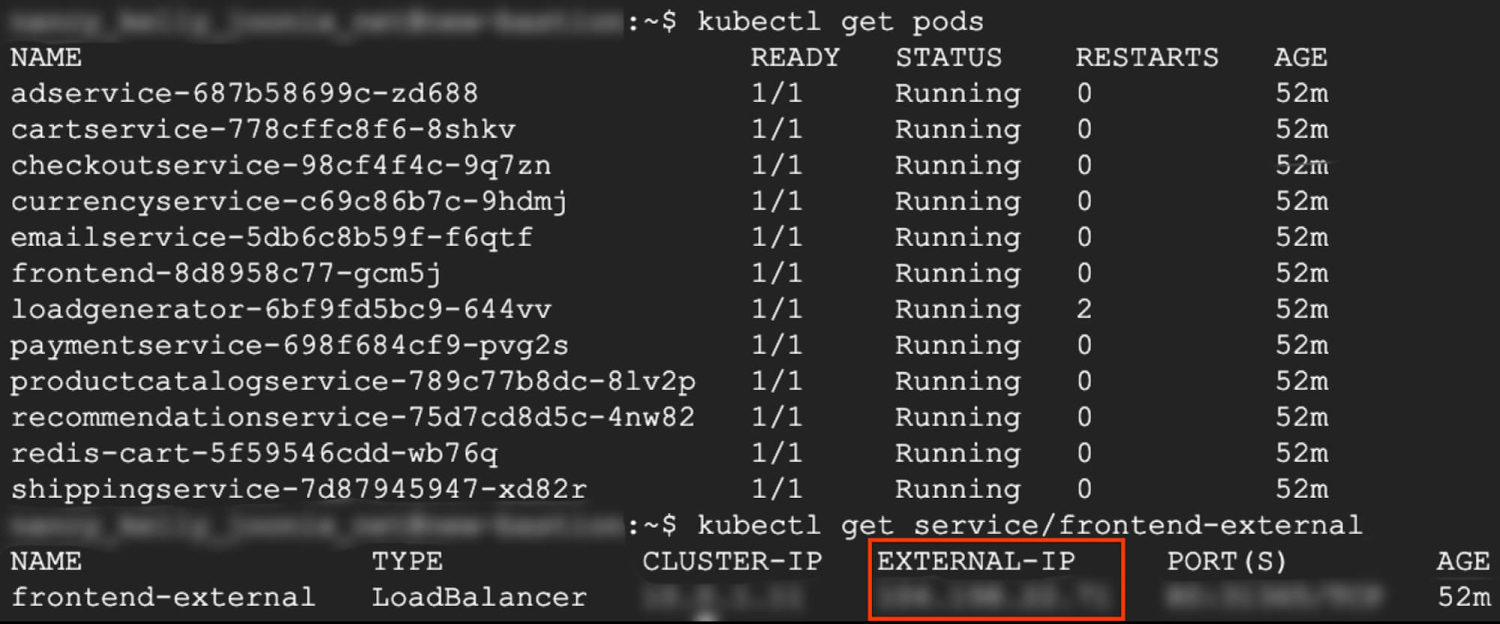
7. If the setup worked correctly, you should be able to navigate to the external IP address and view your demo Online Boutique application. It looks like this:
Next steps
Now that you know how to deploy a workload onto your secure Google Cloud foundation, you can continue to leverage Terraform, or your preferred method, to deploy your own workloads.
Be sure to watch/star your favorite Cloud Foundation Toolkit repos and provide feedback by raising issues in their respective repositories.