Introducing the Jenkins GKE Plugin—deploy software to your Kubernetes clusters
Vic Iglesias
Senior Product Manager
Craig Barber
Open Source CI/CD Tech Lead
Jenkins is one of the most widely used tools for automating software build, test, and deployment. Kubernetes, meanwhile, is an increasingly popular deployment target for those workloads. While it’s already possible to run Jenkins on Google Kubernetes Engine (GKE) clusters, it’s harder to manage robust deployment strategies for your workloads that run on Kubernetes.
Today, we are excited to announce the availability of the Jenkins Google Kubernetes Engine (GKE) Plugin, which provides a build step that streamlines deploying workloads to GKE clusters across GCP projects.
Here is a screenshot of the user interface:
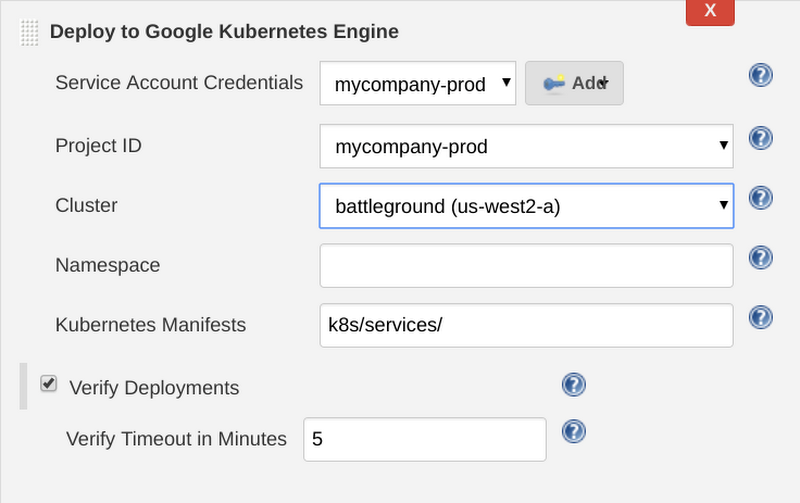
After providing credentials and configuration to the plugin it will do the following during your Jenkins job:
- Download ephemeral credentials for your target GKE cluster
- Use kubectl to apply the Kubernetes resources in your workspace
- Wait for the number of replicas you have defined in your Deployment specification to reach the healthy state
Getting started with the Jenkins GKE plugin is easy. First, provide a single set of credentials to the plugin to discover the GKE clusters across your GCP projects. Then, after choosing a project and cluster, configure the path to the manifests in the Jenkins workspace from which you’d like to deploy. You can also optionally define a namespace to deploy your manifests to.
While many deployment mechanisms fire off a kubectl command and hope that Kubernetes realizes their changes successfully, this can lead to many false positives as deployments fail to reach the healthy state. You can configure the Jenkins GKE Plugin to wait for your deployment to enter the desired state by checking the “Verify Deployments” option. For each Deployment manifest that is applied to the cluster, the plugin polls the deployment to ensure that the number of healthy pods matches the requested minimum number of healthy replicas. In the future we hope to add more of this type of logic to verify other types of resources.
Getting started using the graphical interface like we do with the build step configuration above can speed up your initial exploration of the plugin, providing some guard rails and a more intuitive user experience. But in most cases you’ll want to define your application deployment processes in code so that changes can be reviewed, audited, and approved. Thankfully Jenkins provides the Pipeline syntax that lets you define your build, test and release process in a file alongside your source code. Below is an example pipeline that defines a simple rollout process that deploys to a staging cluster, waits for a manual approval from someone in the “sre-approvers” group and then finally deploys to production.
Now that you’ve seen some of the features of the Jenkins GKE plugin, go ahead and install it. Head over to the Jenkins Plugin Manager and search the available plugins for “Google Kubernetes Engine Plugin” to install the latest version. For more information on how to configure the plugin, check out the documentation. We’d love your feedback and contributions:
- Visit our GitHub repo to let us know how we can make this plugin even better
- Chat with us on the GCP Community Slack in the #gcp-jenkins channel
More about Jenkins on GCP
We’ve released a number of Jenkins plugins that make running continuous integration and continuous delivery workloads on Google Cloud even easier:
- Use the Google Cloud Storage Plugin to store your build artifacts
- Use the Google Compute Engine Plugin to dynamically create Jenkins agents that match your utilization
- Use the Google OAuth Plugin to store GCP service account credentials in the Jenkins credentials store
We also have the following tutorials to help you get up to speed with Jenkins on GCP: