Scale your Composer environment together with your business
Haotian Wu
Zhou Fang
When you’re building data pipelines, it’s important to consider business needs now and in the future. We often hear from customers that they want to configure and optimize their Cloud Composer environments. So we on the Cloud Composer engineering team will share in this post how Cloud Composer—built on Apache Airflow—works, and offer some tips to optimize your Cloud Composer performance.
Cloud Composer is a fully managed workflow orchestration service that lets you author, schedule, and monitor pipelines that span across clouds and on-premises data centers. It’s built on Apache Airflow open source software and operated using the Python programming language.
We’ll start by analyzing how Airflow configurations can affect performance, then offer tips on ways to quickly bootstrap your initial settings for high performance. You may also find this sizing guide helpful—make a copy and add your own numbers.
Understanding Apache Airflow scheduler architecture with CeleryExecutor
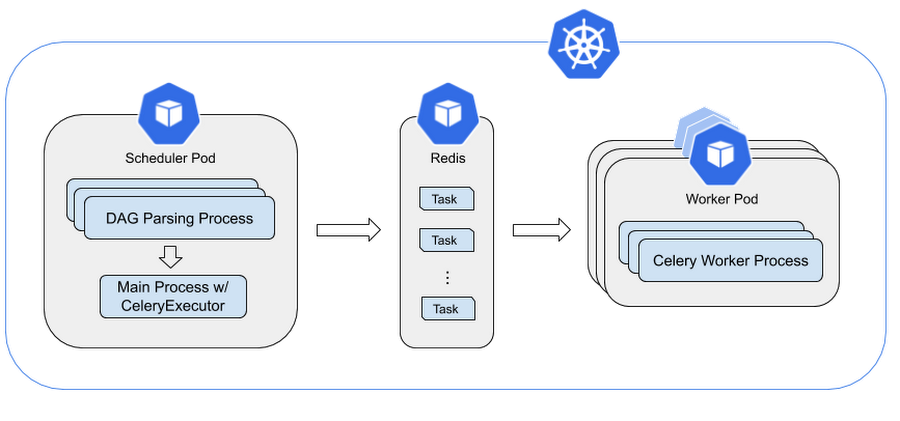
Let’s start with this detailed architecture of Airflow scheduler/worker in Cloud Composer. This assumes you’re already familiar with overall Cloud Composer architecture and Apache Airflow concepts.
In the diagram below, you can see that the process of parsing DAGs loads DAGs from files repeatedly. The process checks DAGs and fires scheduling actions, such as starting a DAG run or creating a task. Tasks are sent to workers for execution via a Redis-based task queue.


The scheduler launches multiple processes by calling Python multiprocessing.Process to parse DAG files in parallel. The total number of DAG processing processes that the scheduler can launch is limited by the Airflow config (scheduler)-max_threads.
Each DAG parsing process will complete the following steps:
Parse a subset of DAG files to generate DAG runs and tasks for those DAG runs.
Collect tasks that meet all dependencies.
Set these tasks to the SCHEDULED state.
The main process of the scheduler will do the following in a loop:
Collect all SCHEDULED tasks from DAG parsing processes.
Set eligible tasks to QUEUED state.
Send certain number of QUEUED tasks into Celery queue. This number is calculated by the
parallelismconfig parameter, which represents the max number of tasks running concurrently.Remaining tasks will remain in QUEUED state.
Life of a task in Cloud Composer
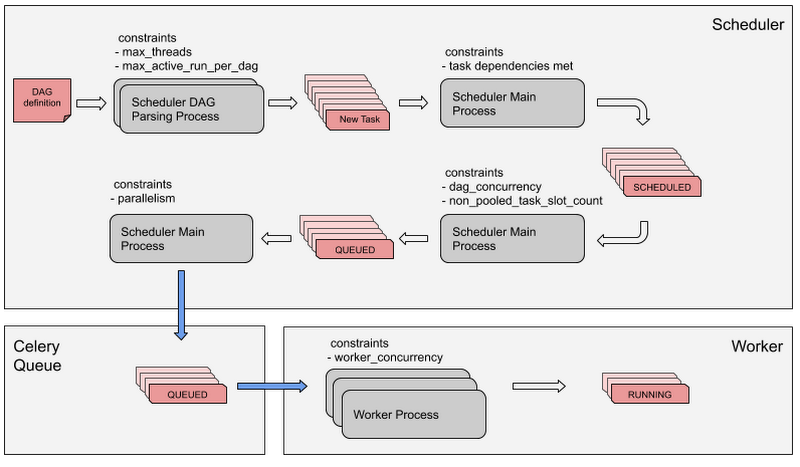
Every Airflow Task goes through the process and constraints depicted below before being executed by a worker. In sequence, a Airflow task needs to pass these Airflow config constraints to be finally executed by a worker:


The DAG parsing process in the scheduler parses the DAG definition, creating task instances for each task in the DAG.
If all of the task dependencies are met, the task is set to the SCHEDULED state.
Once the task is in the SCHEDULED state, the scheduler main process picks it for processing.
The Scheduler main pProcess picks tasks in the SCHEDULED state, taking into account the constraints `dag_concurrency` for maximum number of tasks per DAG and `non_pooled_task_slot_count’ for max number of tasks in the system, together with other criteria for queueing. Effectively queued tasks are set to the QUEUED state.
As the next step, the Scheduler main process queues tasks in the Celery queue based on the `parallelism` constraint, which limits the number of queued tasks in the Celery queue. Queued tasks are kept in state QUEUED.
Last, worker processes take tasks from the Celery queue as long as the number of tasks in the worker is lower than the `worker_concurrency` constraint. Tasks effectively running in a worker are set to the RUNNING state.
Recommended Airflow config variables for optimal performance
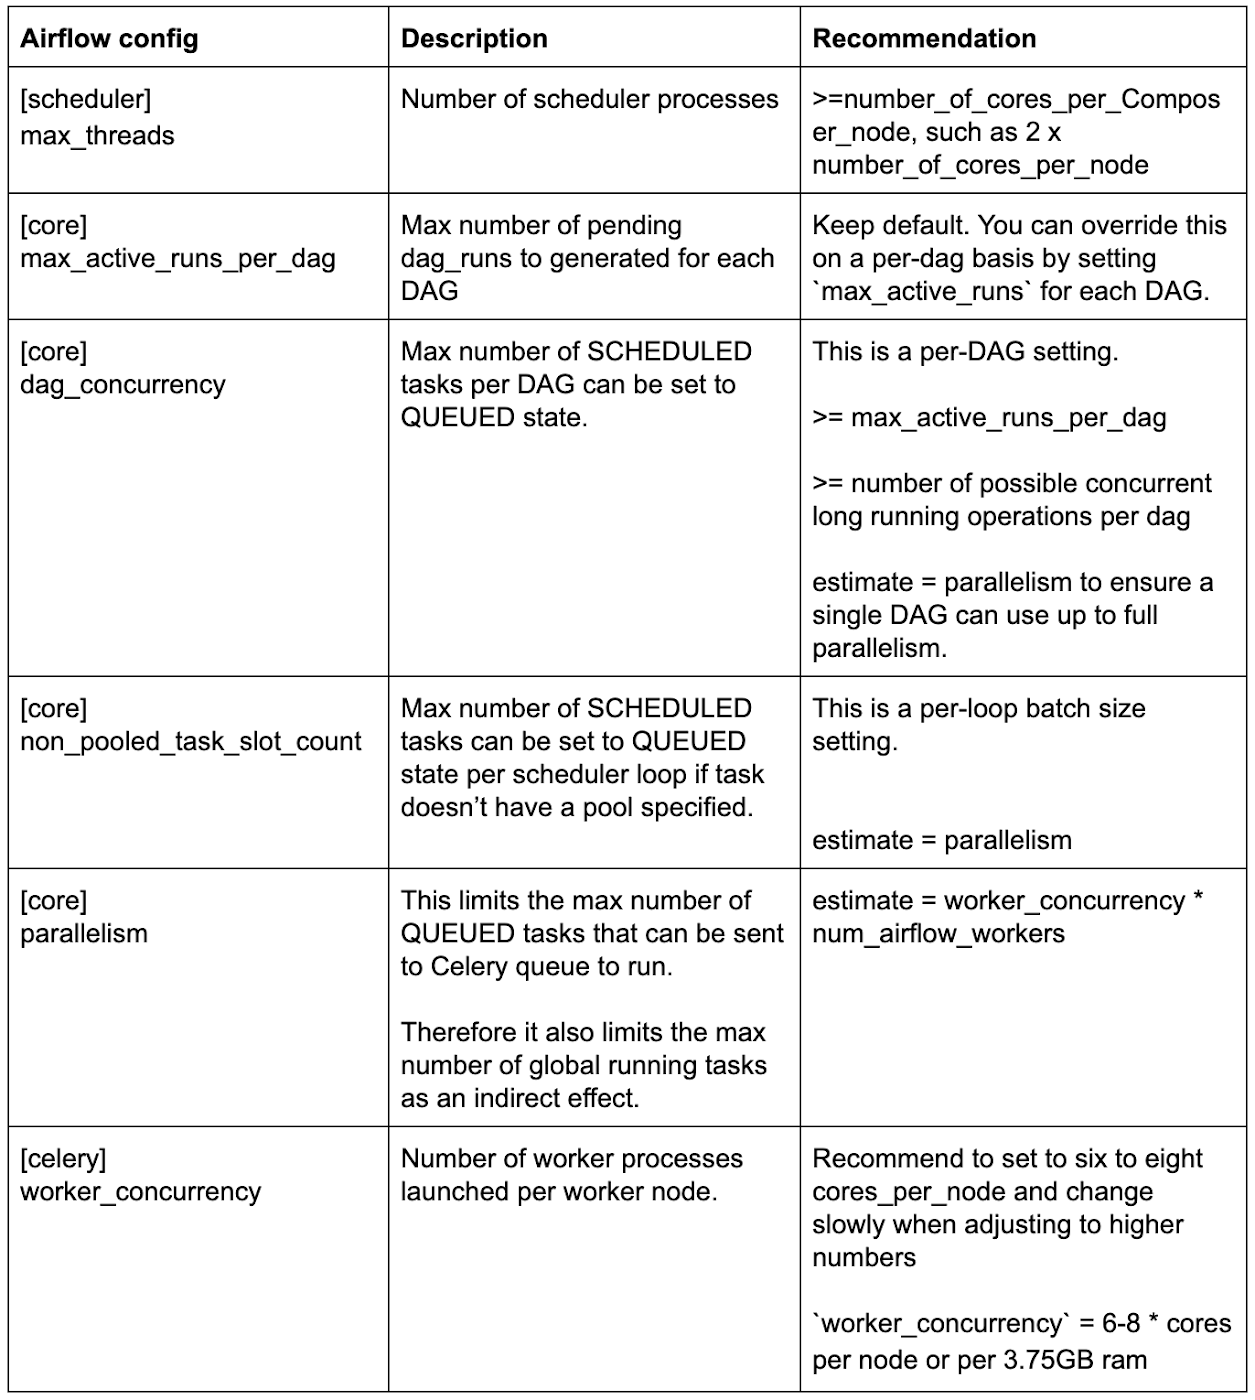
Here’s a quick reference table with our recommendations for various Airflow configs that may affect performance. We’re going to discuss the rationale behind each of them in the following sections.


Choose the right Airflow scheduler settings
When you need to scale your Cloud Composer environment, you’ll want to choose the right Airflow configs as well as node and machine type settings.
The Airflow default config for scheduler max_threads is only two, which means even if the Airflow scheduler pod runs in a 32-core node, it can only launch two DAG parsing processes. Therefore, it's recommended to set max_threads to at least the number of vCPUs per machine.
If you find tasks are taking a long time in SCHEDULED state, it can mean that tasks are constrained by dag_concurrency or non_pooled_task_slot_count. You can consider increasing the value of the two options.
If you find tasks are stuck in QUEUED state, it can mean they may be constrained by parallelism. It may, however, also be limited by worker processing power, because tasks are only set to RUNNING state after they're already picked up by a worker. You can consider increasing parallelism or adding more worker nodes.
Test Airflow worker performance
Cloud Composer launches a worker pod for each node you have in your environment. Each worker pod can launch multiple worker processes to fetch and run a task from the Celery queue. The number of processes a worker pod can launch is limited by Airflow config worker_concurrency.
To test worker performance, we ran a test based on no-op PythonOperator and found that six or seven concurrent worker processes seem to already fully utilize one vCPU with 3.75GB RAM (the default n1-standard-1 machine type). The addition of worker processes can introduce large context switch overhead and can even result in out-of-memory issues for worker pods, ultimately disrupting task execution.
`worker_concurrency` = 6-8 * cores_per_node or per_3.75GB_ram
Cloud Composer uses six as the default concurrency value for environments. For environments with more cores in a single node, use the above formula to quickly get a worker_concurrency number that works for you. If you do want a higher concurrency, we recommend monitoring worker pod stability closely after the new value takes effect. Worker pod evictions that happen because of out-of-memory errors may indicate the concurrency value is too high. Your real limit may vary depending on your worker process memory consumption.
Another consideration to take into account is long-running operations that are not CPU-intensive, such as polling status from a remote server that consumes memory for running a whole Airflow process. We advise lifting your worker_concurrency number slowly and monitoring closely after adjustment.
Consider more nodes vs. more powerful machines


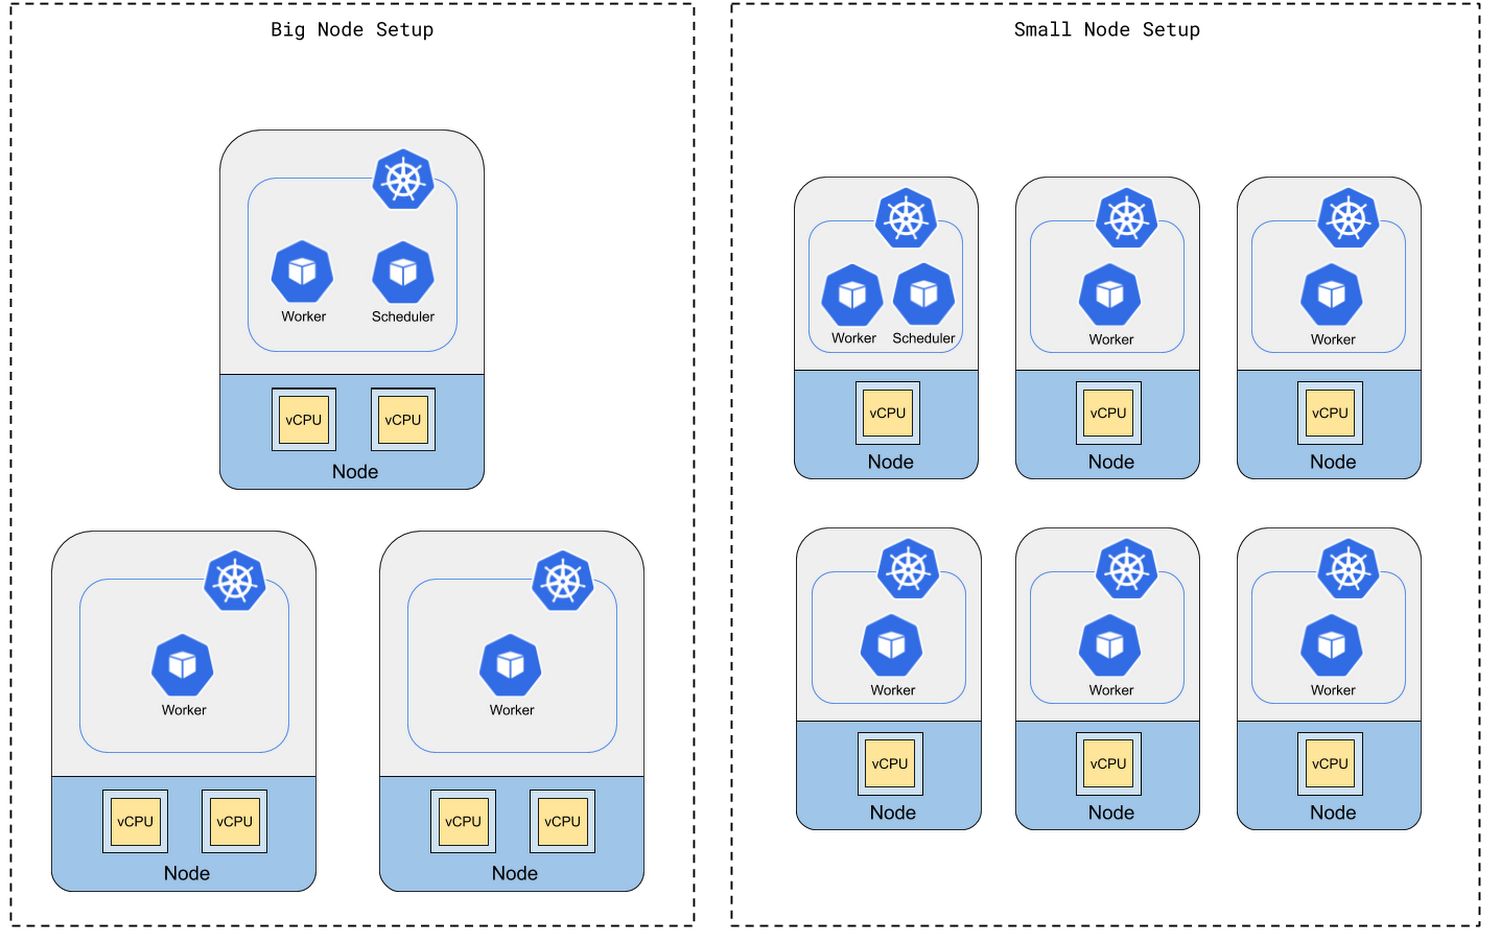
Our internal tests show that worker processing power is most influenced by the total number of vCPU cores rather than machine type. There’s not much difference in terms of worker processing power between a small number of multi-core machines and a large number of single-core machines, as long as the total number of CPU cores is the same.
However, in the small node setup, with a large number of nodes but less powerful machines, the Scheduler runs in a small machine, and it may not have enough compute power to produce tasks for workers to execute.
Therefore, we recommend setting up a Cloud Composer cluster with a relatively small number of powerful machines, keeping in mind that if the number of machines is too small, a failure of one machine will impact the cluster severely.
Our internal tests show that with worker_cores:scheduler_cores ratio up to around 9:1, there is no performance difference in terms of system turnout for the same amount of cores, as long as there are no long-running tasks. We recommend that you only exceed that ratio when you have long-running tasks. You can use the formula below to quickly calculate a good worker_cores:scheduler_cores ratio to start with.
For example, if you set up your environment initially with three nodes and two cores per machine and then estimate you may have 24 long-running tasks at the same time, you could try to scale your environment up to 9 + 24 / (2 * 6) = 11 nodes. If you want to have more performance, it may be worth trying with a more powerful machine type instead.
Use our sizing guide to get started, and have a wonderful journey with Cloud Composer!
