Learn Beam patterns with Clickstream processing of Google Tag Manager data
Reza Rokni
Senior Developer Advocate, Dataflow
Shan Kulandaivel
Group Product Manager, Google Cloud
Building your first pipeline can be a daunting task for a developer. When there are so many tools that can get the job done, how should you go about getting started? For power, flexibility, and ease of use, we find that the combination of Apache Beam and Dataflow offers developers a variety of ways to create data processing pipelines that meet their unique needs. And to make it easier, we’ve built a sample e-commerce analytics application to provide a reference implementation that works for developers who are starting out with Apache Beam as well as those who are proficient but may have advanced problems they need to solve. In some cases the tasks can be accomplished in many valid ways; however, we’ll focus on what we think is the easiest path.
This blog will cover some of the patterns used in the sample application, for example the initial processing of the clickstream data from server-side Google Tag Manager. The sample application can also be used to find examples of working with JSON and Apache Beam Schemas for both de-serialization and serialization within the pipeline.
Note: while the application is only implemented in Java, many of the patterns in this post will also be useful for other SDK languages.
About the sample application
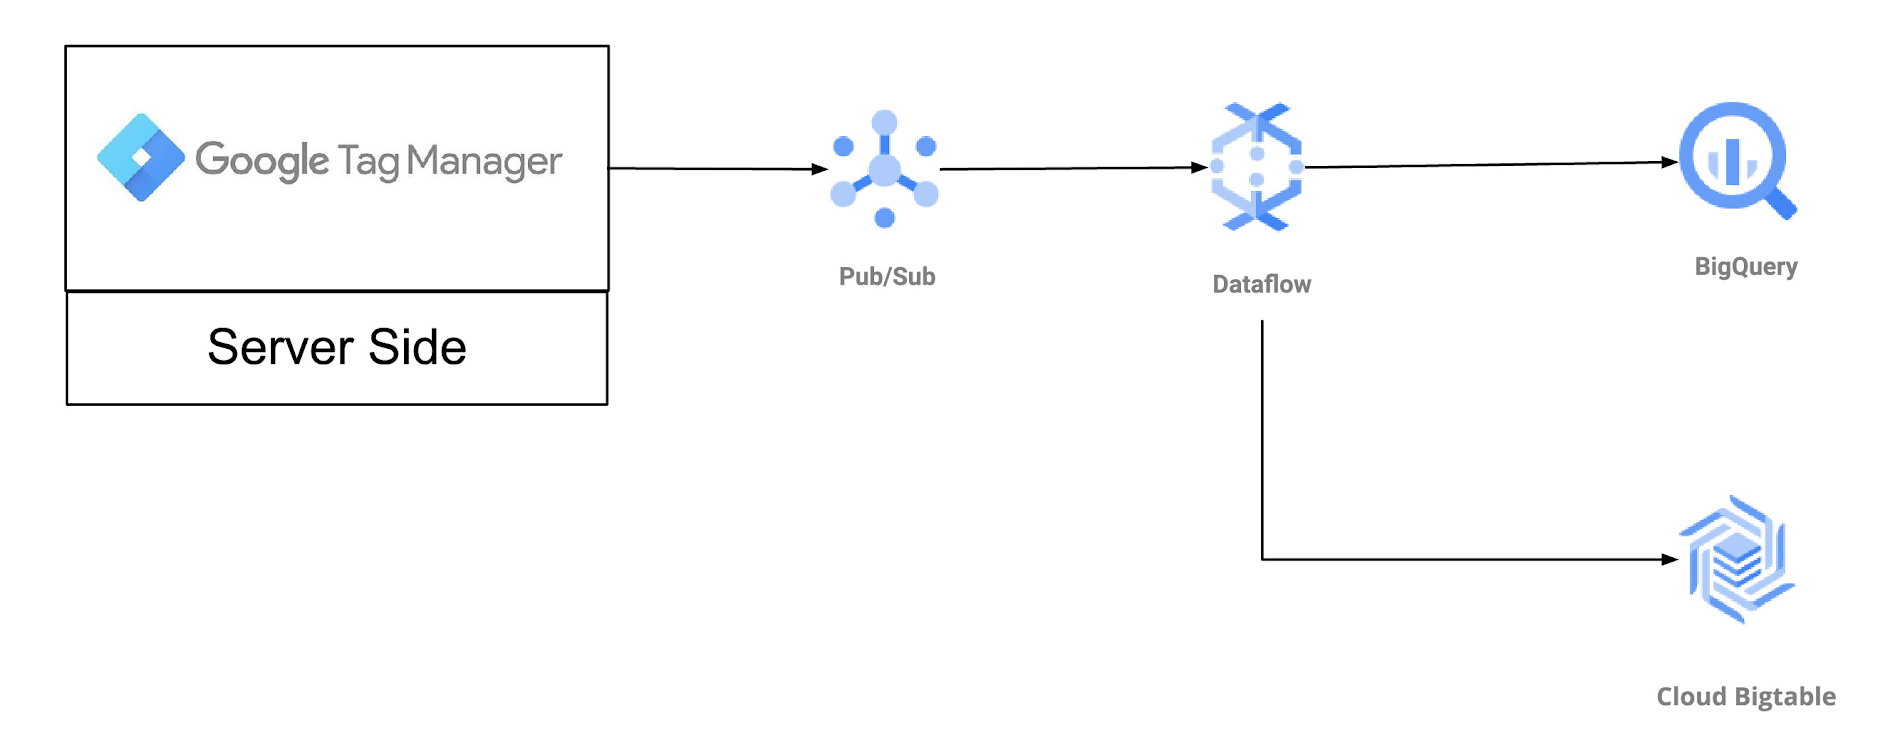
Our sample application implements processing of clickstream data from Google Tag Manager and shows how to dynamically respond to customer actions by analyzing and responding to events as they happen. The application also uses BigQuery as a sink which is updated in real time, and stores, analyzes, and visualizes event data for strategic decision making. Like most real world enterprise applications, it interacts with other products. You’ll find we also use PubSub as a source and Cloud Bigtable as a sink.
Clickstream processing using Dataflow
Imagine you're the developer for a retail company that has an e-commerce site, a mobile application, and brick-and-mortar stores. For now, let’s focus on the e-commerce and mobile applications, which send clickstream events to a web tier and then forward this onto PubSub via Server-side Tagging (GTM). Server-side Tagging allows customers to use a single Google tag on their website to collect the superset of clickstream events needed to enable all of their measurement tools, then send this data to a customer-owned server, and finally fan it out to numerous destinations, such as Google Analytics and other third-parties, or other data storage and dissemination tools such as BigQuery or PubSub. (Learn how to get started with server-side GTM here.)
The architecture diagram below illustrates our integration with server-side Tagging:
The events are published to PubSub and in JSON format, such as the following example:
Now that we know where our clickstream data is coming from and where it’s going, we’ll need to accomplish two tasks to make it useful:
Validate and correct the data
Create session windows to ensure activities are grouped correctly
First task: Validate and correct the data
Just because data gets parsed doesn’t mean that the data types and schema were the right match for our business domain. They could have missing properties or inconsistencies, which is why a good data pipeline should always include validation and correction. We’ve modeled these as separate transforms in our retail application, which allows for clean data to simply pass through the validation step.
There are a few common approaches to data validation when it comes to the pipeline shape. We’ll illustrate some options, along with their pros and cons, and then show how we decide to do it within our retail application.
Let’s use an object Foo which has properties a,b for example: {Foo:{a:'bar',b:'baz'}}. The business has validation logic that needs to check the values of a and b properties for correctness.
Approach A: Single transform
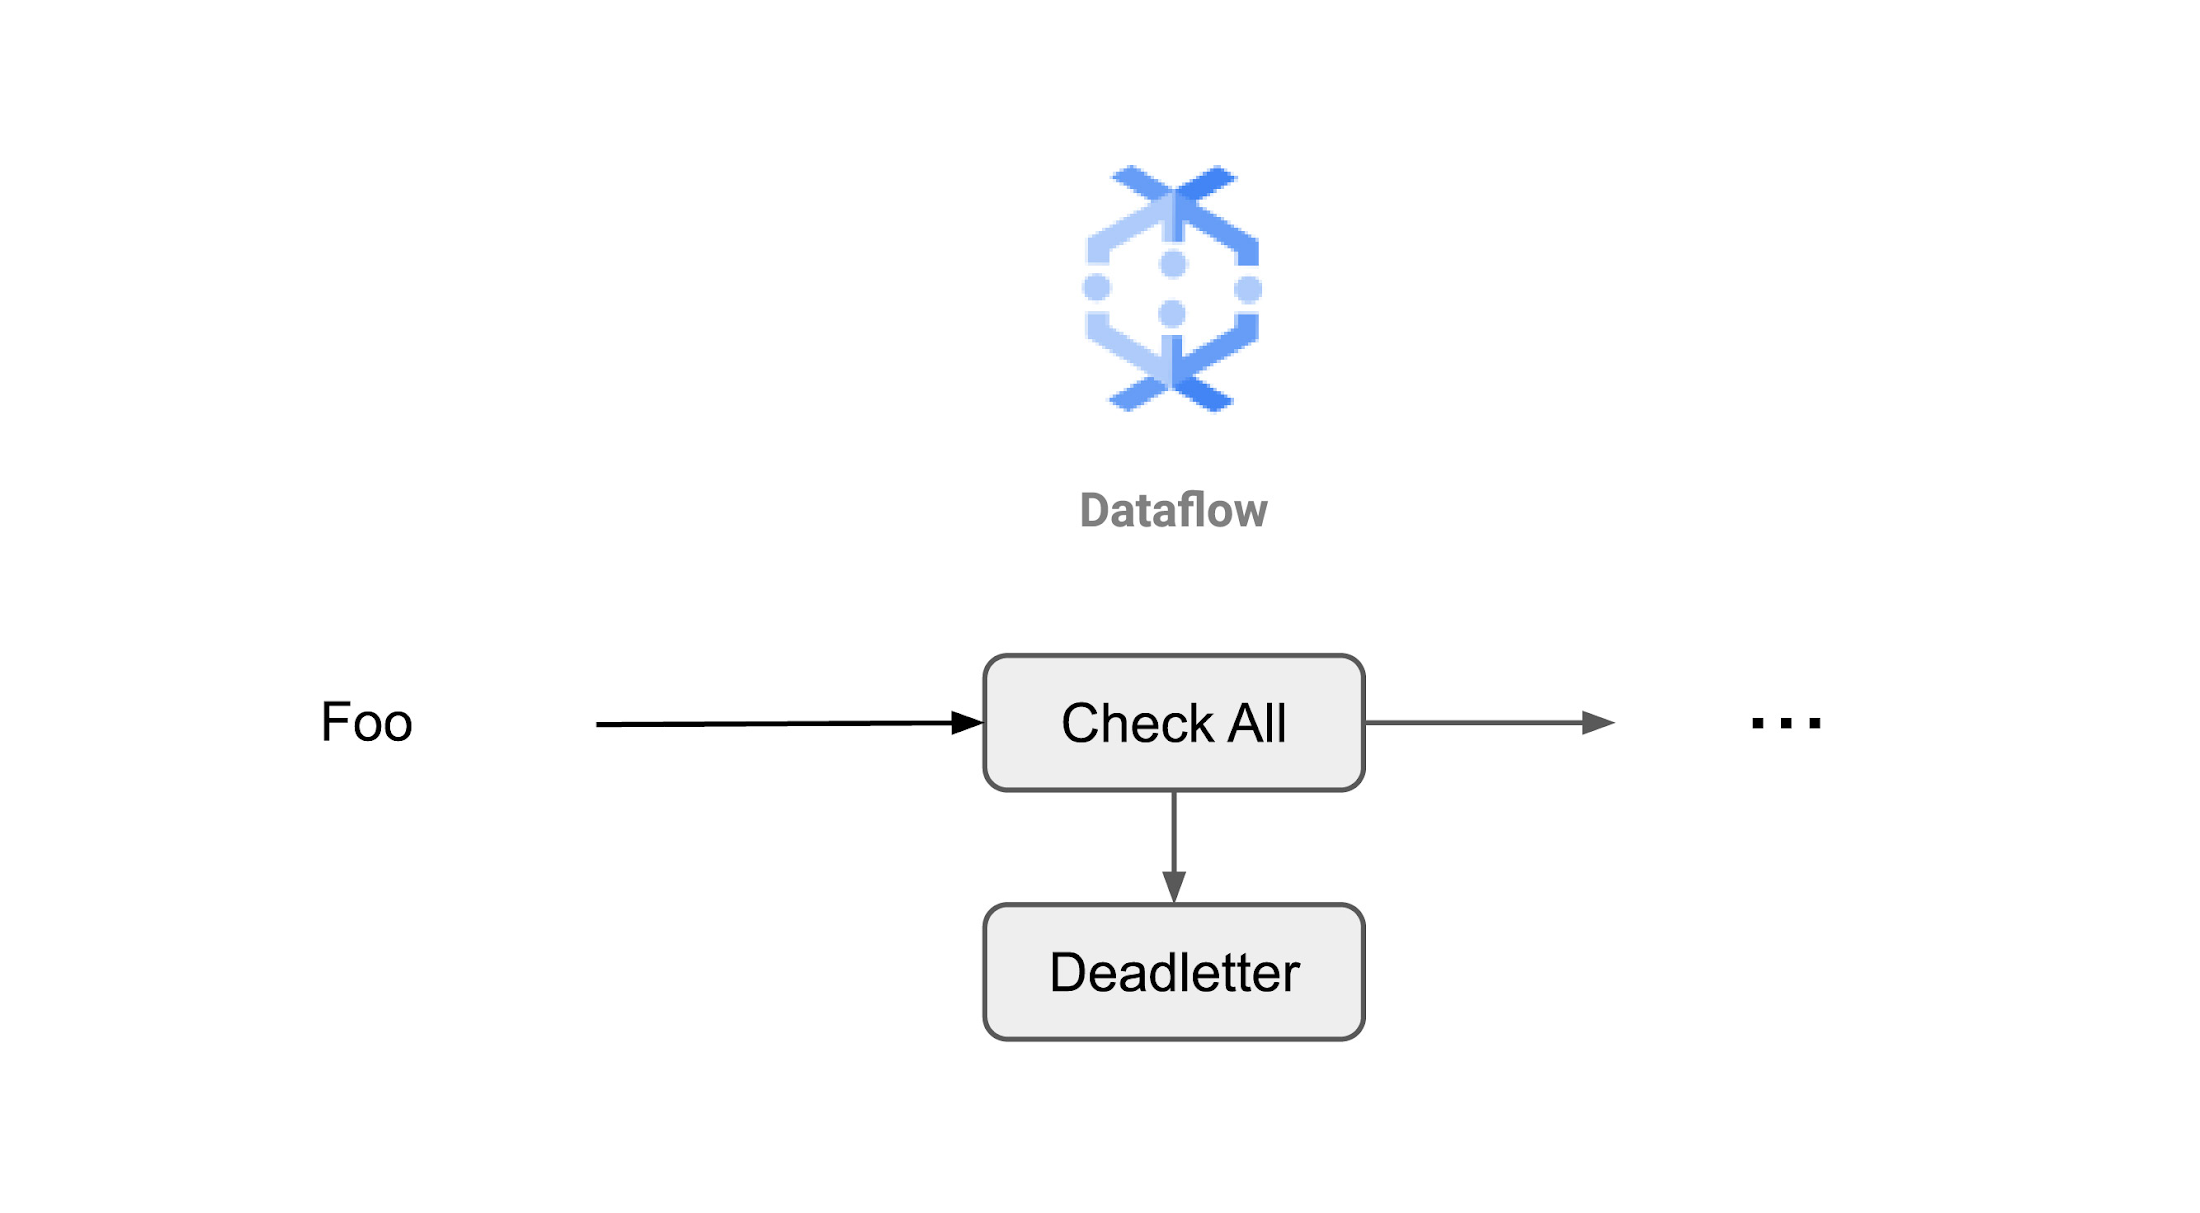
In this approach, the validation and correction code is all built into a single DoFn, where items that cannot be corrected are passed to a deadletter queue.
Pros: This is a straightforward approach that will work very well for many cases.
Cons: This Beam transform is specific to Foo and does not lend itself well to a transform library, which could be reused in different parts of the business. For example, property b might be something that is used in many objects within the retail organization, and this approach would potentially involve duplicate efforts down the line.
Approach B: Router validation transform and branch correction
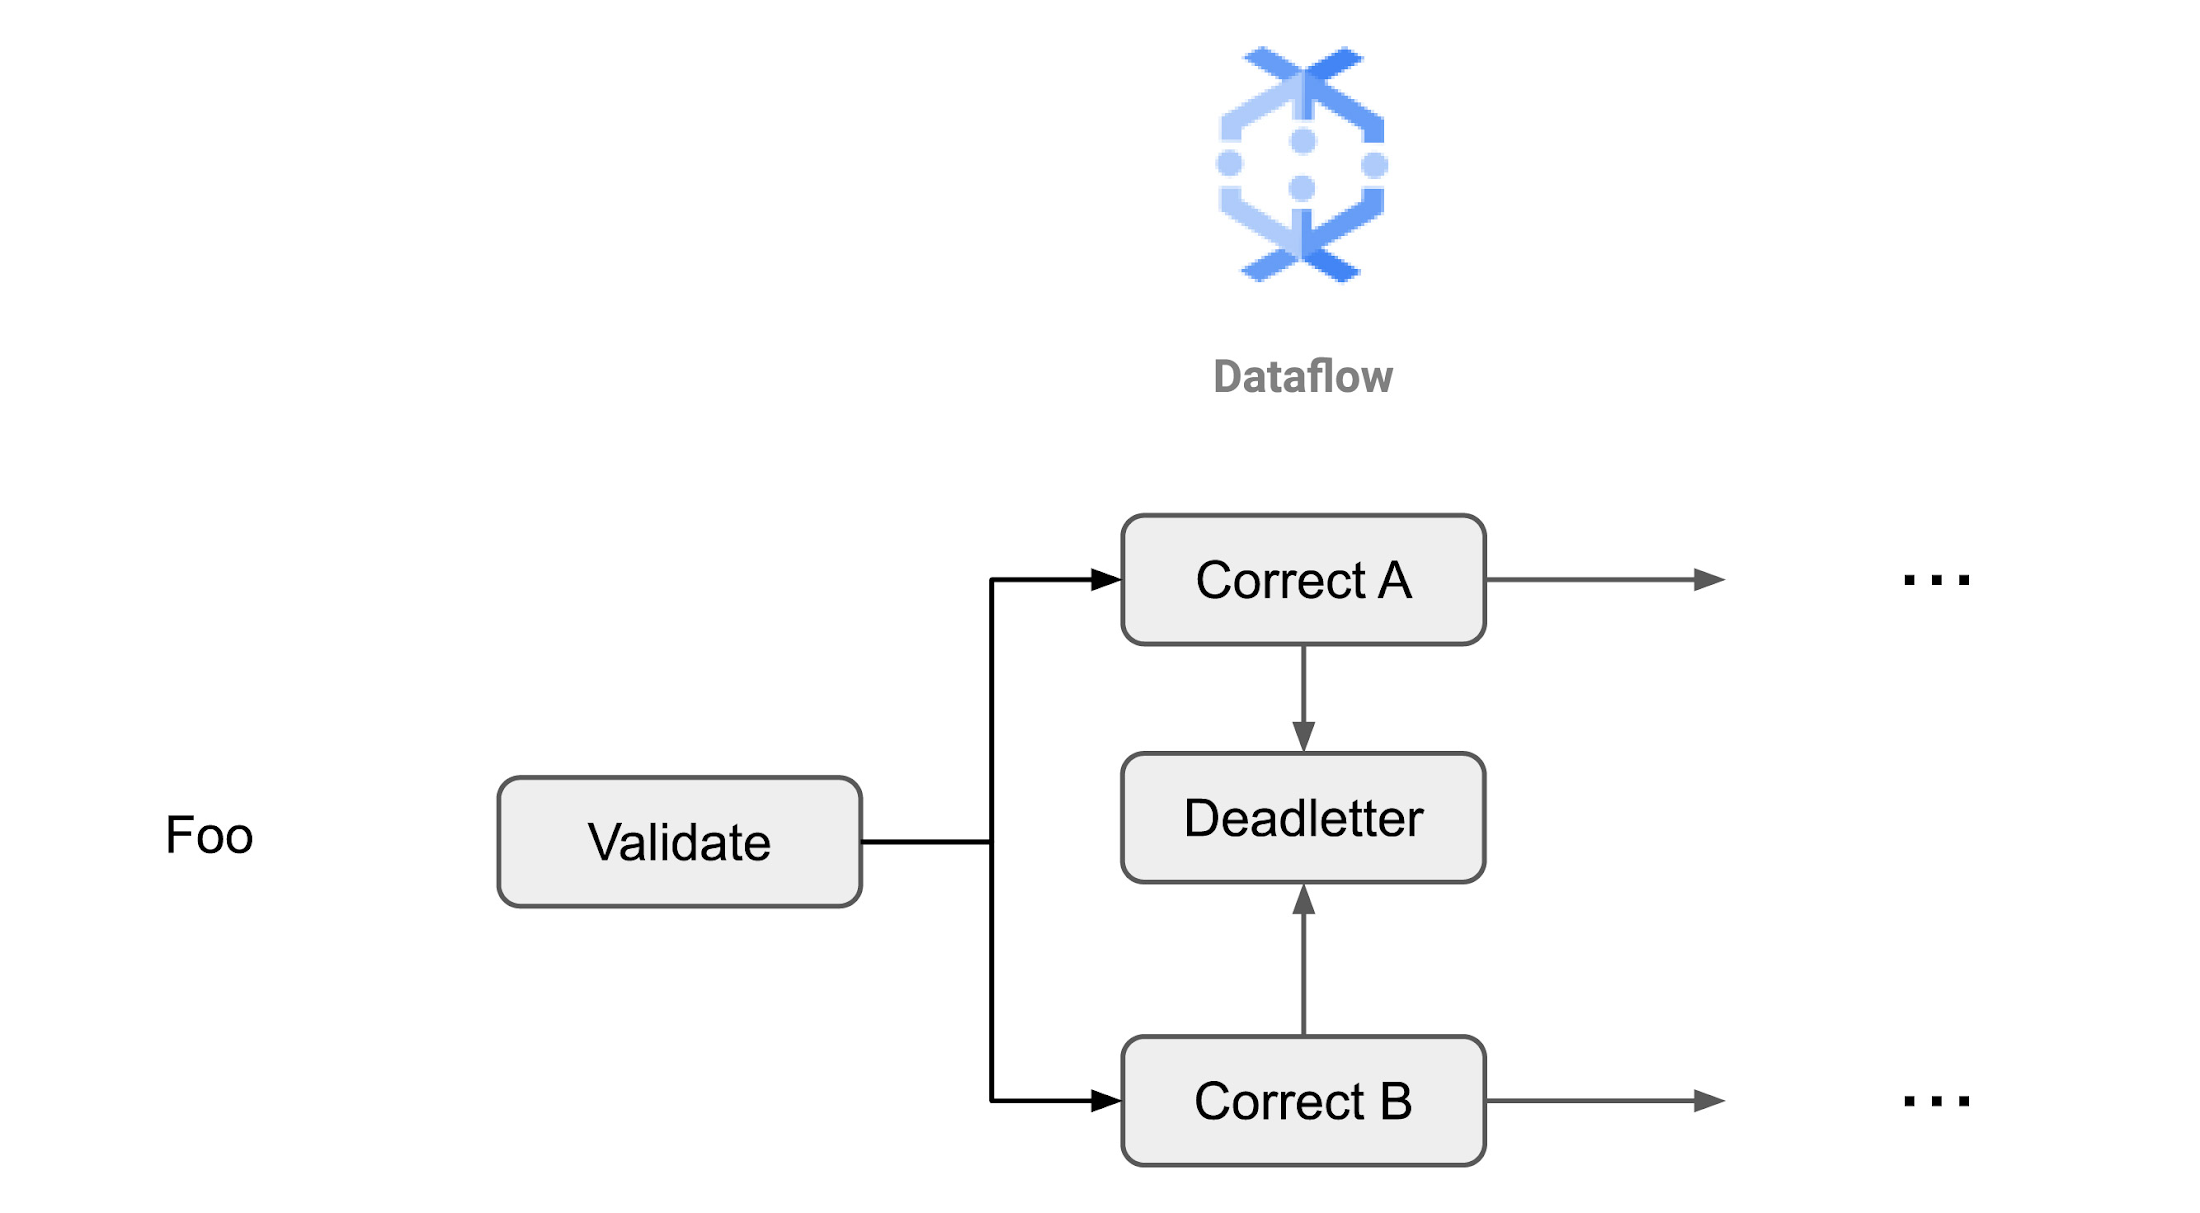
In this approach, different properties (or groups of similar properties) are validated in one transform and then corrected in other transforms.
Pros: This approach allows you to integrate the transforms into a larger transform library.
Cons: Compared to Approach A, this requires writing more boilerplate code. Moreover, there might also be a performance disadvantage to this approach (although Dataflow fusion will make it fairly negligible). Another disadvantage to this approach is that if the element requires both property a and b to be corrected, then you’ll need a join operation downstream to bring back together all parts of the element. A join will require a shuffle operation (which is a redistribution of data based on keys), which, since it can be a relatively slow and expensive operation, is good to avoid if possible.
Approach C: Serial validation and correction transforms
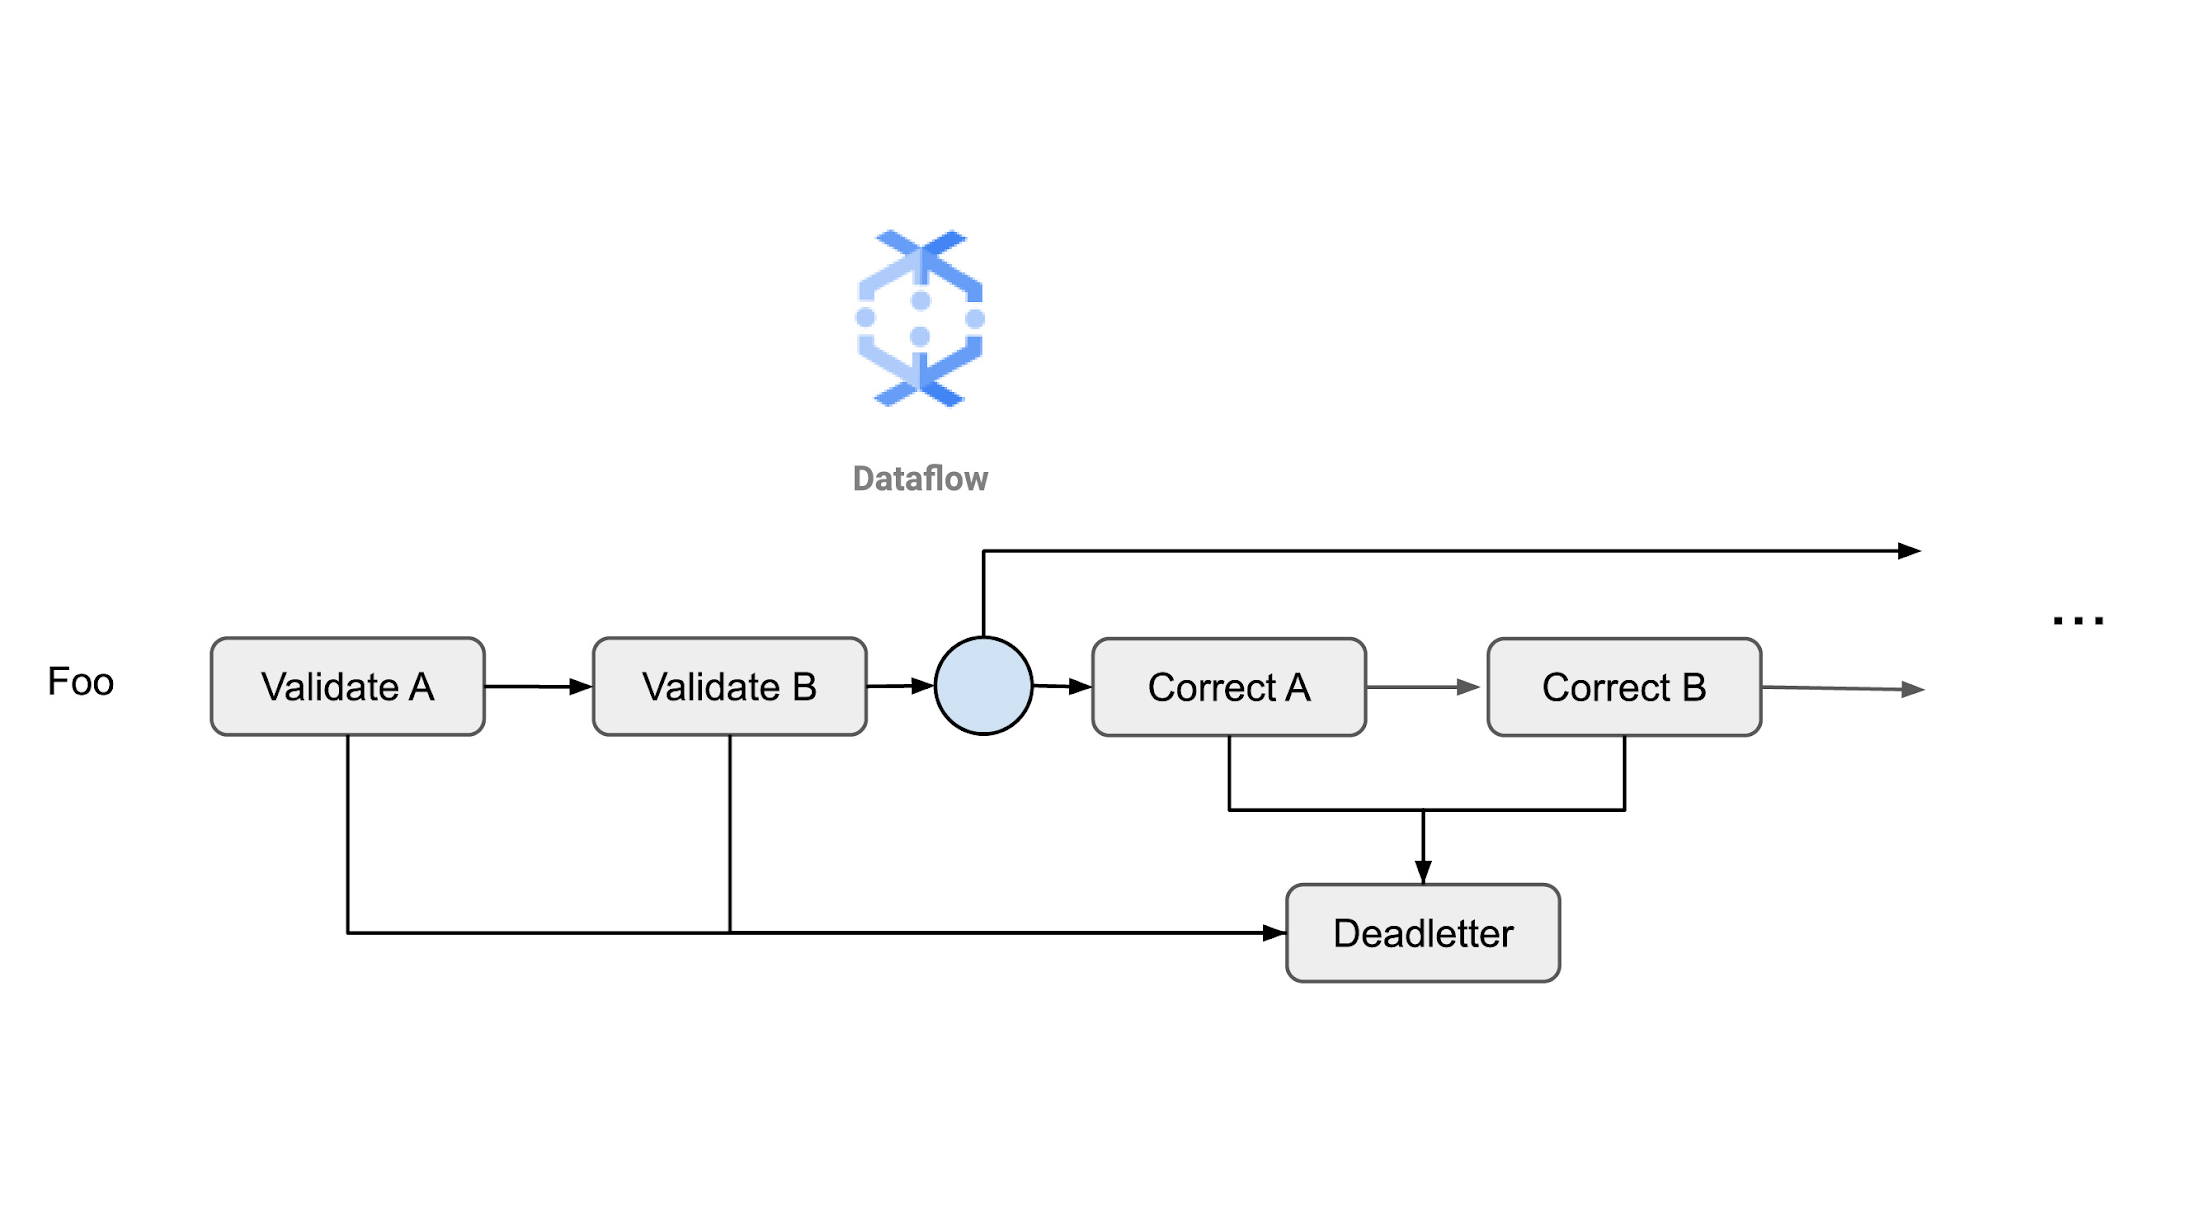
In this approach, the element passes through a series of validation steps, followed by a series of correction steps. Using a multi-output transform, any element which has no errors is passed directly to the transformations downstream. If an element does have errors, then that element is sent on to correction transformations ( unless it is deemed not fixable, in which case it is sent to the deadletter sink). Thanks to Dataflow fusion, these elements can all be efficiently processed through all of these transformations.
While there are many more variations of this process (and a combination of approaches A and C can solve the majority of complex real-life scenarios), we’ll be using Approach C for our retail application, since it offers the most code to illustrate the process. Now that we know what we want to do with our element properties, let's walk through an example that we’ll want to check and correct if needed:
Event DateTime
Every clickstream object will have an Event DateTime property attached to it. As this date is set client-side in our application, there are several issues that could arise that the business would like to check:
Date format: the string itself should be correct. Since this property is a
stringin the schema, it would not have failed, even if the date format is incorrect.Date accuracy: the date should not be in the future. Given that this date is coming from the client-side, it could be incorrectly set. How to deal with incorrect date-times is a choice to be made by the business. For our purposes we’ll correct the time to be set to when the element was published to PubSub (the processing time), as opposed to when it was first seen by the pipeline (the event time).
Note that we’re not correcting the event datetime field itself, but rather the timestamp property of the clickstream event. This lets us keep the original data intact, while still ensuring that any resulting analytics with this data will use the correct time values.
Items
Certain events, such as add_to_cart and purchase, both require the Items array to be populated with at least one item. These items normally have all the fields correctly populated, however, there have been situations where this was not done for some of the descriptive fields, such as item_name, item_brand, and item_category. If any of these are not populated, they need to be fixed.
Implementation
A serial set of transforms can help check whether or not an element needs to be corrected. To do this, we’ll need a way to tag elements with problems. Adding a new property to the ClickStreamEvent element and all other elements that require validation is one way to go, however, this changes the element itself and will show up in any output down stream (e.g., if the element is passed to BigQuery). Instead, we decided to wrap the element in another schema, one which includes an array to tag elements with problems.
In the above code snippet, the errors field lets us add a list of problems to our clickstream, which is then checked for within the correction transforms. ValidateAndCorrectCSEvt transform is then used to compose all of the validation and correction transforms. A section of this is shown below.
Note that we make use of Row.withSchema to create a new row element. Also note that PCollectionTuple is not able to infer the row schema, therefore we use withSchema to explicitly set the row schema.
Once the validation is complete, we’re ready to put the corrections into place:
For items which are not fixable they will follow the deadletter pattern and be sent to a sink for future correction, which is often a manual process.
Another modular pattern that could have been used is to create a DoFn in a way that allows injecting multiple 'verifiers'/'correctors'. The verifiers/correctors could be a library (i.e. not a PTransform) that is reused across the system. Only a failed corrector would trigger the object to the deadletter queue.
With that step, we finish validation and correction, and can move on to creating session windows.
Second task: Creating Session windows
Session windows are a special type of data window, which, unlike fixed windows (which rely on discrete time intervals), make use of the data itself to determine when a window should be closed. From the Apache Beam documentation:
"A session window function defines windows that contain elements that are within a certain gap duration of another element."
To understand what this means, let's imagine a customer logs into your company's mobile shopping application in the morning before work and orders items to be delivered which will be used for the evening meal. Later on in that day, the customer logs in and browses some sports equipment to use over the weekend. Other windowing options (for example, a fixed window), might miss part of a session, or would require you to manually sort through the data to find the time gap and define these sessions. But with a session window, we can treat these two activities as two distinct sessions. As there is a long delay between the end of the morning activities and the start of the evening activities (the 'gap' duration), the session window will output the activities from the morning as distinct sessions and start a new session when the user begins the evening activities.
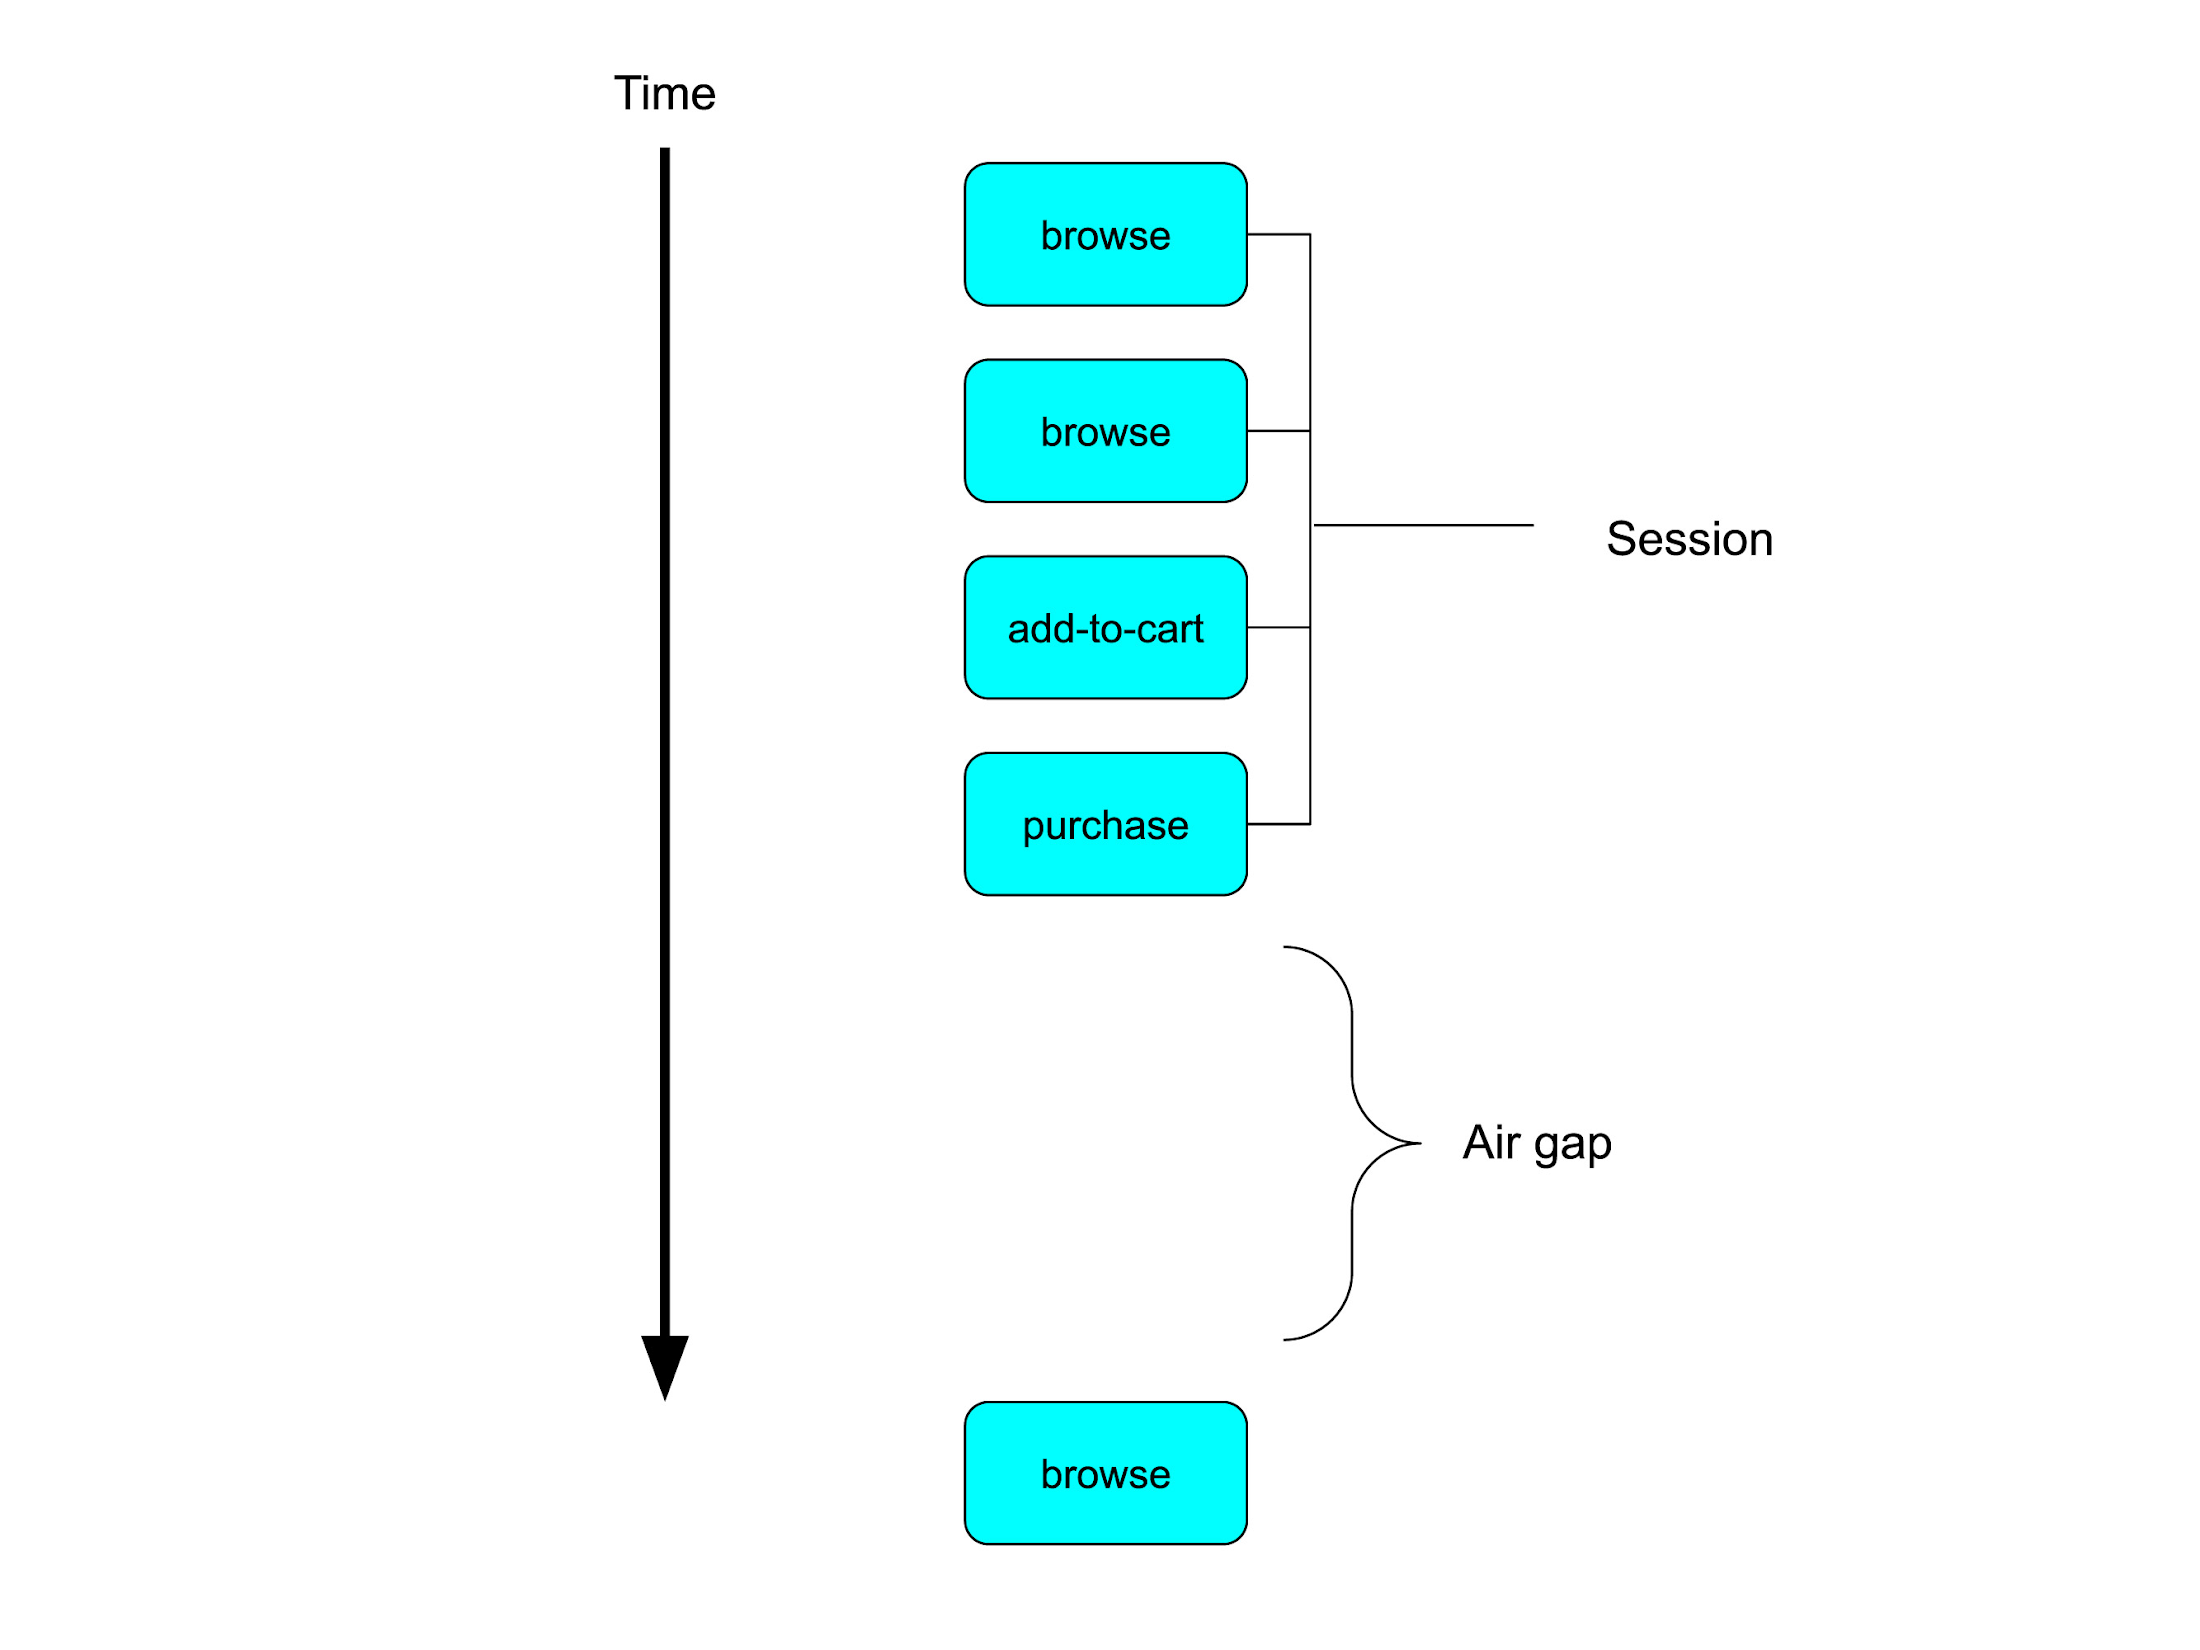
Note that we specify the value of the gap duration when we apply the window transform to our pipeline. While there’s no perfect value for this duration, in practice, something in the range of low single-digit hours works reasonably well.
We can use Apache Beam to create such session windows, and the code is fairly simple as you’ll see below (ClickStreamSessions). We’ll apply a session window to our validated and cleansed data, then do a group.by operation to locate all the different session events together. The grouping key for this will be the client_id which is provided by Tag manager.
The ITERABLE[ROW[ClickstreamEvent]] will hold all the events for that session and can be used to carry out further analysis work. For example, you might want to study what sequence of browsing events ultimately led to the purchase. This can then be found in the transform ClickStreamSessions within the retail application.
Conclusion
We covered a few core concepts and patterns around data validation and correction that are necessary for a healthy streaming pipeline by making use of clickstream data from Google Tag Manager. We also touched on how session windows can help separate the different journeys for a user and segment your data in meaningful ways.
In our next post, we’ll explore data ingestion flows and how to use Apache Beam schemas to both represent the elements within a pipeline. We’ll also look at how to use schemas to write succinct, manageable pipelines. In the meantime, let us know how these approaches are helping you with your day-to-day workflows, and what else you’d like to learn about Dataflow pipelines and applications.
