You create a custom model by training it using a prepared dataset. AutoML API uses the items from the dataset to train the model, test it, and evaluate its performance. You review the results, adjust the training dataset as needed, and train a new model using the improved dataset.
Training a model can take several hours to complete. The AutoML API enables you to check the status of training.
Since AutoML Vision creates a new model each time you start training, your project may include numerous models. You can get a list of the models in your project and you can delete models you no longer need. Alternatively, you can use the Cloud AutoML Vision UI to list and delete models created via the AutoML API that you do not need anymore.
Models are based on state-of-the-art research at Google. Your model will be available as a TF Lite package. For more information about how to integrate a TensorFlow Lite model using the TensorFlow Lite SDK reference the following links for iOS and Android.
Training Edge models
When you have a dataset with a solid set of labeled training items, you are ready to create and train your custom Edge model.
TensorFlow serving and TF Lite models
When training Edge models you can specify three distinct values in the
modelType
field depending on your model needs:
mobile-low-latency-1for low latency,mobile-versatile-1for general purpose usage, ormobile-high-accuracy-1for higher prediction quality.
The model type will also be shown in the API request response.
Web UI
-
Open the AutoML Vision Object Detection UI.
The Datasets page shows the available datasets for the current project.

- Select the dataset you want to use to train the custom model.
-
When the dataset is ready, select the Train tab and Train new model button.
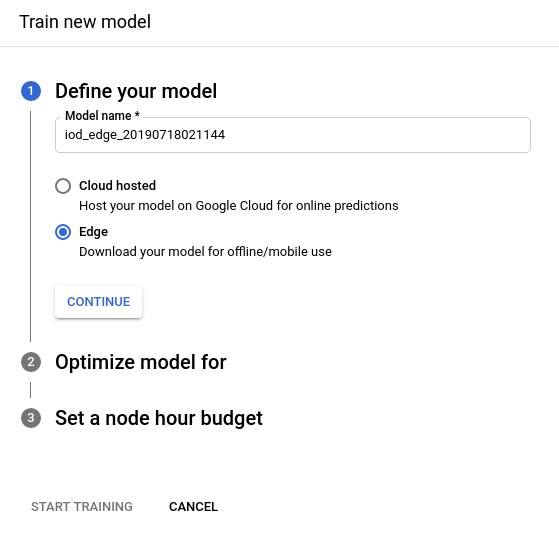
This will open a "Train new model" side window with training options.
- From the training Define your model section, change the model name
(or use the default value) and select radio_button_checked
Edge as the model type. After selecting to train an Edge model select Continue.
-
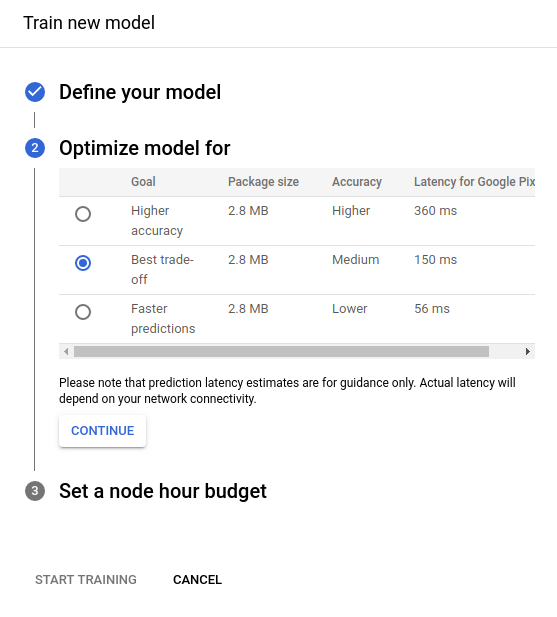
In the following Optimize model for section, select your desired optimization criterion: radio_button_checked Higher accuracy, Best tradeoff, or Faster prediction. After selecting the optimization specification select Continue.
-
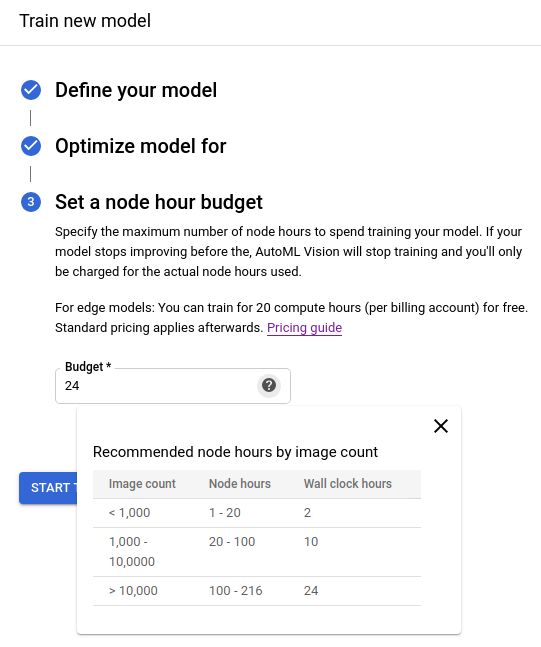
In the following Set a node hour budget section use the recommended node hour budget, or specify a different value.
By default, 24 node hours should be sufficient for most datasets to train your model. This recommended value is an estimation to make the model fully converged. However, you can choose another amount. The minimum amount of node hours for Image Classification is 8. For Object Detection this minimum amount is 20.
-
Select Start training to begin model training.
Training a model can take several hours to complete. After the model is successfully trained, you will receive a message at the e-mail address that you used for your Google Cloud Platform project.
REST
Before using any of the request data, make the following replacements:
- project-id: your GCP project ID.
- dataset-id: the ID of your dataset. The ID is the last element of the name
of your dataset. For example:
- dataset name:
projects/project-id/locations/location-id/datasets/3104518874390609379 - dataset id:
3104518874390609379
- dataset name:
- display-name: a string display name of your choosing.
Specific field considerations:
imageObjectDetectionModelMetadata.trainBudgetMilliNodeHours- The train budget of creating this model, expressed in milli node hours (1,000 value in this field means 1 node hour). The actualtrainCostMilliNodeHourswill be equal or less than this value. If further model training ceases to provide any improvements, it will stop without using full budget and thestopReasonwill beMODEL_CONVERGED.Note: node_hour = actual_hour * number_of_nodes_involved.
For model type
mobile-low-latency-1,mobile-versatile-1, ormobile-high-accuracy-1, the train budget must be between 1,000 and 100,000 milli node hours, inclusive. The default value is 24,000 which represents one day in wall time.
HTTP method and URL:
POST https://automl.googleapis.com/v1/projects/PROJECT_ID/locations/us-central1/models
Request JSON body:
{
  "displayName": "DISPLAY_NAME",
  "datasetId": "DATASET_ID",
  "imageObjectDetectionModelMetadata": {
    "modelType": "mobile-low-latency-1",
    "trainBudgetMilliNodeHours": "24000"
  }
}
To send your request, choose one of these options:
curl
Save the request body in a file named request.json,
and execute the following command:
curl -X POST \
     -H "Authorization: Bearer $(gcloud auth print-access-token)" \
     -H "x-goog-user-project: project-id" \
     -H "Content-Type: application/json; charset=utf-8" \
     -d @request.json \
     "https://automl.googleapis.com/v1/projects/PROJECT_ID/locations/us-central1/models"
PowerShell
Save the request body in a file named request.json,
and execute the following command:
$cred = gcloud auth print-access-token
$headers = @{ "Authorization" = "Bearer $cred"; "x-goog-user-project" = "project-id" }

Invoke-WebRequest `
    -Method POST `
    -Headers $headers `
    -ContentType: "application/json; charset=utf-8" `
    -InFile request.json `
    -Uri "https://automl.googleapis.com/v1/projects/PROJECT_ID/locations/us-central1/models" | Select-Object -Expand Content
You should see output similar to the following. You can use the operation ID
(IOD2106290444865378475, in this case) to get the status of the task. For an
example, see Working with long-running operations.
{
  "name": "projects/PROJECT_ID/locations/us-central1/operations/IOD2106290444865378475",
  "metadata": {
    "@type": "type.googleapis.com/google.cloud.automl.v1.OperationMetadata",
    "createTime": "2019-07-29T17:16:34.476787Z",
    "updateTime": "2019-07-29T17:16:34.476787Z",
    "createModelDetails": {}
  }
}
Go
Before trying this sample, follow the setup instructions for this language on the Client Libraries page.
Java
Before trying this sample, follow the setup instructions for this language on the Client Libraries page.
Node.js
Before trying this sample, follow the setup instructions for this language on the Client Libraries page.
Python
Before trying this sample, follow the setup instructions for this language on the Client Libraries page.
List operations status
Use the following code samples to list your project's operations, and filter results.
REST
Before using any of the request data, make the following replacements:
- project-id: your GCP project ID.
HTTP method and URL:
GET https://automl.googleapis.com/v1/projects/PROJECT_ID/locations/us-central1/operations
To send your request, choose one of these options:
curl
Execute the following command:
curl -X GET \
     -H "Authorization: Bearer $(gcloud auth print-access-token)" \
     -H "x-goog-user-project: project-id" \
     "https://automl.googleapis.com/v1/projects/PROJECT_ID/locations/us-central1/operations"
PowerShell
Execute the following command:
$cred = gcloud auth print-access-token
$headers = @{ "Authorization" = "Bearer $cred"; "x-goog-user-project" = "project-id" }

Invoke-WebRequest `
    -Method GET `
    -Headers $headers `
    -Uri "https://automl.googleapis.com/v1/projects/PROJECT_ID/locations/us-central1/operations" | Select-Object -Expand Content
The output you see will vary depending on the operations you have requested.
You can also filter the operations returned by using select query parameters
(operationId, done, and worksOn). For example,
to return a list of operations that have finished running modify the URL:
GET https://automl.googleapis.com/v1/projects/PROJECT_ID/locations/us-central1/operations?filter="done=true"
Go
Before trying this sample, follow the setup instructions for this language on the APIs & Reference > Client Libraries page.
Java
Before trying this sample, follow the setup instructions for this language on the APIs & Reference > Client Libraries page.
Node.js
Before trying this sample, follow the setup instructions for this language on the APIs & Reference > Client Libraries page.
Python
Before trying this sample, follow the setup instructions for this language on the APIs & Reference > Client Libraries page.
Additional languages
C#: Please follow the C# setup instructions on the client libraries page and then visit the AutoML Vision Object Detection reference documentation for .NET.
PHP: Please follow the PHP setup instructions on the client libraries page and then visit the AutoML Vision Object Detection reference documentation for PHP.
Ruby: Please follow the Ruby setup instructions on the client libraries page and then visit the AutoML Vision Object Detection reference documentation for Ruby.
Getting the status of an operation
REST
Before using any of the request data, make the following replacements:
- project-id: your GCP project ID.
- operation-id: the ID of your operation. The ID is the last element of the name
of your operation. For example:
- operation name:
projects/project-id/locations/location-id/operations/IOD5281059901324392598 - operation id:
IOD5281059901324392598
- operation name:
HTTP method and URL:
GET https://automl.googleapis.com/v1/projects/PROJECT_ID/locations/us-central1/operations/OPERATION_ID
To send your request, choose one of these options:
curl
Execute the following command:
curl -X GET \
     -H "Authorization: Bearer $(gcloud auth print-access-token)" \
     -H "x-goog-user-project: project-id" \
     "https://automl.googleapis.com/v1/projects/PROJECT_ID/locations/us-central1/operations/OPERATION_ID"
PowerShell
Execute the following command:
$cred = gcloud auth print-access-token
$headers = @{ "Authorization" = "Bearer $cred"; "x-goog-user-project" = "project-id" }

Invoke-WebRequest `
    -Method GET `
    -Headers $headers `
    -Uri "https://automl.googleapis.com/v1/projects/PROJECT_ID/locations/us-central1/operations/OPERATION_ID" | Select-Object -Expand Content
{
  "name": "projects/PROJECT_ID/locations/us-central1/operations/OPERATION_ID",
  "metadata": {
    "@type": "type.googleapis.com/google.cloud.automl.v1.OperationMetadata",
    "createTime": "2018-10-29T15:56:29.176485Z",
    "updateTime": "2018-10-29T16:10:41.326614Z",
    "importDataDetails": {}
  },
  "done": true,
  "response": {
    "@type": "type.googleapis.com/google.protobuf.Empty"
  }
}
You should see output similar to the following for a completed create model operation:
{
  "name": "projects/PROJECT_ID/locations/us-central1/operations/OPERATION_ID",
  "metadata": {
    "@type": "type.googleapis.com/google.cloud.automl.v1.OperationMetadata",
    "createTime": "2019-07-22T18:35:06.881193Z",
    "updateTime": "2019-07-22T19:58:44.972235Z",
    "createModelDetails": {}
  },
  "done": true,
  "response": {
    "@type": "type.googleapis.com/google.cloud.automl.v1.Model",
    "name": "projects/PROJECT_ID/locations/us-central1/models/MODEL_ID"
  }
}
Go
Before trying this sample, follow the setup instructions for this language on the Client Libraries page.
Java
Before trying this sample, follow the setup instructions for this language on the Client Libraries page.
Node.js
Before trying this sample, follow the setup instructions for this language on the Client Libraries page.
Python
Before trying this sample, follow the setup instructions for this language on the Client Libraries page.
Additional languages
C#: Please follow the C# setup instructions on the client libraries page and then visit the AutoML Vision Object Detection reference documentation for .NET.
PHP: Please follow the PHP setup instructions on the client libraries page and then visit the AutoML Vision Object Detection reference documentation for PHP.
Ruby: Please follow the Ruby setup instructions on the client libraries page and then visit the AutoML Vision Object Detection reference documentation for Ruby.
Cancelling an 0peration
You can cancel an import or training task using the operation ID.
REST
Before trying this sample, follow the setup instructions for this language on the Client Libraries page.
Before using any of the request data, make the following replacements:
- project-id: your GCP project ID.
- operation-id: the ID of your operation. The ID is the last element of the name
of your operation. For example:
- operation name:
projects/project-id/locations/location-id/operations/IOD5281059901324392598 - operation id:
IOD5281059901324392598
- operation name:
HTTP method and URL:
POST https://automl.googleapis.com/v1/projects/PROJECT_ID/locations/us-central1/operations/OPERATION_ID:cancel
To send your request, choose one of these options:
curl
Execute the following command:
curl -X POST \
     -H "Authorization: Bearer $(gcloud auth print-access-token)" \
     -H "x-goog-user-project: project-id" \
     -H "Content-Type: application/json; charset=utf-8" \
     -d "" \
     "https://automl.googleapis.com/v1/projects/PROJECT_ID/locations/us-central1/operations/OPERATION_ID:cancel"
PowerShell
Execute the following command:
$cred = gcloud auth print-access-token
$headers = @{ "Authorization" = "Bearer $cred"; "x-goog-user-project" = "project-id" }

Invoke-WebRequest `
    -Method POST `
    -Headers $headers `
    -Uri "https://automl.googleapis.com/v1/projects/PROJECT_ID/locations/us-central1/operations/OPERATION_ID:cancel" | Select-Object -Expand Content
{}
Getting information about a model
Use the following code samples to get information about a specific trained model. You can use the information returned from this request to modify the mode or send a prediction request.
REST
Before using any of the request data, make the following replacements:
- project-id: your GCP project ID.
- model-id: the ID of your model, from the
response when you created the model. The ID is the last element of the name of your model.
For example:
- model name:
projects/project-id/locations/location-id/models/IOD4412217016962778756 - model id:
IOD4412217016962778756
- model name:
HTTP method and URL:
GET https://automl.googleapis.com/v1/projects/project-id/locations/us-central1/models/model-id
To send your request, choose one of these options:
curl
Execute the following command:
curl -X GET \
     -H "Authorization: Bearer $(gcloud auth print-access-token)" \
     -H "x-goog-user-project: project-id" \
     "https://automl.googleapis.com/v1/projects/project-id/locations/us-central1/models/model-id"
PowerShell
Execute the following command:
$cred = gcloud auth print-access-token
$headers = @{ "Authorization" = "Bearer $cred"; "x-goog-user-project" = "project-id" }

Invoke-WebRequest `
    -Method GET `
    -Headers $headers `
    -Uri "https://automl.googleapis.com/v1/projects/project-id/locations/us-central1/models/model-id" | Select-Object -Expand Content
You should receive a JSON response similar to the following:
{
  "name": "projects/PROJECT_ID/locations/us-central1/models/MODEL_ID",
  "displayName": "DISPLAY_NAME",
  "datasetId": "DATASET_ID",
  "createTime": "2019-07-29T17:16:34.476787Z",
  "deploymentState": "UNDEPLOYED",
  "updateTime": "2019-07-29T18:30:13.601461Z",
  "imageObjectDetectionModelMetadata": {
    "modelType": "mobile-low-latency-1",
    "nodeQps": -1,
    "stopReason": "MODEL_CONVERGED",
    "trainBudgetMilliNodeHours": "24000",
    "trainCostMilliNodeHours": "861"
    }
   }
Go
Before trying this sample, follow the setup instructions for this language on the Client Libraries page.
Java
Before trying this sample, follow the setup instructions for this language on the Client Libraries page.
Node.js
Before trying this sample, follow the setup instructions for this language on the Client Libraries page.
Python
Before trying this sample, follow the setup instructions for this language on the Client Libraries page.
Additional languages
C#: Please follow the C# setup instructions on the client libraries page and then visit the AutoML Vision Object Detection reference documentation for .NET.
PHP: Please follow the PHP setup instructions on the client libraries page and then visit the AutoML Vision Object Detection reference documentation for PHP.
Ruby: Please follow the Ruby setup instructions on the client libraries page and then visit the AutoML Vision Object Detection reference documentation for Ruby.