This tutorial describes how to access the control plane of a private Google Kubernetes Engine (GKE) cluster using Cloud Build private pools. This access lets you use Cloud Build to deploy applications and manage resources on a private GKE cluster. This tutorial is intended for platform administrators, cluster administrators, and developers. It assumes that you're familiar with GKE, Cloud Build, OpenID Connect, and the gcloud
command-line tool.
Cloud Build private pools and GKE cluster control planes both run in Google-owned Virtual Private Cloud (VPC) networks. These VPC networks are peered to your own VPC network on Google Cloud. However, VPC Network Peering doesn't support transitive peering, which can be a restriction when you use Cloud Build private pools. This tutorial presents a solution that uses Identity Service for GKE to enable workers in a Cloud Build private pool to access the control plane of a private GKE cluster.
Architecture overview
Identity Service for GKE is an authentication proxy for GKE cluster control planes. It proxies requests to the API server and validates ID tokens that are issued by OpenID Connect (OIDC) identity providers. After the proxy successfully validates an ID token, the proxy adds user impersonation HTTP headers to the original request and forwards it to the API server. The proxy runs as a Kubernetes service account that has permissions to impersonate users and groups.
The Identity Service for GKE proxy runs as pods on cluster nodes. A Kubernetes service of type LoadBalancer exposes the proxy outside the cluster. If Identity Service for GKE is enabled on a private cluster, the installer adds an annotation to the Kubernetes service to provision an internal passthrough Network Load Balancer. The proxy can be accessed through the load balancer over a VPC Network Peering connection, such as from a Cloud Build private pool, because the proxy runs on cluster nodes in your VPC network.
You can configure Google as an OpenID Connect identity provider in Identity Service for GKE because Google's OAuth 2.0 authentication system conforms to the OpenID Connect specification. To obtain ID tokens for a Google service account, you can use the generateIdToken method of the Service Account Credentials API API. The ID tokens are issued and signed by Google.
Putting it all together, this solution enables access to the private GKE cluster control plane by using the Identity Service for GKE proxy. Builds that run on a Cloud Build private pool connect to the proxy over a VPC Network Peering connection. The build that's running on the Cloud Build private pool runs as a Google service account. This Google service account can obtain an ID token to authenticate to the proxy from the Service Account Credentials API.
The following diagram shows the architecture that's described in the preceding text:
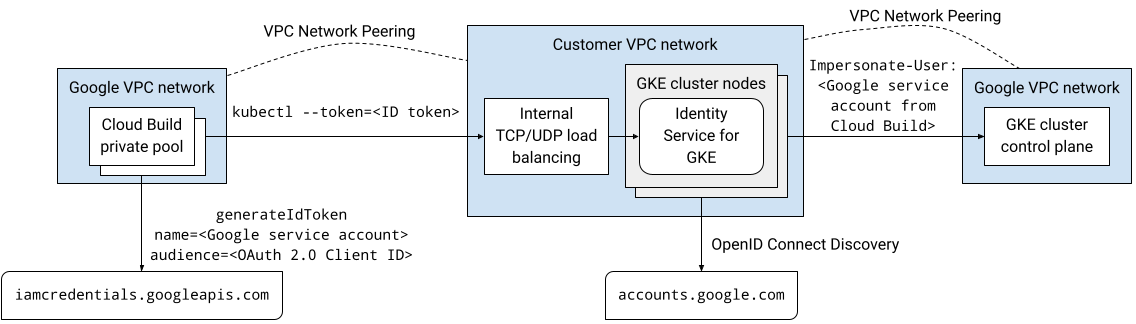
All the communication in this solution takes place over internal IP address space. The workers in the private pool do not need public internet connectivity.
Identity and Access Management (IAM) permissions that are granted to user accounts and Google service accounts do not apply when they authenticate using Identity Service for GKE. Instead, you use Kubernetes role-based access control (RBAC) to manage cluster permissions for these accounts.
Before you begin
- Sign in to your Google Cloud account. If you're new to Google Cloud, create an account to evaluate how our products perform in real-world scenarios. New customers also get $300 in free credits to run, test, and deploy workloads.
- Install the Google Cloud CLI.
-
To initialize the gcloud CLI, run the following command:
gcloud init
-
Create or select a Google Cloud project.
-
Create a Google Cloud project:
gcloud projects create PROJECT_ID
Replace
PROJECT_IDwith a name for the Google Cloud project you are creating. -
Select the Google Cloud project that you created:
gcloud config set project PROJECT_ID
Replace
PROJECT_IDwith your Google Cloud project name.
-
-
Make sure that billing is enabled for your Google Cloud project.
-
Enable the Cloud Build, GKE, Identity-Aware Proxy (IAP), and Service Networking APIs APIs:
gcloud services enable cloudbuild.googleapis.com
container.googleapis.com iap.googleapis.com servicenetworking.googleapis.com - Install the Google Cloud CLI.
-
To initialize the gcloud CLI, run the following command:
gcloud init
-
Create or select a Google Cloud project.
-
Create a Google Cloud project:
gcloud projects create PROJECT_ID
Replace
PROJECT_IDwith a name for the Google Cloud project you are creating. -
Select the Google Cloud project that you created:
gcloud config set project PROJECT_ID
Replace
PROJECT_IDwith your Google Cloud project name.
-
-
Make sure that billing is enabled for your Google Cloud project.
-
Enable the Cloud Build, GKE, Identity-Aware Proxy (IAP), and Service Networking APIs APIs:
gcloud services enable cloudbuild.googleapis.com
container.googleapis.com iap.googleapis.com servicenetworking.googleapis.com
Create a private GKE cluster
In Cloud Shell, create a GKE cluster that has no client access to the public endpoint of the control plane, and that has Identity Service for GKE installed:
gcloud container clusters create CLUSTER  \
  --enable-identity-service \
  --enable-ip-alias \
  --enable-master-authorized-networks \
  --enable-private-endpoint \
  --enable-private-nodes \
  --master-ipv4-cidr CONTROL_PANE_CIDR \
  --network NETWORK\
  --release-channel regular \
  --scopes cloud-platform \
  --subnetwork SUBNET \
  --tags NODE_TAGS \
  --workload-pool PROJECT_ID.svc.id.goog \
  --zone ZONE
Replace the following:
- CLUSTER: the name of the cluster. For this tutorial, use
private-cluster. - CONTROL_PANE_CIDR: the IP address range of the control plane. It must have a
/28prefix. For this tutorial, you can use172.16.0.32/28. - NETWORK: the VPC network that the control plane connects to. For this tutorial, use
default. - SUBNET: the subnet that the GKE cluster control plane connects to. The subnet must belong to the VPC network that's specified by NETWORK. For this tutorial, use
default. - NODE_TAGS: a comma-separated list of network tags to apply to the nodes. For this tutorial, use
private-cluster-node. - PROJECT_ID: your Google Cloud project ID.
- ZONE: the zone for the GKE cluster. For this tutorial, use
us-central1-f.
Note the following about the command:
The
--enable-identity-serviceflag enables Identity Service for GKE on the cluster. In your own environment, you can enable Identity Service for GKE on an existing cluster.The
--enable-private-endpointflag configures the control plane to be accessible only by using internal IP addresses.The
--enable-private-nodesflag configures the cluster nodes to have only internal IP addresses.The
--enable-master-authorized-networksand--enable-private-nodesflags allow access to the API server only from the private networks that are specified by the--networkflag.The optional
--workload-poolflag enables Workload Identity. It's not required for this tutorial.
- CLUSTER: the name of the cluster. For this tutorial, use
Add a firewall rule that allows the GKE cluster control plane to connect to the validating admission webhook for ClientConfig resources:
gcloud compute firewall-rules create allow-control-plane-clientconfig-webhook \
  --allow tcp:15000 \
  --network NETWORK\
  --source-ranges CONTROL_PANE_CIDR\
  --target-tags NODE_TAGS
ClientConfig is a Kubernetes custom resource type (CRD) that Identity Service for GKE uses to configure how to interact with identity providers.
Register Identity Service for GKE as an OAuth 2.0 client application
In this section, you register Identity Service for GKE as a client application using Google's OAuth 2.0 authentication system.
Open the Credentials page in the Google Cloud console.
Click Create Credentials.
Select OAuth Client ID.
If the consent screen hasn't already been configured for the Google Cloud project, click Configure consent screen. Follow the documentation on configuring the consent screen. For this tutorial, set the following values:
- User Type can be either Internal or External. For this tutorial, you can select Internal.
- The values for App name, User support email, and Developer contact information are required and can be of any value.
- You do not need to add any scopes for this tutorial.
When you are done configuring the consent screen, click Back to dashboard, and then start again from step 1 of the current procedure.
In the Application type list, select Web application.
In the Name field, enter a name for the client ID. For this tutorial, use
Identity Service for GKE.Click Create.
A dialog appears. Copy the value of Your Client ID; you need it later in this procedure.
Click OK to close the dialog box.
In Cloud Shell, create a directory underneath your home directory called
cloud-build-private-pools-gke-tutorialand then go to that directory:mkdir -p ~/cloud-build-private-pools-gke-tutorial cd ~/cloud-build-private-pools-gke-tutorial
In the new directory, create a YAML file called
client-config-patch.yamlthat has values that you need later to patch the Identity Service for GKE ClientConfig resource:cat << EOF > client-config-patch.yaml spec: authentication: - name: google-oidc oidc: clientID: CLIENT_ID cloudConsoleRedirectURI: https://console.cloud.google.com/kubernetes/oidc extraParams: prompt=consent,access_type=offline issuerURI: https://accounts.google.com kubectlRedirectURI: http://localhost:10000/callback scopes: email userClaim: email userPrefix: '-' EOFReplace CLIENT_ID with the OAuth client ID from the earlier step.
Note the following about the patch:
ID tokens that are issued by Google's OAuth 2.0 authentication system contain a unique numeric identifier in the sub (subject) claim. Using this opaque identifier in role bindings makes it difficult to identify the subject of a role binding. This patch therefore configures Identity Service for GKE to use the email claim from the ID tokens to identify users instead of using the default sub claim.
The email scope is added so that the issued ID tokens include the email claim.
The
cloudConsoleRedirectURI,extraParams,kubectlRedirectURI, and scopes fields are used when developers authenticate to the cluster using Identity Service for GKE. They are not used when Google service accounts authenticate to the cluster. The kubectlRedirectURI field is mandatory.The
userPrefixfield is a prefix for users who authenticate using the configured identity provider. The value'-'means no prefix.The
spec.authenticationfield is an array. You can use multiple OpenID Connect identity providers with Identity Service for GKE. For instance, you can use Google as the identity provider to authenticate Google service accounts, and a different identity provider to authenticate developers.
For more information about the fields in this configuration, see Use external identity providers to authenticate to GKE.
Create a Google service account to configure Identity Service for GKE
In Cloud Shell, create a Google service account:
gcloud iam service-accounts create ISG_GSA \
  --display-name "Configure Identity Service for GKE"
Replace ISG_GSA with the name that you want to use for the Google service account. For this tutorial, use
identity-service-for-gke.You assign this Google service account to a Compute Engine VM instance in order to configure Identity Service for GKE and Kubernetes role-based access control on the cluster.
Grant the Kubernetes Engine Admin role on the project to the Google service account:
gcloud projects add-iam-policy-binding PROJECT_ID \
  --member serviceAccount:ISG_GSA@PROJECT_ID.iam.gserviceaccount.com \
  --role roles/container.admin
This role provides the permissions that are required in order to do the following tasks in this tutorial:
- Configure Identity Service for GKE settings on clusters in the project.
- Create role bindings and cluster role bindings in the cluster.
Configure Identity Service for GKE
To configure Identity Service for GKE, you must have access to the cluster control plane. In this tutorial, you create a Compute Engine VM instance to access the control plane.
You need SSH access to the VM instance. To enable authenticated and authorized SSH access from outside the VPC network to the VM instance, you use TCP forwarding with Identity-Aware Proxy (IAP). This feature enables SSH access without requiring the VM instance to have a public IP address.
In Cloud Shell, create a firewall rule that allows SSH access using IAP TCP forwarding to any VM instances that have the
ssh-iapnetwork tag:gcloud compute firewall-rules create allow-ssh-ingress-from-iap \ --allow tcp:22 \ --description "Allow SSH tunneling using Identity-Aware Proxy" \ --network NETWORK \ --source-ranges 35.235.240.0/20 \ --target-tags ssh-iapThe source range contains the IP addresses that IAP uses for TCP forwarding.
Create a Compute Engine VM instance in the same VPC network as the GKE cluster:
gcloud compute instances create VM \
  --metadata enable-oslogin=TRUE \
  --network NETWORK \
  --no-address \
  --scopes cloud-platform,userinfo-email \
  --service-account ISG_GSA@PROJECT_ID.iam.gserviceaccount.com \
  --subnet SUBNET  \
  --tags ssh-iap \
  --zone ZONE
Replace VM with the name you want to use for the VM instance. For this tutorial, use
identity-service-for-gke-configuration.Note the following about the command above:
The
--service-accountflag attaches the Google service account to the VM instance.The
cloud-platformscope is required in order to access the Service Account Credentials API.The
userinfo-emailscope is helpful when creating a VM instance for managing Kubernetes role-based access control. It is optional for this tutorial.The
--no-addressflag means that the VM instance is created without an external IP address.The optional
enable-oslogininstance metadata value enables OS Login on the VM instance. OS Login enables management of SSH access to VM instances using IAM.
Copy the ClientConfig patch file to the VM instance:
gcloud compute scp client-config-patch.yaml VM:~ --tunnel-through-iap --zone ZONEThe
--tunnel-through-iapflag instructsgcloudto tunnel the connection through IAP.Connect to the VM instance using SSH:
gcloud compute ssh VM --tunnel-through-iap --zone ZONEYou run the rest of the commands in this section from the SSH session.
Install the
kubectlcommand-line tool and the gke-gcloud-auth-plugin binary in the VM instance:sudo apt-get install -y kubectl google-cloud-sdk-gke-gcloud-auth-pluginFetch credentials for the GKE cluster:
export USE_GKE_GCLOUD_AUTH_PLUGIN=True
gcloud container clusters get-credentials CLUSTER --zone ZONE
Patch the default ClientConfig resource:
kubectl patch clientconfig default \
    --namespace kube-public \
    --patch-file client-config-patch.yaml \
    --type merge
Extract the
certificateAuthorityDatafield from the patched default ClientConfig resource and store it in a file calledcertificateAuthorityData.pem:kubectl get clientconfig default \ --namespace kube-public \ --output jsonpath='{.spec.certificateAuthorityData}' \ | base64 --decode > certificateAuthorityData.pemExtract the server field from the patched default ClientConfig resource and store it in a file called
server.txt:kubectl get clientconfig default \ --namespace kube-public \ --output jsonpath='{.spec.server}' > server.txtLeave the SSH session:
exit
(Optional) Verify the cluster configuration
Before you proceed, you can verify that Identity Service for GKE has been set up correctly on the cluster. You verify the setup by using the Google service account attached to the VM instance to authenticate to the cluster using Identity Service for GKE.
In Cloud Shell, grant the Service Account OpenID Connect Identity Token Creator on the Google service account to the service account itself:
gcloud iam service-accounts add-iam-policy-binding \
  ISG_GSA@PROJECT_ID.iam.gserviceaccount.com \
  --member serviceAccount:ISG_GSA@PROJECT_ID.iam.gserviceaccount.com \
  --role roles/iam.serviceAccountOpenIdTokenCreator
This role provides the
iam.serviceAccounts.getOpenIdTokenpermission that's required in order to request ID tokens for the service account from the Service Account Credentials API.Connect to the VM instance using SSH:
gcloud compute ssh VM --tunnel-through-iap --zone ZONEYou run the rest of the commands in this section from the SSH session.
Request an OAuth 2.0 access token from the metadata server for the Google service account that's attached to the VM instance, using the OAuth client ID as the requested
aud(audience) claim:ACCESS_TOKEN=$(curl --silent --header "Metadata-Flavor: Google" \ http://metadata.google.internal/computeMetadata/v1/instance/service-accounts/default/token \ | python3 -c 'import json, sys; print(json.load(sys.stdin).get("access_token"))')The response body from the metadata server is a JSON document. The command uses an inline Python script to extract the
access_tokenfield from the response body.Request an ID token from the Service Account Credentials API for the Google service account that's attached to the VM instance:
ID_TOKEN=$(curl --silent --request POST \
    --data '{"audience": "CLIENT_ID", "includeEmail": true}' \
    --header "Authorization: Bearer $ACCESS_TOKEN" \
    --header "Content-Type: application/json; charset=utf-8" \
"https://iamcredentials.googleapis.com/v1/projects/-/serviceAccounts/ISG_GSA@PROJECT_ID.iam.gserviceaccount.com:generateIdToken" \
       | python3 -c 'import json, sys; print(json.load(sys.stdin).get("token"))')
Note the following about the command above:
- The
audiencefield in the request body JSON specifies the requestedaud(audience) claim of the ID token. - The access token from the previous step is used to authenticate to the API.
- The
View the claims in the ID token:
echo $ID_TOKEN \
    | cut -d. -f2 \
    | base64 --decode --ignore-garbage 2> /dev/null \
    | python3 -m json.tool
Verify that the
emailclaim contains the email address of the Google service account.Use the ID token to authenticate to the control plane by using Identity Service for GKE:
kubectl get namespaces \
    --certificate-authority certificateAuthorityData.pem \
    --server $(cat server.txt) \
    --token $ID_TOKEN
The output resembles the following:
Error from server (Forbidden): namespaces is forbidden: User "ISG_GSA@PROJECT_ID.iam.gserviceaccount.com" cannot list resource "namespaces" in API group "" at the cluster scopeThis error is expected. Although the Google service account was granted IAM permissions on GKE clusters in the project, IAM permissions do not apply when you authenticate by using Identity Service for GKE. Instead, you configure access using Kubernetes role-based access control (RBAC).
Create a cluster role binding that grants the
viewcluster role to the Google service account when the service account authenticates to the cluster by using Google's OpenID Connect provider:kubectl create clusterrolebinding ISG_GSA-cluster-view \ --clusterrole view \ --user ISG_GSA@PROJECT_ID.iam.gserviceaccount.comIf you set a
userPrefixvalue other than-in the ClientConfig in your own environment, add the prefix to the value of the--userflag in this command.Access the GKE cluster by using Identity Service for GKE:
kubectl get namespaces \
    --certificate-authority certificateAuthorityData.pem \
    --server $(cat server.txt) \
    --token $ID_TOKEN
The output resembles the following:
NAME                      STATUS   AGE
anthos-identity-service   Active   1h
default                   Active   1h
kube-node-lease           Active   1h
kube-public               Active   1h
kube-system               Active   1h
Leave the SSH session:
exit
Create a context for the kubectl tool
The kubectl command can use a kubeconfig file to configure access to clusters. A kubeconfig file contains one or more contexts. Each context has a name, and optionally includes cluster connectivity information, credentials that are used to authenticate to the cluster, and a default namespace.
In this section, you create a kubeconfig file that has a context. The context includes connectivity details of the Identity Service for GKE proxy for your cluster. You do not add any user credentials to the kubeconfig file.
In Cloud Shell, copy the files that contains the certificate authority data and server URL from the VM instance to the current directory:
gcloud compute scp VM:~/certificateAuthorityData.pem VM:~/server.txt . \
    --tunnel-through-iap --zone ZONE
Create a context and a cluster configuration that you will use later to connect to the GKE cluster from Cloud Build:
kubectl config set-context private-cluster \
    --cluster private-cluster \
    --kubeconfig kubeconfig
The
--kubeconfigflag creates the context and cluster configuration in a new file called kubeconfig in the current directory.This command uses the GKE cluster name as the cluster configuration name for the context. In your own environment, you can use a different cluster configuration name in the context.
Set the
certificateAuthorityDatafield on the cluster configuration:kubectl config set-cluster private-cluster \ --certificate-authority certificateAuthorityData.pem \ --embed-certs \ --kubeconfig kubeconfigSet the
serverfield on the cluster configuration:kubectl config set-cluster private-cluster \ --kubeconfig kubeconfig \ --server $(cat server.txt)
Create a Google service account for Cloud Build
In the Cloud Shell, create a Google service account to run builds on the Cloud Build private pool:
gcloud iam service-accounts create CB_GSA \
  --description "Runs builds on Cloud Build private pools" \
  --display-name "Cloud Build private pool"
Replace CB_GSA with the name that you want to use for the Google service account. For this tutorial, use
cloud-build-private-pool.Grant the Cloud Build Service Account role on the project to the Google service account:
gcloud projects add-iam-policy-binding PROJECT_ID \
    --member serviceAccount:CB_GSA@PROJECT_ID.iam.gserviceaccount.com \
    --role roles/cloudbuild.builds.builder
This role provides the default permissions of the Google-managed Cloud Build service account.
Grant the Service Account OpenID Connect Identity Token Creator on the Google service account to the service account itself:
gcloud iam service-accounts add-iam-policy-binding \
    CB_GSA@PROJECT_ID.iam.gserviceaccount.com \
    --member serviceAccount:CB_GSA@PROJECT_ID.iam.gserviceaccount.com \
    --role roles/iam.serviceAccountOpenIdTokenCreator
This role provides the
iam.serviceAccounts.getOpenIdTokenpermission that's required in order to request ID tokens for the service account from the Service Account Credentials API.Connect to the VM instance using SSH:
gcloud compute ssh VM --tunnel-through-iap --zone ZONEYou run the rest of the commands in this section from the SSH session.
In the SSH session, create a Kubernetes cluster role binding that grants the
cluster-admincluster role to the Google service account when the service account authenticates to the cluster by using Google's OpenID Connect provider:kubectl create clusterrolebinding CB_GSA-cluster-admin \ --clusterrole cluster-admin \ --user CB_GSA@PROJECT_ID.iam.gserviceaccount.comThe
cluster-admincluster role grants extensive cluster-wide permissions. In your own environment, you can use a cluster role that provides only the permissions that are necessary for the tasks that Cloud Build performs. You can also use role bindings to grant permissions only to specific namespaces.If you set a
userPrefixin the ClientConfig in your own environment, you must add that prefix to the value of the--userflag in this command.Leave the SSH session:
exit
Create a Cloud Build private pool
In Cloud Shell, allocate an IP address range in your VPC network for the connection with the private pool:
gcloud compute addresses create RESERVED_RANGE_NAME \
--addresses RESERVED_RANGE_START_IP\
    --description "Cloud Build private pool reserved range" \
    --global \
    --network NETWORK \
    --prefix-length RESERVED_RANGE_PREFIX_LENGTH \
    --purpose VPC_PEERING
Replace the following:
- RESERVED_RANGE_NAME: the name of the allocated IP address range that hosts the Cloud Build private pool. For this tutorial, use
cloud-build-private-pool. - RESERVED_RANGE_START_IP: the first IP address of the allocated IP address range. For this tutorial, use
192.168.12.0. - RESERVED_RANGE_PREFIX_LENGTH: the prefix length (subnet mask) of the allocated IP address range. The prefix length must be
/23or a lower number, for example/22or/21. A lower number means a larger address range. For this tutorial, use23, and do not enter the leading/(slash).
- RESERVED_RANGE_NAME: the name of the allocated IP address range that hosts the Cloud Build private pool. For this tutorial, use
Create a firewall rule to allow inbound traffic from the reserved IP address range to other resources in your VPC network:
gcloud compute firewall-rules create allow-private-pools-ingress \
    --allow all \
    --network NETWORK \
    --source-ranges RESERVED_RANGE_START_IP/RESERVED_RANGE_PREFIX_LENGTH
Create a private service connection to connect your VPC network to the Service Networking service:
gcloud services vpc-peerings connect \
    --network NETWORK \
    --ranges RESERVED_RANGE_NAME \
    --service servicenetworking.googleapis.com
Cloud Build private pools run workers using Service Networking. The private service connection enables your VPC network to communicate with the private pool on the allocated range of internal IP addresses, using a VPC Network Peering connection.
It can take a few minutes to create the private service connection.
If you use a Shared VPC in your own environment, for information about additional steps to create the private service connection, see Set up your environment.
Create a Cloud Build private pool in a Google-owned VPC network that is peered with your VPC network:
gcloud builds worker-pools create PRIVATE_POOL_NAME \
   --no-public-egress \
   --peered-network projects/PROJECT_ID/global/networks/NETWORK \
   --region REGION
Replace the following:
- PRIVATE_POOL_NAME: the name of the private pool. For this tutorial, use
private-pool. - REGION: the region to use for the private pool. For this tutorial, use
us-central1.
The
--no-public-egressflag means that workers in the private pool do not have public IP addresses. In your own environment, you can remove this flag if you want workers in the private pool to have internet connectivity using public IP addresses.For information about additional configuration options, such as machine type and disk size for the workers in the private pool, see Create and manage private pools.
- PRIVATE_POOL_NAME: the name of the private pool. For this tutorial, use
Verify the solution
In this section, you verify the solution by running a build on the Cloud Build private pool. The build accesses the private GKE cluster.
In Cloud Shell, create a Cloud Storage bucket to store build logs from Cloud Build:
gsutil mb -l REGION gs://PROJECT_ID-build-logsCreate a build configuration file for Cloud Build:
cat << "EOF" > cloudbuild.yaml
steps:
- id: list-services
  name: gcr.io/google.com/cloudsdktool/google-cloud-cli
  entrypoint: bash
  args:
  - -eEuo
  - pipefail
  - -c
  - |-
    kubectl config use-context $_KUBECTL_CONTEXT

    ACCESS_TOKEN=$$(curl --silent \
        --header "Metadata-Flavor: Google" \
        http://metadata.google.internal/computeMetadata/v1/instance/service-accounts/default/token \
        | python3 -c 'import json, sys; print(json.load(sys.stdin).get("access_token"))')

    ID_TOKEN=$$(curl --silent --request POST \
        --data '{"audience": "CLIENT_ID", "includeEmail": true}' \
        --header "Authorization: Bearer $$ACCESS_TOKEN" \
        --header "Content-Type: application/json; charset=utf-8" \
        "https://iamcredentials.googleapis.com/v1/projects/-/serviceAccounts/$_SERVICE_ACCOUNT:generateIdToken" \
        | python3 -c 'import json, sys; print(json.load(sys.stdin).get("token"))')

    kubectl get services --namespace $_NAMESPACE --token $$ID_TOKEN

logsBucket: gs://PROJECT_ID-build-logs

options:
  env:
  - KUBECONFIG=/workspace/$_KUBECONFIG

substitutions:
  _KUBECONFIG: kubeconfig
  _KUBECTL_CONTEXT: private-cluster
  _NAMESPACE: default

serviceAccount: projects/$PROJECT_ID/serviceAccounts/$_SERVICE_ACCOUNT
EOF
The step in the build configuration file does the following:
Switches to the
kubectlcontext that's specified by the_KUBECTL_CONTEXTsubstitution. The default substitution value isprivate-cluster.Retrieves an access token from the metadata server. The access token is issued to the Google service account that runs the build.
Generates an ID token by using the Service Account Credentials API. The request to generate the ID token is authenticated by using the access token. The requested
aud(audience) claim of the ID token is the OAuth 2.0 client ID that's specified by the_CLIENT_IDsubstitution.Lists the Kubernetes services in the namespace that's specified by the
_NAMESPACEsubstitution. The default substitution value isdefault. The request is authenticated by using the ID token that was generated in the previous command.
Note the following about the build configuration file:
The
$character is the prefix for substitutions.$$is used for bash parameter expansion and command substitution.The substitutions
_KUBECONFIGand_KUBECTL_CONTEXTenable different kubeconfig files and different contexts to be specified when you run a build. These substitutions enable you to manage multiple cluster configurations by using either a single kubeconfig file with multiple contexts, or by using multiple kubeconfig files.The substitution
_SERVICE_ACCOUNTdoes not have a default value. You must provide a value for this substitution when you run a build.The
optionsblock sets theKUBECONFIGenvironment variable for all steps in the build.The build step uses the
gcr.io/google.com/cloudsdktool/google-cloud-clibuilder image. This is a large container image, and it takes some time to pull it from the registry to the private pool worker. To reduce the time it takes to pull the builder image, you can create a custom builder image that contains only the required tools for the build step, such ascurl,kubectl, and Python.
For more information about inline shell scripts in build configuration files, see Running bash scripts.
Run a build using the build configuration file and the files in the current directory:
gcloud builds submit \
    --config cloudbuild.yaml \
    --region REGION \
    --substitutions _SERVICE_ACCOUNT=CB_GSA@PROJECT_ID.iam.gserviceaccount.com \
    --worker-pool projects/PROJECT_ID/locations/REGION/workerPools/PRIVATE_POOL_NAME
The command uploads all files that are in the current directory to Cloud Storage for use by Cloud Build. The build step uses the kubeconfig file to connect to the GKE cluster.
Near the end of the output, you see lines that resemble the following:
NAME         TYPE        CLUSTER-IP   EXTERNAL-IP   PORT(S)   AGE
kubernetes   ClusterIP   10.0.0.1     <none>        443/TCP   2h
This output shows that the private pool worker has connected to the cluster control plane by using the Identity Service for GKE authentication proxy.
Troubleshooting
If you are unable to connect to the VM instance using SSH, add the --troubleshoot flag to help discover the cause of the connectivity issues:
gcloud compute ssh VM --tunnel-through-iap --zone ZONE --troubleshoot
If you get the message Error from server (NotFound): clientconfigs.authentication.gke.io "default" not found when you patch the default ClientConfig on the GKE cluster, ensure that you have created the firewall rule as described in the section Creating a private GKE cluster. Verify that the firewall rule exists:
gcloud compute firewall-rules describe allow-control-plane-clientconfig-webhook
If you cannot authenticate to the Identity Service for GKE proxy, look for errors in the logs of the pods in the gke-oidc-service deployment:
gcloud compute ssh VM --tunnel-through-iap --zone ZONE --command \
    'kubectl logs deployment/gke-oidc-service \
         --namespace anthos-identity-service --all-containers'
If you run into other problems with this tutorial, we recommend that you review these documents:
Clean up
To avoid incurring charges to your Google Cloud account for the resources used in this tutorial, either delete the project that contains the resources, or keep the project and delete the individual resources.
Delete the project
Delete a Google Cloud project:
gcloud projects delete PROJECT_ID
Delete the resources
If you want to keep the project you used in this tutorial, delete the individual resources:
In Cloud Shell, delete the Cloud Build private pool:
gcloud builds worker-pools delete PRIVATE_POOL_NAME --region REGION --quietDelete the private service connection to Service Networking:
gcloud services vpc-peerings delete --network NETWORK \
  --service servicenetworking.googleapis.com --quiet --async
Delete the IP address range allocated to Cloud Build private pools:
gcloud compute addresses delete RESERVED_RANGE_NAME --global --quietDelete the Cloud Storage bucket and all of its contents:
gsutil rm -r gs://PROJECT_ID-build-logsDelete the GKE cluster:
gcloud container clusters delete CLUSTER --zone ZONE --quiet --asyncDelete the Compute Engine VM instance:
gcloud compute instances delete VM --zone ZONE --quietDelete the firewall rules:
gcloud compute firewall-rules delete allow-private-pools-ingress --quiet

gcloud compute firewall-rules delete allow-ssh-ingress-from-iap --quiet

gcloud compute firewall-rules delete allow-control-plane-clientconfig-webhook --quiet
Remove the IAM role bindings:
gcloud projects remove-iam-policy-binding PROJECT_ID \
    --member serviceAccount:CB_GSA@PROJECT_ID.iam.gserviceaccount.com \
    --role roles/cloudbuild.builds.builder

gcloud projects remove-iam-policy-binding PROJECT_ID \
    --member serviceAccount:ISG_GSA@PROJECT_ID.iam.gserviceaccount.com \
    --role roles/container.admin

gcloud iam service-accounts remove-iam-policy-binding \
    CB_GSA@PROJECT_ID.iam.gserviceaccount.com \
    --member serviceAccount:CB_GSA@PROJECT_ID.iam.gserviceaccount.com \
    --role roles/iam.serviceAccountOpenIdTokenCreator

gcloud iam service-accounts remove-iam-policy-binding \
    ISG_GSA@PROJECT_ID.iam.gserviceaccount.com \
    --member serviceAccount:ISG_GSA@PROJECT_ID.iam.gserviceaccount.com \
    --role roles/iam.serviceAccountOpenIdTokenCreator
Delete the Google service accounts:
gcloud iam service-accounts delete CB_GSA@PROJECT_ID.iam.gserviceaccount.com \
   --quiet

gcloud iam service-accounts delete ISG_GSA@PROJECT_ID.iam.gserviceaccount.com \
   --quiet
Delete the OAuth 2.0 client ID
Go to the Credentials page in Google Cloud console:
Select your project from the project selector list.
In the table of OAuth 2.0 Client IDs, find the row for Identity Service for GKE and then click the Delete OAuth client icon.
In the dialog, click Delete.
What's next
- Learn how to access Anthos clusters from Cloud Build with the connect gateway.
- Learn how to access private GKE clusters with Cloud Build private pools using Cloud VPN.
- Learn how to create GKE private clusters with network proxies for control plane access.
- Learn how to access external resources in a private network using a static external IP.
- Discover GKE Identity Service. GKE Identity Service enables you to manage external identity provider authentication across a fleet of Anthos clusters.