Let’s get it started! Triggering ML pipeline runs
Sara Robinson
Developer Advocate, Google Cloud Platform
ML pipelines are great at automating end-to-end ML workflows, but what if you want to go one step further and automate the execution of your pipeline? In this post I’ll show you how to do exactly that. You’ll learn how to trigger your Vertex Pipelines runs in response to data added to a BigQuery table.
I’ll focus on automating pipeline executions rather than building pipelines from scratch. If you want to learn how to build ML pipelines, check out this codelab or this blog post.
What are ML pipelines? A quick refresher
If the term ML pipeline is throwing you for a loop, you’re not alone! Let’s first understand what that means and the tools we’ll be using to implement it. ML pipelines are part of the larger practice of MLOps, which is concerned with productionizing ML workflows in a reproducible, reliable way.
When you’re building out an ML system and have established steps for gathering and preprocessing data, and model training, deployment, and evaluation, you might start by building out these steps as ad-hoc, disparate processes. You may want to share the workflow you’ve developed with another team and ensure they get the same results as you when they go through the steps. This will be tricky if your ML steps aren’t connected, and that’s where pipelines can help. With pipelines, you define your ML workflow as a series of steps or components. Each step in a pipeline is embodied by a container, and the output of each step will be fed as input to the next step.
How do you build a pipeline? There are open source libraries that do a lot of this heavy lifting by providing tooling for expressing and connecting pipeline steps and converting them to containers. Here I’ll be using Vertex Pipelines, a serverless tool for building, monitoring, and running ML pipelines. The best part? It supports pipelines built with two popular open source frameworks: Kubeflow Pipelines (which I’ll use here) and Tensorflow Extended (TFX).
Compiling Vertex Pipelines with the Kubeflow Pipelines SDK
This post assumes you’ve already defined a pipeline that you’d like to automate. Let’s imagine you’ve done this using the Kubeflow Pipelines SDK. Once you’ve defined your pipeline, the next step is to compile it. This will generate a JSON file with your pipeline definition that you’ll use when running the pipeline.
With your pipeline compiled, you’re ready to run it. If you’re curious what a pipeline definition looks like, check out this tutorial.
Triggering a pipeline run from data added to BigQuery
In MLOps, it’s common to retrain your model when new data is available. Here, we’ll look specifically at how to trigger a pipeline run when more data is added to a table in BigQuery. This assumes your pipeline is using data from BigQuery to train a model, but you could use the same approach outlined below and replace BigQuery with a different data source. Here’s a diagram of what we’ll build:
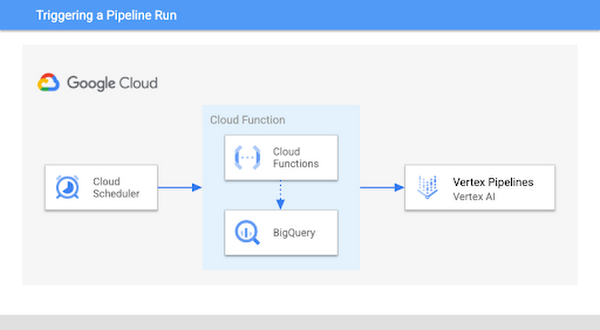

To implement this, we’ll use a Cloud Function to check for new data, and if there is we’ll execute our pipeline. The first step here is to determine how many new rows of data should trigger model retraining. In this example we’ll use 1000 as the threshold, but you can customize this value based on your use case. Inside the Cloud Function, we’ll compare the number of rows in our BigQuery table to the amount of data last used to train our model. If it exceeds our threshold, we’ll kick off a new pipeline run to retrain our model.
There are a few types of Cloud Functions to choose from. For this we’ll use an HTTP function so that we can trigger it with Cloud Scheduler. The function will take two parameters: the name of the BigQuery dataset where you’re storing model training data, along with the table containing that data. The function then creates a table called count in that dataset, and uses it to keep a snapshot of the number of rows used last time you ran your retraining pipeline:
If the current number of rows in the table exceeds the latest value in the count table by your predetermined threshold, it’ll kick off a pipeline run and update count to the new number of rows with the Kubeflow Pipelines SDK method create_run_from_job_spec:
The resulting count table will show a running log of the size of your data table each time the function kicked off a pipeline run:


You can see the full function code in this gist, where the check_table_size function is the Cloud Functions entrypoint. Note that you’ll want to add error handling based on your use case to catch scenarios where the pipeline run fails.
When you deploy your function, include a requirements.txt file with both the kfp and google-cloud-bigquery libraries. You’ll also need your compiled pipeline JSON file. Once your function is deployed, it’s time to create a Cloud Scheduler job that will run this function on a recurring basis.
You can do this right from the Cloud Scheduler section of your console. First, click Create job and give the job a name, frequency, and time zone. The frequency will largely depend on how often new data is added in your application. Setting this won’t necessarily run your pipeline with the frequency you specify, it’ll only be checking for new data in BigQuery[1].
In this example we’ll run this function weekly, on Mondays at 9:00am EST:
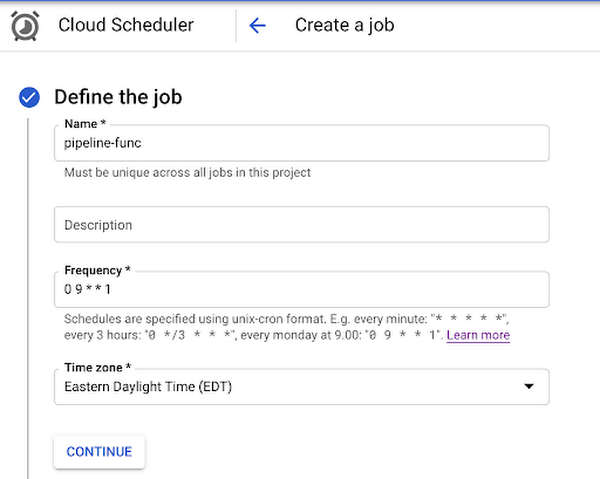

Next, set HTTP as the target type and add the URL of the Cloud Function you deployed. In the body, add the JSON with the two parameters this function takes: your BigQuery dataset and table name:
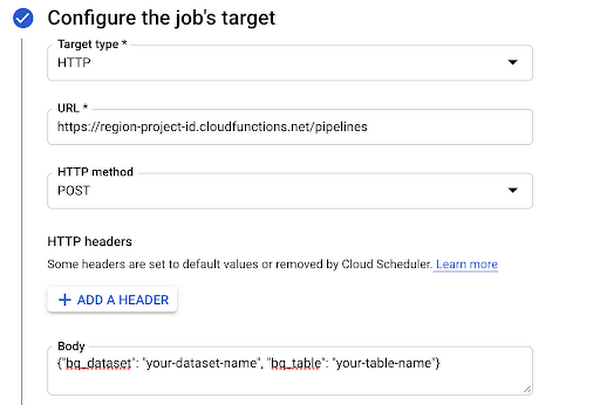

Then create a service account that has the Cloud Functions Invoker role. Under Auth header, select Add OIDC token and add the service account you just created:


With that, you can create the Scheduler job, sit back, and relax with the comforting thought that your retraining pipeline will run when enough new data becomes available. Want to see everything working? Go to the Cloud Scheduler in your console to see the last time your job ran:


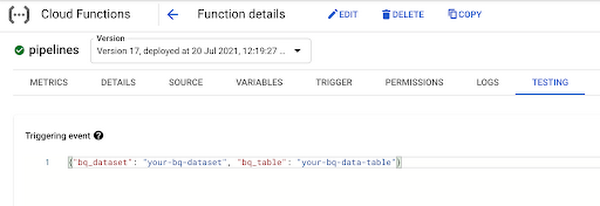
You can also click the Run Now button on the right if you don’t want to wait for the next scheduled time. To test out the function directly, you can go to the Functions section of your console and test it right in the browser, passing in the two parameters the function expects:

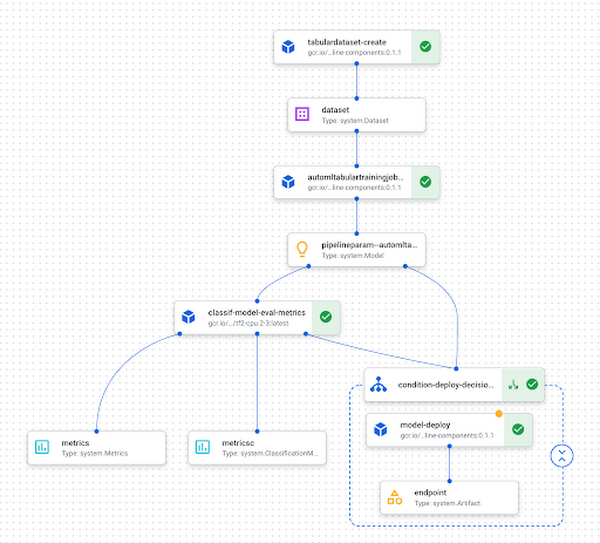
Finally, you can see the pipeline running in Vertex AI. Here’s an example of what a completed pipeline run looks like:

What’s next?
In this post I showed you how to trigger your pipeline when new data is added to a BigQuery table. To learn more about the different products I covered here, check out these resources:
Do you have comments on this post or ideas for more ML content you’d like to see? Let me know on Twitter at @SRobTweets.
[1] Note that if you’d like to run your pipeline on a recurring schedule you can use the create_schedule_from_job_spec method as described in the docs. This will create a Cloud Scheduler job that runs your pipeline at the specified frequency, rather than running it only in response to changes in your Cloud environment.
Thank you to Marc Cohen and Polong Lin for their feedback on this post.


