Django ORM support for Cloud Spanner is now Generally Available
Vikash Singh
Software Engineer, GCP Databases
Try Google Cloud
Start building on Google Cloud with $300 in free credits and 20+ always free products.
Free trialToday we're happy to announce GA support for Google Cloud Spanner in the Django ORM. The django-google-spanner package is a third-party database backend for Cloud Spanner, powered by the Cloud Spanner Python client library. The Django ORM is a powerful standalone component of the Django web framework that maps Python objects to relational data. It provides a nice Pythonic interface to the underlying database, and includes tools for automatically generating schema changes and managing schema version history. With this integration, Django applications can now take advantage of Cloud Spanner's high availability and consistency at scale.
We'll follow the Django tutorial below to create a new project and start writing data to Cloud Spanner. This is a follow up to the "Introducing Django ORM support for Cloud Spanner" blog post, which we published during the Beta launch. We have updated the tutorial to work with the Django 3.2 library.
If you're already using Django with another database backend you can skip down to "Migrating an existing Django project to Cloud Spanner" for instructions on switching to Cloud Spanner. You can also read the documentation here, and follow the repository here.
Changes since the Beta release
The library supports Django version 2.2.x, and 3.2.x. Both versions are long-term support (LTS) releases for the Django project. The minimum required Python version is 3.6.
NUMERIC data type support is now available. We have also added support for JSON object storage and retrieval with Django 3.2.x support, but querying inside the JSONfield is not supported in the current django-google-spanner release. This feature is being worked on and can be tracked here.
Support for PositiveBigIntegerField, PositiveIntegerField and PositiveSmallIntegerField were added along with relevant check constraints.
Installation
To use django-google-spanner, you'll need a working Python installation and Django project. The library requires Django~=2.2 or Django~=3.2 and Python>=3.6. If you're new to Django, see the Django getting started guide specific to the Django version you are using. For the tutorial below we will be using Django~=3.2 but the process is similar for Django~=2.2 as well.
You'll also need an active Google Cloud project with the Cloud Spanner API enabled. For more details on getting started with Cloud Spanner see the Cloud Spanner getting started guide.
Django applications are typically configured to use a single database. If you're an existing Cloud Spanner customer, you should already have a database suitable for use with your Django application. If you don't already have a Cloud Spanner database, or want to start from scratch for a new Django application, you can create a new instance and database using the Google Cloud SDK:To install the Cloud Spanner database backend package:
Next, start a new Django project:
django-google-spanner provides a Django application named django_spanner. To use the Cloud Spanner database backend, this application needs to be the first entry in INSTALLED_APPS in your application's settings.py file:
The django_spanner application changes the default behavior of Django's AutoField so that it generates random (instead of automatically incrementing sequential) values. We do this to avoid a common anti-pattern in Cloud Spanner usage.
Configure the database engine by setting the project, instance, and database name:
To run your code locally during development and testing, you'll need to authenticate with Application Default Credentials, or set the GOOGLE_APPLICATION_CREDENTIALS environment variable to authenticate using a service account. This library delegates authentication to the Cloud Spanner Python client library. If you're already using this or another client library successfully, you shouldn't have to do anything new to authenticate from your Django application. For more information, see the client libraries documentation on setting up authentication.
Working with django-google-spanner
Under the hood, django-google-spanner uses the Cloud Spanner Python client library, which communicates with Cloud Spanner via its gRPC API. The client library also manages Cloud Spanner session lifetimes, and provides sane request timeout and retry defaults.
To support the Django ORM, we added an implementation of the Python Database API Specification (or DB-API) to the client library in the google.cloud.spanner_dbapi package. This package handles Cloud Spanner database connections, provides a standard cursor for iterating over streaming results, and seamlessly retries queries and DML statements in aborted transactions. In the future we hope to use this package to support other libraries and ORMs that are compatible with the DB-API, including SQLAlchemy.
Django ships with a powerful schema version control system known as migrations. Each migration describes a change to a Django model that results in a schema change. Django tracks migrations in an internal django_migrations table, and includes tools for migrating data between schema versions and generating migrations automatically from an app's models. django-google-spanner provides backend support for Cloud Spanner by converting Django migrations into DDL statements – namely CREATE TABLE and ALTER TABLE – to be run at migration time.
Following the Django tutorial, let's see how the client library interacts with the Cloud Spanner API. The example that follows starts from the "Database setup" step of Tutorial 2, and assumes you've already created the mysite and polls apps from the first part of the tutorial.
After configuring database backend as described above, we can run the initial migrations for the project:
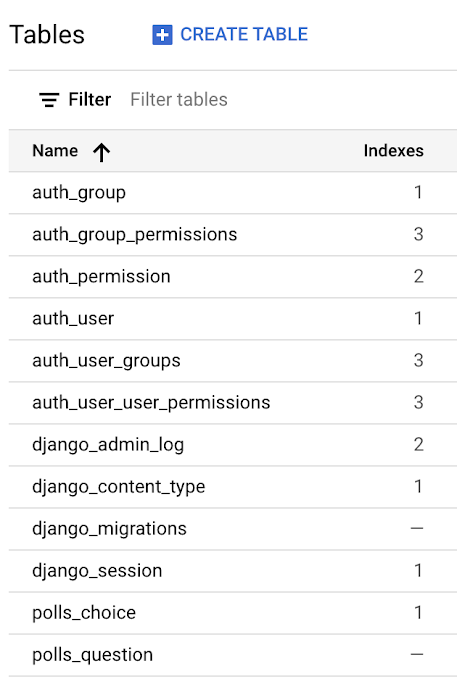
After running the migrations, we can see the tables and indexes Django created in the GCP Cloud Console:
Alternatively, we can inspect information_schema.tables to display the tables Django created using the Google Cloud SDK:
Note that this will display Spanner-internal tables too, including SPANNER_SYS and INFORMATION_SCHEMA tables. These are omitted in the example above.
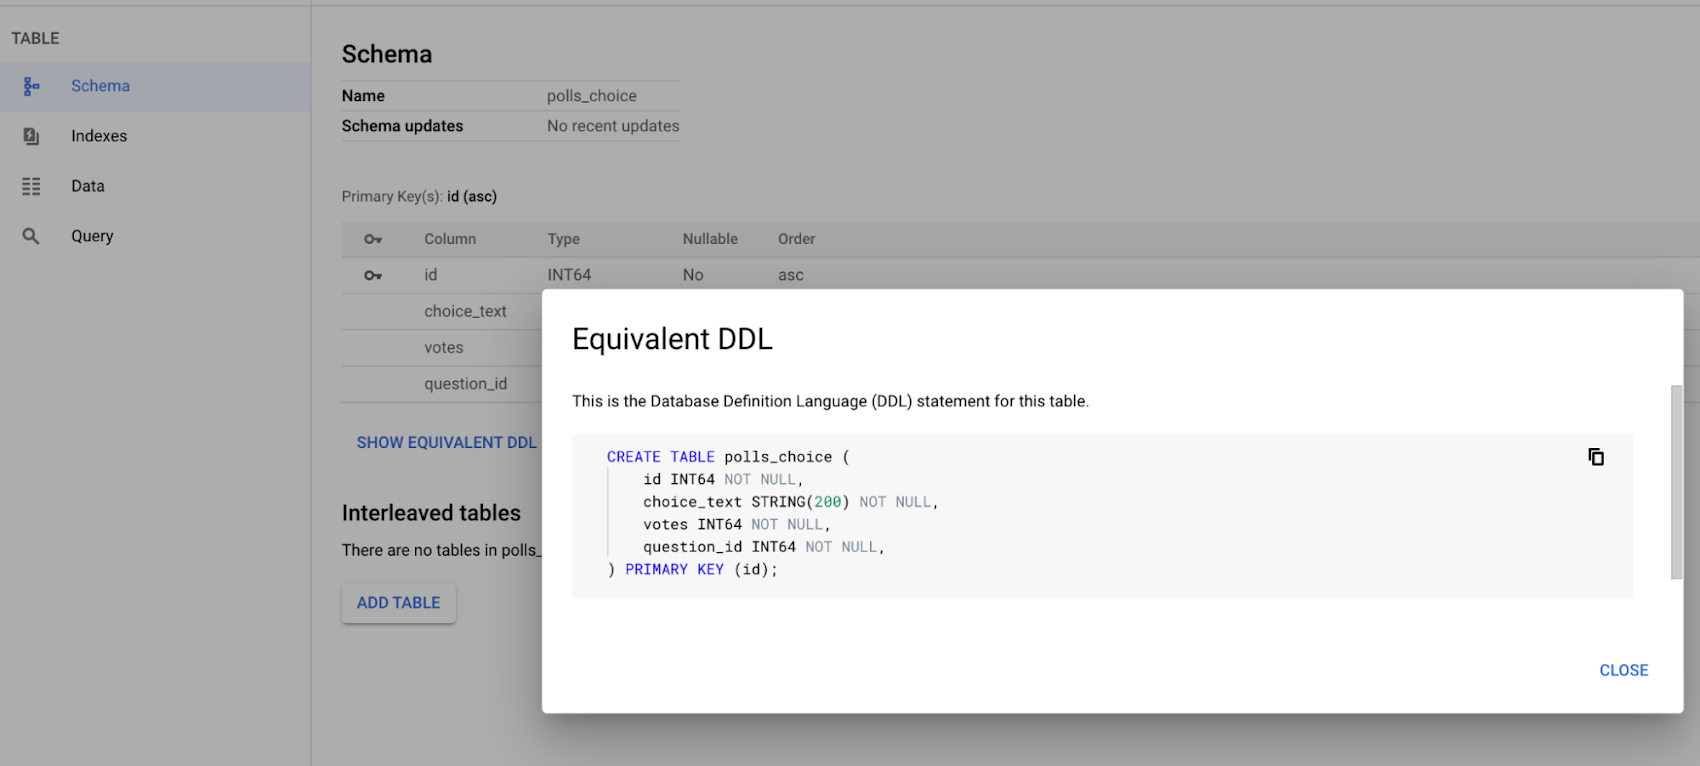
Check the table schema of any table in GCP cloud console by clicking the SHOW EQUIVALENT DDL link on the table detail page in the Cloud Console:
Now, following the Playing with the API section of the tutorial, let's create and modify some objects in the polls app and see how the changes are persisted in Cloud Spanner. In the example below, each code segment from the tutorial is followed by any SQL statements executed by Django, and a partial list of resulting Cloud Spanner API requests, including their arguments.
To see the generated SQL statements yourself, you can enable the django.db.backends logger.
Query the empty Questions table
This code results in the SQL statement:
We have skipped the internal Cloud Spanner API calls that are made, those details can be found in our earlier blog post.
Create and save a new Question object
This code results in the SQL statement:
Modify an existing Question
This code results in the SQL statement:
Migrating an existing Django project to Cloud Spanner
To migrate a Django project from another database to Cloud Spanner, we can use Django's built-in support for multiple database connections. This feature allows us to connect to two databases at once; to read from one and write to another.
Suppose you want to move your application's data from SQLite to Cloud Spanner. Assuming the existing database connection is already configured as "default", we can add a second database connection to Cloud Spanner. We'll call this connection "spanner":
As in the tutorial, running python manage.py migrate will create tables and indexes for all models in the project. By default, migrate will run on all configured database connections, and generate DDL specific to each database backend. After running migrate, both databases should have equivalent schemas, but the new Cloud Spanner database will still be empty.
Since Django automatically generates the schema from the project's models, it's a good idea to check that the generated DDL follows Cloud Spanner best practices. You can adjust the project's models accordingly in a separate migration after copying data into Cloud Spanner.
There are several options for copying data into Cloud Spanner, including using HarbourBridge to import data from a PostgreSQL or MySQL database or Dataflow to import Avro files. Any option will work as long as the imported data matches the new schema, but the easiest (if not the fastest) way to copy data between databases is by using Django itself.
Consider the models we created in the tutorial. In this code snippet, we read all Questions and Choices from the SQLite database and then write them to Cloud Spanner:
For each row in each table in the existing database, we:
- Read the row and store it in memory as a Django model object
- Unset the primary key, and
- Write it back to the new database, at which point it gets assigned a new primary key.
Note that we need to update foreign keys to use the newly-generated primary keys too. Also note that we call question.choice_set.all() before we change question's primary key – otherwise the QuerySet would be evaluated lazily using the wrong key!
This is a naive example; meant to be easy to understand, but not necessarily fast. It makes a separate "SELECT … FROM polls_choice" query for each Question. Since we know ahead of time that we're going to read all Choices in the database, we can reduce this to a single query with Choice.objects.all().select_related('question'). In general, it should be possible to write your migration logic in a way that takes advantage of your project's schema, e.g. by using bulk_update instead of a separate request to write each row. This logic can take the form of a code snippet to be run in the Django shell (as above), a separate script, or a Django data migration.
After migrating from the old database to Cloud Spanner, you can remove the configuration for the old database connection and rename the Cloud Spanner connection to "default":
Limitations
Note that some Django database features are disabled because they're not compatible with the Cloud Spanner API. As Django ships with a comprehensive test suite, you can look at the list of Django tests that we skip for a detailed list of Django features that aren't yet supported by python-spanner-django.
Customers using the Cloud Spanner Emulator may see different behavior than the Cloud Spanner service, for instance because the emulator doesn't support concurrent transactions. See the Cloud Spanner Emulator documentation for a list of limitations and differences from the Cloud Spanner service.
We recommend that you go through the list of additional limitations of Spanner and django-google-spanner both before deploying any projects using this library. These limitations are documented here.
Getting involved
We'd love to hear from you, especially if you're using the Cloud Spanner Python client library with a Django application now, or if you're an existing Cloud Spanner customer who is considering using Django for new projects. The project is open source, and you can comment, report bugs, and open pull requests on Github.