How to protect your site from DDoS attacks with the power of Google Cloud networking and network security
Marc Howard
Staff Software Engineer
Max Saltonstall
Developer Advocate
Google Cloud constantly innovates and invests significantly in our capabilities to stop cyberattacks such as distributed denial-of-service attacks from taking down websites, apps, and services. It’s an essential part of protecting our customers.
Our Project Shield offering, which uses Google's Cloud networking and our Global Front End infrastructure to help defend against attacks, including stopping one of the world's largest distributed denial-of-service (DDoS) attacks to date, uses elements of our Cloud Armor, Cloud CDN, and Load Balancing services. It combines them into a robust defense platform that can help keep key public-interest websites online in the face of constant attacks.
While Project Shield is designed for customers at high risk of DDoS attacks, such as news media, election and voting infrastructure, and human rights organizations, enterprise customers can also tap the power of Google Cloud networking and network security. Google Cloud can help you protect workloads anywhere on the web, just like Project Shield does, using the same defense platform to help protect your app, website, or API. Here’s how.
Denying the denial
DDoS is a serious threat, and can take down your service — no special access or compromise required. These attacks could come from anywhere in the world, and are hard to track. They frequently use botnets made up of compromised machines (and sometimes light bulbs). The attacks look like normal network traffic, except they are blazingly fast, with hundreds of millions of malicious requests per second.


Some of the DDoS attacks that we see here at Google. Over the last decade, the size and frequency of attacks has continued to grow.
Protecting your service requires separating legitimate traffic from attack traffic; you still have to process every request, no matter its origin. We want you to be able to focus on delivering value to your audience instead of trying to beat the request escalation. To do so, successful defenses have to be able to scale up to more than your total actual traffic.
How to get started
Older defensive techniques have proven inadequate over time. Firewalls struggle to block requests when they come from seemingly legitimate sources. Filtering traffic yourself requires a huge investment in infrastructure, which is expensive and drains resources you’d prefer to put to better use.
It only takes a few minutes to protect your site with Google Cloud networking and network security offerings. Our tools can mitigate attacks using our latest machine learning (ML)-based defenses, and cache your content so it can reach users faster while lowering the burden on your hosting servers. While your content can live anywhere, the protections are going to involve using Google Cloud's Load Balancer, Content Delivery Network, Cloud Armor and potentially Adaptive Protection.
There are two ways to set up these defenses for your organization. You can follow our below outlined guidance through the Google Cloud console interface, or you can run this Terraform script (with a few edits.)
Here is a step-by-step guide on how you can protect your service using the Google Cloud console interface:
-
Start with a Google Cloud project.
-
If your content is already hosted on Google Cloud, you can reuse the same project.
-
You'll need to enable APIs for:
-
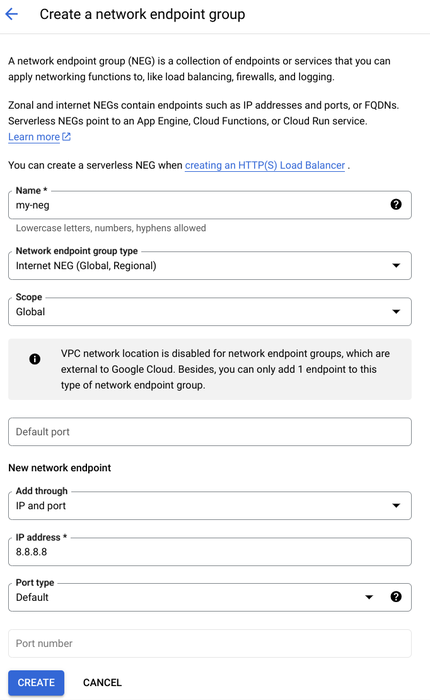
Create a simple proxy to find your content, called a network endpoint group. You have some fields to fill out.
-
Give it a name.
-
You can choose to point to a fully qualified domain name or an IP address under 'New network endpoint'.
-
Use your website's IP and port here (rather than the example below of 8.8.8.8). This step tells the load balancer where to fetch content from when requests come in.
-
Click Create.
-
Next we'll create a new Load Balancer (Global Front End) using the following choices (all are default options, so you can click Next four times):
-
Application load balancer
-
Public facing (external)
-
Best for global workloads
-
Global external Application Load Balancer
-
Give the load balancer a name.
-
Specify where the traffic will go.
-
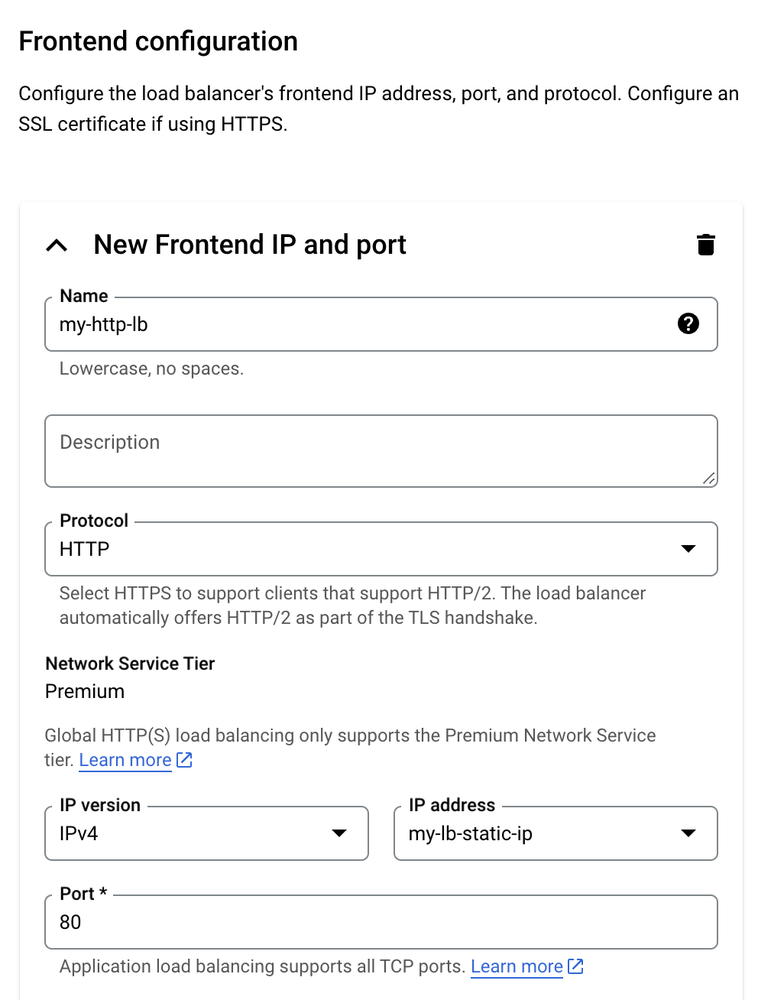
Give the frontend a name, and choose Create IP Address (no more expensive than Ephemeral, and allows you to point traffic at it consistently)
-
Use that IP for your Frontend Load Balancer setup, which will look similar to slide (2).
-
Next add the Backend service
-
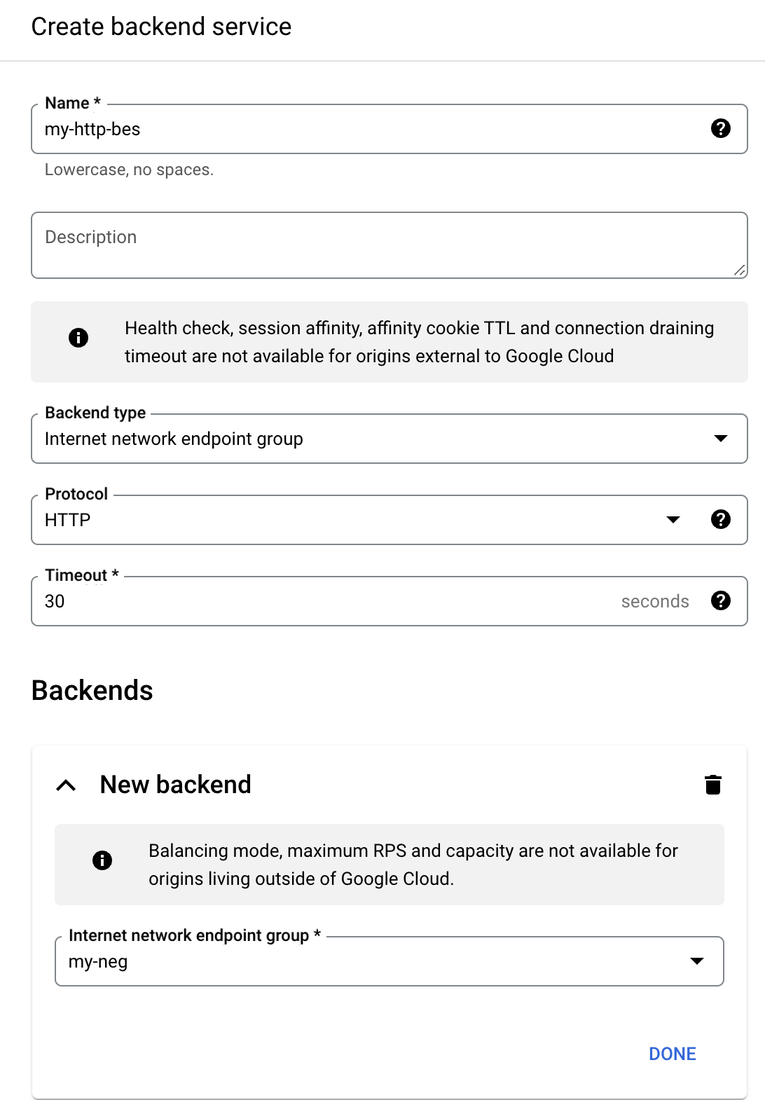
Click Create a Backend Service.
-
Give it a name.
-
Choose backend type: Internet network endpoint group. This container holds the info that the Load Balancer uses to connect to a location somewhere on the internet.
-
Under 'New Backend' click to see a list of network endpoint groups, and the one we made above should show up. Pick that.
-
Make sure that Enable Cloud CDN is checked (it should be) because we need that later.
-
Cache mode defaults are fine. Cache static content means Cloud CDN will cache static content (such as Images and PDFs) if no explicit cache-control header is given, and will otherwise respect cache-control headers.
-
You can leave Security settings at their defaults and come back to modify Cloud Armor rules later in that UI.
-
For the Cloud Armor edge security policy, you can add rules that will take effect before traffic gets to Cloud CDN in case you need to protect your backends from specific sources (such as known attackers, specific geographic regions, and high volume.) You can also add these rules later in the Cloud Armor UI.
-
Click Create to finish adding the backend service to the load balancer.
-
Click Create at the bottom of the page to set up your new Load Balancer.
-
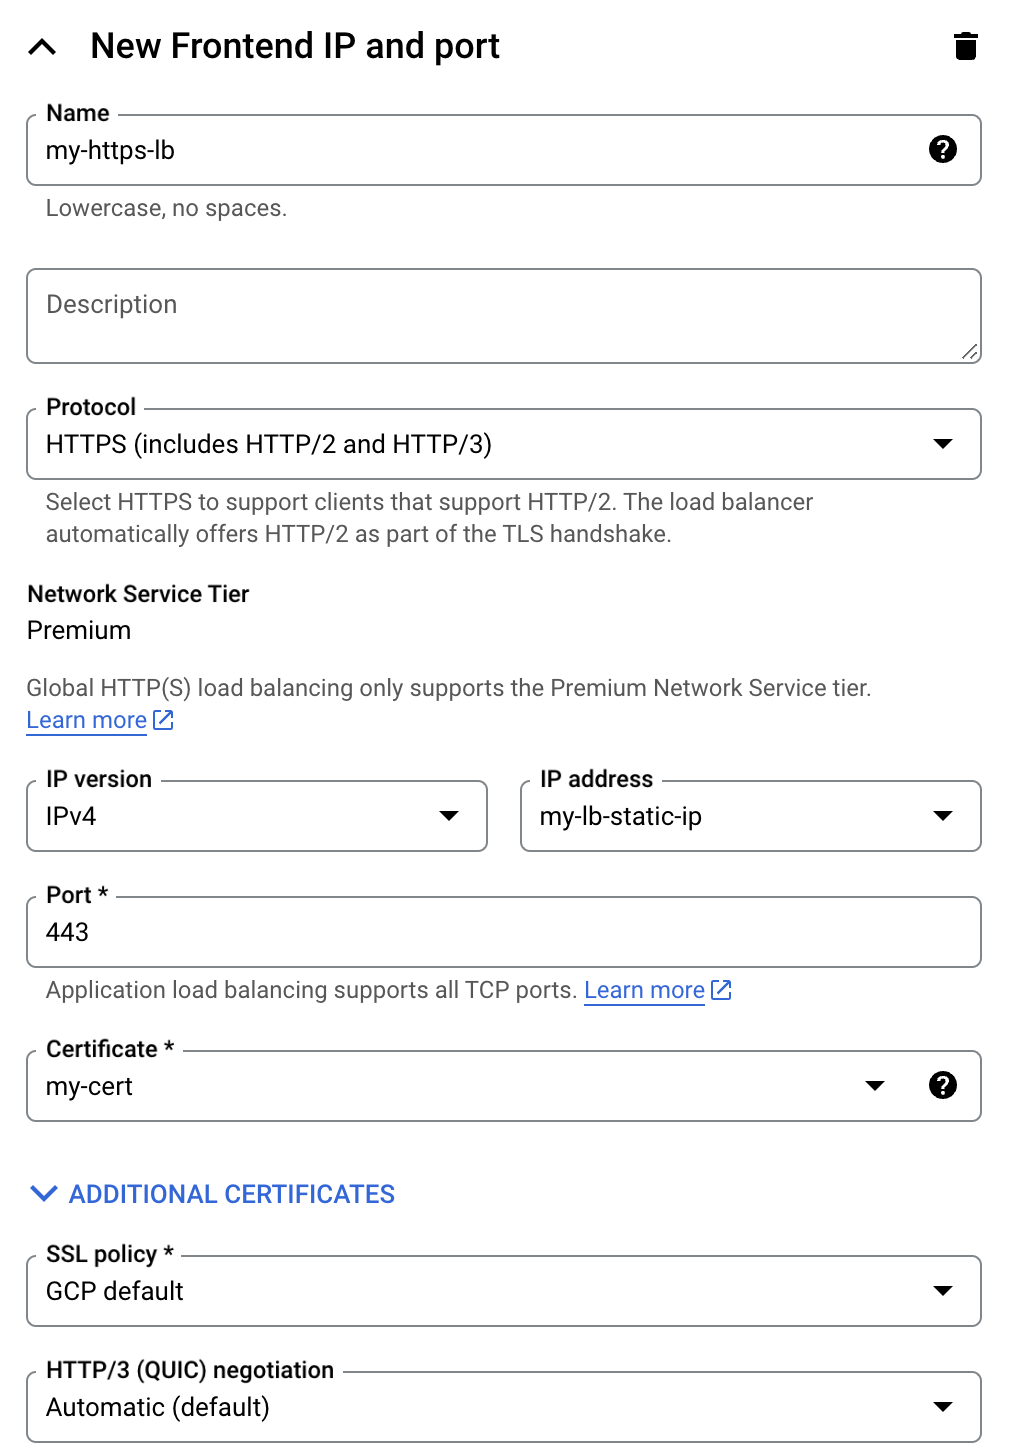
Repeat steps 4 to 7 for HTTPS, using the same static IP as your HTTP load balancer.
-
Select Google-Managed certificates, or upload your own certificates. If you use Google-Managed certificates, follow the instructions to create a CNAME record to provision the certificate.
-
You can use a second security policy, or select the same security policy you created for your HTTP load balancer to simplify your defense configuration.
-
Now that has been configured, you can point your traffic to your new load balancer. Remember to change your DNS settings for your domain to point to the new static IP you created above.
-
[Optional] If you want ML-based protections for your backend, you can do it with a few more clicks:
-
Enroll in the Paygo Cloud Armor Service Tier (or subscribe for yearly savings with Annual).
-
Go to your Cloud Armor policies.
-
Click into your policy.
-
Click Edit.
-
Under Adaptive Protection click the Enable box.
-
Click Update.
-
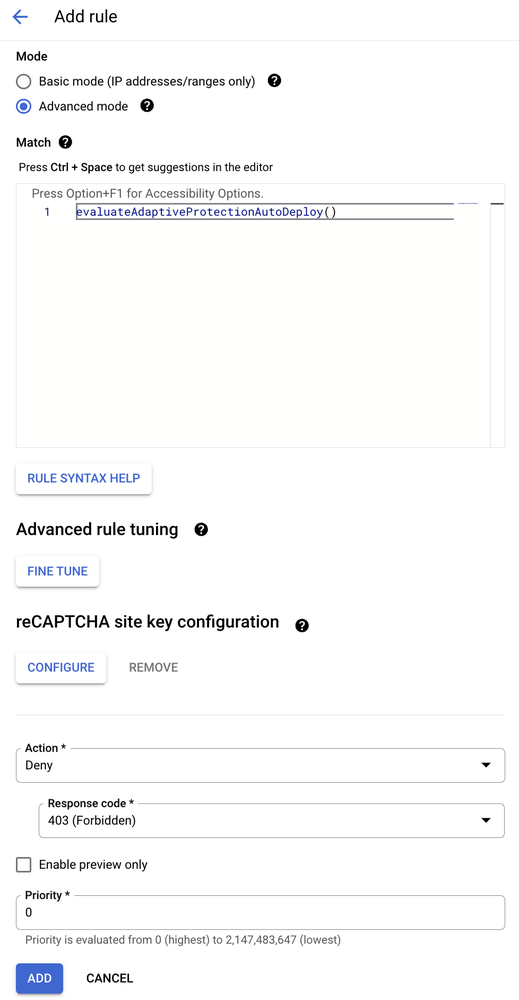
Click Add rule.
-
Select Advanced Mode and enter evaluateAdaptiveProtectionAutoDeploy()
-
Enter 0 for priority (or any other low number to use the rule at high priority.)
-
Click Add.
-
Now Google Cloud can adapt to attack patterns and take care of the cat-and-mouse game for you, using what we learn about attack patterns and normal traffic.
Optimizing your caching layer
Cloud CDN provides caching, giving your backend a break by allowing traffic to resolve at the Google edge (which will also bring lower latency.) That helps defend against broad, shallow DDoS attacks, and you can activate it very easily on your load balancers.
The cache-control headers that your backend serves will guide our cache, though we can also allow for default caching of static resources such as images even in the absence of headers. Using a short Time-To-Live (TTL) can provide a big benefit in mitigating floods of requests, while still preserving freshness. Even starting with ”one second” as your TTL will help avoid backend overload.
Get started today
To try this out today, pick a backend that would benefit for increased accessibility and reliability, and give it some Load Balancer and CDN love, then watch the happiness go up. Protection-as-a-service, with less headache and more time to focus on the joy.
Read more about key topics at:
