Intro to text classification with Keras: automatically tagging Stack Overflow posts
Sara Robinson
Software Engineer
Josh Gordon
Developer Advocate
As humans, our brains can easily read a piece of text and extract the topic, tone, and sentiment. Up until just a few years ago, teaching a computer to do the same thing required extensive machine learning expertise and access to powerful computing resources. Now, frameworks like TensorFlow are helping to simplify the process of building machine learning models, and making it more accessible to developers with no background in ML.
You can find the complete code for this post on GitHub.
Getting the comment data
Data is at the core of any machine learning problem. To build our text classification model, we’ll need to train it on a large dataset of Stack Overflow questions. After training our model, we’ll also need a test dataset to check its accuracy with data it has never seen before. Our first step is getting the Stack Overflow questions and tags. This data is available in BigQuery as a public dataset.We’ll have our model classify Stack Overflow posts from the top 20 tags. To keep things simple, we only selected posts with a single tag. We’ll train the model on 2000 comments from each of the 20 tags, so our dataset will include 40,000 examples in total. We’ll reserve 20% of this data (8,000 examples) for testing our model.
With this SQL query, we can extract our data from BigQuery (we’ll split it into training, validation, and test sets later). You can also view the query on GitHub.
The data in BigQuery looks like this:

BigQuery makes it easy to download the output of this query as a CSV by clicking on the “Download as CSV” option above our results:

Now that we have our data in a CSV file, we’re ready to format it for our model.
Bag of words model
Preprocessing dataWe’ll use a simple Bag of Words model to classify questions. This type of model takes the collection of words in each post as input. It will be able to determine whether each word appears in a post, but it won’t understand grammar or sequence (think of the inputs as a bag of Scrabble tiles, where each tile represents a word). For example, our model will be able to understand that the words “screen” and “listview” are frequently tagged as Android, but it won’t know anything about the order in which they frequently appear.
Processing input features
Our input data is the post title and body, but we can’t feed text directly into our model. Instead, we need to put it into numeric representation, which is a format the model can understand. To do this, we’ll create an array of the top words in our vocabulary. A comment will be represented by a dense vector of our vocabulary size, with a 0 or 1 indicating the absence or presence of a given word from the vocabulary in a comment. Let’s say our vocabulary consisted of five words represented by the following array:
The input vector for the sentence “How to make a ListView in Android Studio” would look like the following, with the indices of each of the three words in our example sentence represented by a 1 in their corresponding index in our vocabulary:
Since our dataset of Stack Overflow posts has over 100,000 unique words in the vocabulary, we’ll limit the vocab size for our model to the top 1000 most commonly used words (this is a parameter you can experiment with). First we’ll use Pandas to read our CSV file of training data:
When feeding data into our model, we’ll separate it into training and test data. The majority of our data will be used as examples that our model will use to update its weights and biases. When the model has finished training, we’ll reserve a subset of our data to test its accuracy on examples it hasn’t seen before. A typical rule for this is to use 80% of your data for training and 20% for testing. Here’s the code to split our Pandas dataframe into train and test sets:
We could write the code to create our bag of word vectors from scratch, but Keras has some built in methods for preprocessing text to make this simple. The Tokenizer class provides methods to count the unique words in our vocabulary and assign each of those words to indices. We’ll create an instance of the Tokenizer class, and then pass it the Pandas dataframe of text we want to train on. Calling fit_on_texts() automatically creates a word index lookup of our vocabulary. By passing a num_words param to the Tokenizer, it will limit our vocabulary to the top words:
With our Tokenizer, we can now use the texts_to_matrix method to create the training data we’ll pass our model. This will take each post’s text and turn it into a vocab_size “bag” array, with 1s indicating the indices where words in a question are present in the vocabulary:
Processing output labels
The tag for each question is a string (i.e. “javascript” or “php”). First, we’ll need to encode each tag as an integer. But instead of using a single int as the label for each input, we’ll turn it into a one-hot vector. If we had only 5 tags (labels) in our dataset and the label “java” was associated with the index 3, our one-hot label vector would look like this:We feed a one-hot vector to our model instead of a single integer because when we use our model for prediction, it will output a vector of probabilities for each post like the following:
scikit-learn has a LabelBinarizer class which makes it easy to build these one-hot vectors. We can pass it the labels column from our Pandas DataFrame and then call fit() and transform() on it:
With our features and labels in a format Keras can read, we’re ready to build our text classification model.
Building the model
To define the layers of our model we’ll use the Keras Sequential model API. This lets us easily define the shape of our input data and the type of layers that make up our model. We can start defining our model with one line of code:Now we’re ready to add our input layer. The input layer will take the vocab_size arrays for each comment. We’ll specify this as a Dense layer in Keras, which means each neuron in this layer will be fully connected to all neurons in the next layer. We pass the Dense layer two parameters: the dimensionality of the layer’s output (number of neurons) and the shape of our input data. Choosing the number of dimensions requires some experimentation, and there is a lot of discussion on the best approach for doing this. It’s common to use a power of 2 as the number of dimensions, so we’ll start with 512. The number of rows in our input data will be the number of posts we’re feeding the model at each training step (called batch size), and the number of columns will be the size of our vocabulary. With that, we’re ready to define the Dense input layer. The activation function tells our model how to calculate the output of a layer (you can read more about ReLU here).
Our network will have one more layer. Since it’s the last layer in our network, it’ll be our output layer. The model will take the “bag of words” for each comment and output a 20-element array indicating the probability that the question belongs to each of our 20 tags. To achieve this output the layer will use the Softmax activation function. If that sounds confusing, Softmax just means the model will normalize the evidence for each possible label into a probability (from 0 to 1), and these 20 values for a given comment will sum up to 1.
How will our model take the vocab_size input, transform it to a 512-dimensional layer, and transform that into an output layer with 20 probability neurons? The beauty of Keras is that it’ll handle those computations for us — all we need to do is tell it the shape of our input data, output data, and the type of each layer. The following code will complete our model:
We just defined our model in 5 lines of code.
Training and evaluating the model
To prepare our model for training, we need to call the compile method with the loss function we want to use, the type of optimizer, and the metrics our model should evaluate during training and testing. We’ll use the cross entropy loss function, since each of our comments can only belong to one post. The optimizer is the function our model uses to minimize loss. In this example we’ll use the Adam optimizer. There are many optimizers available, all of which are different implementations of gradient descent (read more about optimizers here). For metrics we’ll evaluate accuracy, which will tell us the percentage of comments it assigned the correct label to:To train our model, we’ll call the fit() method, pass it our training data and labels, the number of examples to process in each batch (batch size), how many times the model should train on our entire dataset (epochs), and the validation split. validation_split tells Keras what percentage of our training data to reserve for validation.
In a machine learning experiment, the goal is to generate accurate predictions on questions the model hasn’t seen before. To do this we’ll compute our model’s accuracy on our test set, which was hidden from the model during the training process:
We’re ready to run training! In this example, our model will go through our dataset 2 times. If it’s learning correctly, the loss should decrease and accuracy should increase after each epoch. Here are the logs after running training and validation over 2 epochs:
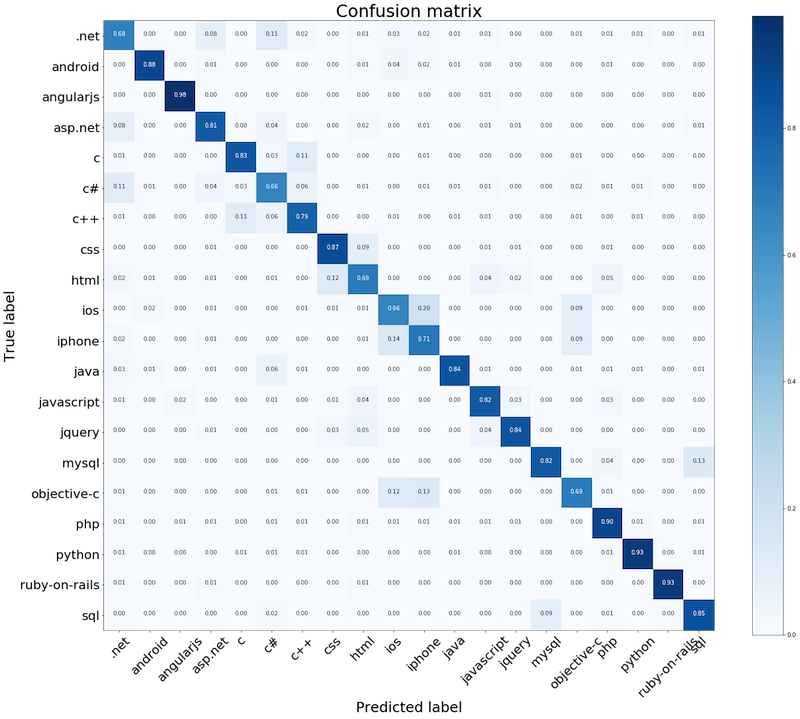
How well did the model do? A confusion matrix is a great way to see how many questions the model tagged correctly, and where mistakes were most commonly made. For example, we can see that our model had the highest accuracy on questions tagged “angularjs” and it occasionally confused questions tagged as “objective-c” with “iphone” or “ios”. This makes sense since we were only looking at questions with exactly one tag.
Generating predictions
We’ve built and trained a model and evaluated its accuracy, but we’re not quite done. Now that the model is trained, what if we want it to generate a prediction for a few examples?Here we’ll pass our model 10 posts from our test set. All we need to do to generate predictions is call predict() on our model, passing it the post converted to a bag of words matrix:
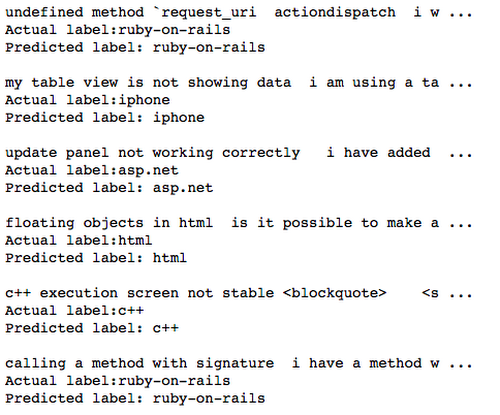
Prediction is now a 1x20 array: 1 row for the individual question and 20 columns for the softmax probability that the question belongs to each tag. For this array of probabilities generated by our model, we want to get the index of the highest value, find the tag associated with that index from our LabelBinarizer, and output the question text and predicted label:
Here’s the output from a few predictions:
Next Steps
This post introduced a simple way to represent Stack Overflow questions and build a model to classify them using the Keras API. Our emphasis here hasn’t been on accuracy. To improve that, we could experiment with various hyperparameters:- Changing the vocab size the BOW model uses
- Changing batch size, number of epochs, or the dimensionality of the input layer
- Increasing the size of our training dataset
- Adding dropout to one of our layers to prevent the model from overfitting
In the next post, we’ll approach this problem from a big data perspective. We’ll work with a much larger dataset that doesn’t fit into memory, and show how you can train a model at scale using TensorFlow Estimators, and the new Datasets API.We’d love to hear what you’re building with Keras or if there’s another topic you’d like to see covered on the blog — let us know in the comments or find us on Twitter at @SRobTweets, @random_forests, and @hereismari.