Use a GitHub repository to manage pipelines across Data Fusion instances/namespaces
De Lan
Software Engineer
Samik Gupta
Senior Software Engineer
Data engineers, do you struggle to manage your data pipelines?
As data pipelines become more complex and involve multiple team members, it can be challenging to keep track of changes, collaborate effectively, and deploy pipelines to different environments in a controlled manner.
In this post we will talk about how data engineers can manage their data fusion pipelines across instances and namespaces using the pipeline git integration feature.
Background & Overview
As enterprises move towards modernizing their businesses with digital transformation, they’re faced with the challenge to adapt to the volume, velocity, and veracity of data. The only real way to address this challenge is to iterate fast - delivering data projects sustainably, predictably and quickly. To help customers achieve this goal, Cloud Data Fusion now supports iterative data pipeline design and team-based development/version control systems (VCS) integration. In this post, we mainly focus on the Git integration feature: team-based development/VCS integration. To learn more about iterative data pipeline design in Cloud Data Fusion, see Edit Pipelines.
Nowadays, many developer tools have integrations with VCS systems. It improves development efficiency, assists CI/CD and facilitates team collaborations. With the pipeline git integration feature in Cloud Data Fusion, ETL developers are able to manage pipelines using Github, so that they can implement proper development processes, such as code reviews, promotion/demotion between environments for the pipelines. Below we will showcase these user journeys.
Before you begin
You need a Cloud Data Fusion instance with version 6.9.1 or above.
Only GitHub is supported as the git hosting provider.
Currently Cloud Data Fusion only supports personal access token (PAT) auth mechanisms. Please refer to Creating a fine-grained personal access token to create a PAT with limited permissions to read and write to the git repository.
To connect to a GitHub server from a private Cloud Data Fusion instance, you must configure network settings for public source access. For more information, see Create a private instance and Connect to a public source from a private instance.
Link a GitHub repository
The first step is to link the GitHub repository. It could be a newly created repository or an existing one. Cloud Data Fusion lets you link a GitHub repository with a namespace. Once the repository is linked with a namespace, you can push deployed pipelines from namespace to repository, or pull and deploy pipelines from repository to namespace.
To link a Github repository, follow these steps:
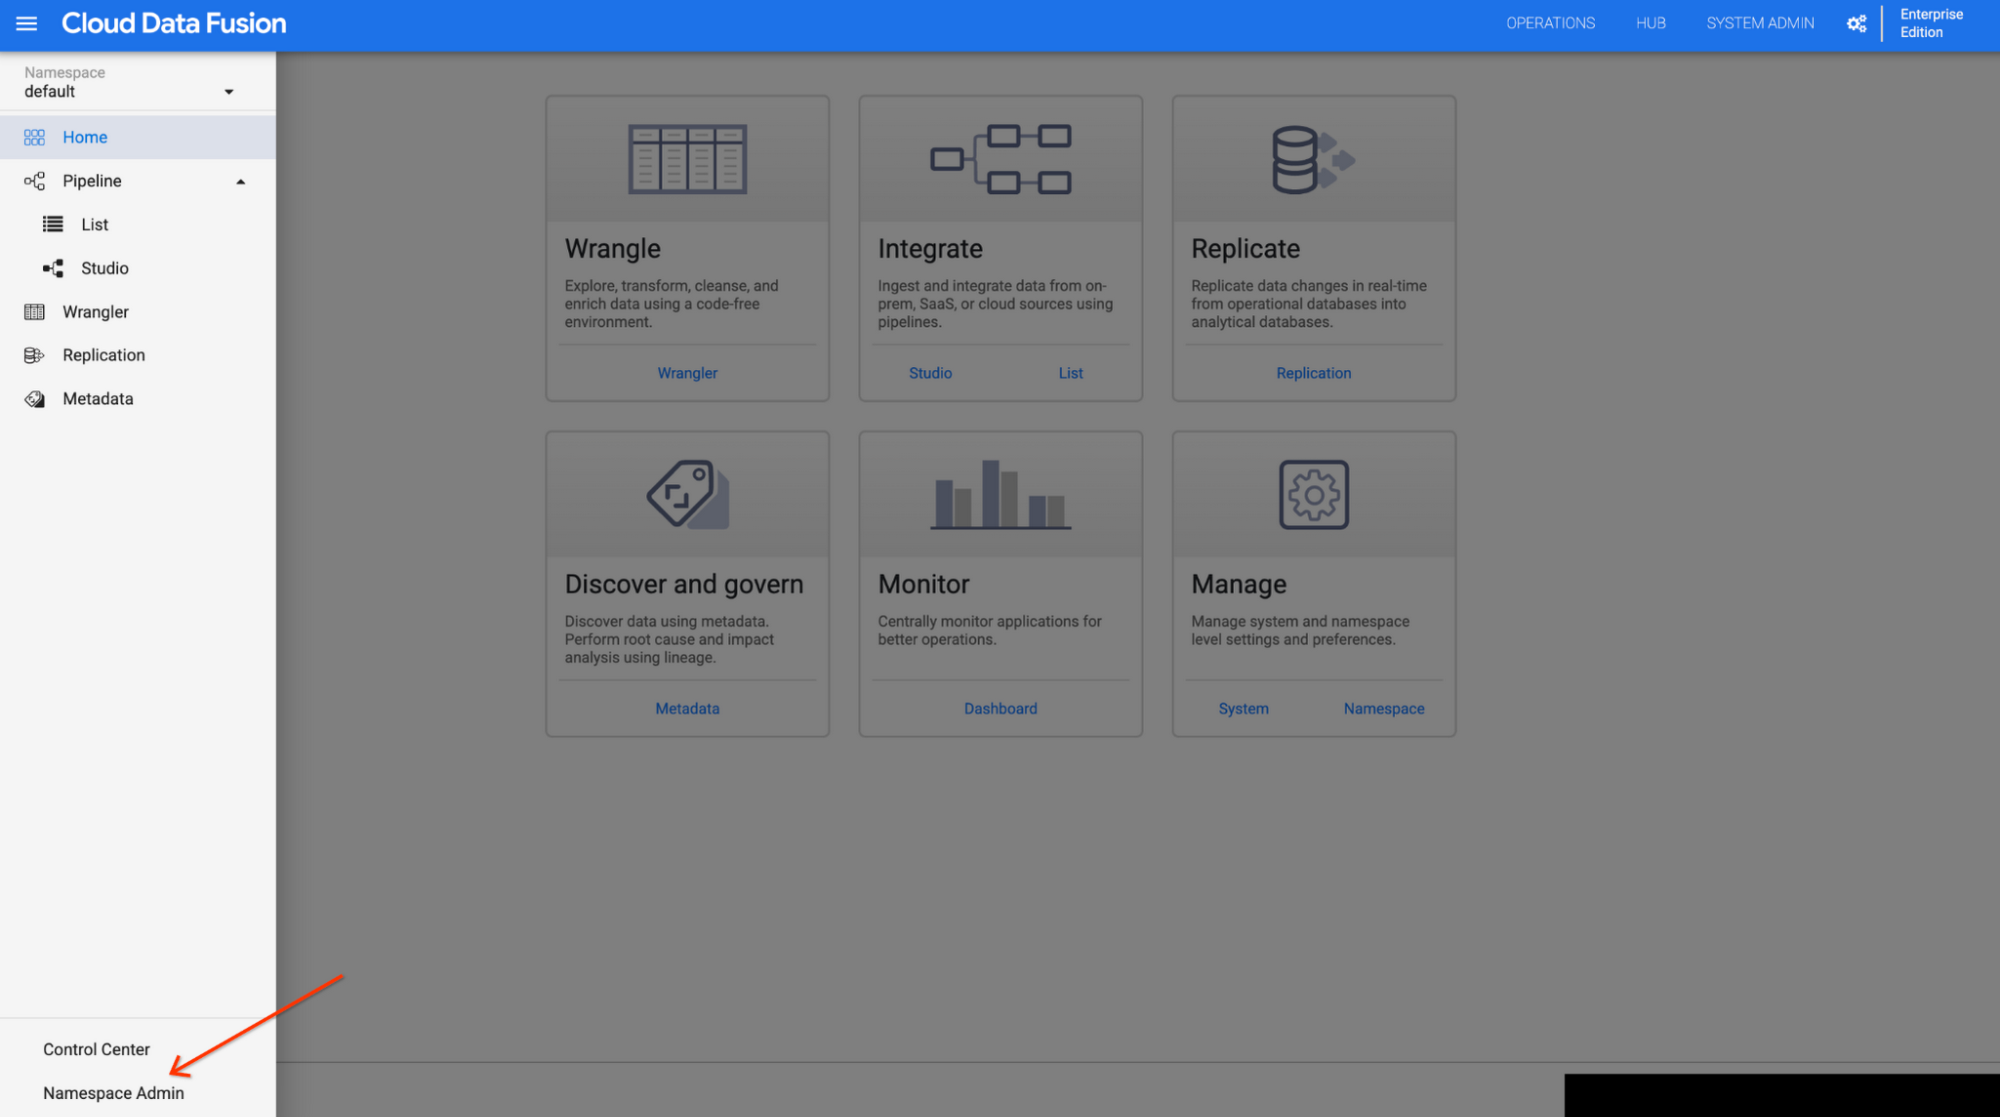
1. In the Cloud Data Fusion web interface, click hamburger Menu --> Namespace Admin.

2. On the Namespace Admin page, click the Source Control Management tab.


- Repository URL (required)
- Default branch (optional)
- Path prefix (optional)
- Authentication type (optional)
- Token name (required)
- Token (required)
- User name (optional)
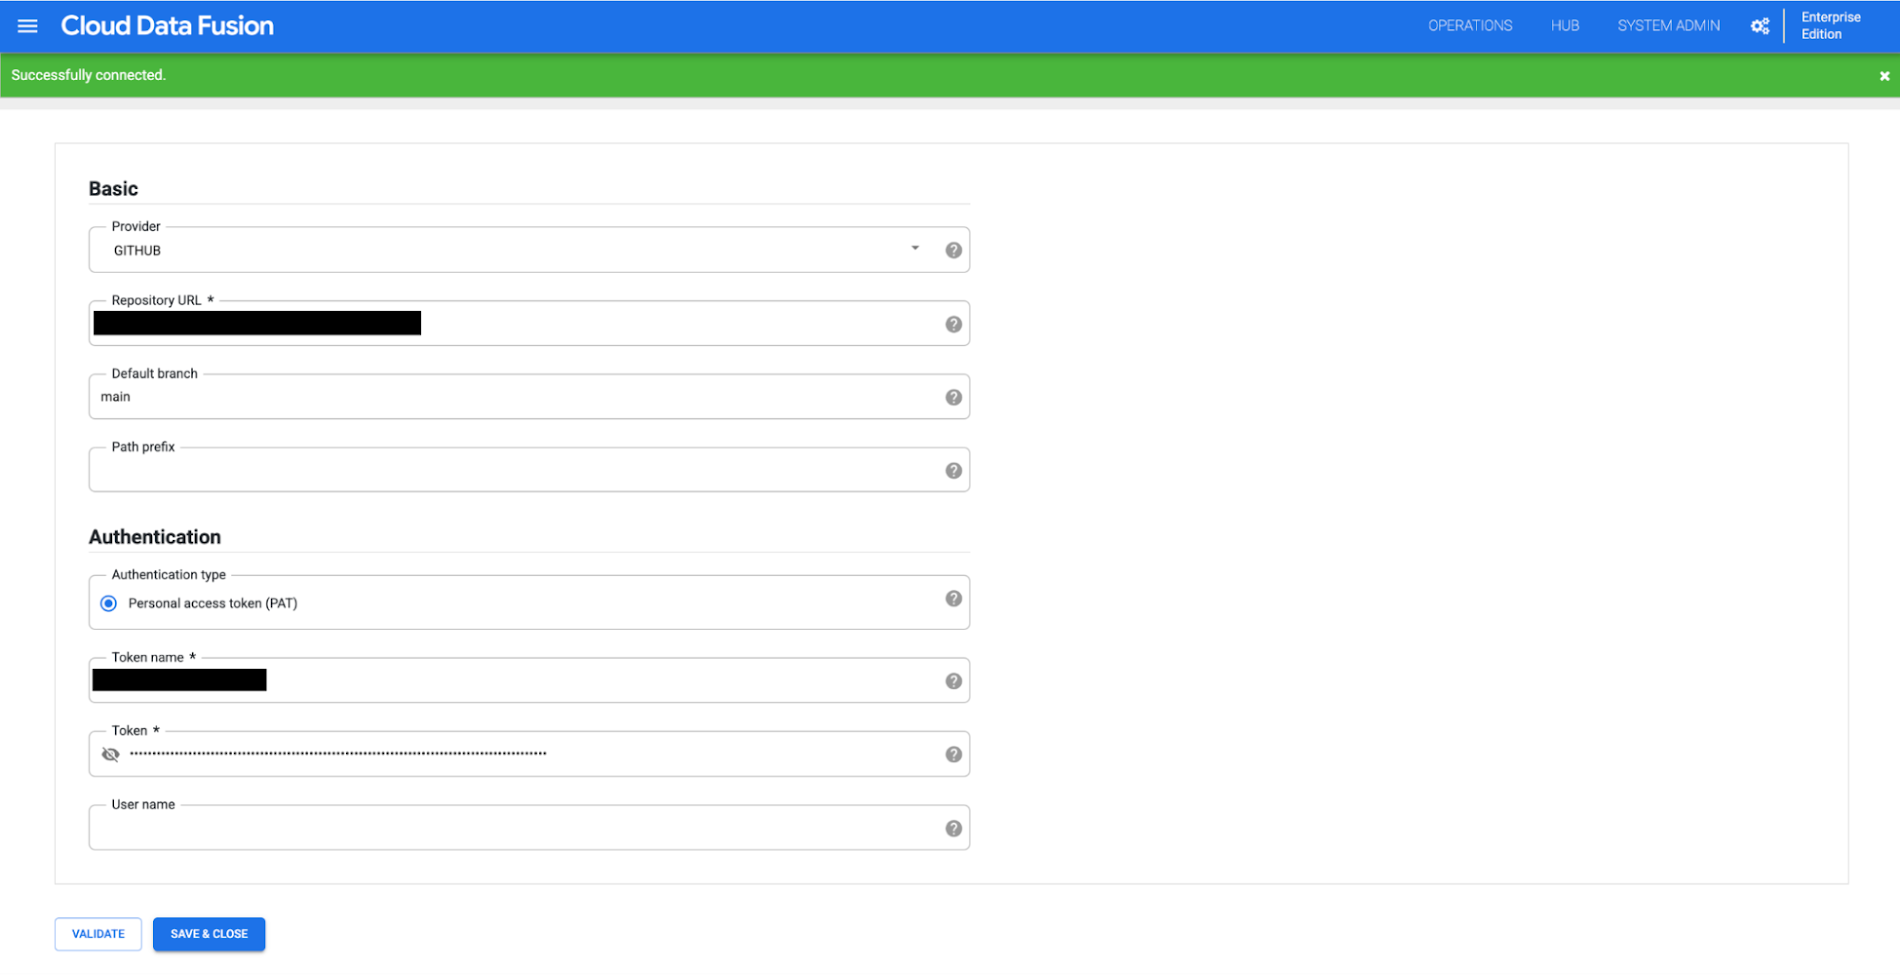

To verify the configuration click the VALIDATE button and you should see a green banner indicating a valid GitHub connection. Click the SAVE & CLOSE button to save the configuration.
4. You can always edit/delete the configuration later, as needed.
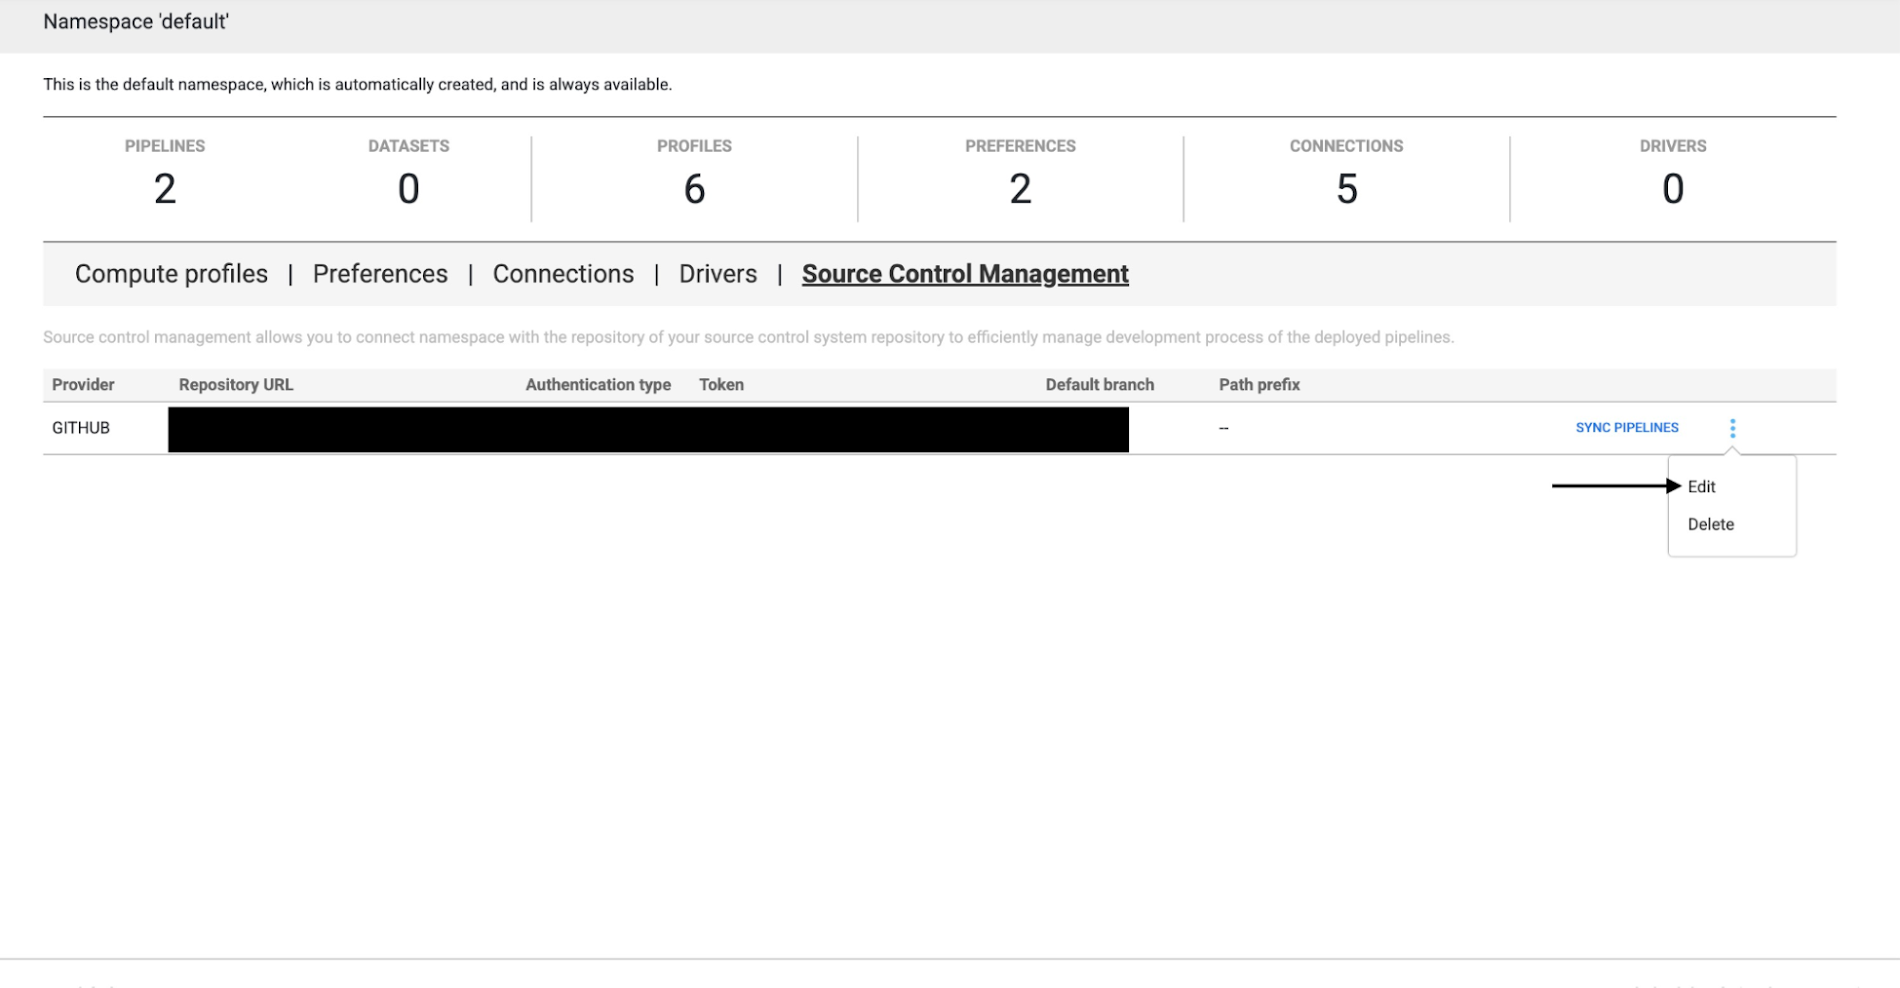

Unlinking the repository with a namespace will not delete the configurations present in GitHub
Use Case: Use linked GitHub repository to manage pipeline across instances/namespaces
Imagine Bob is an IT admin at an ecommerce company. The team has already built several data pipelines. Recently the company created a new Cloud Data Fusion instance for a newly opened company branch. Bob wants to replicate the existing pipelines from the existing instance to the new instance. In the past, Bob had to manually export and import those pipelines. It is cumbersome to do so and prone to error. With the git integration, let’s see how Bob’s workflow has improved.
Pushing pipelines to GitHub repository
In the same Source Control Management page after the above configuration, Bob can see the configured repository as below:
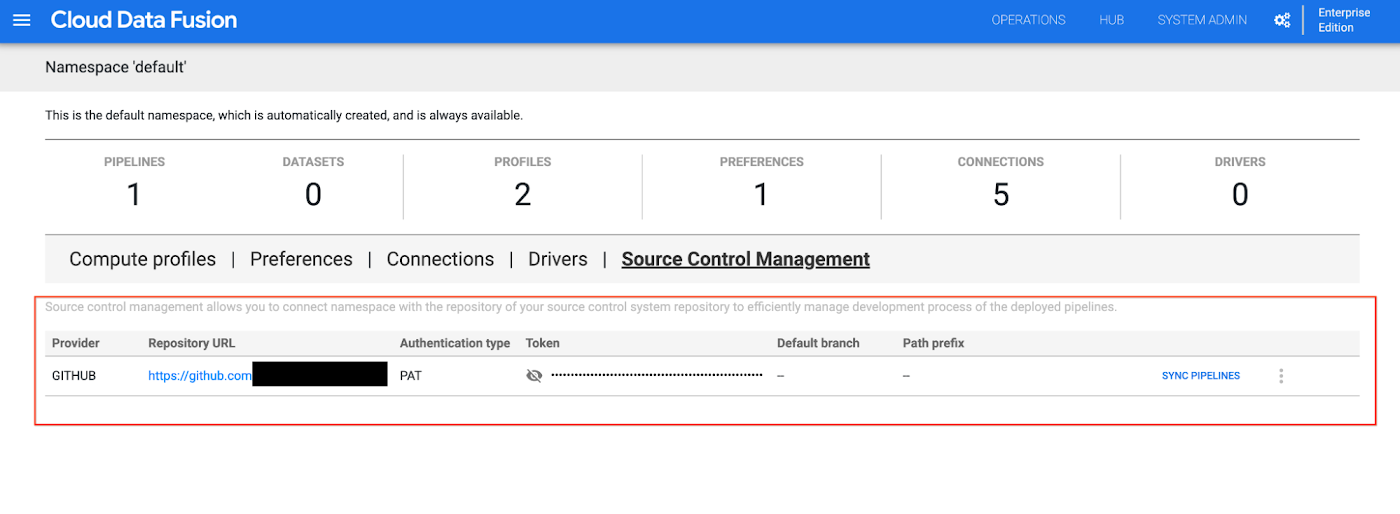

To view the deployed pipelines in the current namespace, Bob clicks SYNC PIPELINES. Then, to push the DataFusionQuickStart pipeline config to the linked repository, Bob selects the PUSH TO REMOTE checkbox by the pipeline.
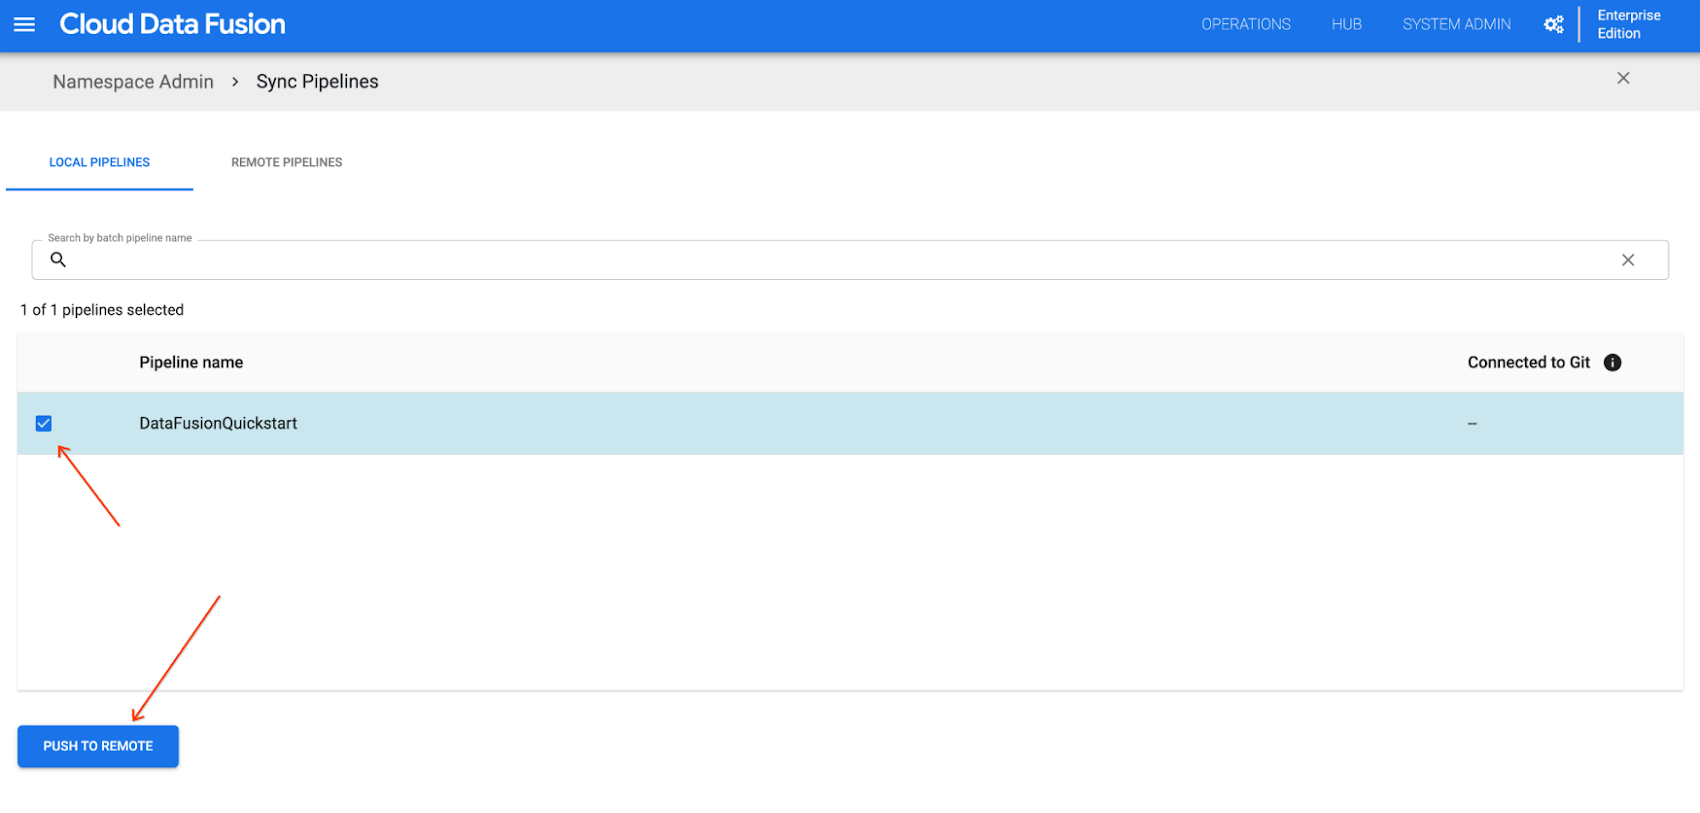

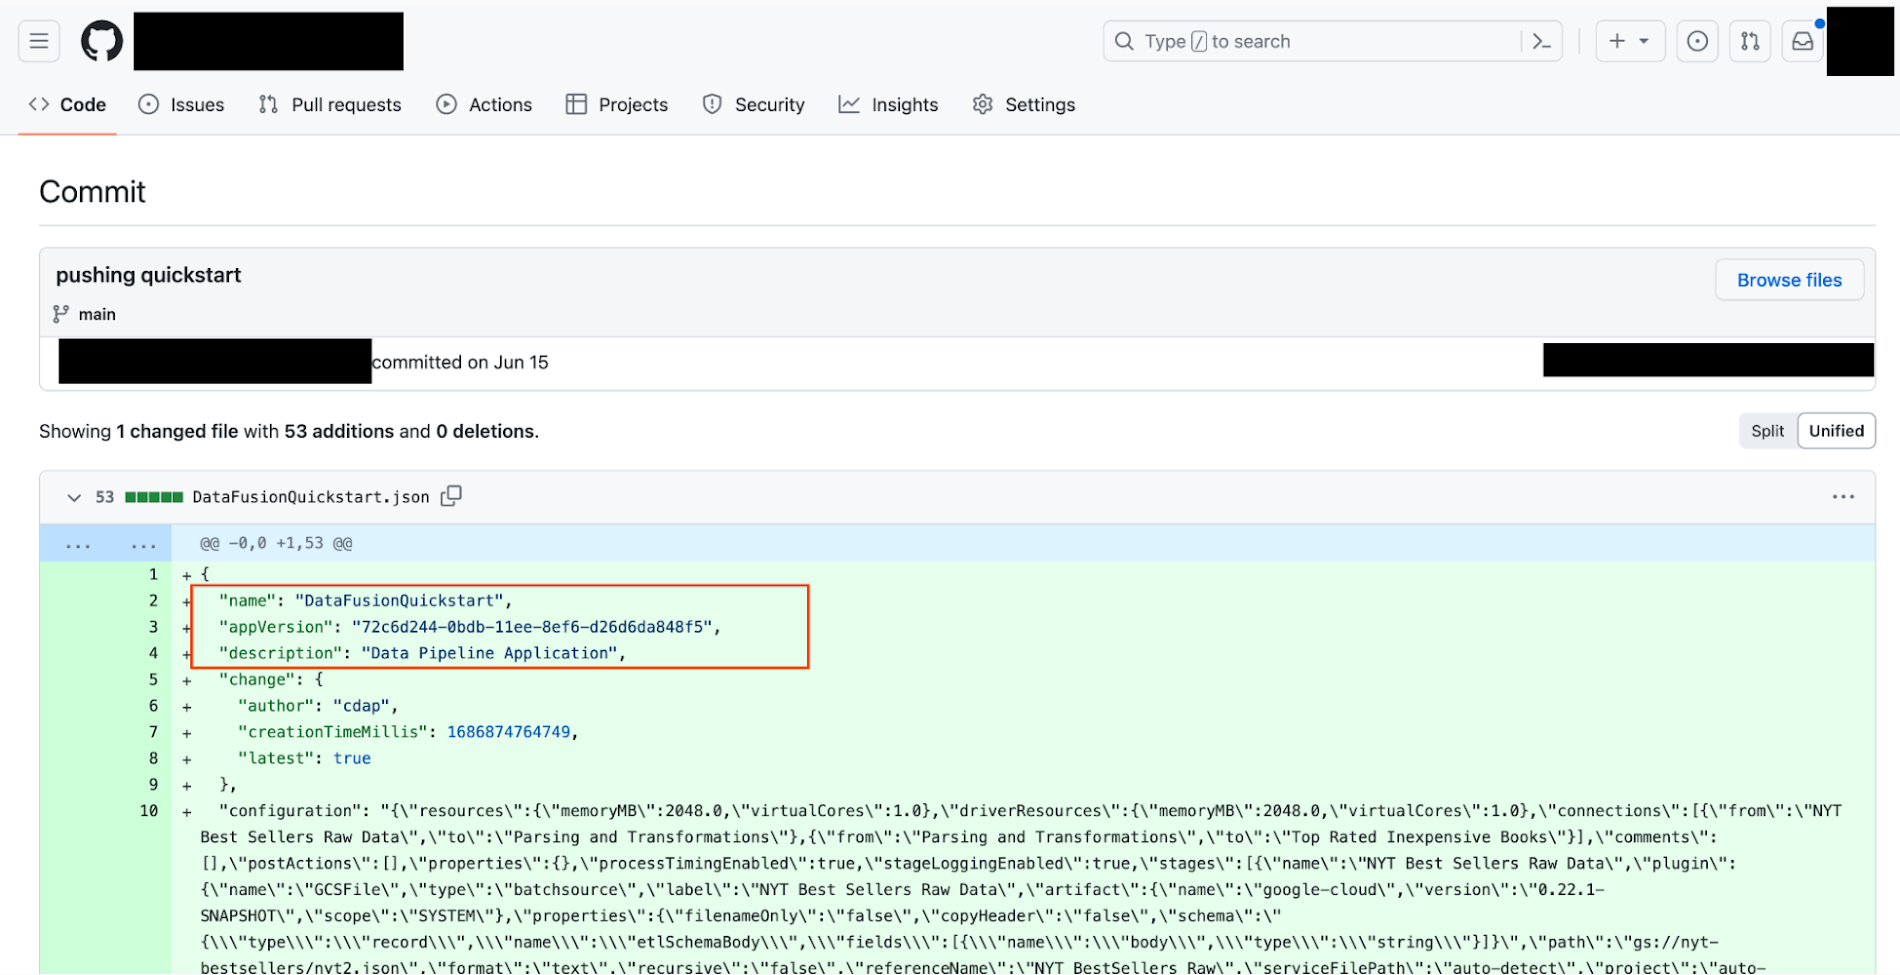
A dialog appears where Bob enters a commit message and clicks Push. They can see the pipeline is pushed successfully. Now Bob can switch to the GitHub repository page and check the pushed pipeline configuration JSON file:

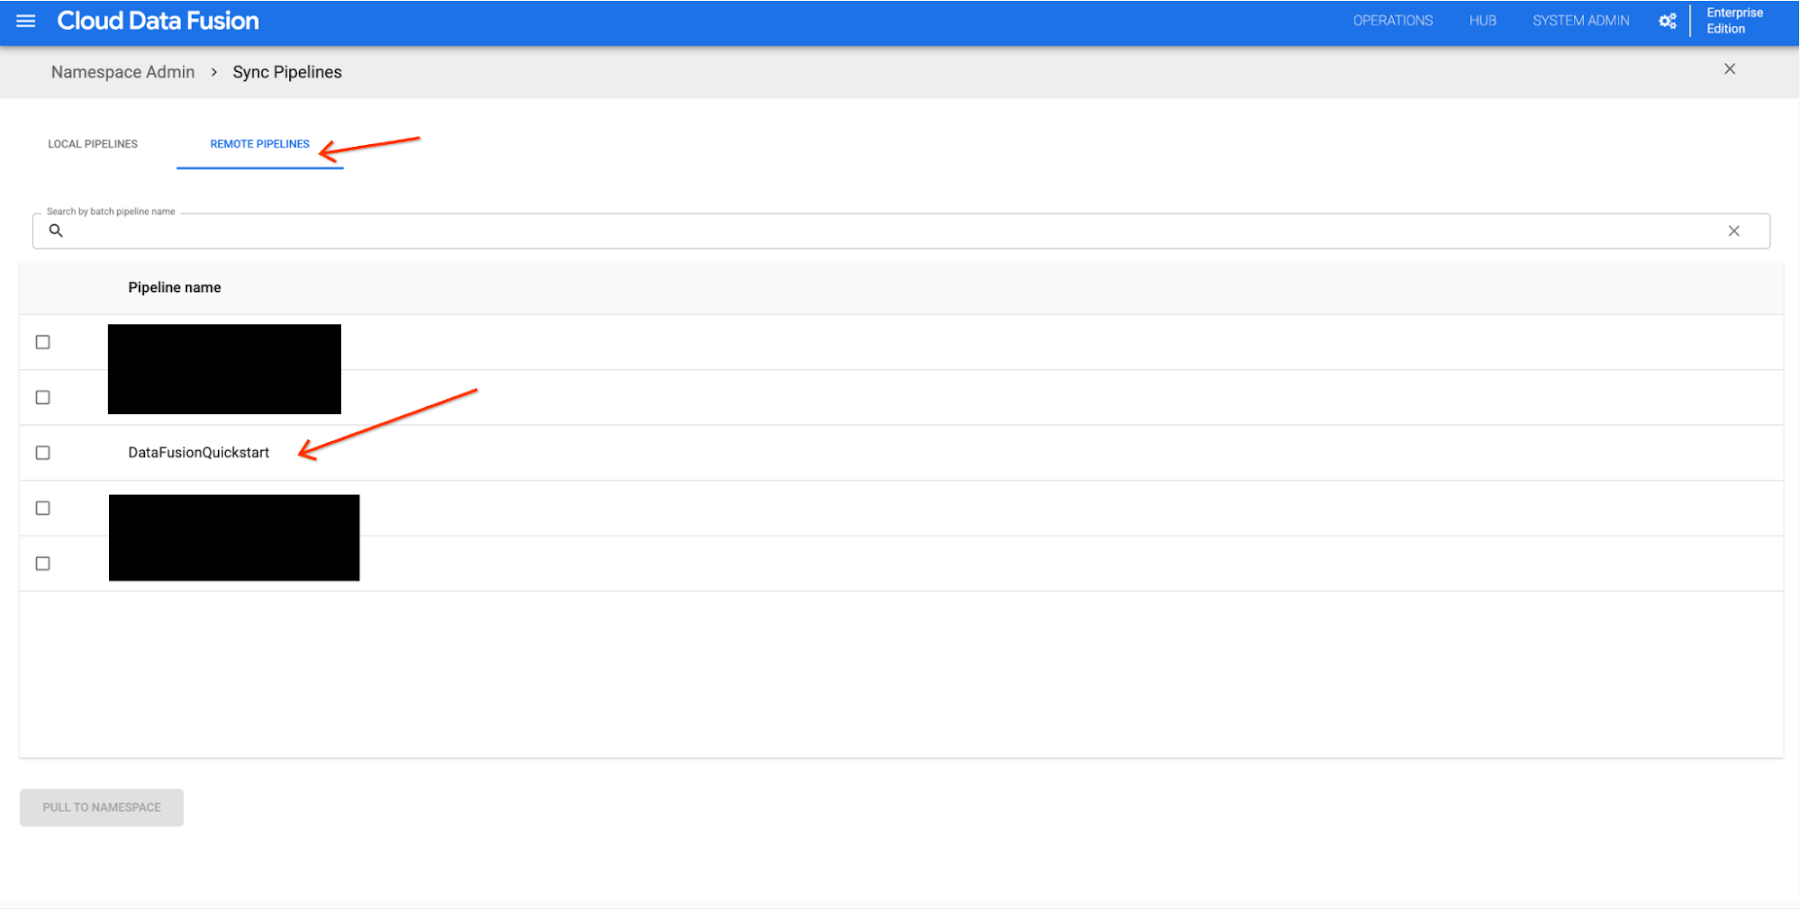
Similarly, to see details about the pipeline that was pushed, Bob goes to the Cloud Data Fusion REMOTE PIPELINES tab.

Pulling pipelines from linked repository
To initiate a new instance with existing pipelines, Bob can link the same repository to a namespace to the new instance.
To deploy the pipelines that Bob pushed to the linked GitHub repository, Bob opens the Source Control Management page, clicks on the SYNC PIPELINES button and switches to the REMOTE PIPELINES tab. Now they can choose the pipeline of interest and click PULL TO NAMESPACE.
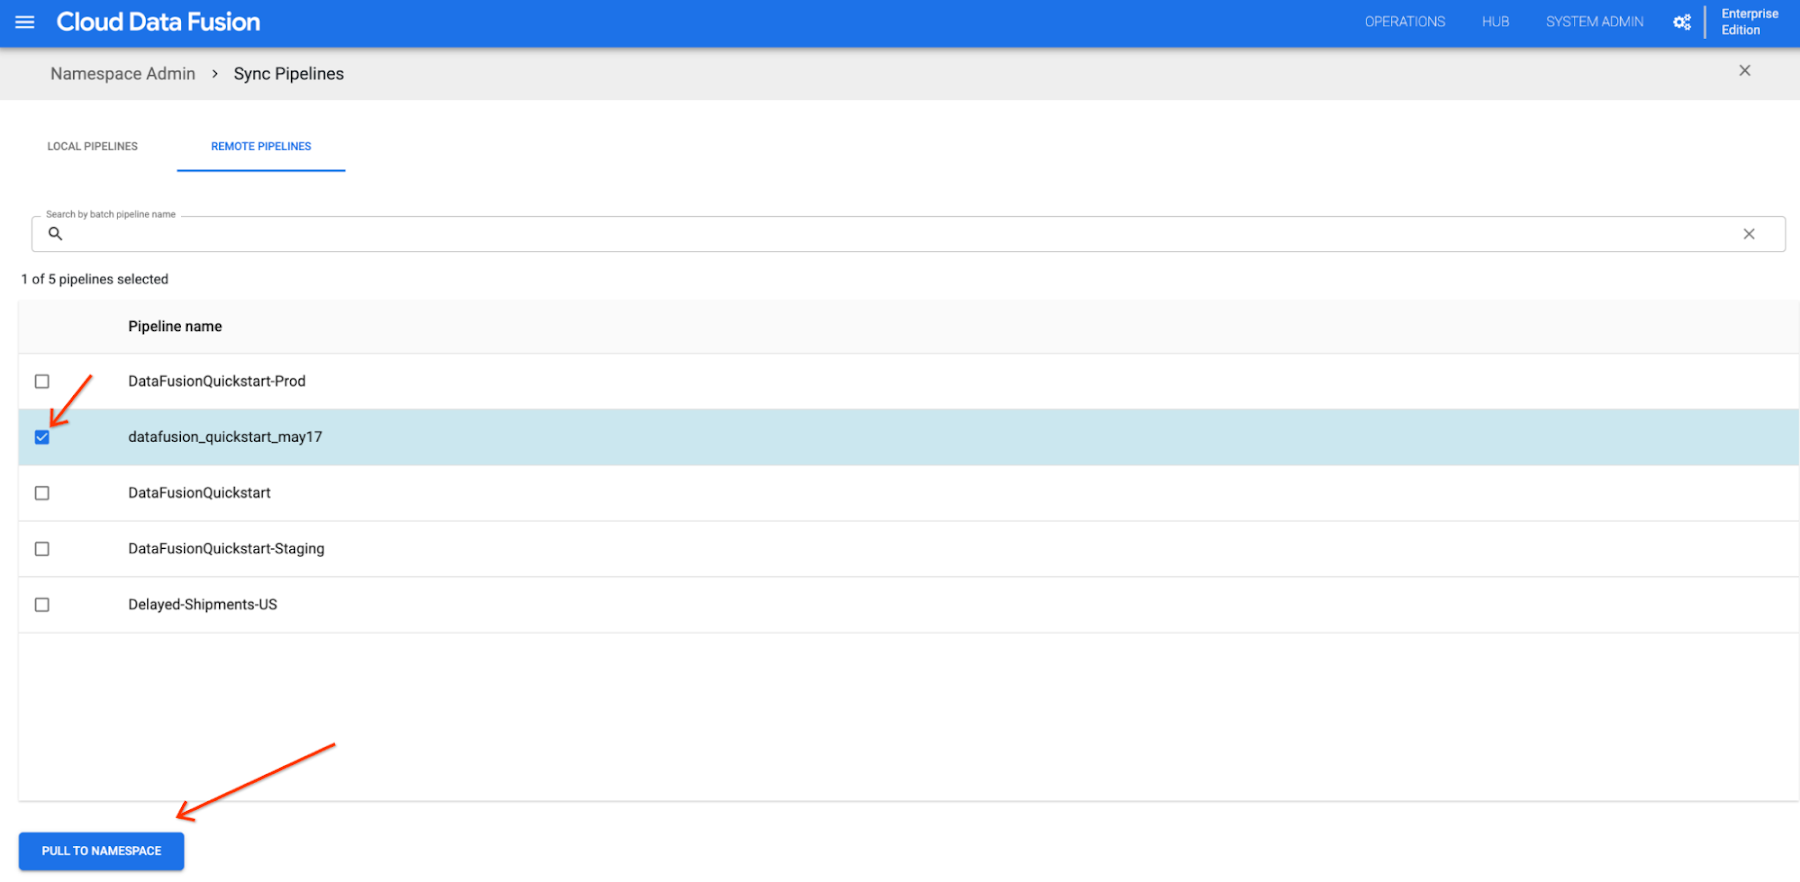

In the LOCAL PIPELINES tab, Bob can see the newly deployed pipeline. They could also see the new pipeline in the deployed pipeline list page:


Use case: Team-based development
Billie built several pipelines to perform data analytics in different environments, such as test, staging, and prod. One of their pipelines classifies on-time and delayed orders, based on whether shipping time takes more than two days. Due to the increased number of customer orders during Black Friday, Billie just received a change request from the business to increase the expected delivery time temporarily.
Billie could edit the pipeline and modify it iteratively to find a proper increased time. But Billie doesn’tt want to risk deploying the new changes into the prod environment without fully testing it.
Before, there was no easy way for them to apply the new changes across from testing env to staging, and finally Prod. With git integration, let’s see how Billie can solve this problem.
Edit the pipeline
1. Billie opens the deployed pipeline in the Studio page
2. Billie clicks on the cog icon on the right side of the top bar.
3. In the drop down, Billie selects Edit which starts the edit flow.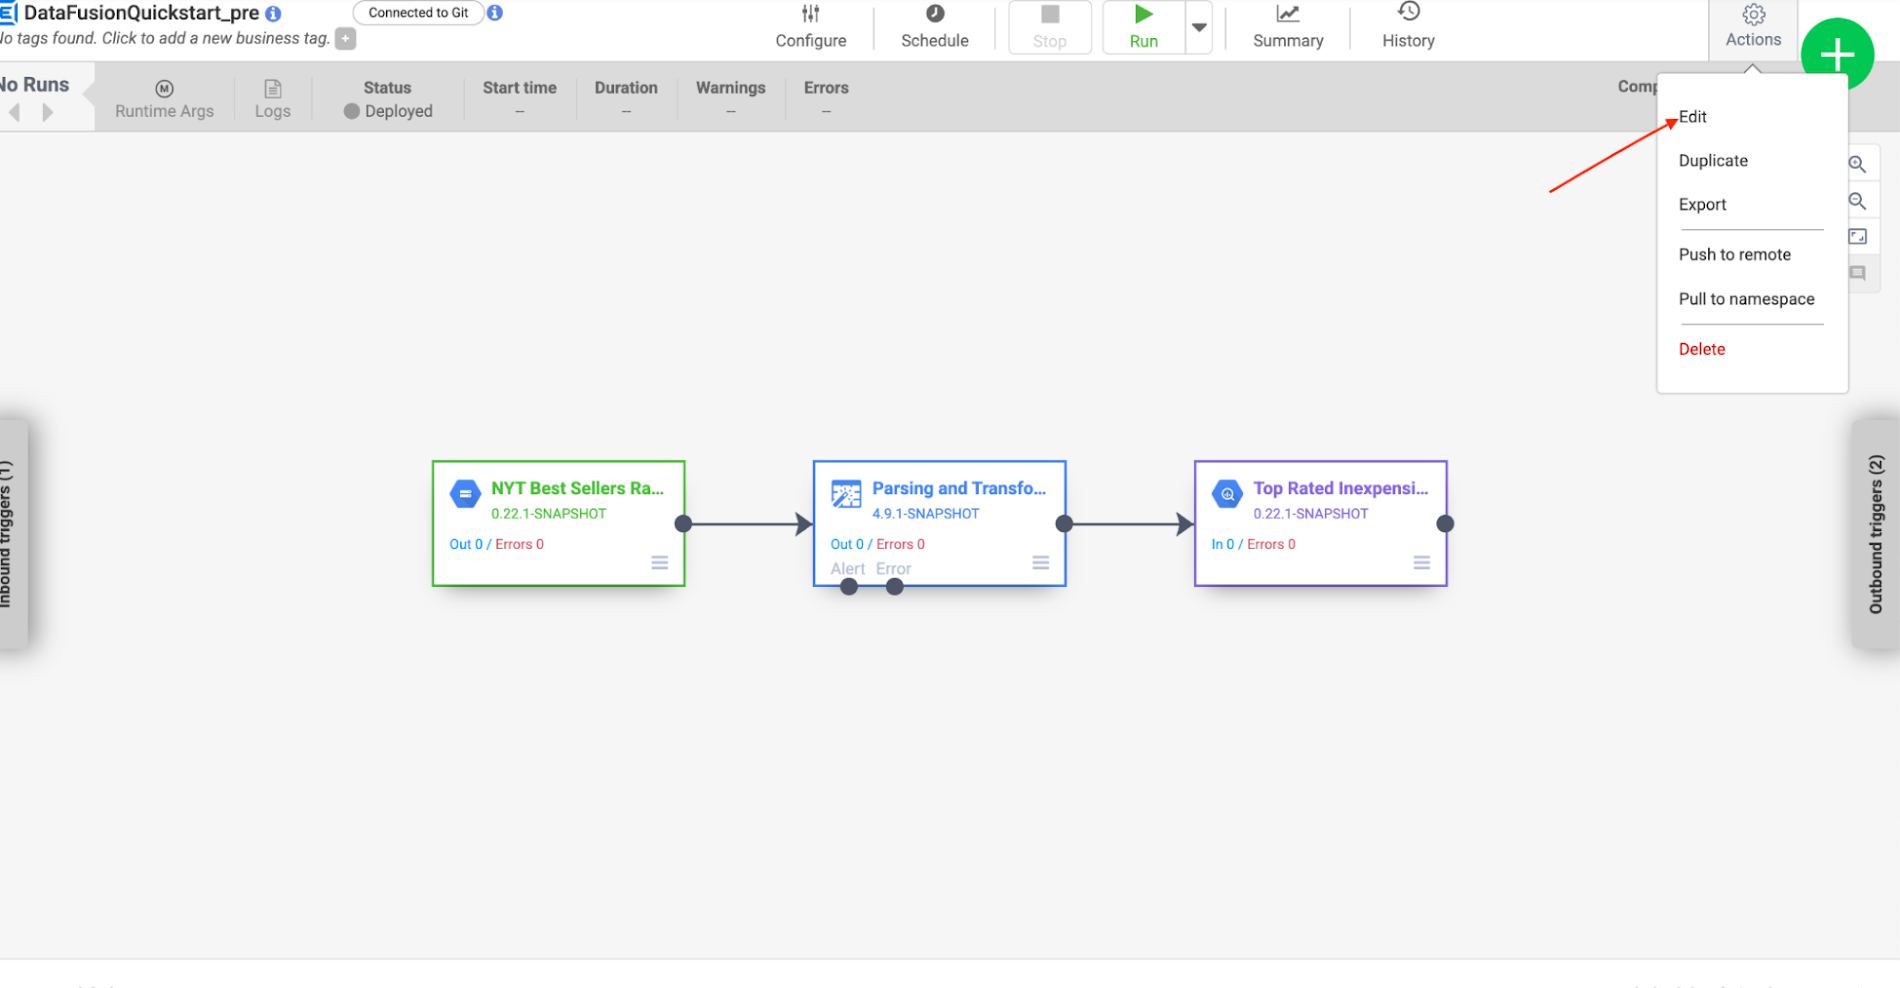

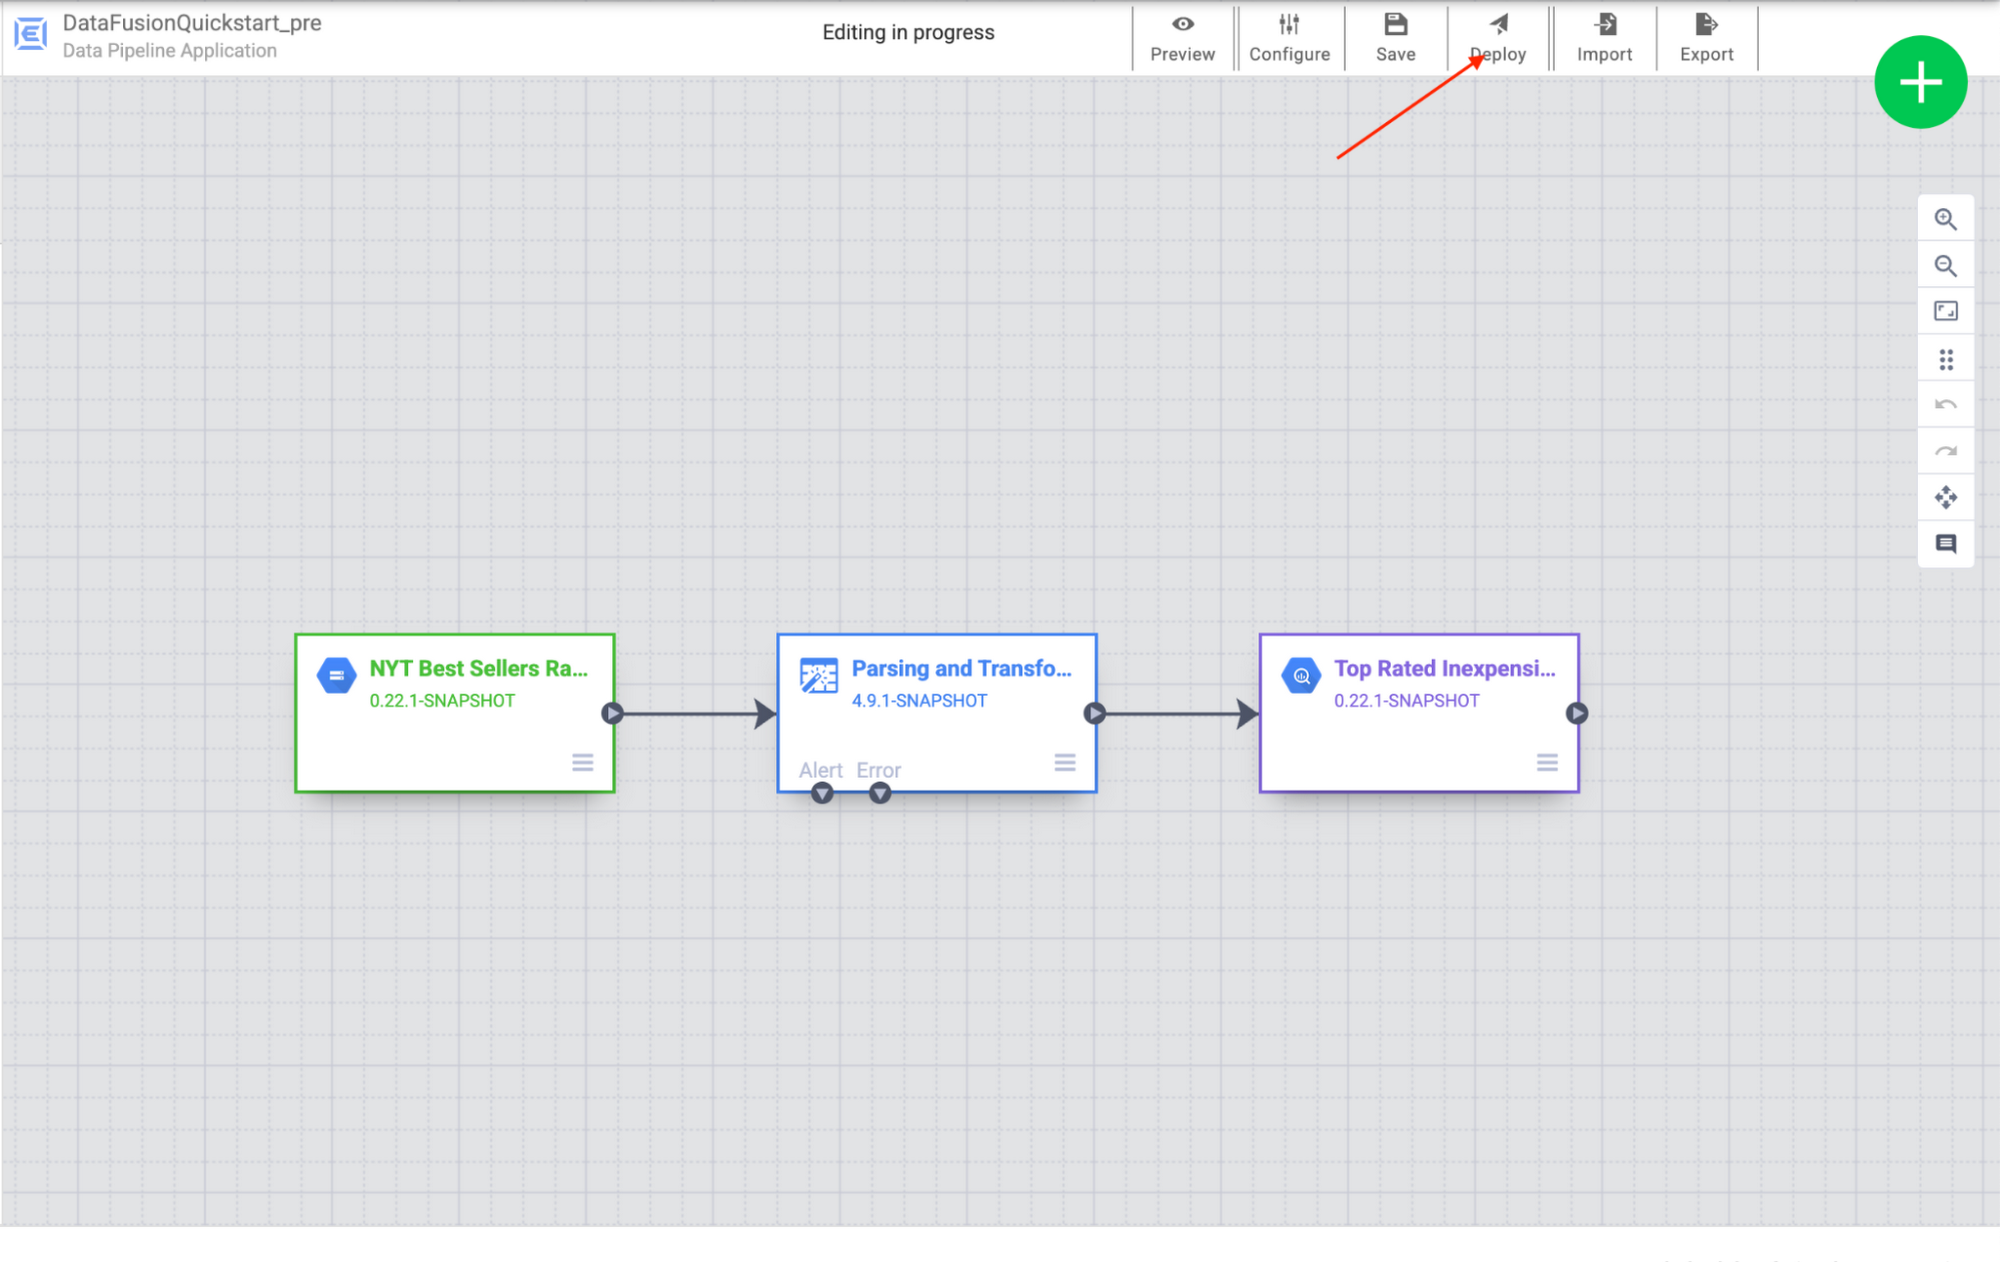
4. Billie makes the necessary changes in the plugin config. Once done, Billie clicks Deploy and a new version of the pipeline will be deployed. To learn more about iterative data pipeline design in Cloud Data Fusion, see Edit Pipelines.

Push the latest pipeline version to git
The namespace was already linked with a git repository and a previous version of the pipeline has already been pushed.
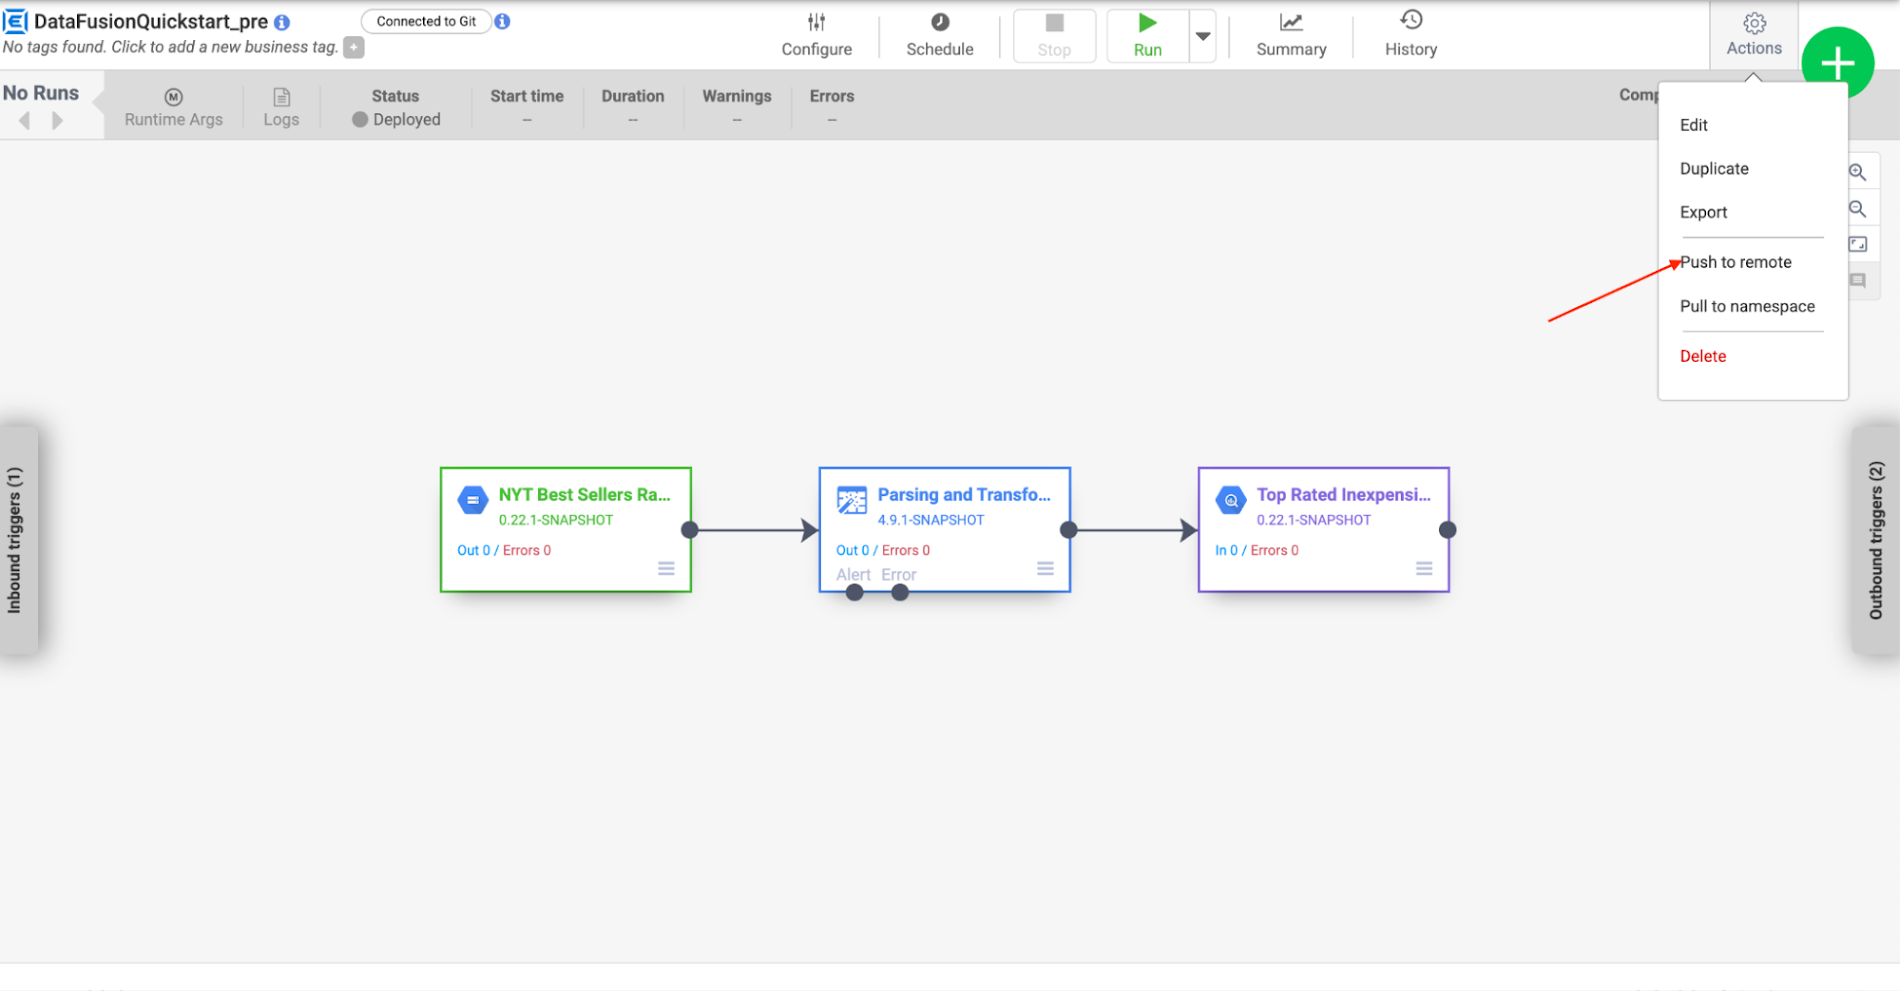
Billie clicks on the cog icon on the right side of the top bar. In the drop-down, select Push to remote.

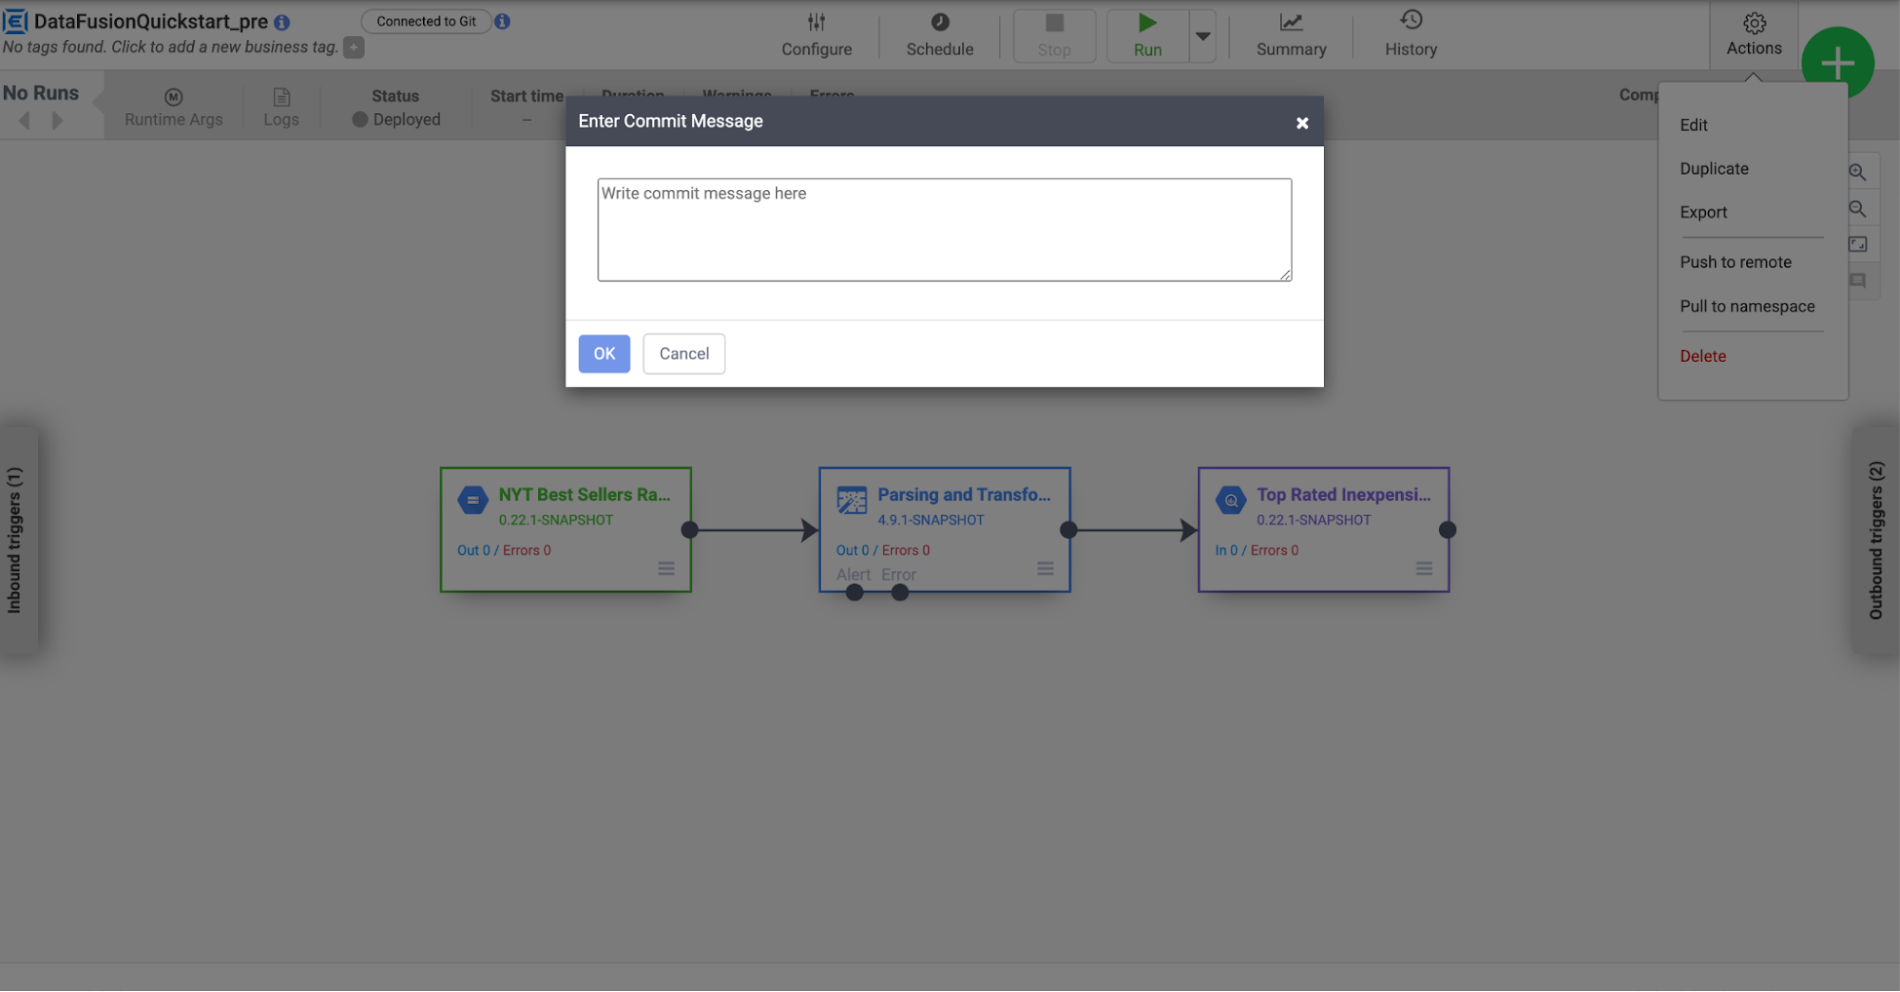
A dialog will be shown to give the commit message. Once confirmed, the pipeline push process begins.

In case of success Billie sees a green banner at the top. Billie can now go and check in GitHub that the new pipeline config has been synced.
Merge the changes to main
For a proper review flow we suggest using different branches for different environments. Billie can push the changes to a development branch and then create a pull request to merge the changes to the main branch.
Pulling the latest pipeline version from GitHub
The production namespace has been linked with the main branch of the git repository. There already exists the older version of the pipeline.
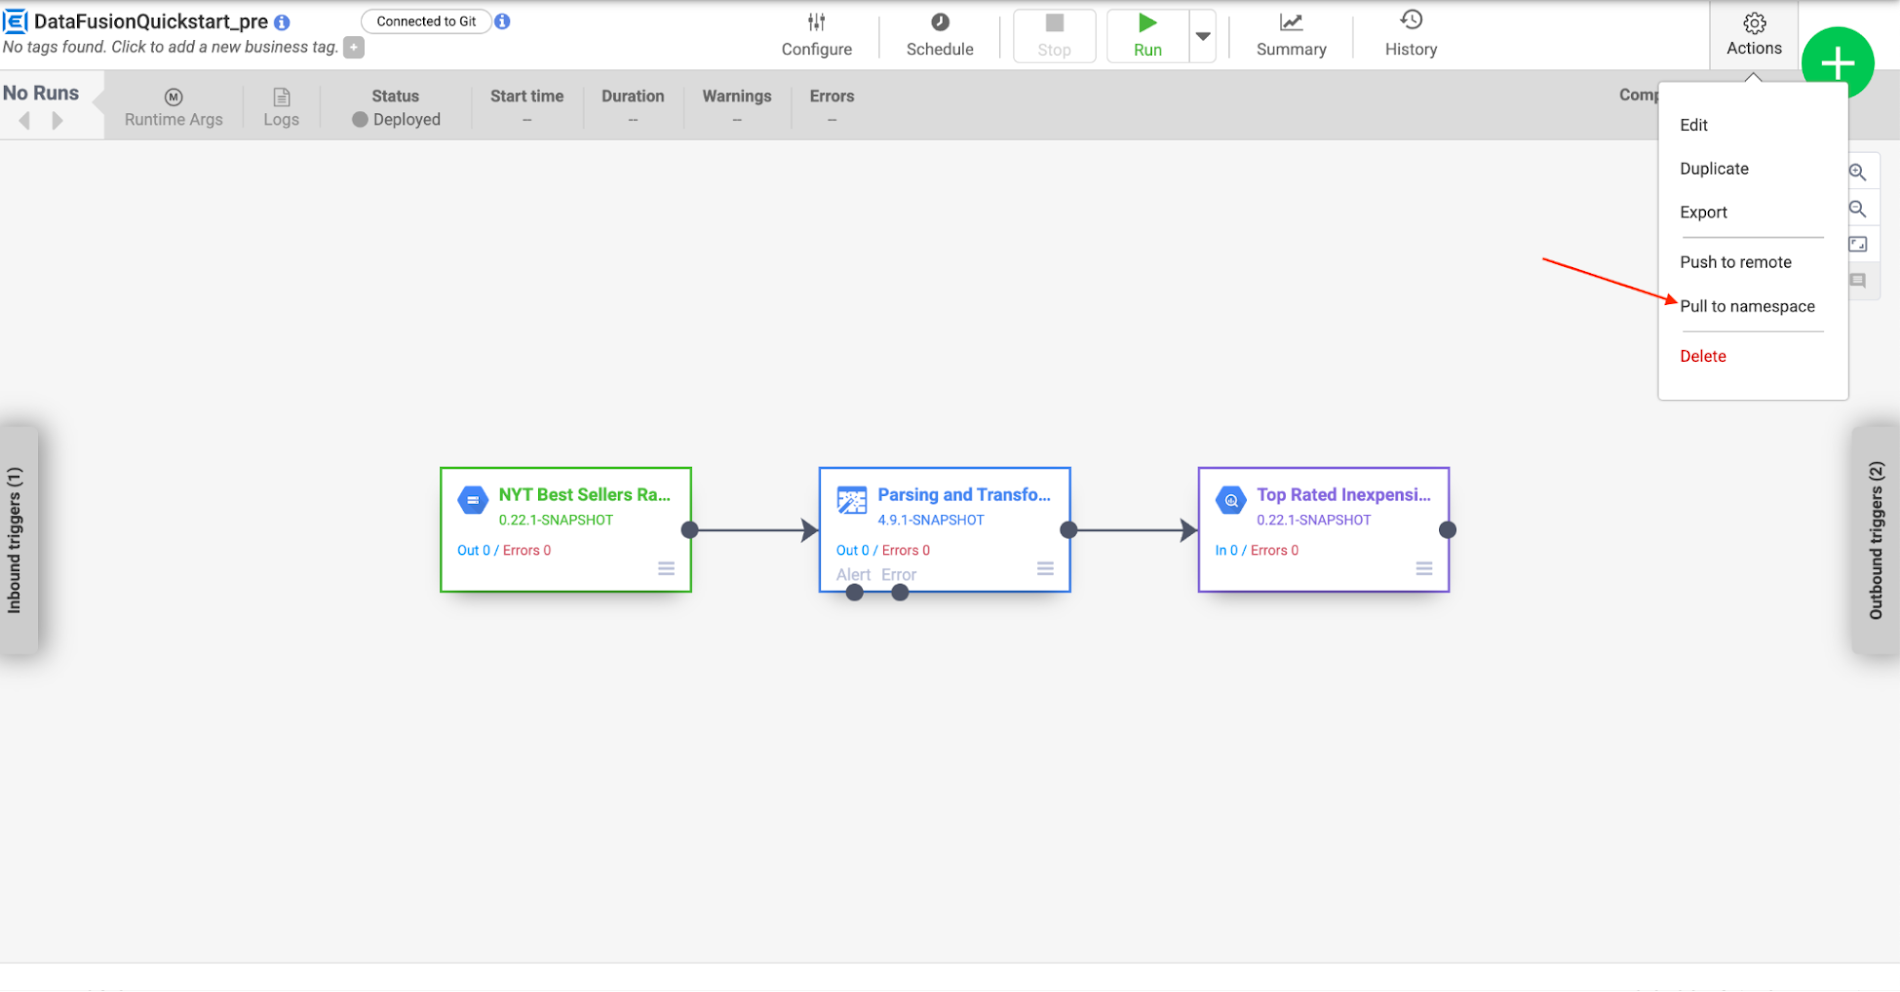
Billie clicks on the cog icon on the right side of the top bar. In the drop down Billie selects Pull to namespace. The pull process will take some time to complete as it also deploys the new version of the pipeline

Once succeeded Billie can now click on the history button at the top bar and sees a new version has been deployed.
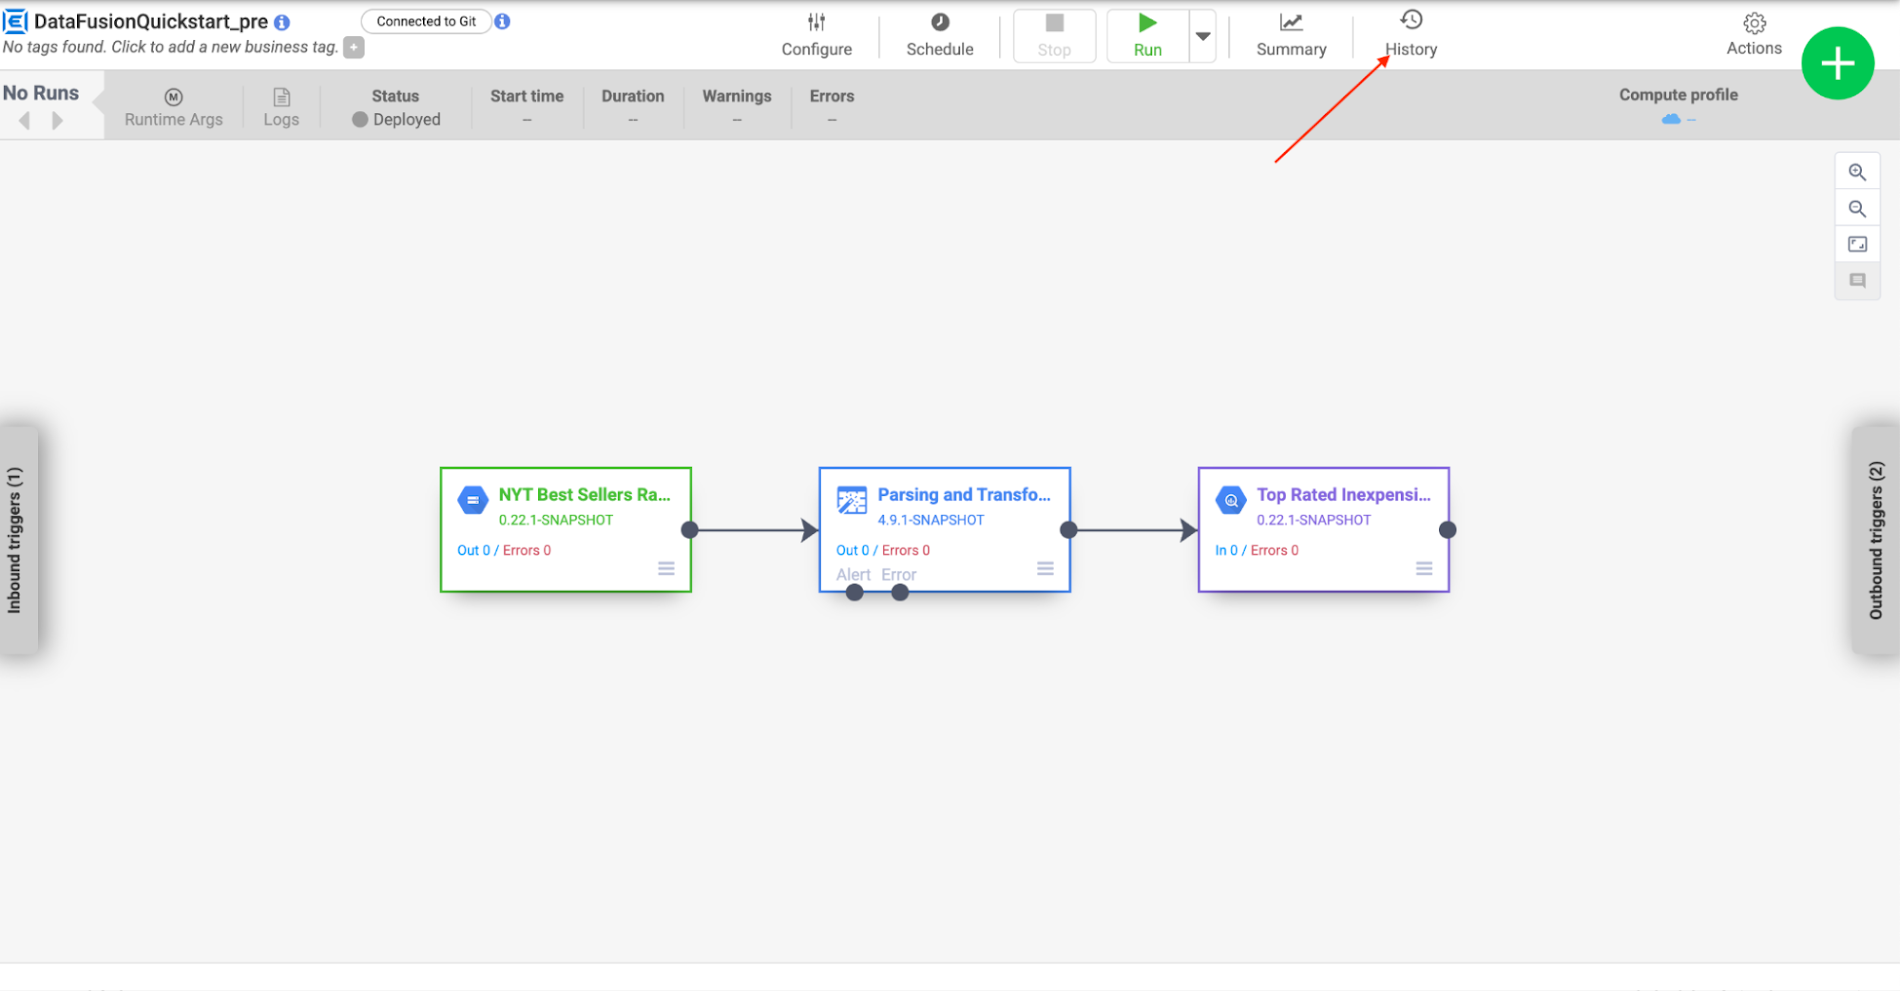

Billie can now verify the change in the plugin config.
In the above steps, we see how Billie applies the new pipeline changes across from testing env to finally Prod with the git integration feature. Please visit https://cloud.google.com/data-fusion and learn more about data fusion features.
