Les règles Apigee peuvent être utilisées pour transformer les formats de message, appliquer le contrôle des accès, appeler des services distants, autoriser des utilisateurs, vérifier le contenu des messages pour détecter des menaces potentielles, et bien plus. Pour en savoir plus, consultez l'article Qu'est-ce qu'une règle ?
Les points de terminaison proxy et cibles définissent un pipeline de traitement des messages de requête et de réponse, appelé flux de requêtes et de réponses. Les flux sont des étapes séquentielles le long du chemin de traitement des requêtes API. Les règles sont associées à différents moments dans les flux de message de requêtes et de réponse sous forme d'étapes de traitement.
Dans les étapes suivantes, vous allez créer une règle et l'associer à votre proxy d'API dans le flux de réponse PreFlow pour vous assurer que la stratégie est appliquée avant tout autre traitement. La stratégie XMLtoJSON utilisée dans ce tutoriel convertit la charge utile du message de réponse de l'API du format XML au format JSON.
Créer une règle XMLtoJSON
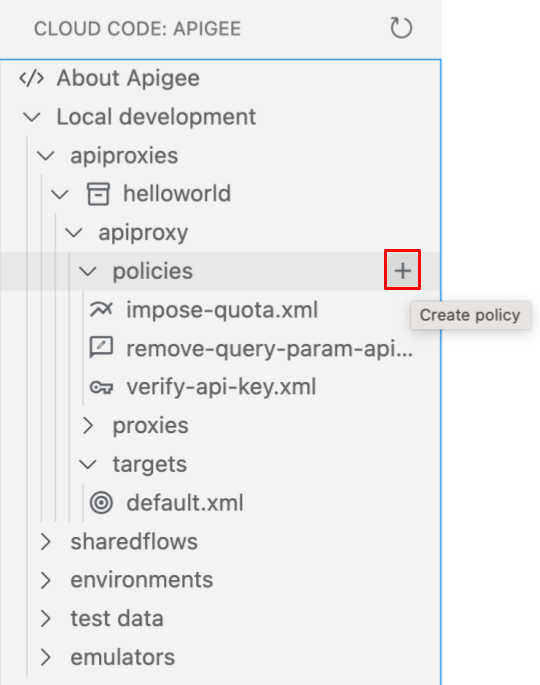
Développez le groupe de proxys d'API helloworld, placez le curseur sur le dossier policies, puis cliquez sur .
L'assistant Créer une règle s'ouvre.
Sélectionnez la catégorie de règle Médiation.
Sélectionnez le type de stratégie XML to JSON (XML à JSON).
Saisissez XMLtoJSON comme nom de règle, puis cliquez sur Entrée.
La règle est ajoutée au dossier /policies du proxy d'API et ouverte dans l'éditeur.
Cliquez sur XMLtoJSON.xml pour modifier la règle. Définissez les éléments <OutputVariable> et <Source> sur response, puis enregistrez vos modifications.
Enregistrez les modifications apportées au fichier.
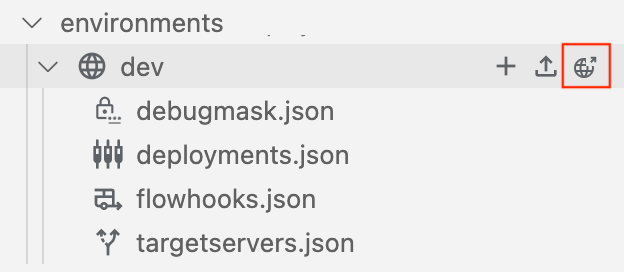
Pour redéployer l'environnement, placez votre curseur sur le dossier d'environnement dev, puis cliquez sur .
Lorsque vous êtes invité à sélectionner un groupe de test à exporter, cliquez sur Déployer sans groupe de test, car le groupe de test a déjà été exporté.
Sauf indication contraire, le contenu de cette page est régi par une licence Creative Commons Attribution 4.0, et les échantillons de code sont régis par une licence Apache 2.0. Pour en savoir plus, consultez les Règles du site Google Developers. Java est une marque déposée d'Oracle et/ou de ses sociétés affiliées.
Dernière mise à jour le 2025/08/07 (UTC).
[[["Facile à comprendre","easyToUnderstand","thumb-up"],["J'ai pu résoudre mon problème","solvedMyProblem","thumb-up"],["Autre","otherUp","thumb-up"]],[["Difficile à comprendre","hardToUnderstand","thumb-down"],["Informations ou exemple de code incorrects","incorrectInformationOrSampleCode","thumb-down"],["Il n'y a pas l'information/les exemples dont j'ai besoin","missingTheInformationSamplesINeed","thumb-down"],["Problème de traduction","translationIssue","thumb-down"],["Autre","otherDown","thumb-down"]],["Dernière mise à jour le 2025/08/07 (UTC)."],[[["\u003cp\u003eThis tutorial focuses on Apigee and Apigee hybrid, and it demonstrates how to attach a policy to an API proxy.\u003c/p\u003e\n"],["\u003cp\u003eApigee policies are used to transform messages, enforce access, call services, authorize users, and more, and they are attached at different steps in request and response flows.\u003c/p\u003e\n"],["\u003cp\u003eYou can create an XMLtoJSON policy to convert API response payloads from XML to JSON format by selecting it from the Mediation category in the Create Policy wizard, and then configure its output and source.\u003c/p\u003e\n"],["\u003cp\u003eAttaching the XMLtoJSON policy to the \u003ccode\u003ePreFlow\u003c/code\u003e response flow ensures that it is applied before other processing, and this is done by adding a \u003ccode\u003e<Step>\u003c/code\u003e element in the proxy's configuration file.\u003c/p\u003e\n"],["\u003cp\u003eAfter attaching the policy and redeploying, you can test the changes by calling the API, which will now return a JSON response instead of XML, and the next step will involve deploying to an Apigee environment.\u003c/p\u003e\n"]]],[],null,["*This page\napplies to **Apigee** and **Apigee hybrid**.*\n\n\n*View [Apigee Edge](https://docs.apigee.com/api-platform/get-started/what-apigee-edge) documentation.*\n\n\u003cbr /\u003e\n\nApigee policies can transform message formats, enforce access control, call remote services, authorize users, examine message content for potential threats, and do much more. For more information, see [What's a policy?](/apigee/docs/api-platform/develop/policy-attachment-and-enforcement)\n\nProxy and target endpoints define a pipeline for request and response message processing referred to as request and response *flows* . Flows are sequential stages along the API request processing path. Policies are attached at different points in the request and response message flows as processing *steps*.\n\nIn the following steps, you create a new policy and attach it to your API proxy in the `PreFlow` response flow to ensure the policy is applied before any other processing takes place. The [XMLtoJSON policy](/apigee/docs/api-platform/reference/policies/xml-json-policy) used in this tutorial converts the payload of the API's response message from XML to JSON.\n\n1. Create an XMLtoJSON policy.\n 1. Expand the **helloworld** API proxy bundle, position your cursor over the **policies** folder, and click .\n\n The **Create policy** wizard opens.\n 2. Select **Mediation** as the policy category.\n 3. Select **XML to JSON** as the policy type.\n 4. Enter **XMLtoJSON** as the policy name and click **Enter** .\n\n The policy is added to the `/policies` folder for the API proxy and opened in the editor.\n 5. Click `XMLtoJSON.xml` to edit the policy. Set the `\u003cOutputVariable\u003e` and `\u003cSource\u003e` elements to `response` and save your changes. **Note** : You'll attach the policy to the **response** flow in the API proxy PreFlow in the next step. \n\n ```\n \u003c?xml version=\"1.0\" encoding=\"UTF-8\" standalone=\"yes\"?\u003e\n \u003cXMLToJSON async=\"false\" continueOnError=\"false\" enabled=\"true\" name=\"XMLtoJSON\"\u003e\n \u003cDisplayName\u003eXMLtoJSON\u003c/DisplayName\u003e\n \u003cProperties/\u003e\n \u003cFormat\u003eyahoo\u003c/Format\u003e\n \u003cOutputVariable\u003eresponse\u003c/OutputVariable\u003e\n \u003cSource\u003eresponse\u003c/Source\u003e\n \u003c/XMLToJSON\u003e\n ```\n2. Attach the policy to the default proxy endpoint.\n 1. Expand the **proxies** folder in the **helloworld** API proxy bundle and click **default.xml** to open the file in the editor.\n 2. Add a `\u003cStep\u003e` element that references the **XMLtoJSON** policy to the `\u003cResponse\u003e` flow in the API proxy `\u003cPreFlow\u003e`: \n\n ```\n \u003cProxyEndpoint name=\"default\"\u003e\n \u003cPreFlow name=\"PreFlow\"\u003e\n \u003cRequest\u003e\n \u003cStep\u003e\n \u003cName\u003everify-api-key\u003c/Name\u003e\n \u003c/Step\u003e\n \u003cStep\u003e\n \u003cName\u003eremove-query-param-apikey\u003c/Name\u003e\n \u003c/Step\u003e\n \u003cStep\u003e\n \u003cName\u003eimpose-quota\u003c/Name\u003e\n \u003c/Step\u003e\n \u003c/Request\u003e\n \u003cResponse\u003e\n \u003cStep\u003e\n \u003cName\u003eXMLtoJSON\u003c/Name\u003e\n \u003c/Step\u003e\n \u003c/Response\u003e\n \u003c/PreFlow\u003e\n ...\n \u003c/ProxyEndpoint\u003e\n ```\n 3. Save your changes to the file.\n3. To redeploy the environment, position your cursor over the **dev** environment folder and click .\n\n4. When prompted to select a test bundle to export, click **Deploy without a test bundle** because the test bundle has already been exported.\n\n5. Call your API in the **Terminal** tab. \n\n ```\n curl 0:8998/helloworld?apikey=ZQA5euYtNeJ7ZCGCJMpvd6F2BZOmxOzY\n ```\n\n\n The XML response is converted to JSON, as follows: \n\n ```\n {\n \"root\": {\n \"city\": \"San Jose\",\n \"firstName\": \"John\",\n \"lastName\": \"Doe\",\n \"state\": \"CA\"\n }\n }\n ```\n\n**Congratulations!** You've successfully attached the XMLtoJSON policy to your API proxy!\n\nNext, you will deploy your API as an archive to an Apigee environment for integration testing and production release.\n\n\n[1](/apigee/docs/api-platform/local-development/vscode/tutorial-create-workspace)\n\n\n[2](/apigee/docs/api-platform/local-development/vscode/tutorial-create-proxy)\n\n\n[3](/apigee/docs/api-platform/local-development/vscode/tutorial-deploy)\n\n\n[4](/apigee/docs/api-platform/local-development/vscode/tutorial-test)\n\n\n[5](/apigee/docs/api-platform/local-development/vscode/tutorial-change-target-endpoint)\n\n\n[6](/apigee/docs/api-platform/local-development/vscode/tutorial-attach-policy)\n\n\n[(NEXT) Step 7: Deploy to an Apigee environment](/apigee/docs/api-platform/local-development/vscode/tutorial-deploy-apigee)\n\n\n[8](/apigee/docs/api-platform/local-development/vscode/tutorial-promote)\n\n\u003cbr /\u003e"]]

 .
.
 .
.