检测图片中的文本

光学字符识别 (OCR)

Vision API 可以检测并提取图片中的文本。支持光学字符识别 (OCR) 的注释功能有两种

  • TEXT_DETECTION 可检测并提取任何图片中的文本。例如,某张照片可能包含街道标志或交通标志。JSON 包含所提取的整个字符串,以及各个字词及其边界框。

    路标图片

  • DOCUMENT_TEXT_DETECTION 也可提取图片中的文本,但其响应针对密集文本和文档进行了优化。JSON 包含页面、文本块、段落、字词和换行信息。

    带有注释的密集图片

    详细了解用于提取文件 (PDF/TIFF) 中的手写内容文本DOCUMENT_TEXT_DETECTION

自行试用

如果您是 Google Cloud 新手,请创建一个账号来评估 Cloud Vision 在实际场景中的表现。新客户还可获享 $300 赠金,用于运行、测试和部署工作负载。

免费试用 Cloud Vision

文本检测请求

设置您的 Google Cloud 项目和身份验证

检测本地图片中的文本

您可以使用 Vision API 对本地图片文件执行特征检测。

对于 REST 请求,请将图片文件的内容作为 base64 编码的字符串在请求正文中发送。

对于 gcloud 和客户端库请求,请在请求中指定本地图片的路径。

gcloud

如需执行文本检测,请使用 gcloud ml vision detect-text 命令,如以下示例所示:

gcloud ml vision detect-text ./path/to/local/file.jpg

REST

在使用任何请求数据之前,请先进行以下替换:

  • BASE64_ENCODED_IMAGE:二进制图片数据的 base64 表示(ASCII 字符串)。此字符串应类似于以下字符串:
    • /9j/4QAYRXhpZgAA...9tAVx/zDQDlGxn//2Q==
    如需了解详情,请参阅 base64 编码主题。
  • PROJECT_ID:您的 Google Cloud 项目 ID。

HTTP 方法和网址:

POST https://vision.googleapis.com/v1/images:annotate

请求 JSON 正文:

{
  "requests": [
    {
      "image": {
        "content": "BASE64_ENCODED_IMAGE"
      },
      "features": [
        {
          "type": "TEXT_DETECTION"
        }
      ]
    }
  ]
}

如需发送请求,请选择以下方式之一:

curl

将请求正文保存在名为 request.json 的文件中,然后执行以下命令:

curl -X POST \
-H "Authorization: Bearer $(gcloud auth print-access-token)" \
-H "x-goog-user-project: PROJECT_ID" \
-H "Content-Type: application/json; charset=utf-8" \
-d @request.json \
"https://vision.googleapis.com/v1/images:annotate"

PowerShell

将请求正文保存在名为 request.json 的文件中,然后执行以下命令:

$cred = gcloud auth print-access-token
$headers = @{ "Authorization" = "Bearer $cred"; "x-goog-user-project" = "PROJECT_ID" }

Invoke-WebRequest `
-Method POST `
-Headers $headers `
-ContentType: "application/json; charset=utf-8" `
-InFile request.json `
-Uri "https://vision.googleapis.com/v1/images:annotate" | Select-Object -Expand Content

如果请求成功,服务器将返回一个 200 OK HTTP 状态代码以及 JSON 格式的响应。

TEXT_DETECTION 响应包含检测到的词组及其边界框,以及各个字词及其边界框。

Go

试用此示例之前,请按照《Vision 快速入门:使用客户端库》中的 Go 设置说明进行操作。如需了解详情,请参阅 Vision Go API 参考文档

如需向 Vision 进行身份验证,请设置应用默认凭据。 如需了解详情,请参阅为本地开发环境设置身份验证


// detectText gets text from the Vision API for an image at the given file path.
func detectText(w io.Writer, file string) error {
	ctx := context.Background()

	client, err := vision.NewImageAnnotatorClient(ctx)
	if err != nil {
		return err
	}

	f, err := os.Open(file)
	if err != nil {
		return err
	}
	defer f.Close()

	image, err := vision.NewImageFromReader(f)
	if err != nil {
		return err
	}
	annotations, err := client.DetectTexts(ctx, image, nil, 10)
	if err != nil {
		return err
	}

	if len(annotations) == 0 {
		fmt.Fprintln(w, "No text found.")
	} else {
		fmt.Fprintln(w, "Text:")
		for _, annotation := range annotations {
			fmt.Fprintf(w, "%q\n", annotation.Description)
		}
	}

	return nil
}

Java

在试用此示例之前,请按照Vision API 快速入门:使用客户端库中的 Java 设置说明进行操作。如需了解详情,请参阅 Vision API Java 参考文档


import com.google.cloud.vision.v1.AnnotateImageRequest;
import com.google.cloud.vision.v1.AnnotateImageResponse;
import com.google.cloud.vision.v1.BatchAnnotateImagesResponse;
import com.google.cloud.vision.v1.EntityAnnotation;
import com.google.cloud.vision.v1.Feature;
import com.google.cloud.vision.v1.Image;
import com.google.cloud.vision.v1.ImageAnnotatorClient;
import com.google.protobuf.ByteString;
import java.io.FileInputStream;
import java.io.IOException;
import java.util.ArrayList;
import java.util.List;

public class DetectText {
  public static void detectText() throws IOException {
    // TODO(developer): Replace these variables before running the sample.
    String filePath = "path/to/your/image/file.jpg";
    detectText(filePath);
  }

  // Detects text in the specified image.
  public static void detectText(String filePath) throws IOException {
    List<AnnotateImageRequest> requests = new ArrayList<>();

    ByteString imgBytes = ByteString.readFrom(new FileInputStream(filePath));

    Image img = Image.newBuilder().setContent(imgBytes).build();
    Feature feat = Feature.newBuilder().setType(Feature.Type.TEXT_DETECTION).build();
    AnnotateImageRequest request =
        AnnotateImageRequest.newBuilder().addFeatures(feat).setImage(img).build();
    requests.add(request);

    // Initialize client that will be used to send requests. This client only needs to be created
    // once, and can be reused for multiple requests. After completing all of your requests, call
    // the "close" method on the client to safely clean up any remaining background resources.
    try (ImageAnnotatorClient client = ImageAnnotatorClient.create()) {
      BatchAnnotateImagesResponse response = client.batchAnnotateImages(requests);
      List<AnnotateImageResponse> responses = response.getResponsesList();

      for (AnnotateImageResponse res : responses) {
        if (res.hasError()) {
          System.out.format("Error: %s%n", res.getError().getMessage());
          return;
        }

        // For full list of available annotations, see http://g.co/cloud/vision/docs
        for (EntityAnnotation annotation : res.getTextAnnotationsList()) {
          System.out.format("Text: %s%n", annotation.getDescription());
          System.out.format("Position : %s%n", annotation.getBoundingPoly());
        }
      }
    }
  }
}

Node.js

试用此示例之前,请按照《Vision 快速入门:使用客户端库》中的 Node.js 设置说明进行操作。如需了解详情,请参阅 Vision Node.js API 参考文档

如需向 Vision 进行身份验证,请设置应用默认凭据。 如需了解详情,请参阅为本地开发环境设置身份验证

const vision = require('@google-cloud/vision');

// Creates a client
const client = new vision.ImageAnnotatorClient();

/**
 * TODO(developer): Uncomment the following line before running the sample.
 */
// const fileName = 'Local image file, e.g. /path/to/image.png';

// Performs text detection on the local file
const [result] = await client.textDetection(fileName);
const detections = result.textAnnotations;
console.log('Text:');
detections.forEach(text => console.log(text));

Python

试用此示例之前,请按照《Vision 快速入门:使用客户端库》中的 Python 设置说明进行操作。如需了解详情,请参阅 Vision Python API 参考文档

如需向 Vision 进行身份验证,请设置应用默认凭据。 如需了解详情,请参阅为本地开发环境设置身份验证

def detect_text(path):
    """Detects text in the file."""
    from google.cloud import vision

    client = vision.ImageAnnotatorClient()

    with open(path, "rb") as image_file:
        content = image_file.read()

    image = vision.Image(content=content)

    response = client.text_detection(image=image)
    texts = response.text_annotations
    print("Texts:")

    for text in texts:
        print(f'\n"{text.description}"')

        vertices = [
            f"({vertex.x},{vertex.y})" for vertex in text.bounding_poly.vertices
        ]

        print("bounds: {}".format(",".join(vertices)))

    if response.error.message:
        raise Exception(
            "{}\nFor more info on error messages, check: "
            "https://cloud.google.com/apis/design/errors".format(response.error.message)
        )

其他语言

C#: 请按照客户端库页面上的 C# 设置说明操作,然后访问 .NET 版 Vision 参考文档。

PHP: 请按照客户端库页面上的 PHP 设置说明操作,然后访问 PHP 版 Vision 参考文档。

Ruby 版: 请按照客户端库页面上的 Ruby 设置说明操作,然后访问 Ruby 版 Vision 参考文档。

检测远程图片中的文本

您可以使用 Vision API 对位于 Cloud Storage 或网络中的远程图片文件执行特征检测。如需发送远程文件请求,请在请求正文中指定文件的网址或 Cloud Storage URI。

gcloud

如需执行文本检测,请使用 gcloud ml vision detect-text 命令,如以下示例所示:

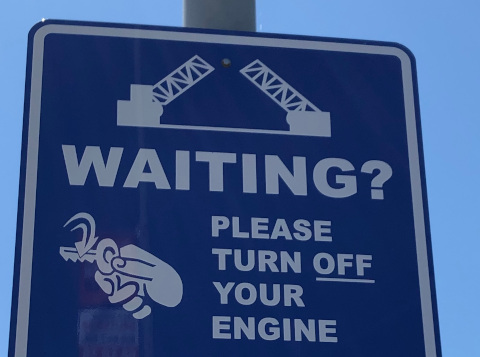
gcloud ml vision detect-text gs://cloud-samples-data/vision/ocr/sign.jpg

REST

在使用任何请求数据之前,请先进行以下替换:

  • CLOUD_STORAGE_IMAGE_URI:Cloud Storage 存储桶中有效图片文件的路径。您必须至少拥有该文件的读取权限。 示例:
    • gs://cloud-samples-data/vision/ocr/sign.jpg
  • PROJECT_ID:您的 Google Cloud 项目 ID。

HTTP 方法和网址:

POST https://vision.googleapis.com/v1/images:annotate

请求 JSON 正文:

{
  "requests": [
    {
      "image": {
        "source": {
          "imageUri": "CLOUD_STORAGE_IMAGE_URI"
        }
       },
       "features": [
         {
           "type": "TEXT_DETECTION"
         }
       ]
    }
  ]
}

如需发送请求,请选择以下方式之一:

curl

将请求正文保存在名为 request.json 的文件中,然后执行以下命令:

curl -X POST \
-H "Authorization: Bearer $(gcloud auth print-access-token)" \
-H "x-goog-user-project: PROJECT_ID" \
-H "Content-Type: application/json; charset=utf-8" \
-d @request.json \
"https://vision.googleapis.com/v1/images:annotate"

PowerShell

将请求正文保存在名为 request.json 的文件中,然后执行以下命令:

$cred = gcloud auth print-access-token
$headers = @{ "Authorization" = "Bearer $cred"; "x-goog-user-project" = "PROJECT_ID" }

Invoke-WebRequest `
-Method POST `
-Headers $headers `
-ContentType: "application/json; charset=utf-8" `
-InFile request.json `
-Uri "https://vision.googleapis.com/v1/images:annotate" | Select-Object -Expand Content

如果请求成功,服务器将返回一个 200 OK HTTP 状态代码以及 JSON 格式的响应。

TEXT_DETECTION 响应包含检测到的词组及其边界框,以及各个字词及其边界框。

Go

试用此示例之前,请按照《Vision 快速入门:使用客户端库》中的 Go 设置说明进行操作。如需了解详情,请参阅 Vision Go API 参考文档

如需向 Vision 进行身份验证,请设置应用默认凭据。 如需了解详情,请参阅为本地开发环境设置身份验证


// detectText gets text from the Vision API for an image at the given file path.
func detectTextURI(w io.Writer, file string) error {
	ctx := context.Background()

	client, err := vision.NewImageAnnotatorClient(ctx)
	if err != nil {
		return err
	}

	image := vision.NewImageFromURI(file)
	annotations, err := client.DetectTexts(ctx, image, nil, 10)
	if err != nil {
		return err
	}

	if len(annotations) == 0 {
		fmt.Fprintln(w, "No text found.")
	} else {
		fmt.Fprintln(w, "Text:")
		for _, annotation := range annotations {
			fmt.Fprintf(w, "%q\n", annotation.Description)
		}
	}

	return nil
}

Java

在试用此示例之前,请按照Vision API 快速入门:使用客户端库中的 Java 设置说明进行操作。如需了解详情,请参阅 Vision API Java 参考文档


import com.google.cloud.vision.v1.AnnotateImageRequest;
import com.google.cloud.vision.v1.AnnotateImageResponse;
import com.google.cloud.vision.v1.BatchAnnotateImagesResponse;
import com.google.cloud.vision.v1.EntityAnnotation;
import com.google.cloud.vision.v1.Feature;
import com.google.cloud.vision.v1.Image;
import com.google.cloud.vision.v1.ImageAnnotatorClient;
import com.google.cloud.vision.v1.ImageSource;
import java.io.IOException;
import java.util.ArrayList;
import java.util.List;

public class DetectTextGcs {

  public static void detectTextGcs() throws IOException {
    // TODO(developer): Replace these variables before running the sample.
    String filePath = "gs://your-gcs-bucket/path/to/image/file.jpg";
    detectTextGcs(filePath);
  }

  // Detects text in the specified remote image on Google Cloud Storage.
  public static void detectTextGcs(String gcsPath) throws IOException {
    List<AnnotateImageRequest> requests = new ArrayList<>();

    ImageSource imgSource = ImageSource.newBuilder().setGcsImageUri(gcsPath).build();
    Image img = Image.newBuilder().setSource(imgSource).build();
    Feature feat = Feature.newBuilder().setType(Feature.Type.TEXT_DETECTION).build();
    AnnotateImageRequest request =
        AnnotateImageRequest.newBuilder().addFeatures(feat).setImage(img).build();
    requests.add(request);

    // Initialize client that will be used to send requests. This client only needs to be created
    // once, and can be reused for multiple requests. After completing all of your requests, call
    // the "close" method on the client to safely clean up any remaining background resources.
    try (ImageAnnotatorClient client = ImageAnnotatorClient.create()) {
      BatchAnnotateImagesResponse response = client.batchAnnotateImages(requests);
      List<AnnotateImageResponse> responses = response.getResponsesList();

      for (AnnotateImageResponse res : responses) {
        if (res.hasError()) {
          System.out.format("Error: %s%n", res.getError().getMessage());
          return;
        }

        // For full list of available annotations, see http://g.co/cloud/vision/docs
        for (EntityAnnotation annotation : res.getTextAnnotationsList()) {
          System.out.format("Text: %s%n", annotation.getDescription());
          System.out.format("Position : %s%n", annotation.getBoundingPoly());
        }
      }
    }
  }
}

Node.js

试用此示例之前,请按照《Vision 快速入门:使用客户端库》中的 Node.js 设置说明进行操作。如需了解详情,请参阅 Vision Node.js API 参考文档

如需向 Vision 进行身份验证,请设置应用默认凭据。 如需了解详情,请参阅为本地开发环境设置身份验证

// Imports the Google Cloud client libraries
const vision = require('@google-cloud/vision');

// Creates a client
const client = new vision.ImageAnnotatorClient();

/**
 * TODO(developer): Uncomment the following lines before running the sample.
 */
// const bucketName = 'Bucket where the file resides, e.g. my-bucket';
// const fileName = 'Path to file within bucket, e.g. path/to/image.png';

// Performs text detection on the gcs file
const [result] = await client.textDetection(`gs://${bucketName}/${fileName}`);
const detections = result.textAnnotations;
console.log('Text:');
detections.forEach(text => console.log(text));

Python

试用此示例之前,请按照《Vision 快速入门:使用客户端库》中的 Python 设置说明进行操作。如需了解详情,请参阅 Vision Python API 参考文档

如需向 Vision 进行身份验证,请设置应用默认凭据。 如需了解详情,请参阅为本地开发环境设置身份验证

def detect_text_uri(uri):
    """Detects text in the file located in Google Cloud Storage or on the Web."""
    from google.cloud import vision

    client = vision.ImageAnnotatorClient()
    image = vision.Image()
    image.source.image_uri = uri

    response = client.text_detection(image=image)
    texts = response.text_annotations
    print("Texts:")

    for text in texts:
        print(f'\n"{text.description}"')

        vertices = [
            f"({vertex.x},{vertex.y})" for vertex in text.bounding_poly.vertices
        ]

        print("bounds: {}".format(",".join(vertices)))

    if response.error.message:
        raise Exception(
            "{}\nFor more info on error messages, check: "
            "https://cloud.google.com/apis/design/errors".format(response.error.message)
        )

其他语言

C#: 请按照客户端库页面上的 C# 设置说明操作,然后访问 .NET 版 Vision 参考文档。

PHP: 请按照客户端库页面上的 PHP 设置说明操作,然后访问 PHP 版 Vision 参考文档。

Ruby 版: 请按照客户端库页面上的 Ruby 设置说明操作,然后访问 Ruby 版 Vision 参考文档。

指定语言(可选)

这两种类型的 OCR 请求均支持一个或多个 languageHints(用于指定图片中任何文本的语言)。但是,使用空值时效果最佳,因为省略值将启用自动语言检测。对于基于拉丁字母的语言,无需设置 languageHints。在极少数情况下,如果图片中文本的语言已知,设置提示有助于获得更好的结果(但是,如果提示错误,则会造成很大的阻碍)。如果已指定语言中有一种或多种不在支持的语言范围内,文本检测将返回错误。

如果您选择提供语言提示,请修改请求正文(request.json 文件),以在 imageContext.languageHints 字段中以一种受支持的语言提供字符串,如以下示例所示:

{
  "requests": [
    {
      "image": {
        "source": {
          "imageUri": "IMAGE_URL"
        }
      },
      "features": [
        {
          "type": "DOCUMENT_TEXT_DETECTION"
        }
      ],
      "imageContext": {
        "languageHints": ["en-t-i0-handwrit"]
      }
    }
  ]
}

多区域支持

现可指定洲级数据存储和 OCR 处理。目前支持以下区域:

  • us:仅限美国
  • eu:欧盟

位置

借助 Cloud Vision,您可以控制存储和处理项目资源的位置。具体来说,您可以将 Cloud Vision 配置为仅在欧盟地区存储和处理您的数据。

默认情况下,Cloud Vision 会在全球位置存储和处理资源,这意味着 Cloud Vision 不保证您的资源将保留在特定位置或区域内。如果您选择欧盟位置,Google 只会在欧盟地区存储和处理您的数据。您和您的用户可以从任意位置访问该数据。

使用 API 设置位置

Vision API 支持全球 API 端点 (vision.googleapis.com) 以及两个基于区域的端点:欧盟端点 (eu-vision.googleapis.com) 和美国端点 (us-vision.googleapis.com)。使用这些端点进行特定于区域的处理。例如,要仅在欧盟地区存储和处理数据,请使用 URI eu-vision.googleapis.com 代替 vision.googleapis.com 进行 REST API 调用:

  • https://eu-vision.googleapis.com/v1/projects/PROJECT_ID/locations/eu/images:annotate
  • https://eu-vision.googleapis.com/v1/projects/PROJECT_ID/locations/eu/images:asyncBatchAnnotate
  • https://eu-vision.googleapis.com/v1/projects/PROJECT_ID/locations/eu/files:annotate
  • https://eu-vision.googleapis.com/v1/projects/PROJECT_ID/locations/eu/files:asyncBatchAnnotate

如需仅在美国存储和处理您的数据,请在上述方法中使用美国端点 (us-vision.googleapis.com)。

使用客户端库设置位置

默认情况下,Vision API 客户端库会访问全球 API 端点 (vision.googleapis.com)。如需仅在欧盟地区存储和处理您的数据,您需要明确设置端点 (eu-vision.googleapis.com)。以下代码示例展示了如何配置此设置。

REST

在使用任何请求数据之前,请先进行以下替换:

  • REGION_ID:有效的区域位置标识符之一:
    • us:仅限美国
    • eu:欧盟
  • CLOUD_STORAGE_IMAGE_URI:Cloud Storage 存储桶中有效图片文件的路径。您必须至少拥有该文件的读取权限。 示例:
    • gs://cloud-samples-data/vision/ocr/sign.jpg
  • PROJECT_ID:您的 Google Cloud 项目 ID。

HTTP 方法和网址:

POST https://REGION_ID-vision.googleapis.com/v1/projects/PROJECT_ID/locations/REGION_ID/images:annotate

请求 JSON 正文:

{
  "requests": [
    {
      "image": {
        "source": {
          "imageUri": "CLOUD_STORAGE_IMAGE_URI"
        }
       },
       "features": [
         {
           "type": "TEXT_DETECTION"
         }
       ]
    }
  ]
}

如需发送请求,请选择以下方式之一:

curl

将请求正文保存在名为 request.json 的文件中,然后执行以下命令:

curl -X POST \
-H "Authorization: Bearer $(gcloud auth print-access-token)" \
-H "x-goog-user-project: PROJECT_ID" \
-H "Content-Type: application/json; charset=utf-8" \
-d @request.json \
"https://REGION_ID-vision.googleapis.com/v1/projects/PROJECT_ID/locations/REGION_ID/images:annotate"

PowerShell

将请求正文保存在名为 request.json 的文件中,然后执行以下命令:

$cred = gcloud auth print-access-token
$headers = @{ "Authorization" = "Bearer $cred"; "x-goog-user-project" = "PROJECT_ID" }

Invoke-WebRequest `
-Method POST `
-Headers $headers `
-ContentType: "application/json; charset=utf-8" `
-InFile request.json `
-Uri "https://REGION_ID-vision.googleapis.com/v1/projects/PROJECT_ID/locations/REGION_ID/images:annotate" | Select-Object -Expand Content

如果请求成功,服务器将返回一个 200 OK HTTP 状态代码以及 JSON 格式的响应。

TEXT_DETECTION 响应包含检测到的词组及其边界框,以及各个字词及其边界框。

Go

试用此示例之前,请按照《Vision 快速入门:使用客户端库》中的 Go 设置说明进行操作。如需了解详情,请参阅 Vision Go API 参考文档

如需向 Vision 进行身份验证,请设置应用默认凭据。 如需了解详情,请参阅为本地开发环境设置身份验证

import (
	"context"
	"fmt"

	vision "cloud.google.com/go/vision/apiv1"
	"google.golang.org/api/option"
)

// setEndpoint changes your endpoint.
func setEndpoint(endpoint string) error {
	// endpoint := "eu-vision.googleapis.com:443"

	ctx := context.Background()
	client, err := vision.NewImageAnnotatorClient(ctx, option.WithEndpoint(endpoint))
	if err != nil {
		return fmt.Errorf("NewImageAnnotatorClient: %w", err)
	}
	defer client.Close()

	return nil
}

Java

在试用此示例之前,请按照Vision API 快速入门:使用客户端库中的 Java 设置说明进行操作。如需了解详情,请参阅 Vision API Java 参考文档

ImageAnnotatorSettings settings =
    ImageAnnotatorSettings.newBuilder().setEndpoint("eu-vision.googleapis.com:443").build();

// Initialize client that will be used to send requests. This client only needs to be created
// once, and can be reused for multiple requests. After completing all of your requests, call
// the "close" method on the client to safely clean up any remaining background resources.
ImageAnnotatorClient client = ImageAnnotatorClient.create(settings);

Node.js

试用此示例之前,请按照《Vision 快速入门:使用客户端库》中的 Node.js 设置说明进行操作。如需了解详情,请参阅 Vision Node.js API 参考文档

如需向 Vision 进行身份验证,请设置应用默认凭据。 如需了解详情,请参阅为本地开发环境设置身份验证

// Imports the Google Cloud client library
const vision = require('@google-cloud/vision');

async function setEndpoint() {
  // Specifies the location of the api endpoint
  const clientOptions = {apiEndpoint: 'eu-vision.googleapis.com'};

  // Creates a client
  const client = new vision.ImageAnnotatorClient(clientOptions);

  // Performs text detection on the image file
  const [result] = await client.textDetection('./resources/wakeupcat.jpg');
  const labels = result.textAnnotations;
  console.log('Text:');
  labels.forEach(label => console.log(label.description));
}
setEndpoint();

Python

试用此示例之前,请按照《Vision 快速入门:使用客户端库》中的 Python 设置说明进行操作。如需了解详情,请参阅 Vision Python API 参考文档

如需向 Vision 进行身份验证,请设置应用默认凭据。 如需了解详情,请参阅为本地开发环境设置身份验证

from google.cloud import vision

client_options = {"api_endpoint": "eu-vision.googleapis.com"}

client = vision.ImageAnnotatorClient(client_options=client_options)

试用

接下来,请尝试执行文本检测和文档文本检测。您可以点击执行来使用已指定的图片 (gs://cloud-samples-data/vision/ocr/sign.jpg),也可以指定自己的图片。

如需尝试文档文本检测功能,请将 type 的值更新为 DOCUMENT_TEXT_DETECTION

路标图片

请求正文:

{
  "requests": [
    {
      "features": [
        {
          "type": "TEXT_DETECTION"
        }
      ],
      "image": {
        "source": {
          "imageUri": "gs://cloud-samples-data/vision/ocr/sign.jpg"
        }
      }
    }
  ]
}