モデルのトレーニング

準備したデータセットを使用してモデルをトレーニングし、カスタムモデルを作成します。AutoML Vision API では、データセットの画像を使用してモデルをトレーニングおよびテストし、モデルのパフォーマンスを評価します。その結果を確認し、必要に応じてトレーニング データセットを調整して、改善されたデータセットで新しいモデルをトレーニングします。

モデルのトレーニングが完了するまで数時間かかることがあります。AutoML Vision API を使用すると、トレーニングのステータスを確認できます。

モデルのトレーニング

境界ボックスとラベルを含む、アノテーション付きトレーニング画像を含むデータセットがある場合は、カスタムモデルを作成してトレーニングできます。

ウェブ UI

  1. AutoML Vision Object Detection UI を開きます。

    [データセット] に、現在のプロジェクトの使用可能データセットが表示されます。

    データセットの一覧ページ

  2. カスタムモデルのトレーニングに使用するデータセットを選択します。

  3. データセットの準備ができたら、[トレーニング] タブと [新しいモデルをトレーニング] ボタンを選択します。

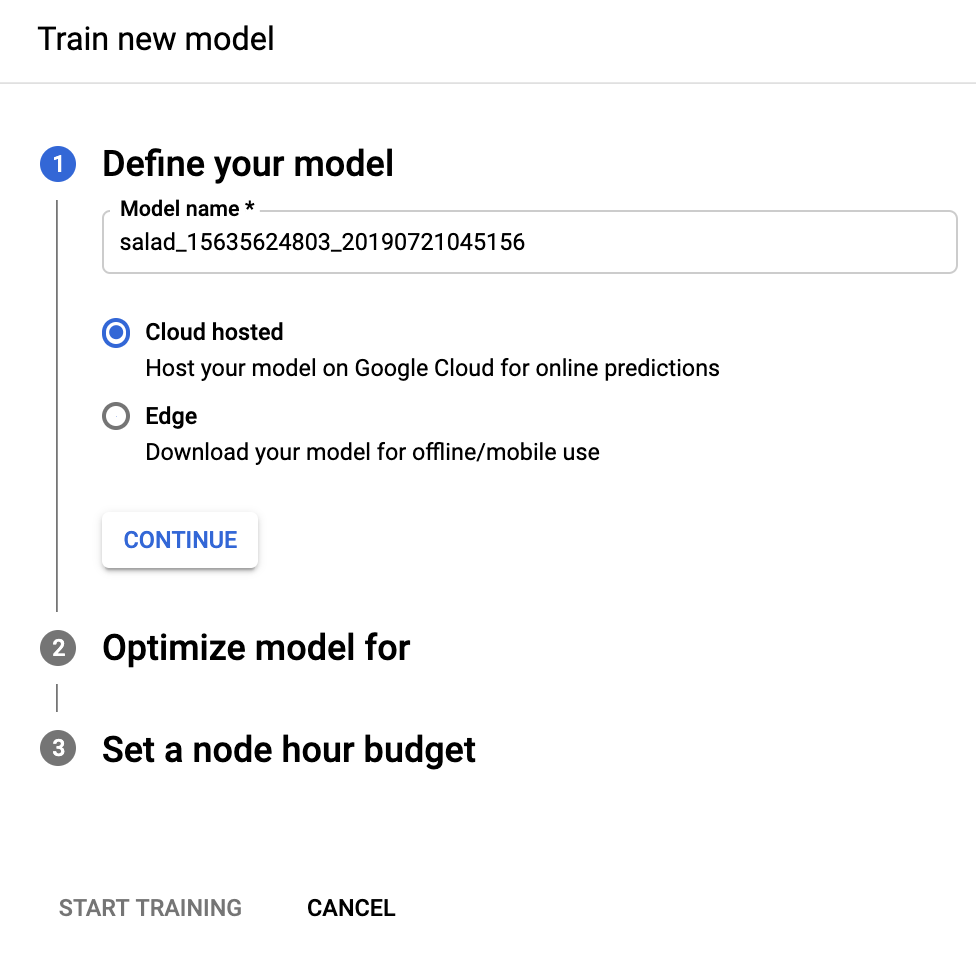
    [新しいモデルのトレーニング] サイド ウィンドウが開き、トレーニング オプションが表示されます。

  4. [モデルの定義] セクションで [モデル名] を指定します(または、デフォルト名をそのまま使用します)。指定されていない場合は、 [クラウドでホスト] モデルタイプとして選択します。Edge モデルのトレーニングを選択したら、[続行] を選択します。
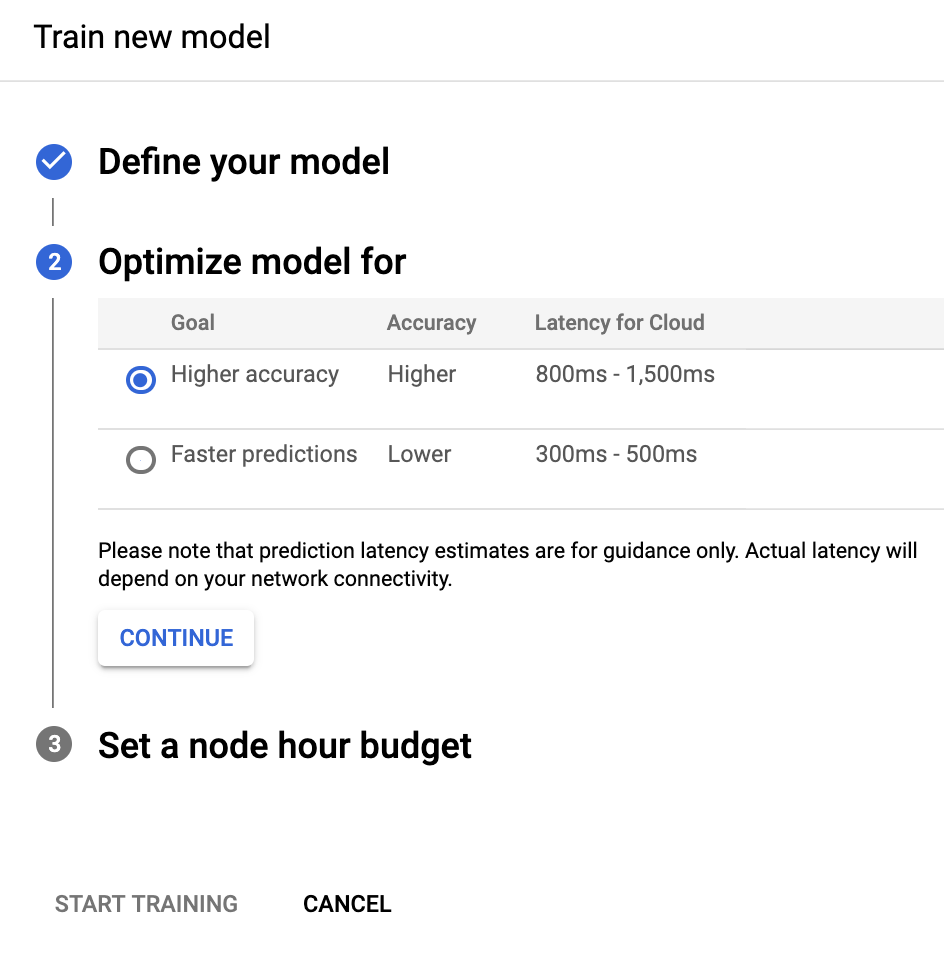
    クラウドモデルのトレーニングのラジオボタン画像

  5. 次の [モデル最適化のオプション] セクションで、[Higher accuracy] または [Faster prediction] から必要な最適化基準を選択します。最適化仕様を選択したら、[続行] を選択します。

    最良のトレードオフのラジオボタン画像

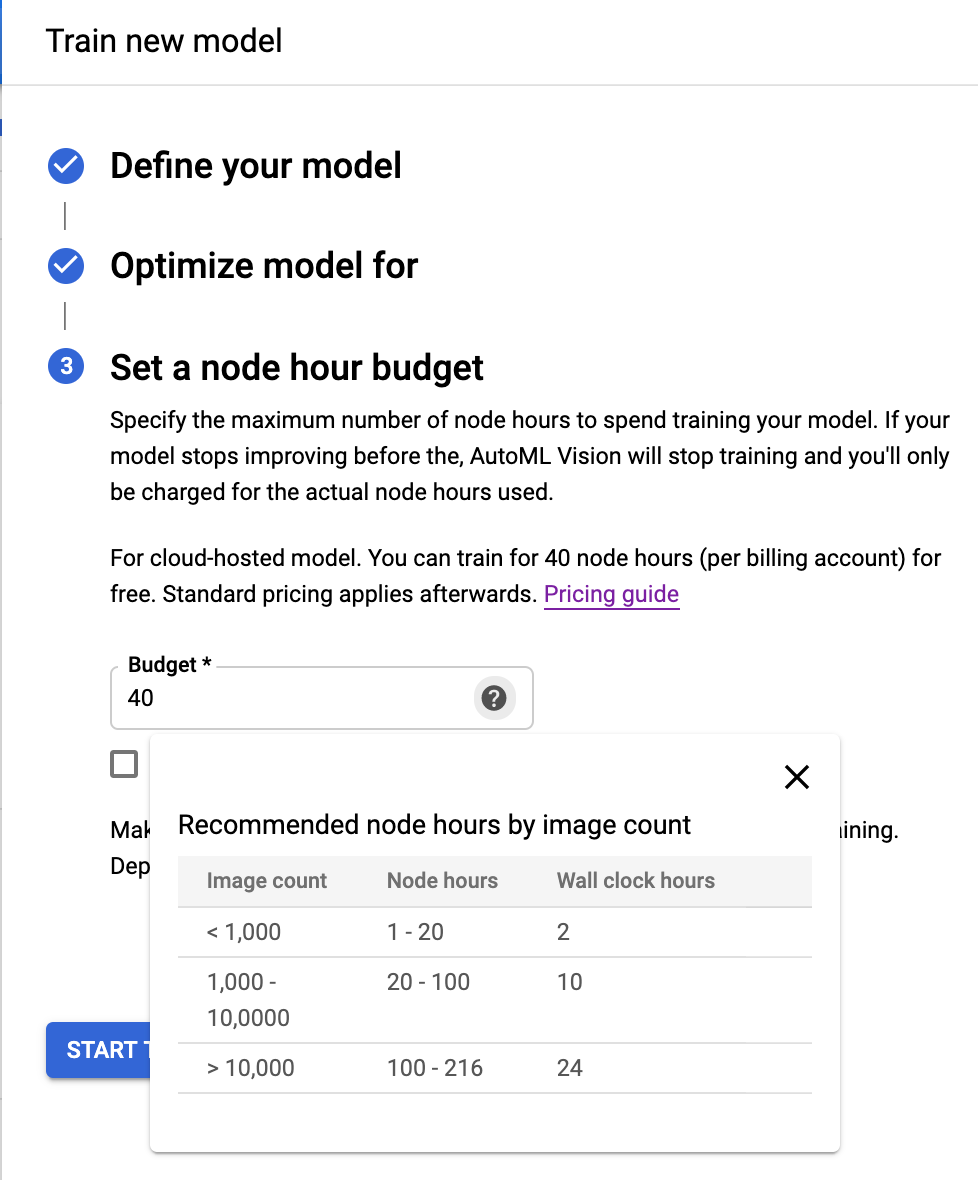
  6. 次の [Set a node hour budget] セクションで、必要なノードの予算を指定します。

    ほとんどのデータセットでは、モデルをトレーニングするのに 24 ノード時間で十分です。この推奨値は、モデルを完全に統合するための推定値です。ただし、別の値を選択することもできます。オブジェクト検出の最小ノード時間は 20 です。画像分類の場合、最小値は 8 です。

    このセクションでは、 [トレーニング後にモデルを 1 ノードにデプロイする] を選択して、トレーニング後にモデルの自動デプロイをオプトインすることもできます。それ以外の場合は、トレーニング終了後にモデルを手動でデプロイする必要があります。

    ノード予算設定セクション

  7. [トレーニングを開始] を選択して、モデルのトレーニングを開始します。

モデルのトレーニングが完了するまで数時間かかることがあります。モデルのトレーニングが正常に終了したら、Google Cloud Platform プロジェクトに使用したメールアドレスにメッセージが届きます。

REST

リクエストのデータを使用する前に、次のように置き換えます。

  • project-id: GCP プロジェクト ID
  • dataset-id: データセットの IDこの ID は、データセットの名前の最後の要素です。例:
    • データセット名: projects/project-id/locations/location-id/datasets/3104518874390609379
    • データセット ID: 3104518874390609379
  • display-name: 選択した文字列の表示名。

特定のフィールドに関する考慮事項:

  • imageObjectDetectionModelMetadata.modelType - モデルを最適化する 2 つのオプションのいずれかを示します。
    • cloud-low-latency-1 - トレーニングのレイテンシを最適化します。
    • cloud-high-accuracy-1 - トレーニングの精度を最適化します。
  • imageObjectDetectionModelMetadata.trainBudgetMilliNodeHours - このモデルを作成するためのトレーニング予算。ミリ単位のノード時間数で表します(このフィールドの値を 1,000 に設定すると 1 ノード時間になります)。実際の trainCostMilliNodeHours は、この値と同等か、それ以下になります。さらにモデルのトレーニングを行っても品質が向上しない場合は、予算を使わずに終了し、stopReasonMODEL_CONVERGED になります。

    : ノード時間 = 実際の時間 * 関係するノード数

    モデルタイプが cloud-high-accuracy-1(デフォルト)と cloud-low-latency-1 の場合、トレーニング予算は 20,000~2,000,000 ミリノード時間数にする必要があります(両端を含む)。デフォルト値は 216,000 で、通常の時間で 1 日を表します。

HTTP メソッドと URL:

POST https://automl.googleapis.com/v1/projects/PROJECT_ID/locations/us-central1/models

リクエストの本文(JSON):

{
  "displayName": "DISPLAY_NAME",
  "datasetId": "DATASET_ID",
  "imageObjectDetectionModelMetadata": {
    "modelType": "cloud-low-latency-1",
    "trainBudgetMilliNodeHours": "216000"
  }
}

リクエストを送信するには、次のいずれかのオプションを選択します。

curl

リクエスト本文を request.json という名前のファイルに保存して、次のコマンドを実行します。

curl -X POST \
-H "Authorization: Bearer $(gcloud auth print-access-token)" \
-H "x-goog-user-project: project-id" \
-H "Content-Type: application/json; charset=utf-8" \
-d @request.json \
"https://automl.googleapis.com/v1/projects/PROJECT_ID/locations/us-central1/models"

PowerShell

リクエスト本文を request.json という名前のファイルに保存して、次のコマンドを実行します。

$cred = gcloud auth print-access-token
$headers = @{ "Authorization" = "Bearer $cred"; "x-goog-user-project" = "project-id" }

Invoke-WebRequest `
-Method POST `
-Headers $headers `
-ContentType: "application/json; charset=utf-8" `
-InFile request.json `
-Uri "https://automl.googleapis.com/v1/projects/PROJECT_ID/locations/us-central1/models" | Select-Object -Expand Content

出力は次のようになります。タスクのステータスは、オペレーション ID(この場合は IOD3074819451447675546)を使用して取得できます。例については、長時間実行オペレーションによる作業をご覧ください。

{
  "name": "projects/PROJECT_ID/locations/us-central1/operations/IOD3074819451447675546",
  "metadata": {
    "@type": "type.googleapis.com/google.cloud.automl.v1.OperationMetadata",
    "createTime": "2019-07-26T21:10:18.338846Z",
    "updateTime": "2019-07-26T21:10:18.338846Z",
    "createModelDetails": {}
  }
}

Go

このサンプルを試す前に、クライアント ライブラリ ページを参照して、この言語の設定手順を完了してください。

import (
	"context"
	"fmt"
	"io"

	automl "cloud.google.com/go/automl/apiv1"
	"cloud.google.com/go/automl/apiv1/automlpb"
)

// visionObjectDetectionCreateModel creates a model for image object detection.
func visionObjectDetectionCreateModel(w io.Writer, projectID string, location string, datasetID string, modelName string) error {
	// projectID := "my-project-id"
	// location := "us-central1"
	// datasetID := "IOD123456789..."
	// modelName := "model_display_name"

	ctx := context.Background()
	client, err := automl.NewClient(ctx)
	if err != nil {
		return fmt.Errorf("NewClient: %w", err)
	}
	defer client.Close()

	req := &automlpb.CreateModelRequest{
		Parent: fmt.Sprintf("projects/%s/locations/%s", projectID, location),
		Model: &automlpb.Model{
			DisplayName: modelName,
			DatasetId:   datasetID,
			ModelMetadata: &automlpb.Model_ImageObjectDetectionModelMetadata{
				ImageObjectDetectionModelMetadata: &automlpb.ImageObjectDetectionModelMetadata{},
			},
		},
	}

	op, err := client.CreateModel(ctx, req)
	if err != nil {
		return fmt.Errorf("CreateModel: %w", err)
	}
	fmt.Fprintf(w, "Processing operation name: %q\n", op.Name())
	fmt.Fprintf(w, "Training started...\n")

	return nil
}

Java

このサンプルを試す前に、クライアント ライブラリ ページを参照して、この言語の設定手順を完了してください。

import com.google.api.gax.longrunning.OperationFuture;
import com.google.cloud.automl.v1.AutoMlClient;
import com.google.cloud.automl.v1.ImageObjectDetectionModelMetadata;
import com.google.cloud.automl.v1.LocationName;
import com.google.cloud.automl.v1.Model;
import com.google.cloud.automl.v1.OperationMetadata;
import java.io.IOException;
import java.util.concurrent.ExecutionException;

class VisionObjectDetectionCreateModel {

  static void createModel() throws IOException, ExecutionException, InterruptedException {
    // TODO(developer): Replace these variables before running the sample.
    String projectId = "YOUR_PROJECT_ID";
    String datasetId = "YOUR_DATASET_ID";
    String displayName = "YOUR_DATASET_NAME";
    createModel(projectId, datasetId, displayName);
  }

  // Create a model
  static void createModel(String projectId, String datasetId, String displayName)
      throws IOException, ExecutionException, InterruptedException {
    // Initialize client that will be used to send requests. This client only needs to be created
    // once, and can be reused for multiple requests. After completing all of your requests, call
    // the "close" method on the client to safely clean up any remaining background resources.
    try (AutoMlClient client = AutoMlClient.create()) {
      // A resource that represents Google Cloud Platform location.
      LocationName projectLocation = LocationName.of(projectId, "us-central1");
      // Set model metadata.
      ImageObjectDetectionModelMetadata metadata =
          ImageObjectDetectionModelMetadata.newBuilder().build();
      Model model =
          Model.newBuilder()
              .setDisplayName(displayName)
              .setDatasetId(datasetId)
              .setImageObjectDetectionModelMetadata(metadata)
              .build();

      // Create a model with the model metadata in the region.
      OperationFuture<Model, OperationMetadata> future =
          client.createModelAsync(projectLocation, model);
      // OperationFuture.get() will block until the model is created, which may take several hours.
      // You can use OperationFuture.getInitialFuture to get a future representing the initial
      // response to the request, which contains information while the operation is in progress.
      System.out.format("Training operation name: %s\n", future.getInitialFuture().get().getName());
      System.out.println("Training started...");
    }
  }
}

Node.js

このサンプルを試す前に、クライアント ライブラリ ページを参照して、この言語の設定手順を完了してください。

/**
 * TODO(developer): Uncomment these variables before running the sample.
 */
// const projectId = 'YOUR_PROJECT_ID';
// const location = 'us-central1';
// const dataset_id = 'YOUR_DATASET_ID';
// const displayName = 'YOUR_DISPLAY_NAME';

// Imports the Google Cloud AutoML library
const {AutoMlClient} = require('@google-cloud/automl').v1;

// Instantiates a client
const client = new AutoMlClient();

async function createModel() {
  // Construct request
  const request = {
    parent: client.locationPath(projectId, location),
    model: {
      displayName: displayName,
      datasetId: datasetId,
      imageObjectDetectionModelMetadata: {},
    },
  };

  // Don't wait for the LRO
  const [operation] = await client.createModel(request);
  console.log(`Training started... ${operation}`);
  console.log(`Training operation name: ${operation.name}`);
}

createModel();

Python

このサンプルを試す前に、クライアント ライブラリ ページを参照して、この言語の設定手順を完了してください。

from google.cloud import automl

# TODO(developer): Uncomment and set the following variables
# project_id = "YOUR_PROJECT_ID"
# dataset_id = "YOUR_DATASET_ID"
# display_name = "your_models_display_name"

client = automl.AutoMlClient()

# A resource that represents Google Cloud Platform location.
project_location = f"projects/{project_id}/locations/us-central1"
# Leave model unset to use the default base model provided by Google
# train_budget_milli_node_hours: The actual train_cost will be equal or
# less than this value.
# https://cloud.google.com/automl/docs/reference/rpc/google.cloud.automl.v1#imageobjectdetectionmodelmetadata
metadata = automl.ImageObjectDetectionModelMetadata(
    train_budget_milli_node_hours=24000
)
model = automl.Model(
    display_name=display_name,
    dataset_id=dataset_id,
    image_object_detection_model_metadata=metadata,
)

# Create a model with the model metadata in the region.
response = client.create_model(parent=project_location, model=model)

print(f"Training operation name: {response.operation.name}")
print("Training started...")

その他の言語

C#: クライアント ライブラリ ページの C# の設定手順を行ってから、.NET 用の AutoML Vision Object Detection リファレンス ドキュメントをご覧ください。

PHP: クライアント ライブラリ ページの PHP の設定手順を行ってから、PHP 用の AutoML Vision Object Detection リファレンス ドキュメントをご覧ください。

Ruby: クライアント ライブラリ ページの Ruby の設定手順を行ってから、Ruby 用の AutoML Vision Object Detection リファレンス ドキュメントをご覧ください。

オペレーションを一覧表示する

次のコードサンプルでは、プロジェクトのオペレーションを一覧表示して、結果をフィルタリングします。

REST

リクエストのデータを使用する前に、次のように置き換えます。

  • project-id: GCP プロジェクト ID

HTTP メソッドと URL:

GET https://automl.googleapis.com/v1/projects/PROJECT_ID/locations/us-central1/operations

リクエストを送信するには、次のいずれかのオプションを選択します。

curl

次のコマンドを実行します。

curl -X GET \
-H "Authorization: Bearer $(gcloud auth print-access-token)" \
-H "x-goog-user-project: project-id" \
"https://automl.googleapis.com/v1/projects/PROJECT_ID/locations/us-central1/operations"

PowerShell

次のコマンドを実行します。

$cred = gcloud auth print-access-token
$headers = @{ "Authorization" = "Bearer $cred"; "x-goog-user-project" = "project-id" }

Invoke-WebRequest `
-Method GET `
-Headers $headers `
-Uri "https://automl.googleapis.com/v1/projects/PROJECT_ID/locations/us-central1/operations" | Select-Object -Expand Content

表示される出力は、リクエストしたオペレーションによって異なります。

select クエリ パラメータ(operationIddoneworksOn)を使用して返されるオペレーションをフィルタすることもできます。たとえば、実行を終了したオペレーションのリストを返すには、URL を次のように変更します。

GET https://automl.googleapis.com/v1/projects/PROJECT_ID/locations/us-central1/operations?filter="done=true"

Go

このサンプルを試す前に、[API とリファレンス] > [クライアント ライブラリ] ページを参照して、この言語の設定手順を完了してください。

import (
	"context"
	"fmt"
	"io"

	automl "cloud.google.com/go/automl/apiv1"
	longrunning "cloud.google.com/go/longrunning/autogen/longrunningpb"
	"google.golang.org/api/iterator"
)

// listOperationStatus lists existing operations' status.
func listOperationStatus(w io.Writer, projectID string, location string) error {
	// projectID := "my-project-id"
	// location := "us-central1"

	ctx := context.Background()
	client, err := automl.NewClient(ctx)
	if err != nil {
		return fmt.Errorf("NewClient: %w", err)
	}
	defer client.Close()

	req := &longrunning.ListOperationsRequest{
		Name: fmt.Sprintf("projects/%s/locations/%s", projectID, location),
	}

	it := client.LROClient.ListOperations(ctx, req)

	// Iterate over all results
	for {
		op, err := it.Next()
		if err == iterator.Done {
			break
		}
		if err != nil {
			return fmt.Errorf("ListOperations.Next: %w", err)
		}

		fmt.Fprintf(w, "Name: %v\n", op.GetName())
		fmt.Fprintf(w, "Operation details:\n")
		fmt.Fprintf(w, "%v", op)
	}

	return nil
}

Java

このサンプルを試す前に、[API とリファレンス] > [クライアント ライブラリ] ページを参照して、この言語の設定手順を完了してください。

import com.google.cloud.automl.v1.AutoMlClient;
import com.google.cloud.automl.v1.LocationName;
import com.google.longrunning.ListOperationsRequest;
import com.google.longrunning.Operation;
import java.io.IOException;

class ListOperationStatus {

  static void listOperationStatus() throws IOException {
    // TODO(developer): Replace these variables before running the sample.
    String projectId = "YOUR_PROJECT_ID";
    listOperationStatus(projectId);
  }

  // Get the status of an operation
  static void listOperationStatus(String projectId) throws IOException {
    // Initialize client that will be used to send requests. This client only needs to be created
    // once, and can be reused for multiple requests. After completing all of your requests, call
    // the "close" method on the client to safely clean up any remaining background resources.
    try (AutoMlClient client = AutoMlClient.create()) {
      // A resource that represents Google Cloud Platform location.
      LocationName projectLocation = LocationName.of(projectId, "us-central1");

      // Create list operations request.
      ListOperationsRequest listrequest =
          ListOperationsRequest.newBuilder().setName(projectLocation.toString()).build();

      // List all the operations names available in the region by applying filter.
      for (Operation operation :
          client.getOperationsClient().listOperations(listrequest).iterateAll()) {
        System.out.println("Operation details:");
        System.out.format("\tName: %s\n", operation.getName());
        System.out.format("\tMetadata Type Url: %s\n", operation.getMetadata().getTypeUrl());
        System.out.format("\tDone: %s\n", operation.getDone());
        if (operation.hasResponse()) {
          System.out.format("\tResponse Type Url: %s\n", operation.getResponse().getTypeUrl());
        }
        if (operation.hasError()) {
          System.out.println("\tResponse:");
          System.out.format("\t\tError code: %s\n", operation.getError().getCode());
          System.out.format("\t\tError message: %s\n\n", operation.getError().getMessage());
        }
      }
    }
  }
}

Node.js

このサンプルを試す前に、[API とリファレンス] > [クライアント ライブラリ] ページを参照して、この言語の設定手順を完了してください。

/**
 * TODO(developer): Uncomment these variables before running the sample.
 */
// const projectId = 'YOUR_PROJECT_ID';
// const location = 'us-central1';

// Imports the Google Cloud AutoML library
const {AutoMlClient} = require('@google-cloud/automl').v1;

// Instantiates a client
const client = new AutoMlClient();

async function listOperationStatus() {
  // Construct request
  const request = {
    name: client.locationPath(projectId, location),
    filter: `worksOn=projects/${projectId}/locations/${location}/models/*`,
  };

  const [response] = await client.operationsClient.listOperations(request);

  console.log('List of operation status:');
  for (const operation of response) {
    console.log(`Name: ${operation.name}`);
    console.log('Operation details:');
    console.log(`${operation}`);
  }
}

listOperationStatus();

Python

このサンプルを試す前に、[API とリファレンス] > [クライアント ライブラリ] ページを参照して、この言語の設定手順を完了してください。

from google.cloud import automl

# TODO(developer): Uncomment and set the following variables
# project_id = "YOUR_PROJECT_ID"

client = automl.AutoMlClient()
# A resource that represents Google Cloud Platform location.
project_location = f"projects/{project_id}/locations/us-central1"
# List all the operations names available in the region.
response = client._transport.operations_client.list_operations(
    name=project_location, filter_="", timeout=5
)

print("List of operations:")
for operation in response:
    print(f"Name: {operation.name}")
    print("Operation details:")
    print(operation)

その他の言語

C#: クライアント ライブラリ ページの C# の設定手順を行ってから、.NET 用の AutoML Vision Object Detection リファレンス ドキュメントをご覧ください。

PHP: クライアント ライブラリ ページの PHP の設定手順を行ってから、PHP 用の AutoML Vision Object Detection リファレンス ドキュメントをご覧ください。

Ruby: クライアント ライブラリ ページの Ruby の設定手順を行ってから、Ruby 用の AutoML Vision Object Detection リファレンス ドキュメントをご覧ください。

長時間実行オペレーションによる作業

REST

リクエストのデータを使用する前に、次のように置き換えます。

  • project-id: GCP プロジェクト ID
  • operation-id: オペレーションの IDこの ID は、オペレーションの名前の最後の要素です。例:
    • オペレーション名: projects/project-id/locations/location-id/operations/IOD5281059901324392598
    • オペレーション ID: IOD5281059901324392598

HTTP メソッドと URL:

GET https://automl.googleapis.com/v1/projects/PROJECT_ID/locations/us-central1/operations/OPERATION_ID

リクエストを送信するには、次のいずれかのオプションを選択します。

curl

次のコマンドを実行します。

curl -X GET \
-H "Authorization: Bearer $(gcloud auth print-access-token)" \
-H "x-goog-user-project: project-id" \
"https://automl.googleapis.com/v1/projects/PROJECT_ID/locations/us-central1/operations/OPERATION_ID"

PowerShell

次のコマンドを実行します。

$cred = gcloud auth print-access-token
$headers = @{ "Authorization" = "Bearer $cred"; "x-goog-user-project" = "project-id" }

Invoke-WebRequest `
-Method GET `
-Headers $headers `
-Uri "https://automl.googleapis.com/v1/projects/PROJECT_ID/locations/us-central1/operations/OPERATION_ID" | Select-Object -Expand Content
完了したインポート オペレーションの場合、出力は次のようになります。
{
  "name": "projects/PROJECT_ID/locations/us-central1/operations/OPERATION_ID",
  "metadata": {
    "@type": "type.googleapis.com/google.cloud.automl.v1.OperationMetadata",
    "createTime": "2018-10-29T15:56:29.176485Z",
    "updateTime": "2018-10-29T16:10:41.326614Z",
    "importDataDetails": {}
  },
  "done": true,
  "response": {
    "@type": "type.googleapis.com/google.protobuf.Empty"
  }
}

完了したモデル作成オペレーションの場合、出力は次のようになります。

{
  "name": "projects/PROJECT_ID/locations/us-central1/operations/OPERATION_ID",
  "metadata": {
    "@type": "type.googleapis.com/google.cloud.automl.v1.OperationMetadata",
    "createTime": "2019-07-22T18:35:06.881193Z",
    "updateTime": "2019-07-22T19:58:44.972235Z",
    "createModelDetails": {}
  },
  "done": true,
  "response": {
    "@type": "type.googleapis.com/google.cloud.automl.v1.Model",
    "name": "projects/PROJECT_ID/locations/us-central1/models/MODEL_ID"
  }
}

Go

このサンプルを試す前に、クライアント ライブラリ ページを参照して、この言語の設定手順を完了してください。

import (
	"context"
	"fmt"
	"io"

	automl "cloud.google.com/go/automl/apiv1"
	"cloud.google.com/go/automl/apiv1/automlpb"
)

// getOperationStatus gets an operation's status.
func getOperationStatus(w io.Writer, projectID string, location string, datasetID string, modelName string) error {
	// projectID := "my-project-id"
	// location := "us-central1"
	// datasetID := "ICN123456789..."
	// modelName := "model_display_name"

	ctx := context.Background()
	client, err := automl.NewClient(ctx)
	if err != nil {
		return fmt.Errorf("NewClient: %w", err)
	}
	defer client.Close()

	req := &automlpb.CreateModelRequest{
		Parent: fmt.Sprintf("projects/%s/locations/%s", projectID, location),
		Model: &automlpb.Model{
			DisplayName: modelName,
			DatasetId:   datasetID,
			ModelMetadata: &automlpb.Model_ImageClassificationModelMetadata{
				ImageClassificationModelMetadata: &automlpb.ImageClassificationModelMetadata{
					TrainBudgetMilliNodeHours: 1000, // 1000 milli-node hours are 1 hour
				},
			},
		},
	}

	op, err := client.CreateModel(ctx, req)
	if err != nil {
		return err
	}
	fmt.Fprintf(w, "Name: %v\n", op.Name())

	// Wait for the longrunning operation complete.
	resp, err := op.Wait(ctx)
	if err != nil && !op.Done() {
		fmt.Println("failed to fetch operation status", err)
		return err
	}
	if err != nil && op.Done() {
		fmt.Println("operation completed with error", err)
		return err
	}
	fmt.Fprintf(w, "Response: %v\n", resp)

	return nil
}

Java

このサンプルを試す前に、クライアント ライブラリ ページを参照して、この言語の設定手順を完了してください。

import com.google.cloud.automl.v1.AutoMlClient;
import com.google.longrunning.Operation;
import java.io.IOException;

class GetOperationStatus {

  static void getOperationStatus() throws IOException {
    // TODO(developer): Replace these variables before running the sample.
    String operationFullId = "projects/[projectId]/locations/us-central1/operations/[operationId]";
    getOperationStatus(operationFullId);
  }

  // Get the status of an operation
  static void getOperationStatus(String operationFullId) throws IOException {
    // Initialize client that will be used to send requests. This client only needs to be created
    // once, and can be reused for multiple requests. After completing all of your requests, call
    // the "close" method on the client to safely clean up any remaining background resources.
    try (AutoMlClient client = AutoMlClient.create()) {
      // Get the latest state of a long-running operation.
      Operation operation = client.getOperationsClient().getOperation(operationFullId);

      // Display operation details.
      System.out.println("Operation details:");
      System.out.format("\tName: %s\n", operation.getName());
      System.out.format("\tMetadata Type Url: %s\n", operation.getMetadata().getTypeUrl());
      System.out.format("\tDone: %s\n", operation.getDone());
      if (operation.hasResponse()) {
        System.out.format("\tResponse Type Url: %s\n", operation.getResponse().getTypeUrl());
      }
      if (operation.hasError()) {
        System.out.println("\tResponse:");
        System.out.format("\t\tError code: %s\n", operation.getError().getCode());
        System.out.format("\t\tError message: %s\n", operation.getError().getMessage());
      }
    }
  }
}

Node.js

このサンプルを試す前に、クライアント ライブラリ ページを参照して、この言語の設定手順を完了してください。

/**
 * TODO(developer): Uncomment these variables before running the sample.
 */
// const projectId = 'YOUR_PROJECT_ID';
// const location = 'us-central1';
// const operationId = 'YOUR_OPERATION_ID';

// Imports the Google Cloud AutoML library
const {AutoMlClient} = require('@google-cloud/automl').v1;

// Instantiates a client
const client = new AutoMlClient();

async function getOperationStatus() {
  // Construct request
  const request = {
    name: `projects/${projectId}/locations/${location}/operations/${operationId}`,
  };

  const [response] = await client.operationsClient.getOperation(request);

  console.log(`Name: ${response.name}`);
  console.log('Operation details:');
  console.log(`${response}`);
}

getOperationStatus();

Python

このサンプルを試す前に、クライアント ライブラリ ページを参照して、この言語の設定手順を完了してください。

from google.cloud import automl

# TODO(developer): Uncomment and set the following variables
# operation_full_id = \
#     "projects/[projectId]/locations/us-central1/operations/[operationId]"

client = automl.AutoMlClient()
# Get the latest state of a long-running operation.
response = client._transport.operations_client.get_operation(operation_full_id)

print(f"Name: {response.name}")
print("Operation details:")
print(response)

その他の言語

C#: クライアント ライブラリ ページの C# の設定手順を行ってから、.NET 用の AutoML Vision Object Detection リファレンス ドキュメントをご覧ください。

PHP: クライアント ライブラリ ページの PHP の設定手順を行ってから、PHP 用の AutoML Vision Object Detection リファレンス ドキュメントをご覧ください。

Ruby: クライアント ライブラリ ページの Ruby の設定手順を行ってから、Ruby 用の AutoML Vision Object Detection リファレンス ドキュメントをご覧ください。

オペレーションのキャンセル

オペレーション ID を使用して、インポート タスクやトレーニング タスクをキャンセルできます。

REST

このサンプルを試す前に、クライアント ライブラリ ページを参照して、この言語の設定手順を完了してください。

リクエストのデータを使用する前に、次のように置き換えます。

  • project-id: GCP プロジェクト ID
  • operation-id: オペレーションの IDこの ID は、オペレーションの名前の最後の要素です。例:
    • オペレーション名: projects/project-id/locations/location-id/operations/IOD5281059901324392598
    • オペレーション ID: IOD5281059901324392598

HTTP メソッドと URL:

POST https://automl.googleapis.com/v1/projects/PROJECT_ID/locations/us-central1/operations/OPERATION_ID:cancel

リクエストを送信するには、次のいずれかのオプションを選択します。

curl

次のコマンドを実行します。

curl -X POST \
-H "Authorization: Bearer $(gcloud auth print-access-token)" \
-H "x-goog-user-project: project-id" \
-H "Content-Type: application/json; charset=utf-8" \
-d "" \
"https://automl.googleapis.com/v1/projects/PROJECT_ID/locations/us-central1/operations/OPERATION_ID:cancel"

PowerShell

次のコマンドを実行します。

$cred = gcloud auth print-access-token
$headers = @{ "Authorization" = "Bearer $cred"; "x-goog-user-project" = "project-id" }

Invoke-WebRequest `
-Method POST `
-Headers $headers `
-Uri "https://automl.googleapis.com/v1/projects/PROJECT_ID/locations/us-central1/operations/OPERATION_ID:cancel" | Select-Object -Expand Content
リクエストが正常に処理されると、空の JSON オブジェクトが返されます。
{}

モデルに関する情報の取得

次のコードサンプルを使用して、特定のトレーニング済みモデルに関する情報を取得します。このリクエストから返された情報を使用して、モードの変更や予測リクエストの送信を行うことができます。

REST

リクエストのデータを使用する前に、次のように置き換えます。

  • project-id: GCP プロジェクト ID
  • model-id: モデルを作成したときにレスポンスで返されたモデルの ID。この ID は、モデルの名前の最後の要素です。例:
    • モデル名: projects/project-id/locations/location-id/models/IOD4412217016962778756
    • モデル ID: IOD4412217016962778756

HTTP メソッドと URL:

GET https://automl.googleapis.com/v1/projects/project-id/locations/us-central1/models/model-id

リクエストを送信するには、次のいずれかのオプションを選択します。

curl

次のコマンドを実行します。

curl -X GET \
-H "Authorization: Bearer $(gcloud auth print-access-token)" \
-H "x-goog-user-project: project-id" \
"https://automl.googleapis.com/v1/projects/project-id/locations/us-central1/models/model-id"

PowerShell

次のコマンドを実行します。

$cred = gcloud auth print-access-token
$headers = @{ "Authorization" = "Bearer $cred"; "x-goog-user-project" = "project-id" }

Invoke-WebRequest `
-Method GET `
-Headers $headers `
-Uri "https://automl.googleapis.com/v1/projects/project-id/locations/us-central1/models/model-id" | Select-Object -Expand Content

次のような JSON レスポンスが返されます。


    {
  "name": "projects/project-id/locations/us-central1/models/model-id",
  "displayName": "display-name",
  "datasetId": "dataset-id",
  "createTime": "2019-07-26T21:10:18.338846Z",
  "deploymentState": "UNDEPLOYED",
  "updateTime": "2019-07-26T22:28:57.464076Z",
  "imageObjectDetectionModelMetadata": {
    "modelType": "cloud-low-latency-1",
    "nodeQps": 1.2987012987012987,
    "stopReason": "MODEL_CONVERGED",
    "trainBudgetMilliNodeHours": "216000",
    "trainCostMilliNodeHours": "8230"
  }
}

Go

このサンプルを試す前に、クライアント ライブラリ ページを参照して、この言語の設定手順を完了してください。

import (
	"context"
	"fmt"
	"io"

	automl "cloud.google.com/go/automl/apiv1"
	"cloud.google.com/go/automl/apiv1/automlpb"
)

// getModel gets a model.
func getModel(w io.Writer, projectID string, location string, modelID string) error {
	// projectID := "my-project-id"
	// location := "us-central1"
	// modelID := "TRL123456789..."

	ctx := context.Background()
	client, err := automl.NewClient(ctx)
	if err != nil {
		return fmt.Errorf("NewClient: %w", err)
	}
	defer client.Close()

	req := &automlpb.GetModelRequest{
		Name: fmt.Sprintf("projects/%s/locations/%s/models/%s", projectID, location, modelID),
	}

	model, err := client.GetModel(ctx, req)
	if err != nil {
		return fmt.Errorf("GetModel: %w", err)
	}

	// Retrieve deployment state.
	deploymentState := "undeployed"
	if model.GetDeploymentState() == automlpb.Model_DEPLOYED {
		deploymentState = "deployed"
	}

	// Display the model information.
	fmt.Fprintf(w, "Model name: %v\n", model.GetName())
	fmt.Fprintf(w, "Model display name: %v\n", model.GetDisplayName())
	fmt.Fprintf(w, "Model create time:\n")
	fmt.Fprintf(w, "\tseconds: %v\n", model.GetCreateTime().GetSeconds())
	fmt.Fprintf(w, "\tnanos: %v\n", model.GetCreateTime().GetNanos())
	fmt.Fprintf(w, "Model deployment state: %v\n", deploymentState)

	return nil
}

Java

このサンプルを試す前に、クライアント ライブラリ ページを参照して、この言語の設定手順を完了してください。

import com.google.cloud.automl.v1.AutoMlClient;
import com.google.cloud.automl.v1.Model;
import com.google.cloud.automl.v1.ModelName;
import java.io.IOException;

class GetModel {

  static void getModel() throws IOException {
    // TODO(developer): Replace these variables before running the sample.
    String projectId = "YOUR_PROJECT_ID";
    String modelId = "YOUR_MODEL_ID";
    getModel(projectId, modelId);
  }

  // Get a model
  static void getModel(String projectId, String modelId) throws IOException {
    // Initialize client that will be used to send requests. This client only needs to be created
    // once, and can be reused for multiple requests. After completing all of your requests, call
    // the "close" method on the client to safely clean up any remaining background resources.
    try (AutoMlClient client = AutoMlClient.create()) {
      // Get the full path of the model.
      ModelName modelFullId = ModelName.of(projectId, "us-central1", modelId);
      Model model = client.getModel(modelFullId);

      // Display the model information.
      System.out.format("Model name: %s\n", model.getName());
      // To get the model id, you have to parse it out of the `name` field. As models Ids are
      // required for other methods.
      // Name Format: `projects/{project_id}/locations/{location_id}/models/{model_id}`
      String[] names = model.getName().split("/");
      String retrievedModelId = names[names.length - 1];
      System.out.format("Model id: %s\n", retrievedModelId);
      System.out.format("Model display name: %s\n", model.getDisplayName());
      System.out.println("Model create time:");
      System.out.format("\tseconds: %s\n", model.getCreateTime().getSeconds());
      System.out.format("\tnanos: %s\n", model.getCreateTime().getNanos());
      System.out.format("Model deployment state: %s\n", model.getDeploymentState());
    }
  }
}

Node.js

このサンプルを試す前に、クライアント ライブラリ ページを参照して、この言語の設定手順を完了してください。

/**
 * TODO(developer): Uncomment these variables before running the sample.
 */
// const projectId = 'YOUR_PROJECT_ID';
// const location = 'us-central1';
// const modelId = 'YOUR_MODEL_ID';

// Imports the Google Cloud AutoML library
const {AutoMlClient} = require('@google-cloud/automl').v1;

// Instantiates a client
const client = new AutoMlClient();

async function getModel() {
  // Construct request
  const request = {
    name: client.modelPath(projectId, location, modelId),
  };

  const [response] = await client.getModel(request);

  console.log(`Model name: ${response.name}`);
  console.log(
    `Model id: ${
      response.name.split('/')[response.name.split('/').length - 1]
    }`
  );
  console.log(`Model display name: ${response.displayName}`);
  console.log('Model create time');
  console.log(`\tseconds ${response.createTime.seconds}`);
  console.log(`\tnanos ${response.createTime.nanos / 1e9}`);
  console.log(`Model deployment state: ${response.deploymentState}`);
}

getModel();

Python

このサンプルを試す前に、クライアント ライブラリ ページを参照して、この言語の設定手順を完了してください。

from google.cloud import automl

# TODO(developer): Uncomment and set the following variables
# project_id = "YOUR_PROJECT_ID"
# model_id = "YOUR_MODEL_ID"

client = automl.AutoMlClient()
# Get the full path of the model.
model_full_id = client.model_path(project_id, "us-central1", model_id)
model = client.get_model(name=model_full_id)

# Retrieve deployment state.
if model.deployment_state == automl.Model.DeploymentState.DEPLOYED:
    deployment_state = "deployed"
else:
    deployment_state = "undeployed"

# Display the model information.
print(f"Model name: {model.name}")
print("Model id: {}".format(model.name.split("/")[-1]))
print(f"Model display name: {model.display_name}")
print(f"Model create time: {model.create_time}")
print(f"Model deployment state: {deployment_state}")

その他の言語

C#: クライアント ライブラリ ページの C# の設定手順を行ってから、.NET 用の AutoML Vision Object Detection リファレンス ドキュメントをご覧ください。

PHP: クライアント ライブラリ ページの PHP の設定手順を行ってから、PHP 用の AutoML Vision Object Detection リファレンス ドキュメントをご覧ください。

Ruby: クライアント ライブラリ ページの Ruby の設定手順を行ってから、Ruby 用の AutoML Vision Object Detection リファレンス ドキュメントをご覧ください。