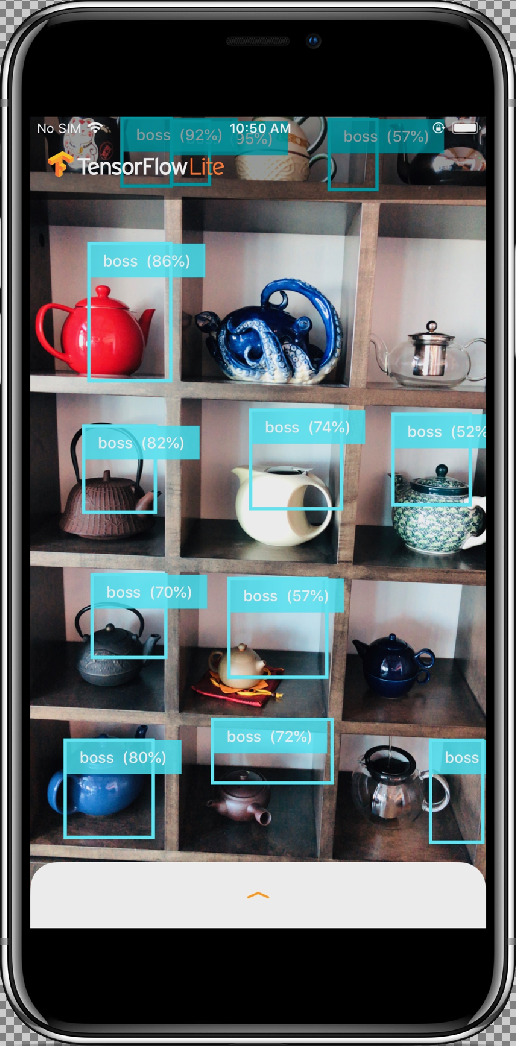
您将构建的模型
在本教程中,您将从 AutoML Vision Edge 下载导出的自定义 TensorFlow Lite 模型。然后,您将运行预制的 iOS 应用,该应用使用该模型检测图片中的多个对象(以边界框标识),并提供对象类别的自定义标签。
目标
在本入门级端到端演示中,您将使用代码执行以下操作:
- 在使用 TF Lite 解释器的 iOS 应用中运行 AutoML Vision 对象检测 Edge 模型。
准备工作
克隆 Git 代码库
使用命令行,通过以下命令克隆下面的 Git 代码库:
git clone https://github.com/tensorflow/examples.git
导航到代码库的本地克隆的 ios 目录 (examples/lite/examples/object_detection/ios/)。您将从 ios 目录运行以下所有代码示例:
cd examples/lite/examples/object_detection/ios
前提条件
- 已安装 Git。
- 支持的 iOS 版本:iOS 12.0 和更高版本。
设置 iOS 应用
生成并打开工作区文件
如需开始设置原始 iOS 应用,您必须先使用所需软件生成工作区文件:
如果您尚未导航到
ios文件夹,请导航到该文件夹:cd examples/lite/examples/object_detection/ios
安装 pod 以生成工作区文件:
pod install
如果您以前安装过此 pod,请使用以下命令:
pod update
生成工作区文件后,您可以使用 Xcode 打开项目。如需通过命令行打开项目,请从
ios目录运行以下命令:open ./ObjectDetection.xcworkspace
创建唯一标识符并构建应用
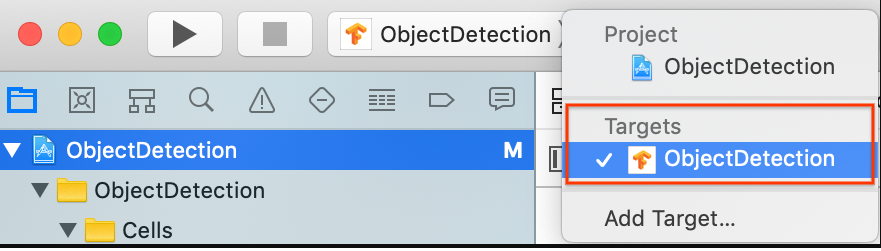
在 Xcode 中打开 ObjectDetection.xcworkspace 后,您必须先将软件包标识符(软件包 ID)更改为唯一值。
在左侧的项目导航器中选择顶部的
ObjectDetection项目项。
确保选择目标 (Targets) > ObjectDetection。
在常规 (General) > 身份 (Identity) 部分,将“软件包标识符”(Bundle Identifier) 字段更改为唯一值。首选样式为反向域名表示法。
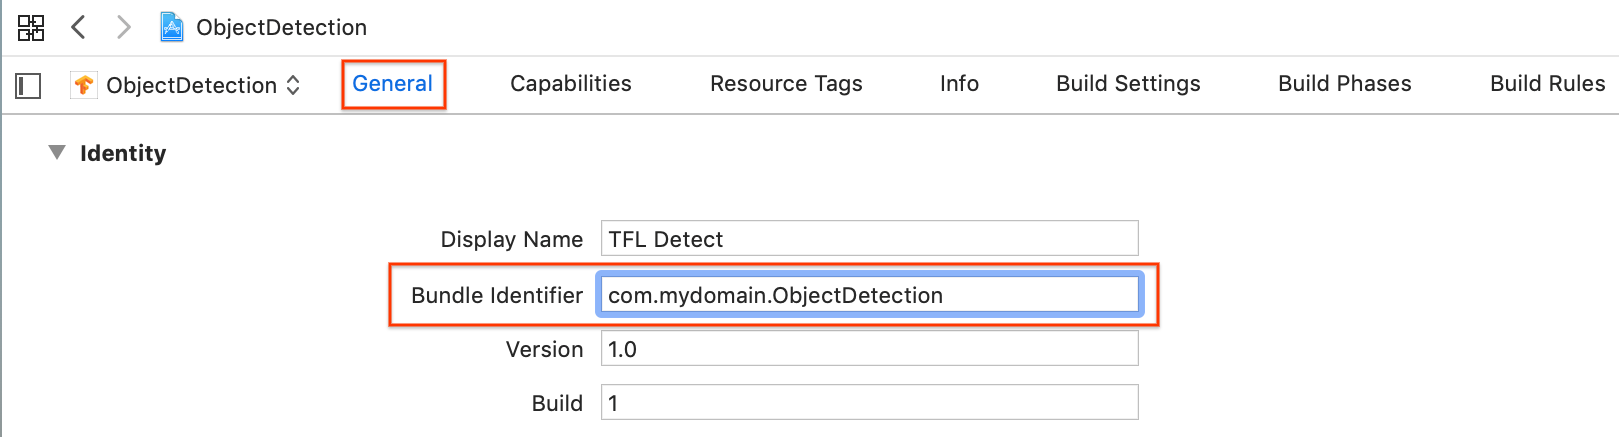
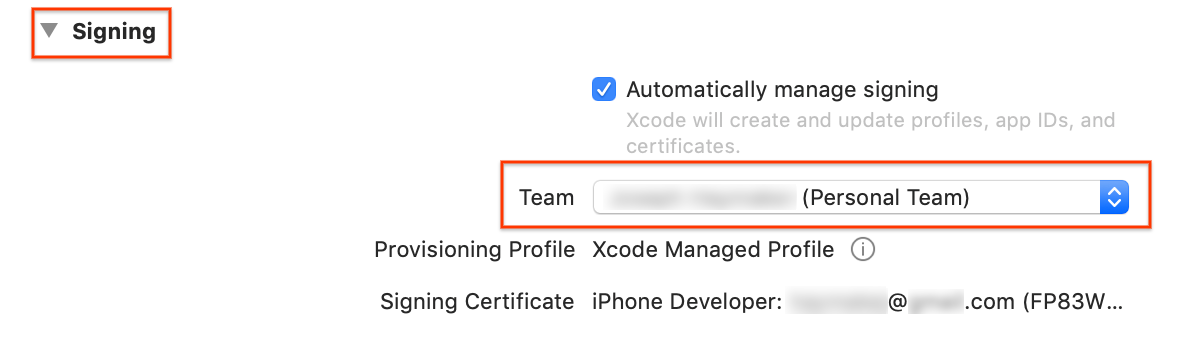
在身份 (Identity) 下面的常规 (General) > 签署 (Signing) 部分,从下拉菜单中指定一个团队。该值通过开发者 ID 提供。
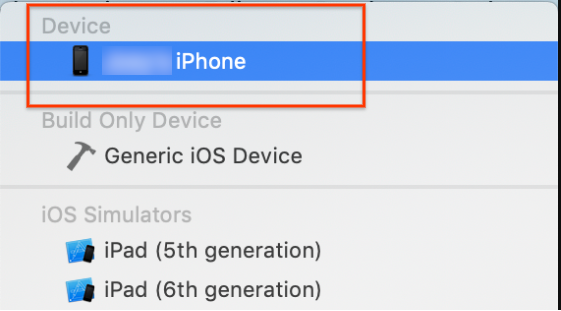
将 iOS 设备连接到您的计算机。检测到设备后,请从设备列表中选择该设备。
指定所有配置更改后,请使用以下命令在 Xcode 中构建应用:Command + B。
运行原始应用
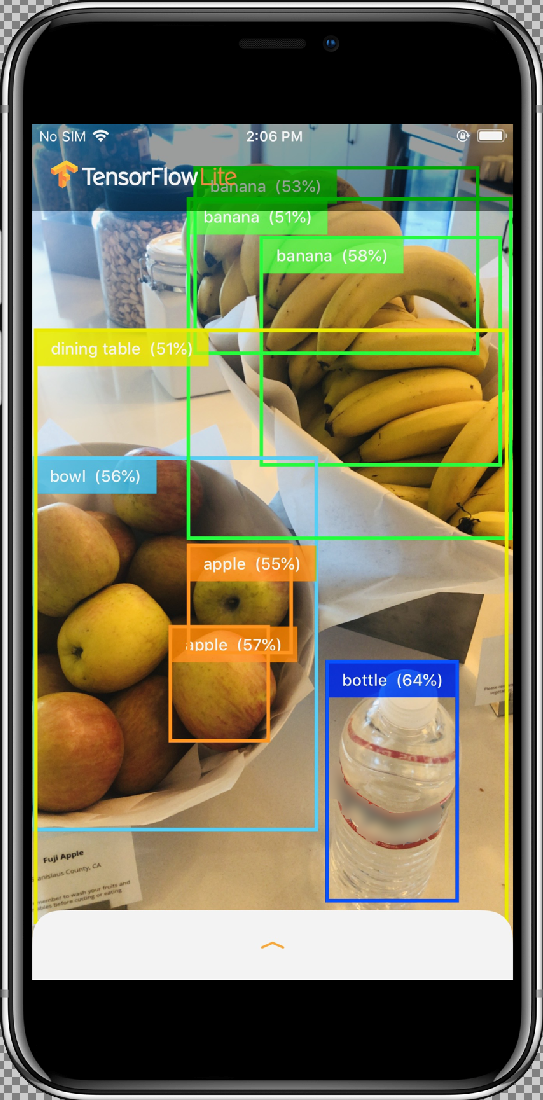
示例应用是一款摄像头应用,可使用在 COCO 数据集上训练的量化 MobileNet SSD 模型持续检测设备后置摄像头所看到的帧中的物体(使用边界框和标签)。
以下说明会引导您在 iOS 设备上构建和运行演示版。
模型文件是在您构建和运行演示版时通过 Xcode 中的脚本下载的。 您无需执行任何步骤来明确将 TF Lite 模型下载到项目中。
插入自定义模型之前,请测试该应用的基准版本,该版本使用基本“mobilenet”训练的模型。
如需在模拟器中启动该应用,请选择 Xcode 窗口左上角的播放按钮
 。
。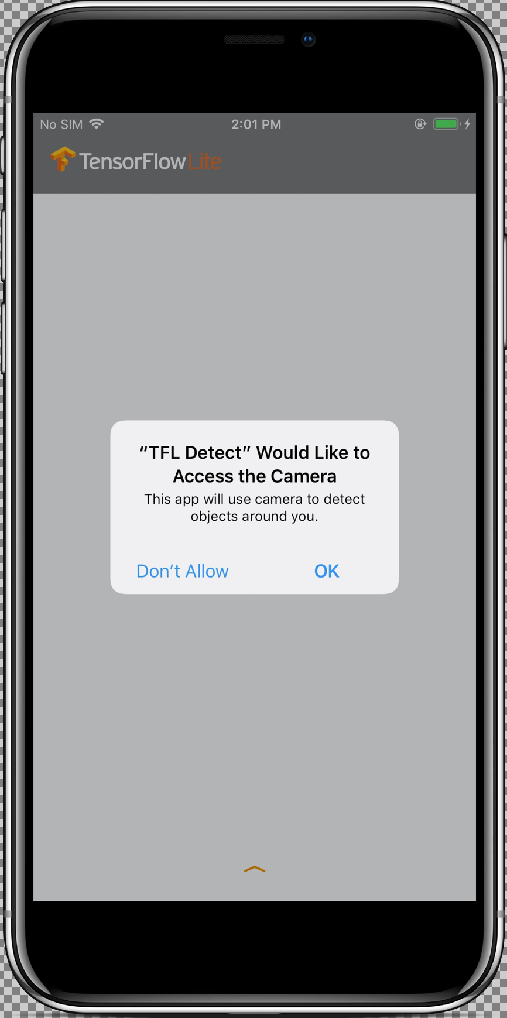
通过选择允许 (Allow) 按钮来允许应用使用摄像头后,应用将启动实时检测和注释功能。在每个摄像头框架中,系统都会检测对象并使用边界框和标签进行标记。
将设备对准周围环境中的其他物体,并验证应用是否在正确检测图片。
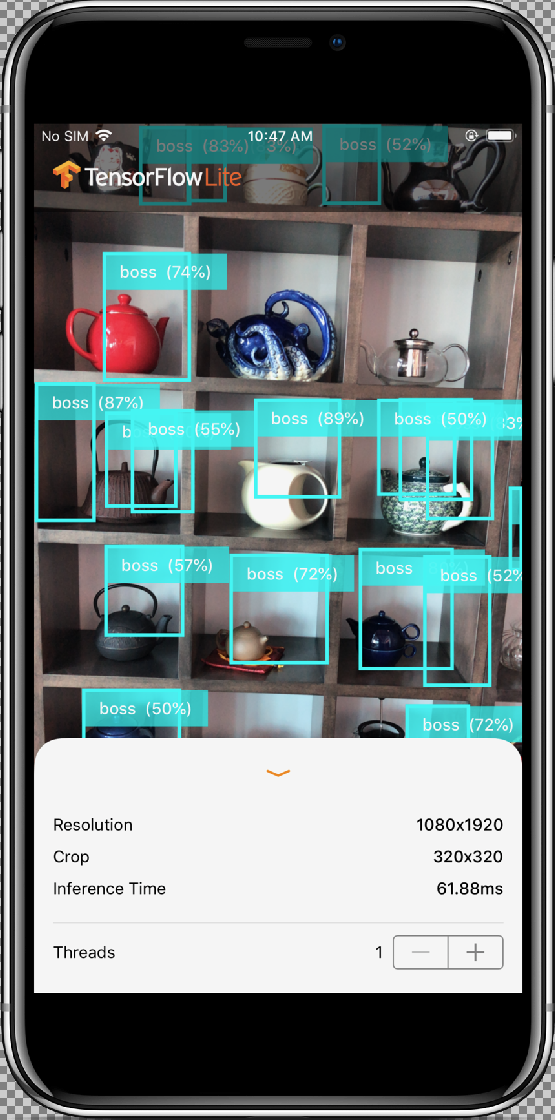
运行自定义应用
修改应用,以便其使用经过重新训练、具有自定义对象图片类别的模型。
将模型文件添加到项目中
此演示版项目配置为在 ios/objectDetection/model 目录中搜索两个文件:
detect.tflitelabelmap.txt
如需将这两个文件替换为您的自定义版本,请运行以下命令:
cp tf_files/optimized_graph.lite ios/objectDetection/model/detect.tflite
cp tf_files/retrained_labels.txt ios/objectDetection/model/labelmap.txt
运行应用
如需在 iOS 设备中重新启动该应用,请选择 Xcode 窗口左上角的播放按钮 ![]() 。
。
如需测试修改效果,请将设备的摄像头对准各种物体,以查看实时预测。
结果应如下所示:
工作方式
现在,您已运行该应用,请查看特定于 TensorFlow Lite 的代码。
TensorFlowLite Pod
此应用会用到预编译的 TFLite Cocoapod。Podfile 包括项目中的 cocoapod:
# Uncomment the next line to define a global platform for your project
platform :ios, '12.0'

target 'ObjectDetection' do
  # Comment the next line if you're not using Swift and don't want to use dynamic frameworks
  use_frameworks!

  # Pods for ObjectDetection
  pod 'TensorFlowLiteSwift'

end
与 TF Lite 对接的代码全部包含在 ModelDataHandler.swift 文件中。该类会预处理所有数据,并通过调用 Interpreter 在给定框架上运行推断。然后,它会为获得的推断设置格式,并为成功的推断返回前 N 个结果。
查看代码
涉及的第一个块(在必要的导入操作之后)是属性声明。tfLite 模型 inputShape 参数(batchSize、inputChannels、inputWidth、inputHeight)可以在 tflite_metadata.json 中找到;在导出 tflite 模型时,您将获得此文件。如需了解详情,请参阅导出 Edge 模型操作方法主题。
tflite_metadata.json 的示例类似于以下代码:
{
    "inferenceType": "QUANTIZED_UINT8",
    "inputShape": [
        1,   // This represents batch size
        512,  // This represents image width
        512,  // This represents image Height
        3  //This represents inputChannels
    ],
    "inputTensor": "normalized_input_image_tensor",
    "maxDetections": 20,  // This represents max number of boxes.
    "outputTensorRepresentation": [
        "bounding_boxes",
        "class_labels",
        "class_confidences",
        "num_of_boxes"
    ],
    "outputTensors": [
        "TFLite_Detection_PostProcess",
        "TFLite_Detection_PostProcess:1",
        "TFLite_Detection_PostProcess:2",
        "TFLite_Detection_PostProcess:3"
    ]
}
...
模型参数:
根据模型的 tflite_metadata.json 文件替换以下值。
let batchSize = 1 //Number of images to get prediction, the model takes 1 image at a time
let inputChannels = 3 //The pixels of the image input represented in RGB values
let inputWidth = 300 //Width of the image
let inputHeight = 300 //Height of the image
...
init
init 方法,该方法使用 Model 路径和 InterpreterOptions 创建 Interpreter,然后为模型的输入分配内存。
init?(modelFileInfo: FileInfo, labelsFileInfo: FileInfo, threadCount: Int = 1) {
    let modelFilename = modelFileInfo.name

    // Construct the path to the model file.
    guard let modelPath = Bundle.main.path(forResource: modelFilename,ofType: modelFileInfo.extension)

    // Specify the options for the `Interpreter`.
   var options = InterpreterOptions()
    options.threadCount = threadCount
    do {
      // Create the `Interpreter`.
      interpreter = try Interpreter(modelPath: modelPath, options: options)
      // Allocate memory for the model's input  `Tensor`s.
      try interpreter.allocateTensors()
    }

    super.init()

    // Load the classes listed in the labels file.
    loadLabels(fileInfo: labelsFileInfo)
  }
…
runModel
以下 runModel 方法:
- 将输入图片缩放到训练模型所需的宽高比。
- 从图片缓冲区中移除 Alpha 版组件以获取 RGB 数据。
- 将 RGB 数据复制到输入张量。
- 通过调用
Interpreter运行推断。 - 获取解释器的输出。
- 设置输出格式。
func runModel(onFrame pixelBuffer: CVPixelBuffer) -> Result? {
将图片剪裁为中间占据最大的正方形,并将其缩小到模型尺寸:
let scaledSize = CGSize(width: inputWidth, height: inputHeight)
guard let scaledPixelBuffer = pixelBuffer.resized(to: scaledSize) else
{
    return nil
}
...

do {
  let inputTensor = try interpreter.input(at: 0)
从图片缓冲区中移除 Alpha 版组件以获取 RGB 数据:
guard let rgbData = rgbDataFromBuffer(
  scaledPixelBuffer,
  byteCount: batchSize * inputWidth * inputHeight * inputChannels,
  isModelQuantized: inputTensor.dataType == .uInt8
) else {
  print("Failed to convert the image buffer to RGB data.")
  return nil
}
将 RGB 数据复制到输入 Tensor:
try interpreter.copy(rgbData, toInputAt: 0)
通过调用 Interpreter 运行推断:
    let startDate = Date()
    try interpreter.invoke()
    interval = Date().timeIntervalSince(startDate) * 1000
    outputBoundingBox = try interpreter.output(at: 0)
    outputClasses = try interpreter.output(at: 1)
    outputScores = try interpreter.output(at: 2)
    outputCount = try interpreter.output(at: 3)
  }
设置结果格式:
    let resultArray = formatResults(
      boundingBox: [Float](unsafeData: outputBoundingBox.data) ?? [],
      outputClasses: [Float](unsafeData: outputClasses.data) ?? [],
      outputScores: [Float](unsafeData: outputScores.data) ?? [],
      outputCount: Int(([Float](unsafeData: outputCount.data) ?? [0])[0]),
      width: CGFloat(imageWidth),
      height: CGFloat(imageHeight)
    )
...
}
过滤掉置信度得分小于阈值的所有结果,并返回前 N 个结果(按降序排列):
  func formatResults(boundingBox: [Float], outputClasses: [Float],
  outputScores: [Float], outputCount: Int, width: CGFloat, height: CGFloat)
  -> [Inference]{
    var resultsArray: [Inference] = []
    for i in 0...outputCount - 1 {

      let score = outputScores[i]
过滤置信度小于阈值的结果:
      guard score >= threshold else {
        continue
      }
获取标签列表中检测到的类的输出类名称:
      let outputClassIndex = Int(outputClasses[i])
      let outputClass = labels[outputClassIndex + 1]

      var rect: CGRect = CGRect.zero
将检测到的边界框转换为 CGRect。
      rect.origin.y = CGFloat(boundingBox[4*i])
      rect.origin.x = CGFloat(boundingBox[4*i+1])
      rect.size.height = CGFloat(boundingBox[4*i+2]) - rect.origin.y
      rect.size.width = CGFloat(boundingBox[4*i+3]) - rect.origin.x
检测到的角用于确定模型尺寸。因此,我们会根据实际的图片尺寸缩放 rect。
let newRect = rect.applying(CGAffineTransform(scaleX: width, y: height))
获取为类分配的颜色:
let colorToAssign = colorForClass(withIndex: outputClassIndex + 1)
      let inference = Inference(confidence: score,
                                className: outputClass,
                                rect: newRect,
                                displayColor: colorToAssign)
      resultsArray.append(inference)
    }

    // Sort results in descending order of confidence.
    resultsArray.sort { (first, second) -> Bool in
      return first.confidence  > second.confidence
    }

    return resultsArray
  }
CameraFeedManager
CameraFeedManager.swift 管理与摄像头相关的所有功能。
它会初始化和配置 AVCaptureSession:
private func configureSession() {session.beginConfiguration()
然后,它会尝试添加
AVCaptureDeviceInput并将builtInWideAngleCamera添加为会话的设备输入。addVideoDeviceInput()
接下来,它会尝试添加
AVCaptureVideoDataOutput:addVideoDataOutput()
session.commitConfiguration() self.cameraConfiguration = .success }启动会话。
停止会话。
错误处理:
- NSNotification.Name.AVCaptureSessionRuntimeError:在
AVCaptureSession实例运行期间发生意外错误时发布。userInfo 字典包含AVCaptureSessionErrorKey键的NSError对象。 - NSNotification.Name.AVCaptureSessionWasInterrupted:在出现中断(例如打电话、闹钟响铃等)时发布。此时,相应的
AVCaptureSession实例将自动停止运行,以便对中断作出响应。userInfo 将包含指示中断原因的AVCaptureSessionInterruptionReasonKey。 - NSNotification.Name.AVCaptureSessionInterruptionEnded:在
AVCaptureSession停止中断时发布。一旦中断(例如打电话)结束,会话实例就会继续运行。
InferenceViewController.swift 类负责以下屏幕,我们将主要关注其中的突出显示部分。
- 分辨率 (Resolution):显示当前帧(来自视频会话的图片)的分辨率。
- 剪裁 (Crop):显示当前帧的剪裁大小。
- InferenceTime:显示模型检测对象所花费的时间。
- 线程 (Threads):显示正在运行的线程数量。
用户可以通过点按步进器的
+或-符号来增加或减少此数量。TensorFlow Lite 解释器使用的当前线程数量。
ViewController.swift 类包含 CameraFeedManager 的实例,该实例管理摄像头的相关功能和 ModelDataHandler。ModelDataHandler 处理 Model(经过训练的模型)并获取视频会话图片帧的输出。
private lazy var cameraFeedManager = CameraFeedManager(previewView: previewView)

private var modelDataHandler: ModelDataHandler? =
    ModelDataHandler(modelFileInfo: MobileNetSSD.modelInfo, labelsFileInfo: MobileNetSSD.labelsInfo)
通过调用以下方法来启动摄像头会话:
cameraFeedManager.checkCameraConfigurationAndStartSession()
当您更改线程数量时,该类会在 didChangeThreadCount 函数中使用新的线程数量重新初始化模型。
CameraFeedManager 类会将 ImageFrame 作为 CVPixelBuffer 发送到 ViewController,后者将发送给模型进行预测。
此方法通过 TensorFlow 运行实时摄像头 pixelBuffer 来获取结果。
@objc
func runModel(onPixelBuffer pixelBuffer: CVPixelBuffer) {
通过 TensorFlow 运行实时摄像头 pixelBuffer 来获取结果:
result = self.modelDataHandler?.runModel(onFrame: pixelBuffer)
...
let displayResult = result

let width = CVPixelBufferGetWidth(pixelBuffer)
    let height = CVPixelBufferGetHeight(pixelBuffer)

    DispatchQueue.main.async {
通过切换到 InferenceViewController 来显示结果:
self.inferenceViewController?.resolution = CGSize(width: width, height: height)

self.inferenceViewController?.inferenceTime = inferenceTime
绘制边界框并显示类名称和置信度得分:
self.drawAfterPerformingCalculations(onInferences: displayResult.inferences, withImageSize: CGSize(width: CGFloat(width), height: CGFloat(height)))
    }
  }
后续步骤
现在,您已经使用 Edge 模型完成了 iOS 对象检测和注释应用的演示。您使用训练好的 Edge Tensorflow Lite 模型对对象检测应用进行了测试,然后对其进行了修改并获取了示例注释。然后您查看了特定于 TensorFlow Lite 的代码来了解基础功能。
以下资源可以帮助您继续了解 TensorFlow 模型和 AutoML Vision Edge:
- 参阅官方文档和代码库,详细了解 TFLite。
- 尝试使用一些其他 TFLite 就绪模型,包括语音热词检测器和设备版智能回复。
- 查看 TensorFlow 的使用入门文档,详细了解 TensorFlow。