What you will build

In this tutorial you will download a TensorFlow.js Object Detection model trained and exported using AutoML Vision Edge. You will then build a web page that loads the model and makes a prediction on an image.
Objectives
You will write JavaScript code to:
- Run a pre-trained AutoML Vision Edge Object Detection model in a web page using the TensorFlow.js library.
Before you begin
Train a model from AutoML Vision Edge
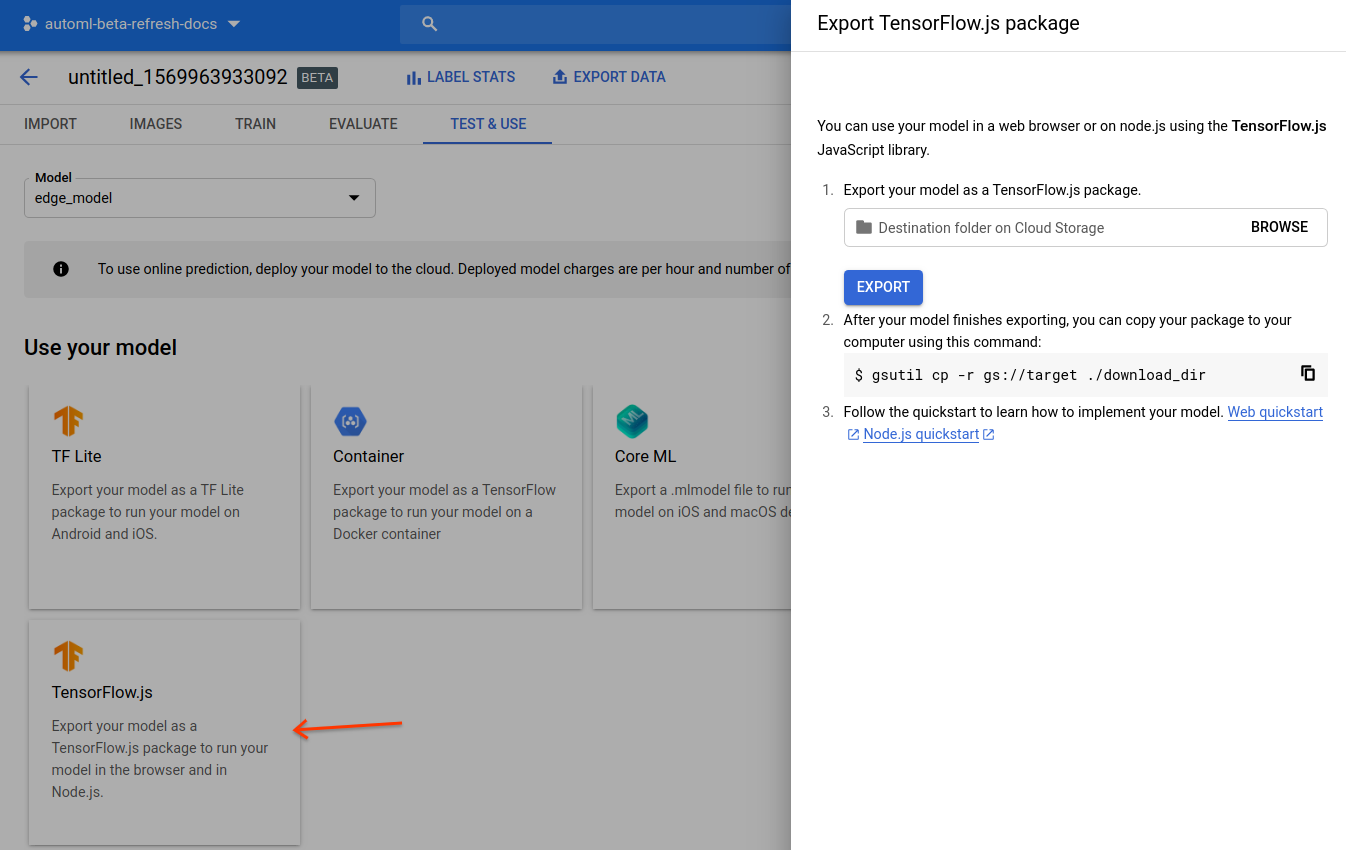
Before you can deploy a model to an Edge device you must first train and export a TensorFlow.js model from AutoML Vision Edge following the Edge device model quickstart.
In the final step, export the model to TensorFlow.js:
After completing the quickstart you should have the following exported files on Google Cloud Storage:
- a
dict.txtfile with labels - a
model.jsonfile *.binweight files

Download the model files
Copy the exported files from Google Cloud Storage to a local directory:
gsutil cp gs://${cloud-storage-bucket}/model-export/iod/${model-name}/* ${local-folder}
Write a small web app
After you have your TensorFlow.js model files stored locally you are ready to write your web app:
Navigate to the local directory where your model files are stored if you haven't already.
Create an
index.htmlfile in that same local directory with the following contents:index.htmlCode samples
(optional): Replace the
srcpath attribute of the<img>tag to point to your own image.
Run the web app
Start a simple HTTP server on port 8000 from the directory with the
index.html file:
Python
python -m http.server 8000
Node.js
If you have Node.js, install the http-server package globally and run:
http-server -p 8000
Open http://localhost:8000 in the browser and you will see the prediction result on the console (View > Developer > JavaScript console), as well as on the page.
The result is a sorted list of prediction objects:
[
  {
    "box": {
      "left": 105.1,
      "top": 22.2,
      "width": 70.6,
      "height": 55.7
    },
    "label": "Tomato",
    "score": 0.972
  },
  ...
]
For more information regarding the API, see the AutoML NPM package documentation.
How does it work?
Now that you have your app running you can explore what the code is doing.
The first two script tags load the TensorFlow.js library and the AutoML library, which are available on NPM package manager.
The AutoML NPM package provides a set of APIs to load and run models produced by AutoML Vision Edge. The package takes care of any pre-processing or post-processing needed to run the model such as the ability to feed an image or video element, normalizing pixel values, and returning a sorted object with labels and scores.
The image tag loads a test image from a publish Google Cloud Storage path:
You should replace the image src with the path to your own image when testing
your model.
Next, you load the model and make a prediction with your image:
You specify a model with tf.automl.loadObjectDetection(url).
This function takes an absolute or relative URL to the exported model.json
file, which is this case is a relative path since the index.html file and
the model files are in the same directory.
You get your predictions by calling model.detect(img, options). This function
runs a single image through the model
and returns the predicted objects. The input for this function is an html image
element, video element, or a
3D tensor.
The model.detect(img, options) function also takes in the optional options
argument with the possible specifications:
score- Probability score between 0 and 1. Defaults to 0.5. Boxes with score lower than this threshold will be ignored.topk- Only the topk most likely objects are returned. The actual number of objects might be less than this number.iou- Intersection over union threshold. IoU is a metric between 0 and 1 used to measure the overlap of two boxes. The predicted boxes will not overlap more than the specified threshold.See the Evaluating models page for more information on model evaluation using Intersection over union (IoU).
For more information regarding the API, see the AutoML NPM package documentation.
What's next?
You have completed a tutorial of the TensorFlow.js Object Detection web app using an Edge model. You ran the web app in a web browser and made an object detection prediction using your custom Edge model and an image that you loaded from the web. You then examined parts of the sample code to understand the underlying functionality.
Next steps:
- View a demo that uses SVG to overlay the predicted boxes with probabilities onto the image.
- Learn more about TensorFlow.js.
- Learn more about the AutoML NPM library via the official documentation.
- Learn more about TensorFlow in general via its tutorials.