個別に予測を行う

モデルを作成(トレーニング)してデプロイすると、オンライン(または同期)予測リクエストを行うことができます。

オンライン(個別)予測の例

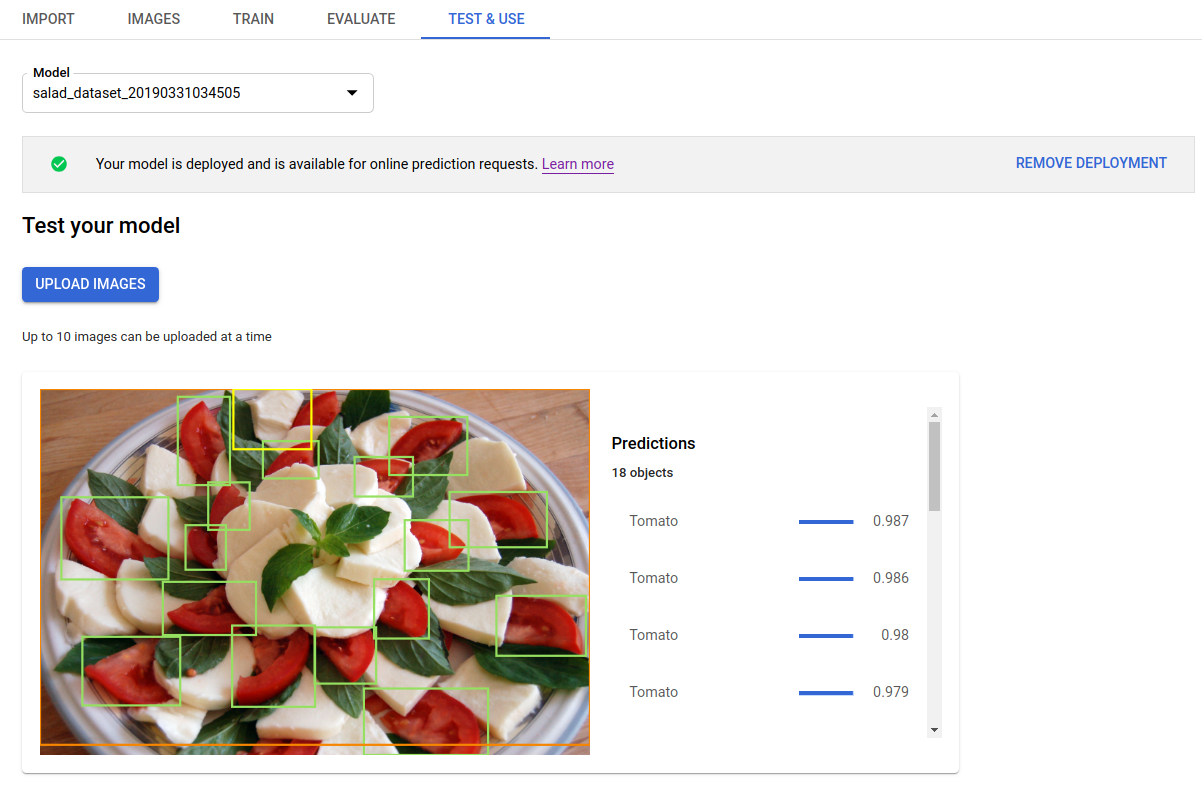
トレーニング済みのモデルをデプロイすると、predict メソッドを使用して画像の予測をリクエストできます。また、UI を使用して予測のアノテーションを取得できます。predict メソッドは、画像のオブジェクト境界ボックスにラベルを適用します。

モデルがデプロイされている間は料金がかかります。トレーニング済みのモデルで予測を行った後で、モデルのデプロイを解除すると、モデルのホスティング料金の発生を防ぐことができます。

ウェブ UI

  1. AutoML Vision Object Detection UI を開き、左側のナビゲーション バーで電球のアイコンがある [モデル] タブをクリックすると、使用可能なモデルが表示されます。

    別のプロジェクトのモデルを表示するには、タイトルバーの右上にあるプルダウン リストからプロジェクトを選択します。

  2. 画像のラベル付けに使用するモデルの行をクリックします。

  3. モデルがまだデプロイされていない場合は、[モデルのデプロイ] を選択してデプロイします。

    オンライン予測を使用するには、モデルをデプロイする必要があります。モデルのデプロイでは料金が発生します。詳細については、料金のページをご覧ください。

  4. タイトルバーのすぐ下にある [テストと使用] タブをクリックします。

    モデルページをテストして使用する

  5. [画像をアップロード] をクリックして、ラベルを付ける画像をアップロードします。

    アップロードされた画像の予測ページ

REST

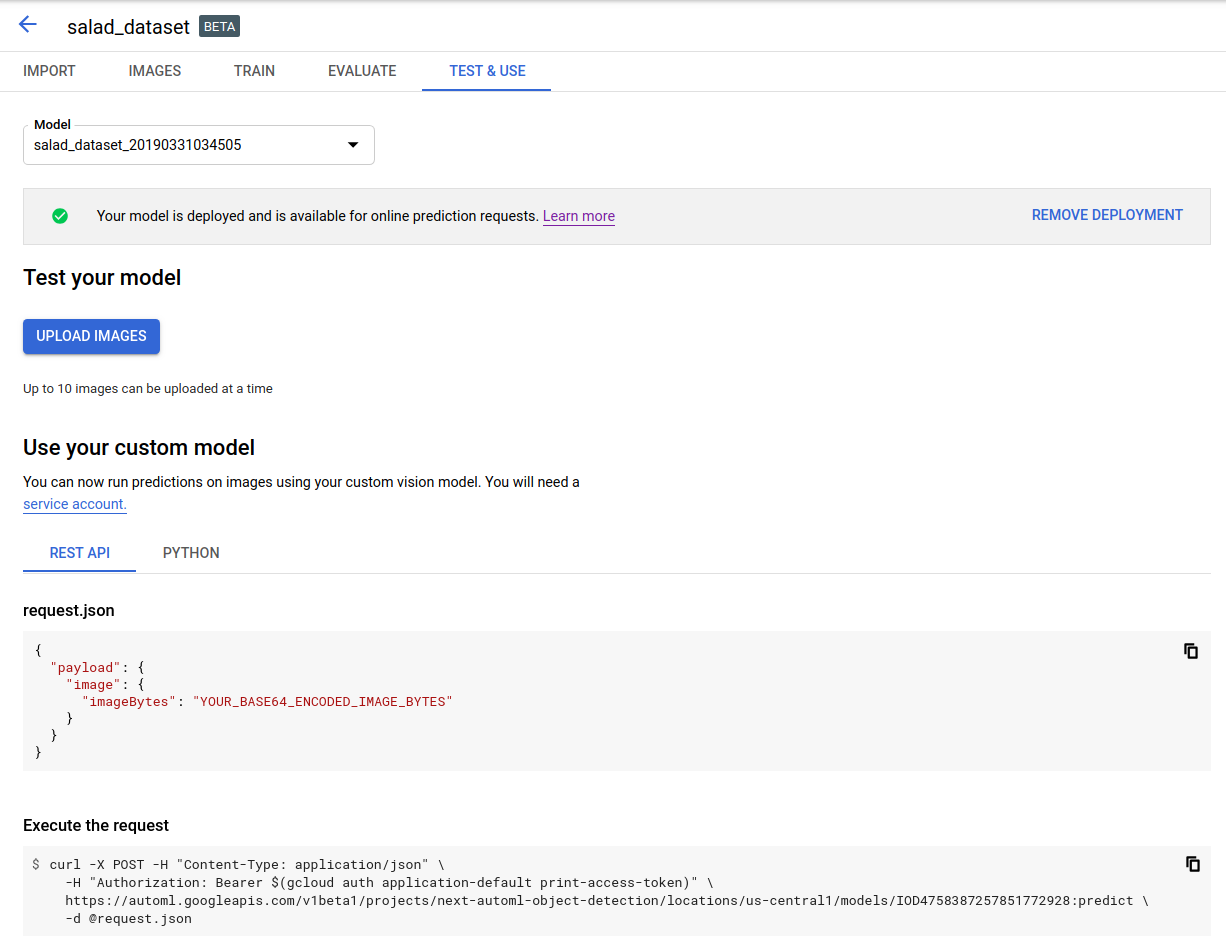
予測をテストする前に、クラウドでホストされるモデルをデプロイする必要があります。

リクエストのデータを使用する前に、次のように置き換えます。

  • project-id: GCP プロジェクト ID
  • model-id: モデルを作成したときにレスポンスで返されたモデルの ID。この ID は、モデルの名前の最後の要素です。例:
    • モデル名: projects/project-id/locations/location-id/models/IOD4412217016962778756
    • モデル ID: IOD4412217016962778756
  • base64-encoded-image: バイナリ画像データの base64 表現(ASCII 文字列)。この文字列は、/9j/4QAYRXhpZgAA...9tAVx/zDQDlGxn//2Q== のような文字列になります。詳細については、Base64 エンコードのトピックをご覧ください。

フィールド固有の考慮事項:

  • scoreThreshold - 0~1 の値です。スコアしきい値がこの値以上の値のみが表示されます。デフォルト値は 0.5 です。
  • maxBoundingBoxCount - レスポンスで返される境界ボックスの最大数(上限)です。デフォルト値は 100、最大値は 500 です。この値はリソース制約の対象となり、サーバーによって制限されます。

HTTP メソッドと URL:

POST https://automl.googleapis.com/v1/projects/PROJECT_ID/locations/us-central1/models/MODEL_ID:predict

リクエストの本文(JSON):

{
  "payload": {
    "image": {
      "imageBytes": "BASE64_ENCODED_IMAGE"
    }
  },
  "params": {
    "scoreThreshold": "0.5",
    "maxBoundingBoxCount": "100"
  }
}

リクエストを送信するには、次のいずれかのオプションを選択します。

curl

リクエスト本文を request.json という名前のファイルに保存して、次のコマンドを実行します。

curl -X POST \
-H "Authorization: Bearer $(gcloud auth print-access-token)" \
-H "x-goog-user-project: project-id" \
-H "Content-Type: application/json; charset=utf-8" \
-d @request.json \
"https://automl.googleapis.com/v1/projects/PROJECT_ID/locations/us-central1/models/MODEL_ID:predict"

PowerShell

リクエスト本文を request.json という名前のファイルに保存して、次のコマンドを実行します。

$cred = gcloud auth print-access-token
$headers = @{ "Authorization" = "Bearer $cred"; "x-goog-user-project" = "project-id" }

Invoke-WebRequest `
-Method POST `
-Headers $headers `
-ContentType: "application/json; charset=utf-8" `
-InFile request.json `
-Uri "https://automl.googleapis.com/v1/projects/PROJECT_ID/locations/us-central1/models/MODEL_ID:predict" | Select-Object -Expand Content

出力が JSON 形式で返されます。payload フィールドに AutoML Vision Object Detection モデルからの予測が含まれます。

  • オブジェクトの boundingBox は対角線上の頂点によって指定されます。
  • displayName は、AutoML Vision Object Detection モデルによって予測されたラベルです。
  • score は、指定されたラベルが画像に適用する信頼度を表します。これは 0(信頼できない)から 1(信頼度が高い)までの値で表されます。

{
  "payload": [
    {
      "imageObjectDetection": {
        "boundingBox": {
          "normalizedVertices": [
            {
              "x": 0.034553755,
              "y": 0.015524037
            },
            {
              "x": 0.941527,
              "y": 0.9912563
            }
          ]
        },
        "score": 0.9997793
      },
      "displayName": "Salad"
    },
    {
      "imageObjectDetection": {
        "boundingBox": {
          "normalizedVertices": [
            {
              "x": 0.11737197,
              "y": 0.7098793
            },
            {
              "x": 0.510878,
              "y": 0.87987
            }
          ]
        },
        "score": 0.63219965
      },
      "displayName": "Tomato"
    }
  ]
}

Go

このサンプルを試す前に、クライアント ライブラリ ページを参照して、この言語の設定手順を完了してください。

import (
	"context"
	"fmt"
	"io"
	"io/ioutil"
	"os"

	automl "cloud.google.com/go/automl/apiv1"
	"cloud.google.com/go/automl/apiv1/automlpb"
)

// visionObjectDetectionPredict does a prediction for image classification.
func visionObjectDetectionPredict(w io.Writer, projectID string, location string, modelID string, filePath string) error {
	// projectID := "my-project-id"
	// location := "us-central1"
	// modelID := "IOD123456789..."
	// filePath := "path/to/image.jpg"

	ctx := context.Background()
	client, err := automl.NewPredictionClient(ctx)
	if err != nil {
		return fmt.Errorf("NewPredictionClient: %w", err)
	}
	defer client.Close()

	file, err := os.Open(filePath)
	if err != nil {
		return fmt.Errorf("Open: %w", err)
	}
	defer file.Close()
	bytes, err := ioutil.ReadAll(file)
	if err != nil {
		return fmt.Errorf("ReadAll: %w", err)
	}

	req := &automlpb.PredictRequest{
		Name: fmt.Sprintf("projects/%s/locations/%s/models/%s", projectID, location, modelID),
		Payload: &automlpb.ExamplePayload{
			Payload: &automlpb.ExamplePayload_Image{
				Image: &automlpb.Image{
					Data: &automlpb.Image_ImageBytes{
						ImageBytes: bytes,
					},
				},
			},
		},
		// Params is additional domain-specific parameters.
		Params: map[string]string{
			// score_threshold is used to filter the result.
			"score_threshold": "0.8",
		},
	}

	resp, err := client.Predict(ctx, req)
	if err != nil {
		return fmt.Errorf("Predict: %w", err)
	}

	for _, payload := range resp.GetPayload() {
		fmt.Fprintf(w, "Predicted class name: %v\n", payload.GetDisplayName())
		fmt.Fprintf(w, "Predicted class score: %v\n", payload.GetImageObjectDetection().GetScore())
		boundingBox := payload.GetImageObjectDetection().GetBoundingBox()
		fmt.Fprintf(w, "Normalized vertices:\n")
		for _, vertex := range boundingBox.GetNormalizedVertices() {
			fmt.Fprintf(w, "\tX: %v, Y: %v\n", vertex.GetX(), vertex.GetY())
		}
	}

	return nil
}

Java

このサンプルを試す前に、クライアント ライブラリ ページを参照して、この言語の設定手順を完了してください。

import com.google.cloud.automl.v1.AnnotationPayload;
import com.google.cloud.automl.v1.BoundingPoly;
import com.google.cloud.automl.v1.ExamplePayload;
import com.google.cloud.automl.v1.Image;
import com.google.cloud.automl.v1.ModelName;
import com.google.cloud.automl.v1.NormalizedVertex;
import com.google.cloud.automl.v1.PredictRequest;
import com.google.cloud.automl.v1.PredictResponse;
import com.google.cloud.automl.v1.PredictionServiceClient;
import com.google.protobuf.ByteString;
import java.io.IOException;
import java.nio.file.Files;
import java.nio.file.Paths;

class VisionObjectDetectionPredict {

  static void predict() throws IOException {
    // TODO(developer): Replace these variables before running the sample.
    String projectId = "YOUR_PROJECT_ID";
    String modelId = "YOUR_MODEL_ID";
    String filePath = "path_to_local_file.jpg";
    predict(projectId, modelId, filePath);
  }

  static void predict(String projectId, String modelId, String filePath) throws IOException {
    // Initialize client that will be used to send requests. This client only needs to be created
    // once, and can be reused for multiple requests. After completing all of your requests, call
    // the "close" method on the client to safely clean up any remaining background resources.
    try (PredictionServiceClient client = PredictionServiceClient.create()) {
      // Get the full path of the model.
      ModelName name = ModelName.of(projectId, "us-central1", modelId);
      ByteString content = ByteString.copyFrom(Files.readAllBytes(Paths.get(filePath)));
      Image image = Image.newBuilder().setImageBytes(content).build();
      ExamplePayload payload = ExamplePayload.newBuilder().setImage(image).build();
      PredictRequest predictRequest =
          PredictRequest.newBuilder()
              .setName(name.toString())
              .setPayload(payload)
              .putParams(
                  "score_threshold", "0.5") // [0.0-1.0] Only produce results higher than this value
              .build();

      PredictResponse response = client.predict(predictRequest);
      for (AnnotationPayload annotationPayload : response.getPayloadList()) {
        System.out.format("Predicted class name: %s\n", annotationPayload.getDisplayName());
        System.out.format(
            "Predicted class score: %.2f\n",
            annotationPayload.getImageObjectDetection().getScore());
        BoundingPoly boundingPoly = annotationPayload.getImageObjectDetection().getBoundingBox();
        System.out.println("Normalized Vertices:");
        for (NormalizedVertex vertex : boundingPoly.getNormalizedVerticesList()) {
          System.out.format("\tX: %.2f, Y: %.2f\n", vertex.getX(), vertex.getY());
        }
      }
    }
  }
}

Node.js

このサンプルを試す前に、クライアント ライブラリ ページを参照して、この言語の設定手順を完了してください。

/**
 * TODO(developer): Uncomment these variables before running the sample.
 */
// const projectId = 'YOUR_PROJECT_ID';
// const location = 'us-central1';
// const modelId = 'YOUR_MODEL_ID';
// const filePath = 'path_to_local_file.jpg';

// Imports the Google Cloud AutoML library
const {PredictionServiceClient} = require('@google-cloud/automl').v1;
const fs = require('fs');

// Instantiates a client
const client = new PredictionServiceClient();

// Read the file content for translation.
const content = fs.readFileSync(filePath);

async function predict() {
  // Construct request
  // params is additional domain-specific parameters.
  // score_threshold is used to filter the result
  const request = {
    name: client.modelPath(projectId, location, modelId),
    payload: {
      image: {
        imageBytes: content,
      },
    },
    params: {
      score_threshold: '0.8',
    },
  };

  const [response] = await client.predict(request);

  for (const annotationPayload of response.payload) {
    console.log(`Predicted class name: ${annotationPayload.displayName}`);
    console.log(
      `Predicted class score: ${annotationPayload.imageObjectDetection.score}`
    );
    console.log('Normalized vertices:');
    for (const vertex of annotationPayload.imageObjectDetection.boundingBox
      .normalizedVertices) {
      console.log(`\tX: ${vertex.x}, Y: ${vertex.y}`);
    }
  }
}

predict();

Python

このサンプルを試す前に、クライアント ライブラリ ページを参照して、この言語の設定手順を完了してください。

from google.cloud import automl

# TODO(developer): Uncomment and set the following variables
# project_id = "YOUR_PROJECT_ID"
# model_id = "YOUR_MODEL_ID"
# file_path = "path_to_local_file.jpg"

prediction_client = automl.PredictionServiceClient()

# Get the full path of the model.
model_full_id = automl.AutoMlClient.model_path(project_id, "us-central1", model_id)

# Read the file.
with open(file_path, "rb") as content_file:
    content = content_file.read()

image = automl.Image(image_bytes=content)
payload = automl.ExamplePayload(image=image)

# params is additional domain-specific parameters.
# score_threshold is used to filter the result
# https://cloud.google.com/automl/docs/reference/rpc/google.cloud.automl.v1#predictrequest
params = {"score_threshold": "0.8"}

request = automl.PredictRequest(name=model_full_id, payload=payload, params=params)

response = prediction_client.predict(request=request)
print("Prediction results:")
for result in response.payload:
    print(f"Predicted class name: {result.display_name}")
    print(f"Predicted class score: {result.image_object_detection.score}")
    bounding_box = result.image_object_detection.bounding_box
    print("Normalized Vertices:")
    for vertex in bounding_box.normalized_vertices:
        print(f"\tX: {vertex.x}, Y: {vertex.y}")

その他の言語

C#: クライアント ライブラリ ページの C# の設定手順を行ってから、.NET 用の AutoML Vision Object Detection リファレンス ドキュメントをご覧ください。

PHP: クライアント ライブラリ ページの PHP の設定手順を行ってから、PHP 用の AutoML Vision Object Detection リファレンス ドキュメントをご覧ください。

Ruby: クライアント ライブラリ ページの Ruby の設定手順を行ってから、Ruby 用の AutoML Vision Object Detection リファレンス ドキュメントをご覧ください。