After you have created (trained) a model, you can export your custom model.
After exporting your model you can then deploy the model to a device.
You can export an image classification model in either generic Tensorflow Lite format, general TensorFlow format, or TensorFlow.js for Web format to a Google Cloud Storage location using the ExportModel API.
Export to devices
TensorFlow Lite models
Web UI
Open the AutoML Vision Object Detection UI and click the lightbulb icon in the left navigation bar to display the available models.
To view the models for a different project, select the project from the drop-down list in the upper right of the title bar.
Select the row for the model you want to use to label your images.
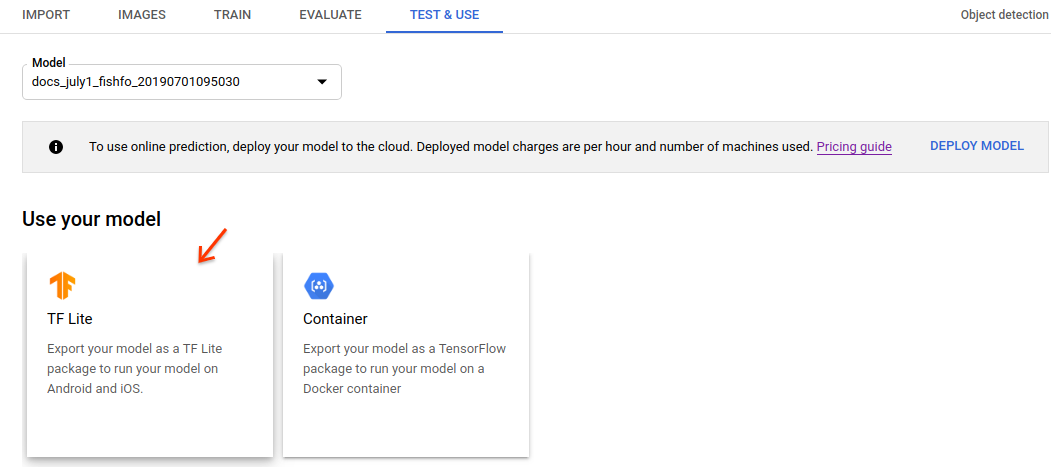
Select the Test & use tab.
In the Use your model section select the TF Lite card. This opens a side "Use your on-device model" window.
In the side window, specify the output Google Cloud Storage location. After choosing the storage location for your model output, select Export to begin the model export operation.
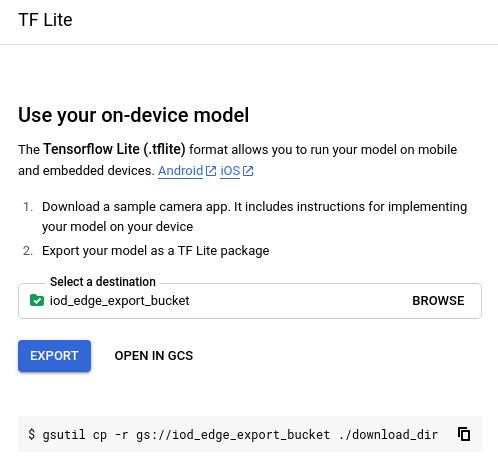
After exporting you can select the "Open in Google Cloud Storage" option in the same window to go directly to the export directory in Google Cloud Storage.
REST
In the "modelFormat" field specify "tflite" (default).
Before using any of the request data, make the following replacements:
- project-id: your GCP project ID.
- model-id: the ID of your model, from the
response when you created the model. The ID is the last element of the name of your model.
For example:
- model name:
projects/project-id/locations/location-id/models/IOD4412217016962778756 - model id:
IOD4412217016962778756
- model name:
- output-storage-bucket: a Google Cloud Storage
bucket/directory to save output files to, expressed in the following form:
gs://bucket/directory/. The requesting user must have write permission to the bucket.
HTTP method and URL:
POST https://automl.googleapis.com/v1/projects/PROJECT_ID/locations/us-central1/models/MODEL_ID:export
Request JSON body:
{
  "outputConfig": {
    "modelFormat": "tflite",
    "gcsDestination": {
      "outputUriPrefix": "OUTPUT_STORAGE_BUCKET/"
    },
  }
}
To send your request, choose one of these options:
curl
Save the request body in a file named request.json,
and execute the following command:
curl -X POST \
     -H "Authorization: Bearer $(gcloud auth print-access-token)" \
     -H "x-goog-user-project: PROJECT_ID" \
     -H "Content-Type: application/json; charset=utf-8" \
     -d @request.json \
     "https://automl.googleapis.com/v1/projects/PROJECT_ID/locations/us-central1/models/MODEL_ID:export"
PowerShell
Save the request body in a file named request.json,
and execute the following command:
$cred = gcloud auth print-access-token
$headers = @{ "Authorization" = "Bearer $cred"; "x-goog-user-project" = "PROJECT_ID" }

Invoke-WebRequest `
    -Method POST `
    -Headers $headers `
    -ContentType: "application/json; charset=utf-8" `
    -InFile request.json `
    -Uri "https://automl.googleapis.com/v1/projects/PROJECT_ID/locations/us-central1/models/MODEL_ID:export" | Select-Object -Expand Content
You should receive a JSON response similar to the following:
{
  "name": "projects/PROJECT_ID/locations/us-central1/operations/OPERATION_ID",
  "metadata": {
    "@type": "type.googleapis.com/google.cloud.automl.v1.OperationMetadata",
    "createTime": "2019-07-22T21:23:21.643041Z",
    "updateTime": "2019-07-22T21:23:21.643041Z",
    "exportModelDetails": {
      "outputInfo": {
        "gcsOutputDirectory": "OUTPUT_STORAGE_BUCKET/model-export/iod/tflite-DATASET_NAME-YYYY-MM-DDThh:mm:ss.sssZ"
      }
    }
  }
}
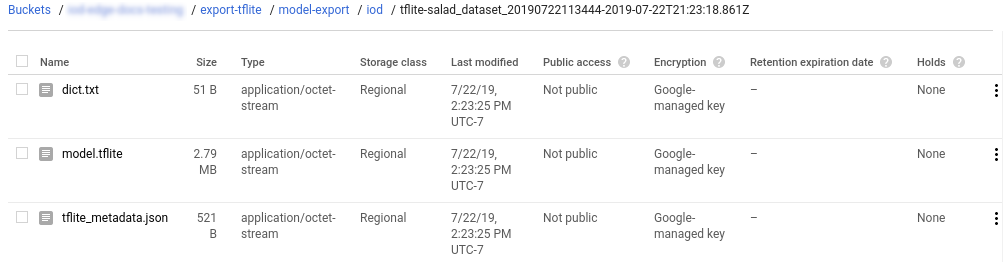
As a result you will see a folder structure in the directory you provided (CLOUD_STORAGE_BUCKET/[DIRECTORY]). The created folder structure will have the following general format (timestamp in ISO-8601 format):
CLOUD_STORAGE_BUCKET/model-export/iod/MODEL_TYPE-DATASET_NAME-YYYY-MM-DDThh:mm:ss.sssZ
For example:
CLOUD_STORAGE_BUCKET/model-export/iod/tf-saved-model-DATASET_NAME-2019-07-22T21:25:35.135ZCLOUD_STORAGE_BUCKET/model-export/iod/tflite-DATASET_NAME-2019-07-22T21:23:18.861Z
The folder contains a TensorFlow Lite model named model.tflite, a label file
named dict.txt, and a tflite_metadata.json file.
Using the exported model
After exporting your model to a Google Cloud Storage bucket you can deploy your AutoML Vision Edge model on Android devices, iOS devices, or Raspberry Pi 3.
Export to a container
Web UI
Open the AutoML Vision Object Detection UI and click the lightbulb icon in the left navigation bar to display the available models.
To view the models for a different project, select the project from the drop-down list in the upper right of the title bar.
Click the row for the model you want to use to label your images.
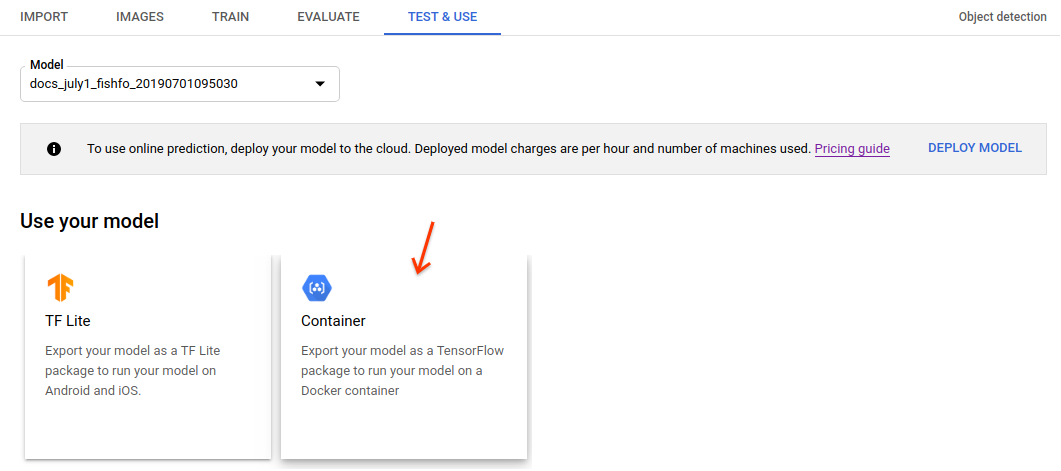
Select the Test & use tab.
In the Use your model section select the TF Lite card. This opens a side "Use your on-device model" window.
In the side window, specify the output Google Cloud Storage location. After choosing the storage location for your model output, select Export to begin the model export operation.
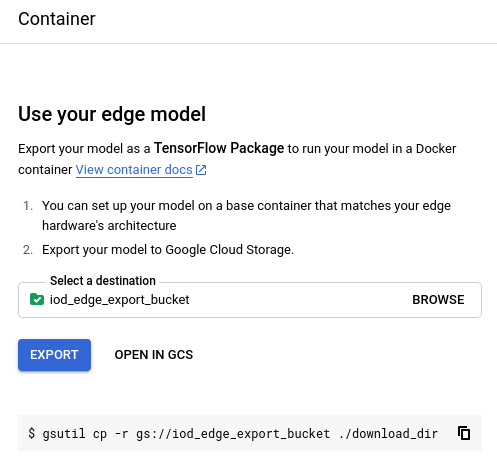
After exporting you can select the "Open in Google Cloud Storage" option in the same window to go directly to the export directory in Google Cloud Storage.
REST
In the "modelFormat" field specify "tf-saved-model".
Before using any of the request data, make the following replacements:
- project-id: your GCP project ID.
- model-id: the ID of your model, from the
response when you created the model. The ID is the last element of the name of your model.
For example:
- model name:
projects/project-id/locations/location-id/models/IOD4412217016962778756 - model id:
IOD4412217016962778756
- model name:
- output-storage-bucket: a Google Cloud Storage
bucket/directory to save output files to, expressed in the following form:
gs://bucket/directory/. The requesting user must have write permission to the bucket.
HTTP method and URL:
POST https://automl.googleapis.com/v1/projects/PROJECT_ID/locations/us-central1/models/MODEL_ID:export
Request JSON body:
{
  "outputConfig": {
    "modelFormat": "tf-saved-model",
    "gcsDestination": {
      "outputUriPrefix": "OUTPUT_STORAGE_BUCKET/"
    },
  }
}
To send your request, choose one of these options:
curl
Save the request body in a file named request.json,
and execute the following command:
curl -X POST \
     -H "Authorization: Bearer $(gcloud auth print-access-token)" \
     -H "x-goog-user-project: PROJECT_ID" \
     -H "Content-Type: application/json; charset=utf-8" \
     -d @request.json \
     "https://automl.googleapis.com/v1/projects/PROJECT_ID/locations/us-central1/models/MODEL_ID:export"
PowerShell
Save the request body in a file named request.json,
and execute the following command:
$cred = gcloud auth print-access-token
$headers = @{ "Authorization" = "Bearer $cred"; "x-goog-user-project" = "PROJECT_ID" }

Invoke-WebRequest `
    -Method POST `
    -Headers $headers `
    -ContentType: "application/json; charset=utf-8" `
    -InFile request.json `
    -Uri "https://automl.googleapis.com/v1/projects/PROJECT_ID/locations/us-central1/models/MODEL_ID:export" | Select-Object -Expand Content
You should receive a JSON response similar to the following:
{
  "name": "projects/PROJECT_ID/locations/us-central1/operations/OPERATION_ID",
  "metadata": {
    "@type": "type.googleapis.com/google.cloud.automl.v1.OperationMetadata",
    "createTime": "2019-07-22T21:23:21.643041Z",
    "updateTime": "2019-07-22T21:23:21.643041Z",
    "exportModelDetails": {
      "outputInfo": {
        "gcsOutputDirectory": "OUTPUT_STORAGE_BUCKET/model-export/iod/tf-saved-model-DATASET_NAME-YYYY-MM-DDThh:mm:ss.sssZ"
      }
    }
  }
}
As a result you will see a folder structure in the directory you provided (CLOUD_STORAGE_BUCKET/[DIRECTORY]). The created folder structure will have the following general format (timestamp in ISO-8601 format):
CLOUD_STORAGE_BUCKET/model-export/iod/MODEL_TYPE-DATASET_NAME-YYYY-MM-DDThh:mm:ss.sssZ
For example:
CLOUD_STORAGE_BUCKET/model-export/iod/tf-saved-model-DATASET_NAME-2019-07-22T21:25:35.135ZCLOUD_STORAGE_BUCKET/model-export/iod/tflite-DATASET_NAME-2019-07-22T21:23:18.861Z
The folder contains a TensorFlow model named saved_model.pb.

Using the exported model
After exporting your model to a Google Cloud Storage bucket you can use your exported model to make predictions in a Docker image. See the Containers tutorial for instructions on deployment to a container.
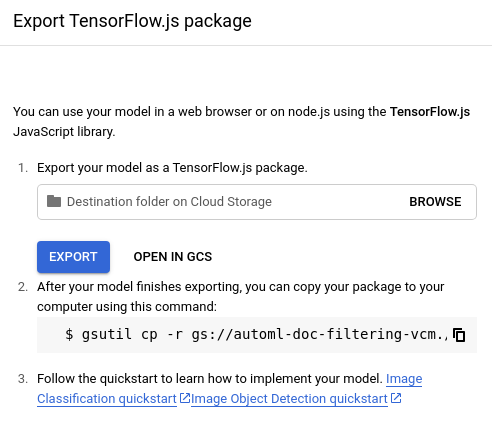
Export for Web
Web UI
-
Open the Vision Dashboard and select the lightbulb icon in the side navigation bar to display the available models.
To view the models for a different project, select the project from the drop-down list in the upper right of the title bar.
-
Select the row for the model you want to use to label your images.
-
Select the Test & Use tab just below the title bar.
-
In the Use your model section select the Tensorflow.js option. After selecting the Tensorflow.js option and specifying the export location on Cloud Storage in the side window, select Export to export your Web-ready TensorFlow.js model.

REST
Before using any of the request data, make the following replacements:
- project-id: your GCP project ID.
- model-id: the ID of your model, from the
response when you created the model. The ID is the last element of the name of your model.
For example:
- model name:
projects/project-id/locations/location-id/models/IOD4412217016962778756 - model id:
IOD4412217016962778756
- model name:
- output-storage-bucket: a Google Cloud Storage
bucket/directory to save output files to, expressed in the following form:
gs://bucket/directory/. The requesting user must have write permission to the bucket.
HTTP method and URL:
POST https://automl.googleapis.com/v1/projects/PROJECT_ID/locations/us-central1/models/MODEL_ID:export
Request JSON body:
{
  "outputConfig": {
    "modelFormat": "tf_js",
    "gcsDestination": {
      "outputUriPrefix": "OUTPUT_STORAGE_BUCKET/"
    },
  }
}
To send your request, choose one of these options:
curl
Save the request body in a file named request.json,
and execute the following command:
curl -X POST \
     -H "Authorization: Bearer $(gcloud auth print-access-token)" \
     -H "x-goog-user-project: project-id" \
     -H "Content-Type: application/json; charset=utf-8" \
     -d @request.json \
     "https://automl.googleapis.com/v1/projects/PROJECT_ID/locations/us-central1/models/MODEL_ID:export"
PowerShell
Save the request body in a file named request.json,
and execute the following command:
$cred = gcloud auth print-access-token
$headers = @{ "Authorization" = "Bearer $cred"; "x-goog-user-project" = "project-id" }

Invoke-WebRequest `
    -Method POST `
    -Headers $headers `
    -ContentType: "application/json; charset=utf-8" `
    -InFile request.json `
    -Uri "https://automl.googleapis.com/v1/projects/PROJECT_ID/locations/us-central1/models/MODEL_ID:export" | Select-Object -Expand Content
You should receive a JSON response similar to the following:
{
  "name": "projects/PROJECT_ID/locations/us-central1/operations/OPERATION_ID",
  "metadata": {
    "@type": "type.googleapis.com/google.cloud.automl.v1.OperationMetadata",
    "createTime": "2019-07-22T21:23:21.643041Z",
    "updateTime": "2019-07-22T21:23:21.643041Z",
    "exportModelDetails": {
      "outputInfo": {
        "gcsOutputDirectory": "OUTPUT_STORAGE_BUCKET/model-export/icn/tf_js-DATASET_NAME-YYYY-MM-DDThh:mm:ss.sssZ"
      }
    }
  }
}
As a result you will see a folder in the directory you provided
(USER_GCS_PATH). The created folder will be named according to
timestamp in the format
/model-export/icn/tf_js-DATASET_NAME-YYYY-MM-DDThh:mm:ss.sssZ (for example,
tf_js-edge_model-2019-10-03T17:24:46.999Z).
The folder contains binary files (.bin), a label file named
dict.txt, and a model.json file.
