初始模型部署
部署对象检测模型会产生费用。如需了解详情,请参阅价格页面。
创建(训练)模型后,您必须先部署模型,然后才能在线(或同步)调用模型。
现在,如果您还需要其他在线预测能力,还可以更新模型部署。
网页界面
打开 AutoML Vision Object Detection 界面,然后选择左侧导航栏中的模型标签页以显示可用的模型。
如需查看其他项目的模型,请从标题栏右上角的下拉列表中选择该项目。
- 选择要用于标记图片的模型所对应的行。
- 选择标题栏正下方的测试和使用标签页。
-
从模型名称下方的横幅中选择部署模型,以打开模型部署选项窗口。


在该窗口中,您可以选择要在其中部署模型的节点数,以及查看每秒可用的预测查询次数 (QPS)。
-
选择部署以开始部署模型。
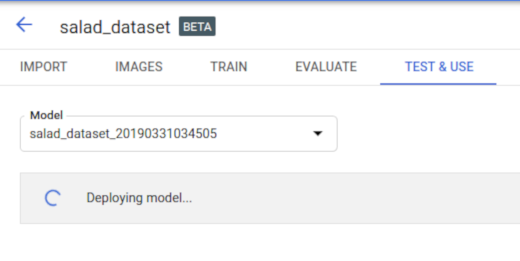
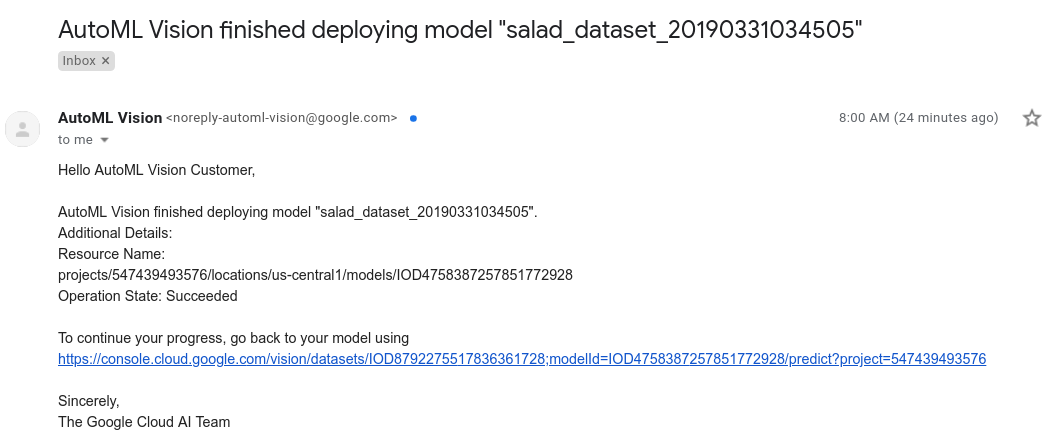
模型部署完成后,您会收到电子邮件通知。
REST
在使用任何请求数据之前,请先进行以下替换:
- project-id:您的 GCP 项目 ID。
- model-id:您的模型的 ID(从创建模型时返回的响应中获取)。此 ID 是模型名称的最后一个元素。
例如:
- 模型名称:
projects/project-id/locations/location-id/models/IOD4412217016962778756 - 模型 ID:
IOD4412217016962778756
- 模型名称:
字段注意事项:
nodeCount- 需要在其上部署模型的节点的数量。值必须介于 1 到 100 之间,包括 1 和 100。节点是机器资源的抽象,可处理模型的qps_per_node中指定的每秒在线预测查询次数 (QPS)。
HTTP 方法和网址:
POST https://automl.googleapis.com/v1/projects/PROJECT_ID/locations/us-central1/models/MODEL_ID:deploy
请求 JSON 正文:
{
  "imageObjectDetectionModelDeploymentMetadata": {
    "nodeCount": 2
  }
}
如需发送请求,请选择以下方式之一:
curl
将请求正文保存在名为 request.json 的文件中,然后执行以下命令:
curl -X POST \
    -H "Authorization: Bearer $(gcloud auth print-access-token)" \
    -H "x-goog-user-project: project-id" \
    -H "Content-Type: application/json; charset=utf-8" \
    -d @request.json \
    "https://automl.googleapis.com/v1/projects/PROJECT_ID/locations/us-central1/models/MODEL_ID:deploy"
PowerShell
将请求正文保存在名为 request.json 的文件中,然后执行以下命令:
$cred = gcloud auth print-access-token
$headers = @{ "Authorization" = "Bearer $cred"; "x-goog-user-project" = "project-id" }

Invoke-WebRequest `
    -Method POST `
    -Headers $headers `
    -ContentType: "application/json; charset=utf-8" `
    -InFile request.json `
    -Uri "https://automl.googleapis.com/v1/projects/PROJECT_ID/locations/us-central1/models/MODEL_ID:deploy" | Select-Object -Expand Content
您应该会看到类似如下所示的输出。可以使用操作 ID 来获取任务的状态。如需查看示例,请参阅处理长时间运行的操作。
{
  "name": "projects/PROJECT_ID/locations/us-central1/operations/OPERATION_ID",
  "metadata": {
    "@type": "type.googleapis.com/google.cloud.automl.v1.OperationMetadata",
    "createTime": "2019-08-07T22:00:20.692109Z",
    "updateTime": "2019-08-07T22:00:20.692109Z",
    "deployModelDetails": {}
  }
}
您可以通过以下 HTTP 方法和网址获取操作的状态:
GET https://automl.googleapis.com/v1/projects/PROJECT_ID/locations/us-central1/operations/OPERATION_ID
操作完成的状态将类似于以下内容:
{
  "name": "projects/PROJECT_ID/locations/us-central1/operations/OPERATION_ID",
  "metadata": {
    "@type": "type.googleapis.com/google.cloud.automl.v1.OperationMetadata",
    "createTime": "2019-06-21T16:47:21.704674Z",
    "updateTime": "2019-06-21T17:01:00.802505Z",
    "deployModelDetails": {}
  },
  "done": true,
  "response": {
    "@type": "type.googleapis.com/google.protobuf.Empty"
  }
}
Go
在试用此示例之前,请按照客户端库页面中与此编程语言对应的设置说明执行操作。
Java
在试用此示例之前,请按照客户端库页面中与此编程语言对应的设置说明执行操作。
Node.js
在试用此示例之前,请按照客户端库页面中与此编程语言对应的设置说明执行操作。
Python
在试用此示例之前,请按照客户端库页面中与此编程语言对应的设置说明执行操作。
其他语言
C#: 请按照客户端库页面上的 C# 设置说明操作,然后访问 .NET 版 AutoML Vision Object Detection 参考文档。
PHP: 请按照客户端库页面上的 PHP 设置说明操作,然后访问 PHP 版 AutoML Vision Object Detection 参考文档。
Ruby 版: 请按照客户端库页面上的 Ruby 设置说明操作,然后访问 Ruby 版 AutoML Vision Object Detection 参考文档。
更新模型的节点编号
如果您拥有经过训练的已部署模型,可以更新部署模型的节点数量,以响应您的特定流量。例如,如果您遇到的每秒查询次数 (QPS) 高于预期。
您可以在不必首先取消部署的情况下更改此节点数量。更新部署将更改节点数量,而不会中断您处理的预测流量。
网页界面
在 AutoML Vision Object Detection UI中,选择左侧导航栏中的模型标签页(带有灯泡图标)以显示可用的模型。
如需查看其他项目的模型,请从标题栏右上角的下拉列表中选择该项目。
- 选择已部署且经过训练的模型。
- 选择标题栏正下方的测试和使用标签页。
-
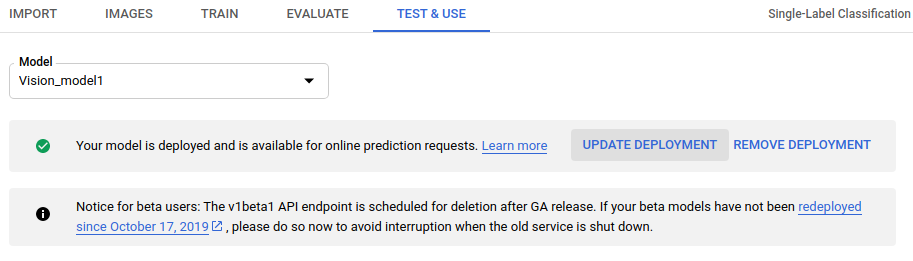
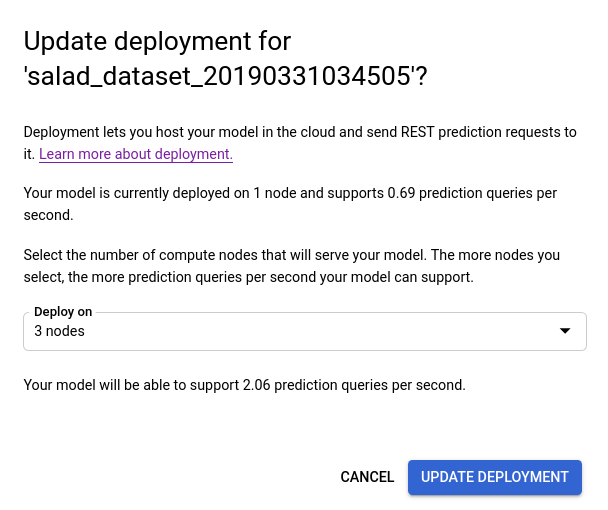
页面顶部的框中将显示一条消息,其内容是“您的模型已部署,可用于在线预测请求”。选择此文本旁边的更新部署选项。
- 在打开的更新部署窗口中,从列表中选择用于部署模型的新节点数量。节点数量显示其估算的每秒预测查询次数 (QPS)。
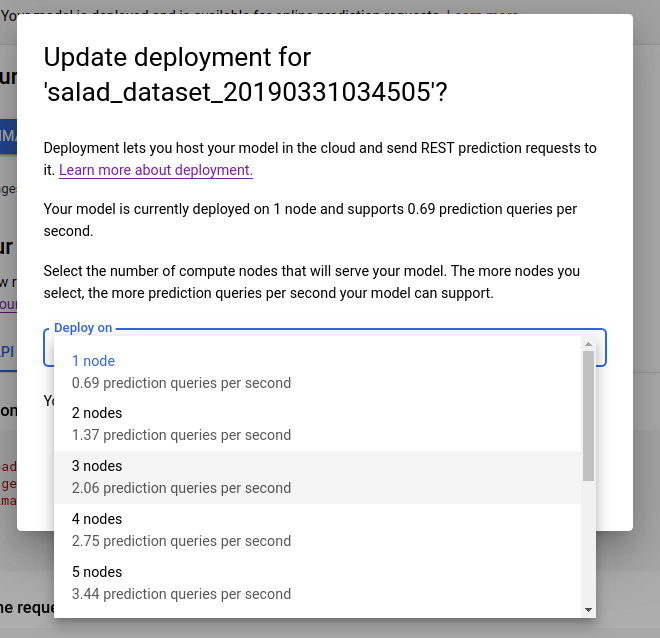
从列表中选择新节点数量后,选择更新部署以更新用于部署模型的节点数。
- 您将返回到测试和使用窗口,此时您会看到显示“正在部署模型…”的文本框。
模型成功部署到新的节点数量后,您会在与项目关联的地址处收到一封电子邮件。
REST
最初用于部署模型的方法与更改已部署模型的节点数量的方法相同。在使用任何请求数据之前,请先进行以下替换:
- project-id:您的 GCP 项目 ID。
- model-id:您的模型的 ID(从创建模型时返回的响应中获取)。此 ID 是模型名称的最后一个元素。
例如:
- 模型名称:
projects/project-id/locations/location-id/models/IOD4412217016962778756 - 模型 ID:
IOD4412217016962778756
- 模型名称:
字段注意事项:
nodeCount- 需要在其上部署模型的节点的数量。值必须介于 1 到 100 之间,包括 1 和 100。节点是机器资源的抽象,可处理模型的qps_per_node中指定的每秒在线预测查询次数 (QPS)。
HTTP 方法和网址:
POST https://automl.googleapis.com/v1/projects/PROJECT_ID/locations/us-central1/models/MODEL_ID:deploy
请求 JSON 正文:
{
  "imageObjectDetectionModelDeploymentMetadata": {
    "nodeCount": 2
  }
}
如需发送请求,请选择以下方式之一:
curl
将请求正文保存在名为 request.json 的文件中,然后执行以下命令:
curl -X POST \
    -H "Authorization: Bearer $(gcloud auth print-access-token)" \
    -H "x-goog-user-project: project-id" \
    -H "Content-Type: application/json; charset=utf-8" \
    -d @request.json \
    "https://automl.googleapis.com/v1/projects/PROJECT_ID/locations/us-central1/models/MODEL_ID:deploy"
PowerShell
将请求正文保存在名为 request.json 的文件中,然后执行以下命令:
$cred = gcloud auth print-access-token
$headers = @{ "Authorization" = "Bearer $cred"; "x-goog-user-project" = "project-id" }

Invoke-WebRequest `
    -Method POST `
    -Headers $headers `
    -ContentType: "application/json; charset=utf-8" `
    -InFile request.json `
    -Uri "https://automl.googleapis.com/v1/projects/PROJECT_ID/locations/us-central1/models/MODEL_ID:deploy" | Select-Object -Expand Content
您应该会看到类似如下所示的输出。可以使用操作 ID 来获取任务的状态。如需查看示例,请参阅处理长时间运行的操作。
{
  "name": "projects/PROJECT_ID/locations/us-central1/operations/OPERATION_ID",
  "metadata": {
    "@type": "type.googleapis.com/google.cloud.automl.v1.OperationMetadata",
    "createTime": "2019-08-07T22:00:20.692109Z",
    "updateTime": "2019-08-07T22:00:20.692109Z",
    "deployModelDetails": {}
  }
}
Go
在试用此示例之前,请按照客户端库页面中与此编程语言对应的设置说明执行操作。
Java
在试用此示例之前,请按照客户端库页面中与此编程语言对应的设置说明执行操作。
Node.js
在试用此示例之前,请按照客户端库页面中与此编程语言对应的设置说明执行操作。
Python
在试用此示例之前,请按照客户端库页面中与此编程语言对应的设置说明执行操作。
其他语言
C#: 请按照客户端库页面上的 C# 设置说明操作,然后访问 .NET 版 AutoML Vision Object Detection 参考文档。
PHP: 请按照客户端库页面上的 PHP 设置说明操作,然后访问 PHP 版 AutoML Vision Object Detection 参考文档。
Ruby 版: 请按照客户端库页面上的 Ruby 设置说明操作,然后访问 Ruby 版 AutoML Vision Object Detection 参考文档。