Membatalkan deployment model

Setelah men-deploy dan membuat prediksi, Anda dapat membatalkan deployment model secara manual untuk menghindari biaya tambahan.

Membatalkan deployment contoh kode

UI Web

  1. Buka Vision Dashboard dan pilih tab Model (dengan ikon bohlam) di menu navigasi sebelah kiri untuk menampilkan model yang tersedia.

    Untuk melihat model project yang berbeda, pilih project dari menu drop-down di kanan atas panel judul.

  2. Pilih baris untuk model yang ingin Anda gunakan untuk memberi label pada gambar.
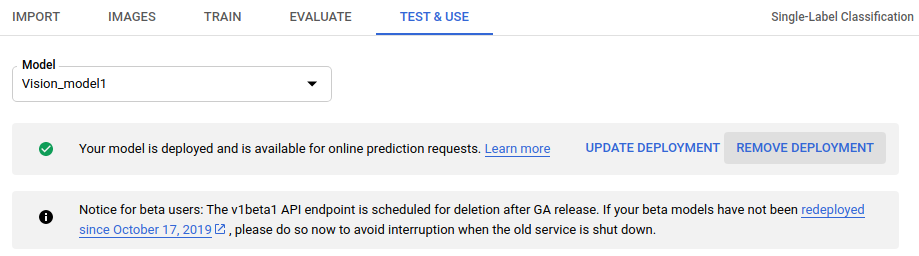
  3. Pilih tab Pengujian & Penggunaan tepat di bawah panel judul.
  4. Pilih Hapus deployment dari banner di bawah nama model Anda untuk membuka jendela opsi batalkan deployment.

    menu pop-up membatalkan deployment
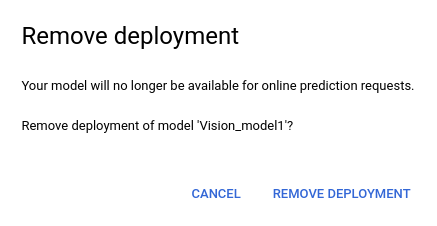
  5. Pilih Hapus deployment untuk membatalkan deployment model.

    deployment model men-deploy model
  6. Anda akan menerima email saat pembatalan deployment model selesai.

REST

Sebelum menggunakan salah satu data permintaan, lakukan penggantian berikut:

  • project-id: Project ID GCP Anda.
  • model-id: ID model Anda, dari respons saat membuat model. ID adalah elemen terakhir dari nama model Anda. Misalnya:
    • nama model: projects/project-id/locations/location-id/models/IOD4412217016962778756
    • id model: IOD4412217016962778756

Metode HTTP dan URL:

POST https://automl.googleapis.com/v1/projects/PROJECT_ID/locations/us-
central1/models/MODEL_ID:undeploy

Untuk mengirim permintaan Anda, pilih salah satu opsi berikut:

curl

Jalankan perintah berikut:

curl -X POST \
-H "Authorization: Bearer $(gcloud auth print-access-token)" \
-H "x-goog-user-project: project-id" \
-H "Content-Type: application/json; charset=utf-8" \
-d "" \
"https://automl.googleapis.com/v1/projects/PROJECT_ID/locations/us- central1/models/MODEL_ID:undeploy"

PowerShell

Jalankan perintah berikut:

$cred = gcloud auth print-access-token
$headers = @{ "Authorization" = "Bearer $cred"; "x-goog-user-project" = "project-id" }

Invoke-WebRequest `
-Method POST `
-Headers $headers `
-Uri "https://automl.googleapis.com/v1/projects/PROJECT_ID/locations/us- central1/models/MODEL_ID:undeploy" | Select-Object -Expand Content
Anda akan menerima respons dengan ID operasi deployment:
{
  "name": "projects/PROJECT_ID/locations/us-central1/operations/OPERATION_ID",
  "metadata": {
    "@type": "type.googleapis.com/google.cloud.automl.v1.OperationMetadata",
    "createTime": "2019-08-07T22:19:50.828033Z",
    "updateTime": "2019-08-07T22:19:50.828033Z",
    "undeployModelDetails": {}
  }
}

Anda dapat mendapatkan status operasi dengan metode HTTP dan URL berikut:

GET https://automl.googleapis.com/v1/projects/PROJECT_ID/locations/us-central1/operations/OPERATION_ID

Status operasi yang selesai akan terlihat mirip dengan status berikut:

{
  "name": "projects/PROJECT_ID/locations/us-central1/operations/OPERATION_ID",
  "metadata": {
    "@type": "type.googleapis.com/google.cloud.automl.v1.OperationMetadata",
    "createTime": "2019-06-21T16:47:21.704674Z",
    "updateTime": "2019-06-21T17:01:00.802505Z",
    "deployModelDetails": {}
  },
  "done": true,
  "response": {
    "@type": "type.googleapis.com/google.protobuf.Empty"
  }
}

Go

Sebelum mencoba contoh ini, ikuti petunjuk penyiapan untuk bahasa ini di halaman Library Klien.

import (
	"context"
	"fmt"
	"io"

	automl "cloud.google.com/go/automl/apiv1"
	"cloud.google.com/go/automl/apiv1/automlpb"
)

// undeployModel deploys a model.
func undeployModel(w io.Writer, projectID string, location string, modelID string) error {
	// projectID := "my-project-id"
	// location := "us-central1"
	// modelID := "TRL123456789..."

	ctx := context.Background()
	client, err := automl.NewClient(ctx)
	if err != nil {
		return fmt.Errorf("NewClient: %w", err)
	}
	defer client.Close()

	req := &automlpb.UndeployModelRequest{
		Name: fmt.Sprintf("projects/%s/locations/%s/models/%s", projectID, location, modelID),
	}

	op, err := client.UndeployModel(ctx, req)
	if err != nil {
		return fmt.Errorf("DeployModel: %w", err)
	}
	fmt.Fprintf(w, "Processing operation name: %q\n", op.Name())

	if err := op.Wait(ctx); err != nil {
		return fmt.Errorf("Wait: %w", err)
	}

	fmt.Fprintf(w, "Model undeployed.\n")

	return nil
}

Java

Sebelum mencoba contoh ini, ikuti petunjuk penyiapan untuk bahasa ini di halaman Library Klien.

import com.google.api.gax.longrunning.OperationFuture;
import com.google.cloud.automl.v1.AutoMlClient;
import com.google.cloud.automl.v1.ModelName;
import com.google.cloud.automl.v1.OperationMetadata;
import com.google.cloud.automl.v1.UndeployModelRequest;
import com.google.protobuf.Empty;
import java.io.IOException;
import java.util.concurrent.ExecutionException;

class UndeployModel {

  static void undeployModel() throws IOException, ExecutionException, InterruptedException {
    // TODO(developer): Replace these variables before running the sample.
    String projectId = "YOUR_PROJECT_ID";
    String modelId = "YOUR_MODEL_ID";
    undeployModel(projectId, modelId);
  }

  // Undeploy a model from prediction
  static void undeployModel(String projectId, String modelId)
      throws IOException, ExecutionException, InterruptedException {
    // Initialize client that will be used to send requests. This client only needs to be created
    // once, and can be reused for multiple requests. After completing all of your requests, call
    // the "close" method on the client to safely clean up any remaining background resources.
    try (AutoMlClient client = AutoMlClient.create()) {
      // Get the full path of the model.
      ModelName modelFullId = ModelName.of(projectId, "us-central1", modelId);
      UndeployModelRequest request =
          UndeployModelRequest.newBuilder().setName(modelFullId.toString()).build();
      OperationFuture<Empty, OperationMetadata> future = client.undeployModelAsync(request);

      future.get();
      System.out.println("Model undeployment finished");
    }
  }
}

Node.js

Sebelum mencoba contoh ini, ikuti petunjuk penyiapan untuk bahasa ini di halaman Library Klien.

/**
 * TODO(developer): Uncomment these variables before running the sample.
 */
// const projectId = 'YOUR_PROJECT_ID';
// const location = 'us-central1';
// const modelId = 'YOUR_MODEL_ID';

// Imports the Google Cloud AutoML library
const {AutoMlClient} = require('@google-cloud/automl').v1;

// Instantiates a client
const client = new AutoMlClient();

async function undeployModel() {
  // Construct request
  const request = {
    name: client.modelPath(projectId, location, modelId),
  };

  const [operation] = await client.undeployModel(request);

  // Wait for operation to complete.
  const [response] = await operation.promise();
  console.log(`Model undeployment finished. ${response}`);
}

undeployModel();

Python

Sebelum mencoba contoh ini, ikuti petunjuk penyiapan untuk bahasa ini di halaman Library Klien.

from google.cloud import automl

# TODO(developer): Uncomment and set the following variables
# project_id = "YOUR_PROJECT_ID"
# model_id = "YOUR_MODEL_ID"

client = automl.AutoMlClient()
# Get the full path of the model.
model_full_id = client.model_path(project_id, "us-central1", model_id)
response = client.undeploy_model(name=model_full_id)

print(f"Model undeployment finished. {response.result()}")

Bahasa tambahan

C# : Ikuti Petunjuk penyiapan C# di halaman library klien, lalu kunjungi dokumentasi referensi AutoML Vision untuk .NET.

PHP : Ikuti Petunjuk penyiapan PHP di halaman library klien, lalu kunjungi dokumentasi referensi AutoML Vision untuk PHP.

Ruby : Ikuti Petunjuk penyiapan Ruby di halaman library klien, lalu kunjungi dokumentasi referensi AutoML Vision untuk Ruby.