您将构建的模型
在本教程中,您将从 AutoML Vision Edge 下载导出的自定义 TensorFlow Lite 模型。然后,您会运行一个使用该模型识别花卉图片的预制 iOS 应用。
目标
在本入门级端到端演示中,您将使用代码执行以下操作:
- 在使用 TFLite 解释器的 iOS 应用中运行预训练模型。
准备工作
安装 TensorFlow
在开始学习本教程之前,您需要安装如下软件:
- 安装 TensorFlow 1.7 版
- 安装 PILLOW
如果您已经安装了 Python 并且可以正常使用,请运行以下命令下载此软件:
pip install --upgrade  "tensorflow==1.7.*"
pip install PILLOW
克隆 Git 代码库
使用命令行,通过以下命令克隆 Git 代码库:
git clone https://github.com/googlecodelabs/tensorflow-for-poets-2
导航到代码库的本地克隆的目录(tensorflow-for-poets-2 目录)。您将从此目录运行以下所有代码示例:
cd tensorflow-for-poets-2
设置 iOS 应用
演示版 iOS 应用需要使用其他几种工具:
- Xcode
- Xcode 命令行工具
- Cocoapods
下载 Xcode
使用以下链接将 Xcode 下载到您的机器上。
安装 Xcode 命令行工具
运行以下命令来安装 Xcode 命令行工具:
xcode-select --install
安装 Cocoapods
Cocoapods 会用到 macOS 上默认安装的 Ruby。
如需安装 cocoapods,请运行以下命令:
sudo gem install cocoapods
Install TFLite Cocoapod
导航到 .xcworkspace 文件
此 Codelab 的其余部分需要直接在 macOS 中运行,因此请立即关闭 Docker(按 Ctrl+D 可以退出 Docker)。
使用以下命令安装 TensorFlow Lite 并使用 cocoapods 创建 .xcworkspace 文件:
pod install --project-directory=ios/tflite/
使用 Xcode 打开项目。您可以通过命令行或界面打开项目。
如需通过命令行打开项目,请运行以下命令:
open ios/tflite/tflite_photos_example.xcworkspace
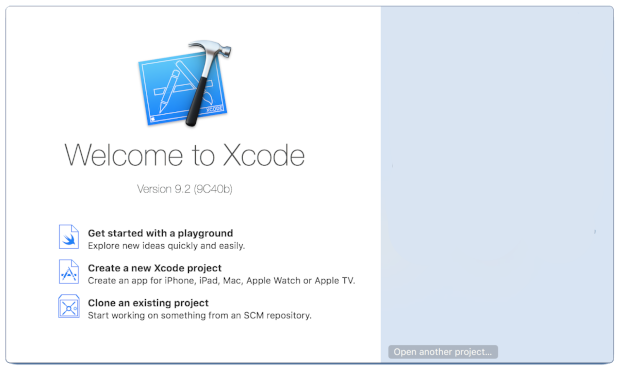
如需通过界面打开项目,请启动 Xcode 并选择“打开其他项目”(Open another Project) 按钮。
打开项目后,导航到 .xcworkspace 文件(不是 .xcproject 文件)。
运行原始应用
该应用是在 iOS 模拟器中运行图像识别模型的简单示例。该应用会从照片库中读取数据,因为模拟器不支持相机输入。
插入自定义模型之前,请测试该应用的基准版本,该版本使用基于 1000 个 ImageNet 类别而训练的基本“mobilenet”。
如需在模拟器中启动该应用,请选择 Xcode 窗口右上角的播放按钮 ![]() 。
。
点击“下一张照片”(Next Photo) 按钮可以逐一浏览设备上的照片。
您只需将照片拖放到模拟器窗口,即可将其添加到设备的照片库中。
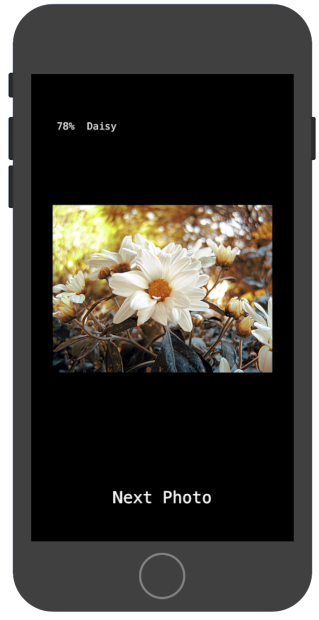
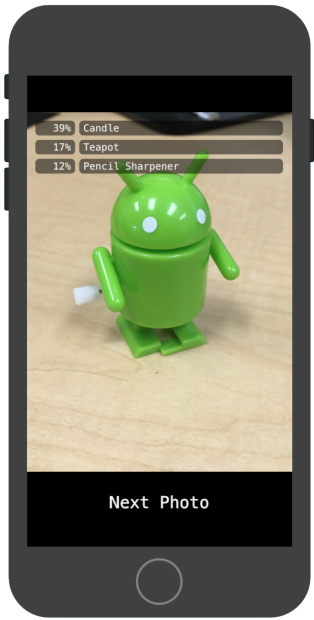
结果应显示与以下图片类似的注释:
运行自定义应用
原始应用设置使用标准 MobileNet 将图片归为 1000 个 ImageNet 类别中的一个。
修改应用,以便其使用具有自定义图片类别的重新训练模型。
将模型文件添加到项目中
此演示版项目配置为在 android/tflite/app/src/main/assets/ 目录中搜索 graph.lite 和 labels.txt 文件。
如需将这两个文件替换为您的版本,请运行以下命令:
cp tf_files/optimized_graph.lite ios/tflite/data/graph.lite
cp tf_files/retrained_labels.txt ios/tflite/data/labels.txt
运行应用
如需在模拟器中重新启动该应用,请选择 Xcode 窗口右上角的播放按钮 ![]() 。
。
如需测试修改效果,请从 flower_photos/ 目录添加图片文件并进行预测。
结果应如下所示:
请注意,默认图片不是花卉图片。
如需真正试用模型,请添加您之前下载的一些训练数据图片,或通过 Google 搜索下载一些用于预测的图片。
工作方式
现在,您已运行该应用,请查看特定于 TensorFlow Lite 的代码。
TensorFlowLite Pod
此应用会用到预编译的 TFLite Cocoapod。Podfile 包括项目中的 cocoapod:
platform :ios, '8.0'
inhibit_all_warnings!

target 'tflite_photos_example'
       pod 'TensorFlowLite'
与 TFLite 对接的代码全部包含在 CameraExampleViewController.mm 文件中。
设置
涉及的第一个块(在必要的导入操作之后)是 viewDidLoad 方法:
CameraExampleViewController.mm
#include "tensorflow/contrib/lite/kernels/register.h"
#include "tensorflow/contrib/lite/model.h"
#include "tensorflow/contrib/lite/string_util.h"
#include "tensorflow/contrib/lite/tools/mutable_op_resolver.h"

...

- (void)viewDidLoad {
  [super viewDidLoad];
  labelLayers = [[NSMutableArray alloc] init];

  NSString* graph_path = FilePathForResourceName(model_file_name, model_file_type);
  model = tflite::FlatBufferModel::BuildFromFile([graph_path UTF8String]);
  if (!model) {
    LOG(FATAL) << "Failed to mmap model " << graph_path;
  }
  LOG(INFO) << "Loaded model " << graph_path;
  model->error_reporter();
  LOG(INFO) << "resolved reporter";

  ...
该方法前半部分的关键行是 model = tflite::FlatBufferModel::BuildFromFile([graph_path UTF8String]); 这一行。此代码会根据图片文件创建 FlatBufferModel。
FlatBuffer 是一种可映射内存的数据结构。这些是 TFLite 的重要功能,因为它们可以让系统更好地管理模型使用的内存。系统可以根据需要透明地将模型的某些部分换入内存或从内存中换出。
该方法的第二部分为模型构建解释器,从而将操作实现附加到我们之前加载的图片数据结构:
CameraExampleViewController.mm
- (void)viewDidLoad {
  ...

  tflite::ops::builtin::BuiltinOpResolver resolver;
  LoadLabels(labels_file_name, labels_file_type, &labels);

  tflite::InterpreterBuilder(*model, resolver)(&interpreter);
  if (!interpreter) {
    LOG(FATAL) << "Failed to construct interpreter";
  }
  if (interpreter->AllocateTensors() != kTfLiteOk) {
    LOG(FATAL) << "Failed to allocate tensors!";
  }

  [self attachPreviewLayer];
}
如果您熟悉 python 中的 TensorFlow,这大致相当于构建 tf.Session()。
运行模型
UpdatePhoto 方法处理提取下一张照片、更新预览窗口以及在照片上运行模型的所有细节。
CameraExampleViewController.mm
- (void)UpdatePhoto{
  PHAsset* asset;
  if (photos==nil || photos_index >= photos.count){
    [self updatePhotosLibrary];
    photos_index=0;
  }
  if (photos.count){
    asset = photos[photos_index];
    photos_index += 1;
    input_image = [self convertImageFromAsset:asset
                                   targetSize:CGSizeMake(wanted_input_width, wanted_input_height)
                                         mode:PHImageContentModeAspectFill];
    display_image = [self convertImageFromAsset:asset
                                     targetSize:CGSizeMake(asset.pixelWidth,asset.pixelHeight)
                                           mode:PHImageContentModeAspectFit];
    [self DrawImage];
  }

  if (input_image != nil){
    image_data image = [self CGImageToPixels:input_image.CGImage];
    [self inputImageToModel:image];
    [self runModel];
  }
}
这是我们感兴趣的最后三行。
CGImageToPixels 方法将 iOS 照片库返回的 CGImage 转换为包含宽度、高度、通道、像素数据的简单结构。
typedef struct {
  int width;
  int height;
  int channels;
  std::vector<uint8_t> data;
} image_data;
inputImageToModel 方法处理将图片插入解释器内存的操作。这包括调整图片大小以及调整像素值以匹配模型的预期值。
CameraExampleViewController.mm
- (void)inputImageToModel:(image_data)image{
  float* out = interpreter->typed_input_tensor<float>(0);

  const float input_mean = 127.5f;
  const float input_std = 127.5f;
  assert(image.channels >= wanted_input_channels);
  uint8_t* in = image.data.data();

  for (int y = 0; y < wanted_input_height; ++y) {
    const int in_y = (y * image.height) / wanted_input_height;
    uint8_t* in_row = in + (in_y * image.width * image.channels);
    float* out_row = out + (y * wanted_input_width * wanted_input_channels);
    for (int x = 0; x < wanted_input_width; ++x) {
      const int in_x = (x * image.width) / wanted_input_width;
      uint8_t* in_pixel = in_row + (in_x * image.channels);
      float* out_pixel = out_row + (x * wanted_input_channels);
      for (int c = 0; c < wanted_input_channels; ++c) {
        out_pixel[c] = (in_pixel[c] - input_mean) / input_std;
      }
    }
  }
}
我们知道该模型只有一个输入,因此 float* out = interpreter->typed_input_tensor<float>(0); 行会向解释器请求一个用于输入 0 的内存指针。该方法的其余部分处理指针运算和像素扩缩,以便将数据复制到该输入数组中。
最后,runModel 方法执行模型:
CameraExampleViewController.mm
- (void)runModel {
  double startTimestamp = [[NSDate new] timeIntervalSince1970];
  if (interpreter->Invoke() != kTfLiteOk) {
    LOG(FATAL) << "Failed to invoke!";
  }
  double endTimestamp = [[NSDate new] timeIntervalSince1970];
  total_latency += (endTimestamp - startTimestamp);
  total_count += 1;
  NSLog(@"Time: %.4lf, avg: %.4lf, count: %d", endTimestamp - startTimestamp,
        total_latency / total_count,  total_count);

  ...

}
接下来的 runModel 会读回结果。为此,它会向解释器请求一个输出数组数据指针。输出是一个简单的浮点数数组。GetTopN 方法处理前 5 个结果的提取操作(使用优先级队列)。
CameraExampleViewController.mm
- (void)runModel {
  ...

  const int output_size = (int)labels.size();
  const int kNumResults = 5;
  const float kThreshold = 0.1f;

  std::vector<std::pair<float, int>> top_results;

  float* output = interpreter->typed_output_tensor<float>(0);
  GetTopN(output, output_size, kNumResults, kThreshold, &top_results);

  ...
}
接下来的几行只是将前 5 个 (probability, class_id) 对转换为 (probability, label) 对,然后以异步方式将该结果传递给用于更新屏幕报告的 setPredictionValues 方法:
CameraExampleViewController.mm
- (void)runModel {
  ...

  std::vector<std::pair<float, std::string>> newValues;
  for (const auto& result : top_results) {
    std::pair<float, std::string> item;
    item.first = result.first;
    item.second = labels[result.second];

    newValues.push_back(item);
  }
  dispatch_async(dispatch_get_main_queue(), ^(void) {
    [self setPredictionValues:newValues];
  });
}
后续步骤
您现在已经使用 Edge 模型完成了 iOS 花卉分类应用的演示。您使用训练好的 Edge Tensorflow Lite 模型对图片分类应用进行了测试,然后对其进行了修改并获取了示例注释。然后您查看了特定于 TensorFlow Lite 的代码来了解基础功能。
以下资源可以帮助您继续了解 TensorFlow 模型和 AutoML Vision Edge:
- 参阅官方文档和代码库,详细了解 TFLite。
- 试用此演示版应用的相机版本,该版本使用模型的量化版本。该版本通过更小、更高效的软件包提供了相同的功能。
- 尝试使用针对特定用例的其他 TFLite 就绪模型。
- 查看 TensorFlow 的使用入门文档,详细了解 TensorFlow。