作業内容
このチュートリアルでは、エクスポートされたカスタム TensorFlow Lite モデルを AutoML Vision Edge からダウンロードします。モデルを使用して花の画像を識別する既製の iOS アプリを実行します。
目標
この入門用のエンドツーエンドのチュートリアルでは、コードを使用して次のことを行います。
- TFLite インタープリタを使用して、iOS アプリで事前トレーニング済みモデルを実行します。
始める前に
TensorFlow をインストールする
チュートリアルを開始する前に、次のソフトウェアをインストールする必要があります。
- tensorflow バージョン 1.7 をインストールする
- PILLOW をインストールする
Python がすでに動作している場合は、次のコマンドを実行して、このソフトウェアをダウンロードします。
pip install --upgrade  "tensorflow==1.7.*"
pip install PILLOW
Git リポジトリのクローンを作成する
コマンドラインを使用して、次のコマンドで Git リポジトリのクローンを作成します。
git clone https://github.com/googlecodelabs/tensorflow-for-poets-2
リポジトリのローカル クローンのディレクトリ(tensorflow-for-poets-2 ディレクトリ)に移動します。このディレクトリから次のコードサンプルをすべて実行します。
cd tensorflow-for-poets-2
iOS アプリを設定する
デモ iOS アプリには次の追加ツールが必要です。
- Xcode
- Xcode コマンドライン ツール
- Cocoapods
Xcode をダウンロードする
以下のリンクを使用して、Xcode をお客様のマシンにダウンロードします。
Xcode コマンドライン ツールをインストールする
次のコマンドを実行して、Xcode コマンドライン ツールをインストールします。
xcode-select --install
Cocoapods をインストールする
Cocoapods では、macOS にデフォルトでインストールされている Ruby を使用します。
cocoapods をインストールするには、次のコマンドを実行します。
sudo gem install cocoapods
Install TFLite Cocoapod
.xcworkspace ファイルに移動する
この Codelab の残りは macOS で直接実行する必要があるため、ここで Docker を閉じます(Ctrl+D キーで Docker を閉じることができます)。
次のコマンドを使用して TensorFlow Lite をインストールし、cocoapods を使用して .xcworkspace ファイルを作成します。
pod install --project-directory=ios/tflite/
Xcode でプロジェクトを開きます。プロジェクトを開くには、コマンドラインか UI を使用します。
プロジェクトをコマンドラインから開くには、次のコマンドを実行します。
open ios/tflite/tflite_photos_example.xcworkspace
UI を使用してプロジェクトを開くには、Xcode を起動して「別のプロジェクトを開く」ボタンを選択します。
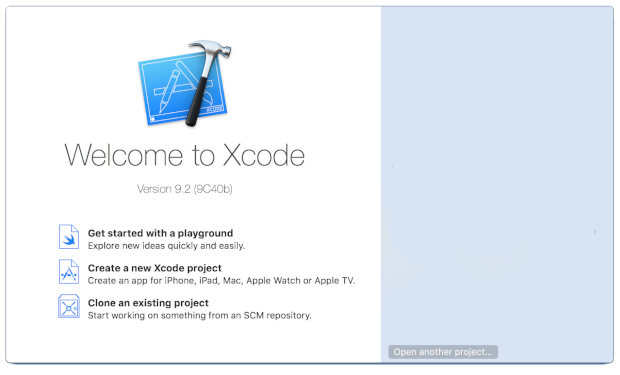
プロジェクトを開いたら、.xcworkspace ファイルへ移動します(.xcproject ファイルではありません)。
オリジナル アプリの実行
このアプリは、iOS Simulator で画像認識モデルを実行する簡単な例です。このシミュレータではカメラ入力がサポートされていないため、写真ライブラリから画像を読み取ります。
カスタマイズされたモデルを挿入する前に、1,000 個の ImageNet カテゴリでトレーニング済みのベース「mobilenet」を使用するアプリのベースライン バージョンをテストします。
シミュレータでアプリを起動するには、Xcode ウィンドウの右上にある再生ボタン ![]() を選択します。
を選択します。
[次の写真] ボタンでデバイス上の次の写真に進めます。
デバイスの写真ライブラリに写真を追加するには、Simulator ウィンドウに写真をドラッグ&ドロップします。
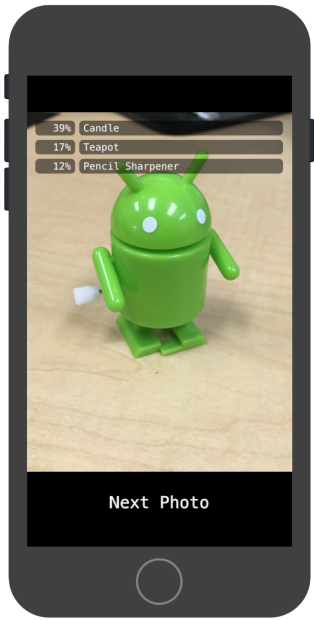
結果には、次のようなアノテーションが表示されます。
カスタマイズしたアプリを実行する
オリジナルのアプリ設定では、標準の MobileNet を使用して 1,000 個の ImageNet クラスのいずれか 1 つに画像を分類します。
カスタムの画像カテゴリで、再トレーニングされたモデルを使用するようにアプリを変更します。
モデルファイルをプロジェクトに追加する
デモ プロジェクトは android/tflite/app/src/main/assets/ ディレクトリの graph.lite と labels.txt ファイルを検索するように構成されています。
これら 2 つのファイルを自身のバージョンに置き換えるには、次のコマンドを実行します。
cp tf_files/optimized_graph.lite ios/tflite/data/graph.lite
cp tf_files/retrained_labels.txt ios/tflite/data/labels.txt
アプリを実行する
シミュレータでアプリを再起動するには、Xcode ウィンドウの右上にある再生ボタン![]() を選択します。
を選択します。
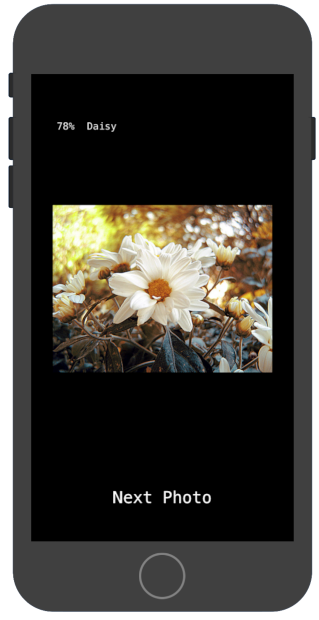
修正をテストするには、flower_photos/ ディレクトリから画像ファイルを追加し、予測を取得します。
結果は次のようになります。
デフォルトの画像は花ではありません。
実際にモデルを試してみるには、先ほどダウンロードしたトレーニング データ画像を追加するか、Google 検索から画像をダウンロードして予測に使用します。
仕組み
アプリを実行したら、TensorFlow Lite 固有のコードを確認します。
TensorFlowLite ポッド
このアプリはコンパイル済み TFLite Cocoapod を使用しています。Podfile にはプロジェクトの cocoapod が含まれています。
platform :ios, '8.0'
inhibit_all_warnings!

target 'tflite_photos_example'
       pod 'TensorFlowLite'
TFLite に連結されたコードは、すべて CameraExampleViewController.mm ファイルに含まれます。
設定
(必要なインポートを行った後に)まず注目すべきブロックは、viewDidLoad メソッドです。
CameraExampleViewController.mm
#include "tensorflow/contrib/lite/kernels/register.h"
#include "tensorflow/contrib/lite/model.h"
#include "tensorflow/contrib/lite/string_util.h"
#include "tensorflow/contrib/lite/tools/mutable_op_resolver.h"

...

- (void)viewDidLoad {
  [super viewDidLoad];
  labelLayers = [[NSMutableArray alloc] init];

  NSString* graph_path = FilePathForResourceName(model_file_name, model_file_type);
  model = tflite::FlatBufferModel::BuildFromFile([graph_path UTF8String]);
  if (!model) {
    LOG(FATAL) << "Failed to mmap model " << graph_path;
  }
  LOG(INFO) << "Loaded model " << graph_path;
  model->error_reporter();
  LOG(INFO) << "resolved reporter";

  ...
このメソッドの前半における重要な行は、model = tflite::FlatBufferModel::BuildFromFile([graph_path UTF8String]); です。このコードは、グラフファイルから FlatBufferModel を作成します。
FlatBuffer は、メモリ マッピング可能なデータ構造です。これらは、モデルが使用するメモリをシステムがより適切に管理できるようにするための、TFLite の重要な機能です。システムは、モデルの一部を必要に応じてメモリ内またはメモリ外に透過的に交換できます。
メソッドの後半は、モデルのインタープリタを作成し、先に読み込んだグラフのデータ構造に Op の実装を追加します。
CameraExampleViewController.mm
- (void)viewDidLoad {
  ...

  tflite::ops::builtin::BuiltinOpResolver resolver;
  LoadLabels(labels_file_name, labels_file_type, &labels);

  tflite::InterpreterBuilder(*model, resolver)(&interpreter);
  if (!interpreter) {
    LOG(FATAL) << "Failed to construct interpreter";
  }
  if (interpreter->AllocateTensors() != kTfLiteOk) {
    LOG(FATAL) << "Failed to allocate tensors!";
  }

  [self attachPreviewLayer];
}
Python の TensorFlow における、tf.Session() をビルドすることとほぼ同等になります。
モデルを実行する
UpdatePhoto メソッドは、次の写真の取得、プレビュー ウィンドウの更新、写真上のモデルの実行のすべての詳細を処理します。
CameraExampleViewController.mm
- (void)UpdatePhoto{
  PHAsset* asset;
  if (photos==nil || photos_index >= photos.count){
    [self updatePhotosLibrary];
    photos_index=0;
  }
  if (photos.count){
    asset = photos[photos_index];
    photos_index += 1;
    input_image = [self convertImageFromAsset:asset
                                   targetSize:CGSizeMake(wanted_input_width, wanted_input_height)
                                         mode:PHImageContentModeAspectFill];
    display_image = [self convertImageFromAsset:asset
                                     targetSize:CGSizeMake(asset.pixelWidth,asset.pixelHeight)
                                           mode:PHImageContentModeAspectFit];
    [self DrawImage];
  }

  if (input_image != nil){
    image_data image = [self CGImageToPixels:input_image.CGImage];
    [self inputImageToModel:image];
    [self runModel];
  }
}
注目すべきは、最後の 3 行です。
CGImageToPixels メソッドは、iOS Photos ライブラリから返された CGImage を幅、高さ、チャネル、ピクセルデータを含む単純な構造に変換します。
typedef struct {
  int width;
  int height;
  int channels;
  std::vector<uint8_t> data;
} image_data;
inputImageToModel メソッドにより、インタープリタのメモリに画像が挿入されます。この処理には、モデルが想定する型に合わせるための画像のサイズ変更やピクセル値の調整などが含まれます。
CameraExampleViewController.mm
- (void)inputImageToModel:(image_data)image{
  float* out = interpreter->typed_input_tensor<float>(0);

  const float input_mean = 127.5f;
  const float input_std = 127.5f;
  assert(image.channels >= wanted_input_channels);
  uint8_t* in = image.data.data();

  for (int y = 0; y < wanted_input_height; ++y) {
    const int in_y = (y * image.height) / wanted_input_height;
    uint8_t* in_row = in + (in_y * image.width * image.channels);
    float* out_row = out + (y * wanted_input_width * wanted_input_channels);
    for (int x = 0; x < wanted_input_width; ++x) {
      const int in_x = (x * image.width) / wanted_input_width;
      uint8_t* in_pixel = in_row + (in_x * image.channels);
      float* out_pixel = out_row + (x * wanted_input_channels);
      for (int c = 0; c < wanted_input_channels; ++c) {
        out_pixel[c] = (in_pixel[c] - input_mean) / input_std;
      }
    }
  }
}
モデルは 1 つの入力しか持たないので、float* out = interpreter->typed_input_tensor<float>(0); 行はインタープリタに入力 0 のメモリへのポインタを要求します。残りのメソッドは、ポインタ算術とピクセル スケーリングを処理して、データをその入力配列にコピーします。
最後に runModel メソッドはモデルを実行します。
CameraExampleViewController.mm
- (void)runModel {
  double startTimestamp = [[NSDate new] timeIntervalSince1970];
  if (interpreter->Invoke() != kTfLiteOk) {
    LOG(FATAL) << "Failed to invoke!";
  }
  double endTimestamp = [[NSDate new] timeIntervalSince1970];
  total_latency += (endTimestamp - startTimestamp);
  total_count += 1;
  NSLog(@"Time: %.4lf, avg: %.4lf, count: %d", endTimestamp - startTimestamp,
        total_latency / total_count,  total_count);

  ...

}
次に、runModel が結果を読み戻します。これを行うために、出力配列のデータへのポインタをインタープリタに問い合わせます。出力は float 型の単純な配列です。GetTopN メソッドは、優先度キューを使用して上位 5 つの結果の抽出を処理します。
CameraExampleViewController.mm
- (void)runModel {
  ...

  const int output_size = (int)labels.size();
  const int kNumResults = 5;
  const float kThreshold = 0.1f;

  std::vector<std::pair<float, int>> top_results;

  float* output = interpreter->typed_output_tensor<float>(0);
  GetTopN(output, output_size, kNumResults, kThreshold, &top_results);

  ...
}
次の数行は、これらの上位 5 つの (probability, class_id) ペア設定を (probability, label) ペアへと簡単に変換し、その結果をスクリーン レポートでアップデートした setPredictionValues メソッドへ非同期で渡します。
CameraExampleViewController.mm
- (void)runModel {
  ...

  std::vector<std::pair<float, std::string>> newValues;
  for (const auto& result : top_results) {
    std::pair<float, std::string> item;
    item.first = result.first;
    item.second = labels[result.second];

    newValues.push_back(item);
  }
  dispatch_async(dispatch_get_main_queue(), ^(void) {
    [self setPredictionValues:newValues];
  });
}
次のステップ
これで、Edge モデルを使った iOS フラワー分類アプリのチュートリアルを完了しました。トレーニングした Edge Tensorflow Lite モデルを使用して、画像分類アプリを修正してアノテーションを取得しました。次に、TensorFlow Lite 固有のコードを調べて基本的な機能を理解しました。
次のリソースは、TensorFlow モデルと AutoML Vision Edge の使い方を説明しています。
- TFLite の詳細については、公式ドキュメントとコード リポジトリをご覧ください。
- カメラ バージョンのデモアプリを使用して、モデルの量子化バージョンを使用します。同じ機能を、小型かつ効率的なパッケージで利用できます。
- 特定のユースケースについては、他の TFLite 対応モデルをお試しください。
- TensorFlow の詳細については、TensorFlow のスタートガイドのドキュメントをご覧ください。