データセットの作成と画像のインポート

データセットには分類するコンテンツ タイプの代表的なサンプルが含まれ、サンプルにはカスタムモデルで使用するカテゴリラベルが付けられています。このデータセットを入力値として利用し、モデルをトレーニングします。

データセットの主な作成手順は次のとおりです。

  1. データセットを作成し、各項目に複数のラベルを付けるかどうかを指定します。
  2. データセットにデータ項目をインポートします
  3. 項目にラベルを付けます

すでにラベルが割り当てられている項目をインポートする場合は、ステップ 2 と 3 を組み合わせます。

データセットの作成

カスタムモデルを作成するには、まず空のデータセットを作成します。作成したデータセットには、最終的にそのモデルのトレーニング データが格納されます。データセットを作成する際に、カスタムモデルで行う分類のタイプを指定します。

  • MULTICLASS は、分類された画像ごとに 1 つのラベルを割り当てます。
  • MULTILABEL を使用すると、1 つの画像に複数のラベルを割り当てることができます。

v1 バージョンの AutoML API では、このリクエストは長時間実行オペレーションの ID を返します。

長時間実行オペレーションが完了すると、画像をインポートできます。新しく作成したデータセットには、画像をインポートするまでデータは含まれません。

コマンドのレスポンスから得た新しいデータセットのデータセット ID を保存して、データセットへの画像のインポートやモデルのトレーニングなどの操作に使用します。

ウェブ UI

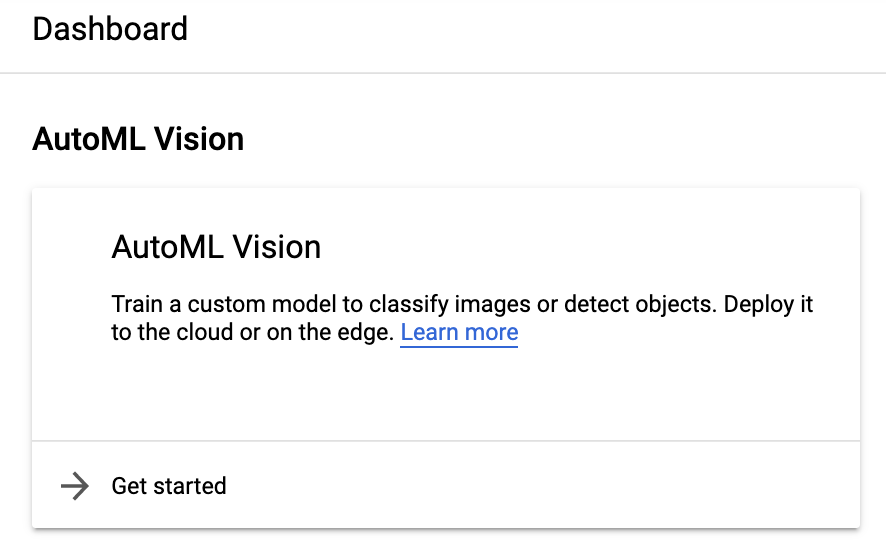
  1. Vision Dashboard を開きます。

    左側のナビゲーション メニュー項目 [人工知能] > [Vision] を使用してコンソールからこのページにアクセスすることもできます。これで、統合された Vision ダッシュボードが表示されます。AutoML Vision カードを選択します。

    統合された UI Vision ダッシュボード

  2. 左側のナビゲーション メニューから [データセット] を選択します。

  3. 上部にある [新しいデータセット] ボタンを選択し、データセット名を更新して(任意)、保有するデータに基づき単一ラベルまたはマルチラベル分類を選択します。

    データセット ページのモデルタイプを選択

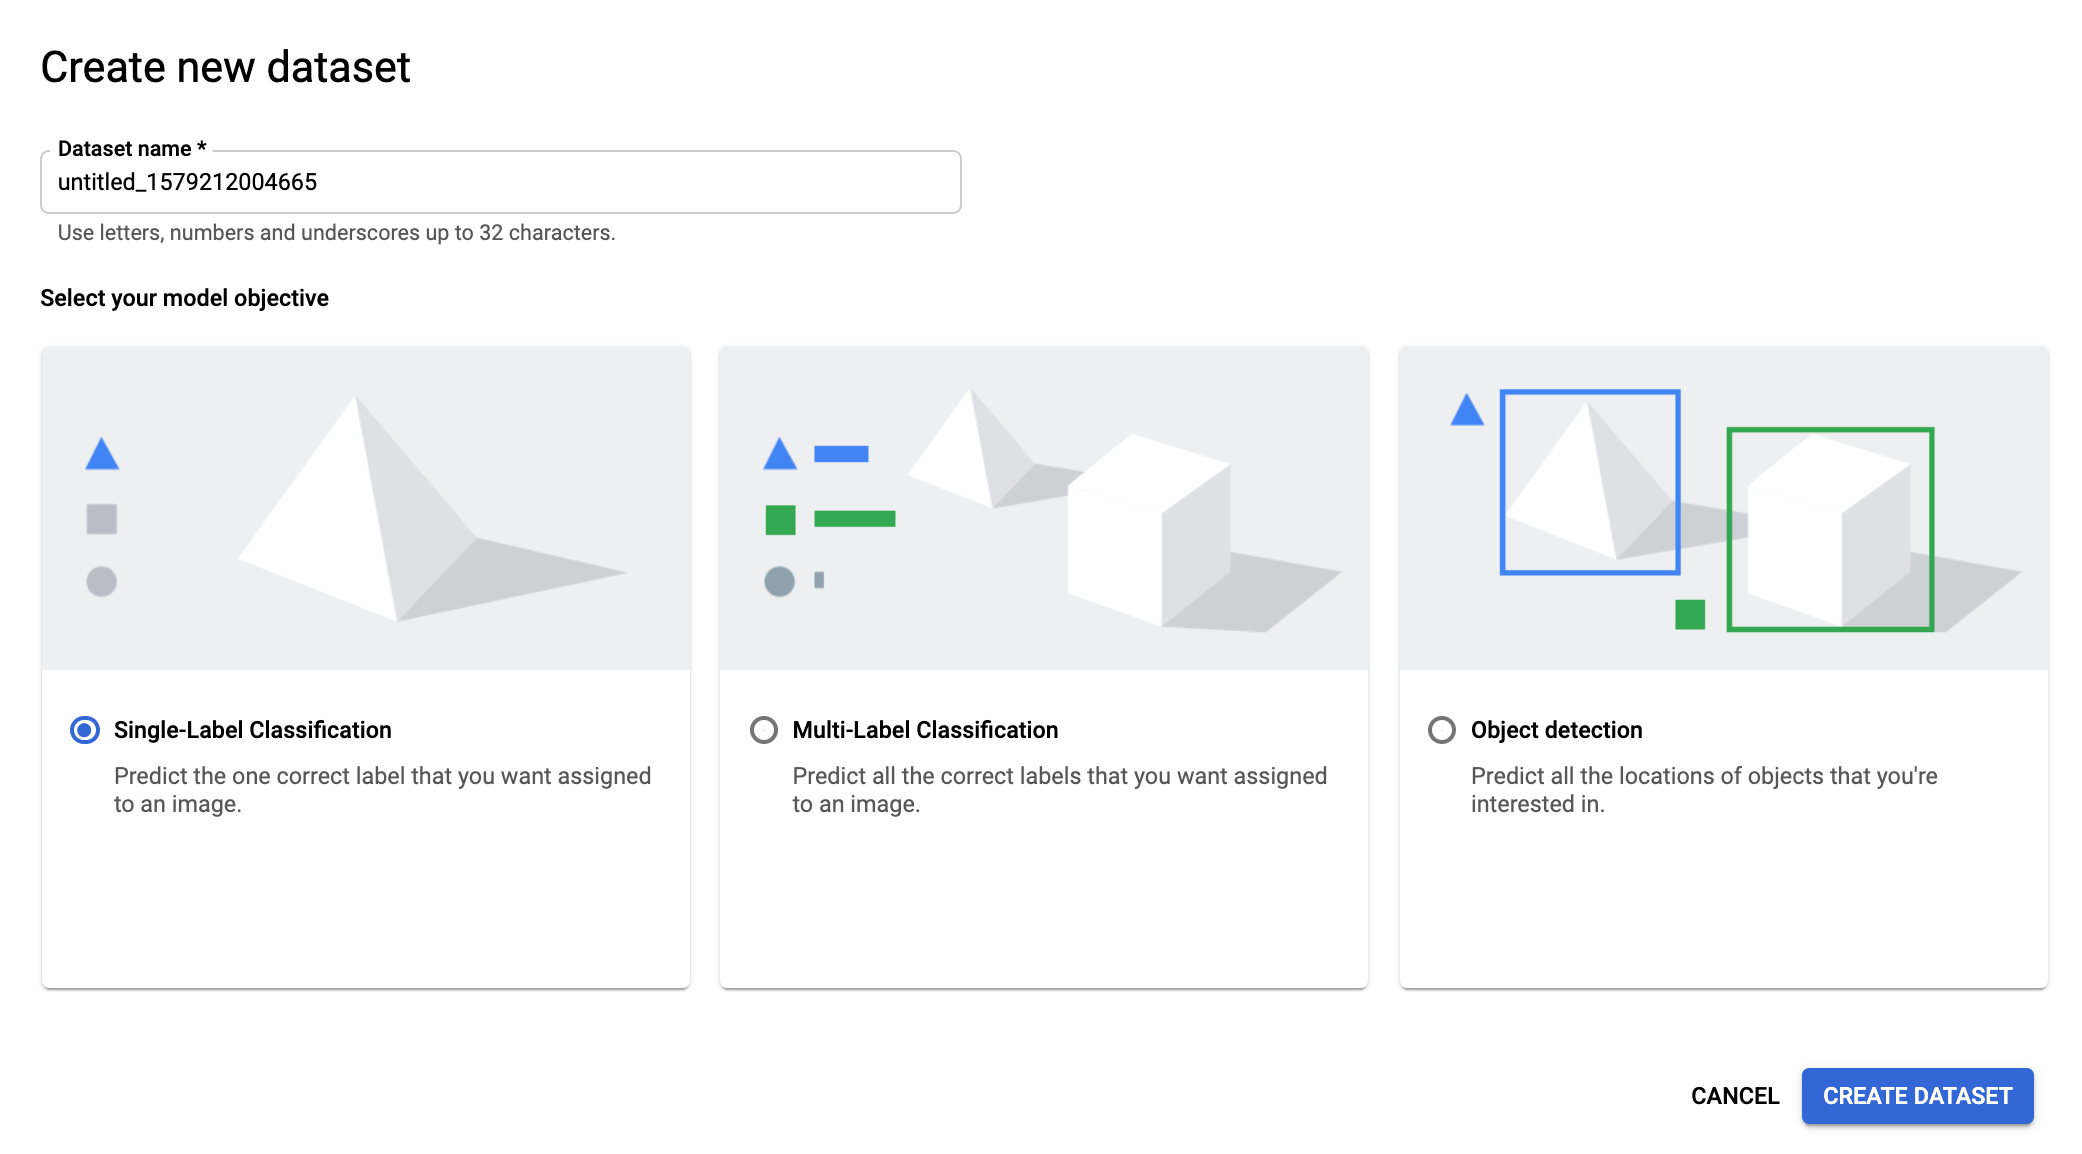
  4. 分類タイプを指定したら、[データセットを作成] を選択します。

  5. [データセットを作成] ページで、Google Cloud Storage から CSV ファイルを選択するか、データセットにインポートするローカル画像ファイルを選択します。

    インポート CSV ウィンドウを選択

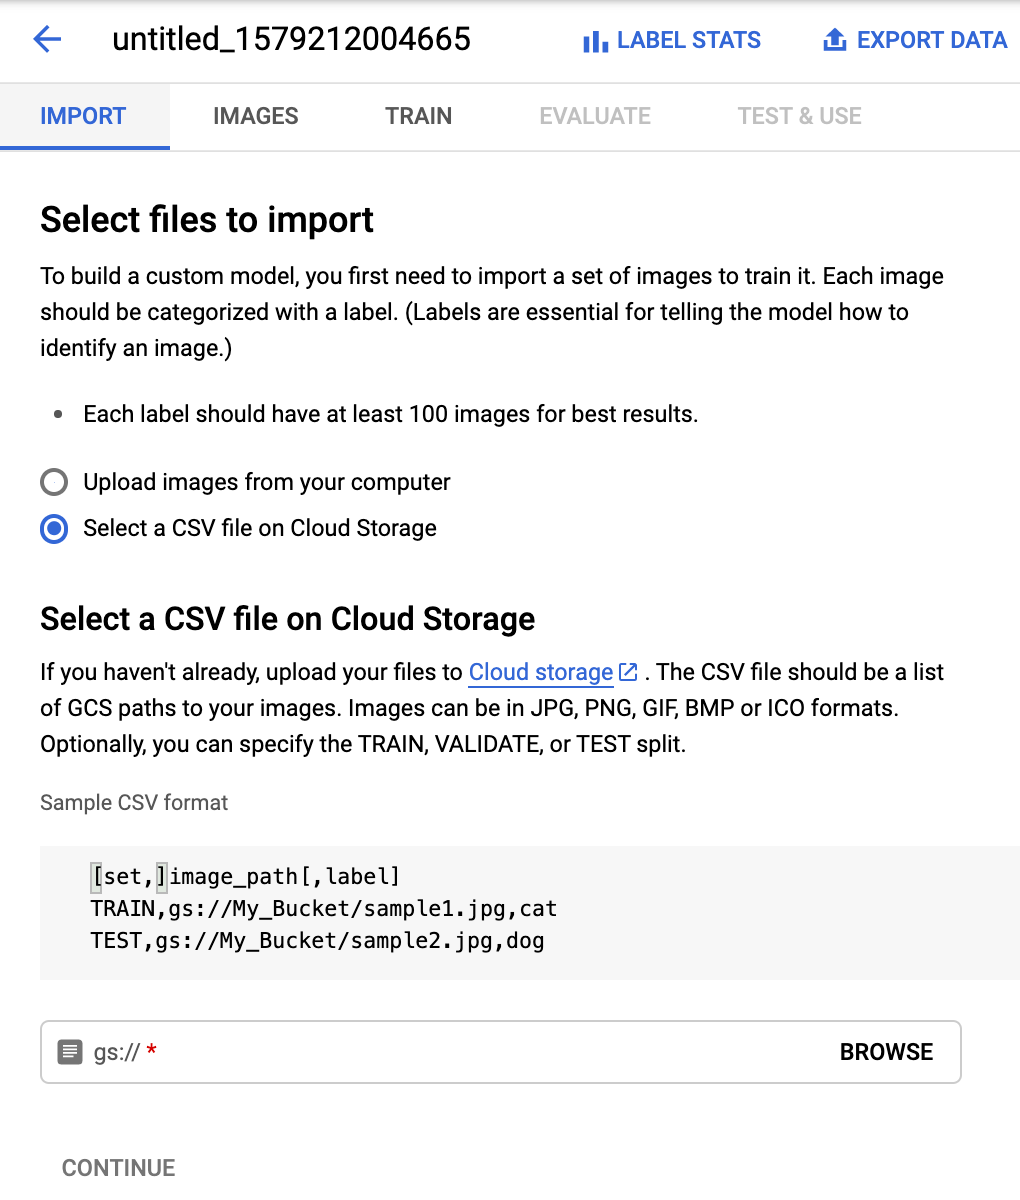
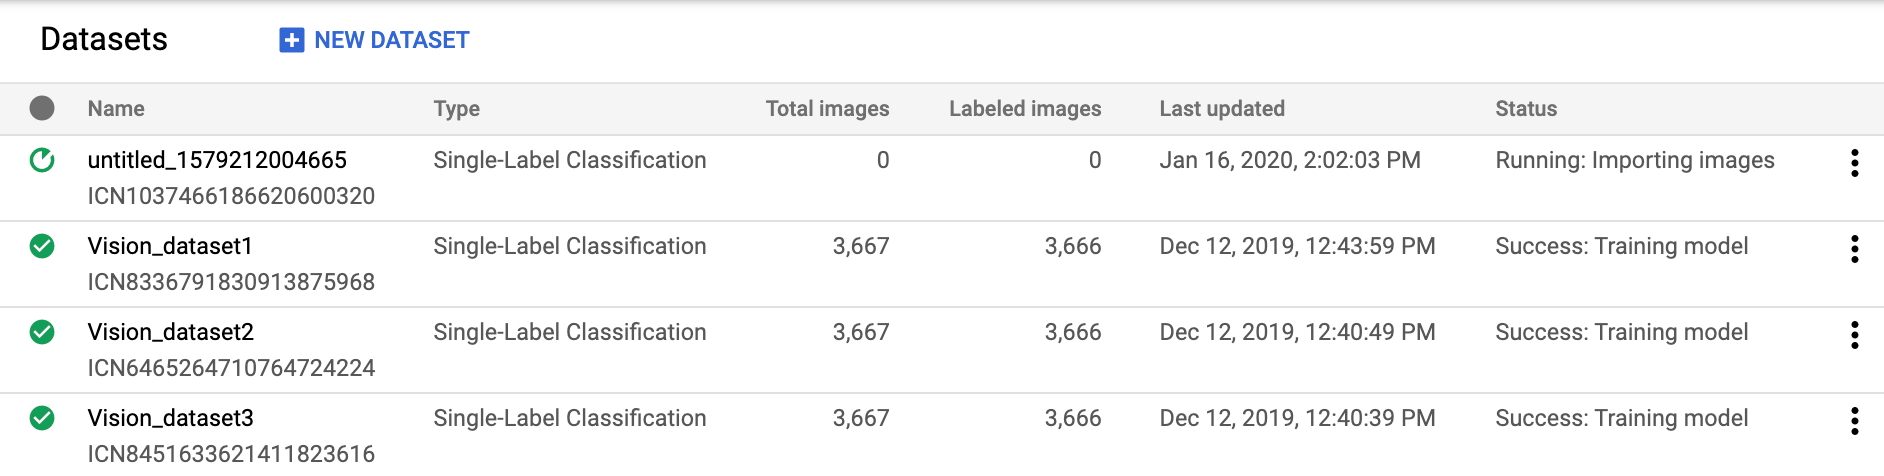
    [続行] を選択して、データセットへの画像のインポートを開始します。インポート中、データセットには画像インポート実行のステータスが表示されます。

  6. インポートが完了するとメールが届きます。

REST

次の例では、アイテムごとに 1 つのラベルをサポートするデータセットを作成します(MULTICLASS を参照)。

新しく作成されたデータセットには、項目をインポートするまでデータは含まれません。

コマンドのレスポンスから新しいデータセットの "name" をメモしておきます。これはデータセットへの項目のインポートやモデルのトレーニングなどの操作で使用します。

リクエストのデータを使用する前に、次のように置き換えます。

  • project-id: GCP プロジェクト ID
  • display-name: 選択した文字列の表示名。

HTTP メソッドと URL:

POST https://automl.googleapis.com/v1/projects/PROJECT_ID/locations/us-central1/datasets

リクエストの本文(JSON):

{
  "displayName": "DISPLAY_NAME",
  "imageClassificationDatasetMetadata": {
    "classificationType": "MULTICLASS"
  }
}

リクエストを送信するには、次のいずれかのオプションを選択します。

curl

リクエスト本文を request.json という名前のファイルに保存して、次のコマンドを実行します。

curl -X POST \
-H "Authorization: Bearer $(gcloud auth print-access-token)" \
-H "x-goog-user-project: project-id" \
-H "Content-Type: application/json; charset=utf-8" \
-d @request.json \
"https://automl.googleapis.com/v1/projects/PROJECT_ID/locations/us-central1/datasets"

PowerShell

リクエスト本文を request.json という名前のファイルに保存して、次のコマンドを実行します。

$cred = gcloud auth print-access-token
$headers = @{ "Authorization" = "Bearer $cred"; "x-goog-user-project" = "project-id" }

Invoke-WebRequest `
-Method POST `
-Headers $headers `
-ContentType: "application/json; charset=utf-8" `
-InFile request.json `
-Uri "https://automl.googleapis.com/v1/projects/PROJECT_ID/locations/us-central1/datasets" | Select-Object -Expand Content

出力は次のようになります。タスクのステータスは、オペレーション ID(この場合は ICN3819960680614725486)を使用して取得できます。例については、長時間実行オペレーションによる作業をご覧ください。

{
  "name": "projects/PROJECT_ID/locations/us-central1/operations/ICN3819960680614725486",
  "metadata": {
    "@type": "type.googleapis.com/google.cloud.automl.v1.OperationMetadata",
    "createTime": "2019-11-14T16:49:13.667526Z",
    "updateTime": "2019-11-14T16:49:13.667526Z",
    "createDatasetDetails": {}
  }
}

長時間実行オペレーションの完了後、同じオペレーション ステータス リクエストでデータセットの ID を取得できます。レスポンスは次のようになります。

{
  "name": "projects/PROJECT_ID/locations/us-central1/operations/ICN3819960680614725486",
  "metadata": {
    "@type": "type.googleapis.com/google.cloud.automl.v1.OperationMetadata",
    "createTime": "2019-11-14T16:49:13.667526Z",
    "updateTime": "2019-11-14T16:49:17.975314Z",
    "createDatasetDetails": {}
  },
  "done": true,
  "response": {
    "@type": "type.googleapis.com/google.cloud.automl.v1.Dataset",
    "name": "projects/PROJECT_ID/locations/us-central1/datasets/ICN5496445433112696489"
  }
}

Go

このサンプルを試す前に、クライアント ライブラリ ページを参照して、この言語の設定手順を完了してください。

import (
	"context"
	"fmt"
	"io"

	automl "cloud.google.com/go/automl/apiv1"
	"cloud.google.com/go/automl/apiv1/automlpb"
)

// visionClassificationCreateDataset creates a dataset for image classification.
func visionClassificationCreateDataset(w io.Writer, projectID string, location string, datasetName string) error {
	// projectID := "my-project-id"
	// location := "us-central1"
	// datasetName := "dataset_display_name"

	ctx := context.Background()
	client, err := automl.NewClient(ctx)
	if err != nil {
		return fmt.Errorf("NewClient: %w", err)
	}
	defer client.Close()

	req := &automlpb.CreateDatasetRequest{
		Parent: fmt.Sprintf("projects/%s/locations/%s", projectID, location),
		Dataset: &automlpb.Dataset{
			DisplayName: datasetName,
			DatasetMetadata: &automlpb.Dataset_ImageClassificationDatasetMetadata{
				ImageClassificationDatasetMetadata: &automlpb.ImageClassificationDatasetMetadata{
					// Specify the classification type:
					// - MULTILABEL: Multiple labels are allowed for one example.
					// - MULTICLASS: At most one label is allowed per example.
					ClassificationType: automlpb.ClassificationType_MULTILABEL,
				},
			},
		},
	}

	op, err := client.CreateDataset(ctx, req)
	if err != nil {
		return fmt.Errorf("CreateDataset: %w", err)
	}
	fmt.Fprintf(w, "Processing operation name: %q\n", op.Name())

	dataset, err := op.Wait(ctx)
	if err != nil {
		return fmt.Errorf("Wait: %w", err)
	}

	fmt.Fprintf(w, "Dataset name: %v\n", dataset.GetName())

	return nil
}

Java

このサンプルを試す前に、クライアント ライブラリ ページを参照して、この言語の設定手順を完了してください。

import com.google.api.gax.longrunning.OperationFuture;
import com.google.cloud.automl.v1.AutoMlClient;
import com.google.cloud.automl.v1.ClassificationType;
import com.google.cloud.automl.v1.Dataset;
import com.google.cloud.automl.v1.ImageClassificationDatasetMetadata;
import com.google.cloud.automl.v1.LocationName;
import com.google.cloud.automl.v1.OperationMetadata;
import java.io.IOException;
import java.util.concurrent.ExecutionException;

class VisionClassificationCreateDataset {

  public static void main(String[] args)
      throws IOException, ExecutionException, InterruptedException {
    // TODO(developer): Replace these variables before running the sample.
    String projectId = "YOUR_PROJECT_ID";
    String displayName = "YOUR_DATASET_NAME";
    createDataset(projectId, displayName);
  }

  // Create a dataset
  static void createDataset(String projectId, String displayName)
      throws IOException, ExecutionException, InterruptedException {
    // Initialize client that will be used to send requests. This client only needs to be created
    // once, and can be reused for multiple requests. After completing all of your requests, call
    // the "close" method on the client to safely clean up any remaining background resources.
    try (AutoMlClient client = AutoMlClient.create()) {
      // A resource that represents Google Cloud Platform location.
      LocationName projectLocation = LocationName.of(projectId, "us-central1");

      // Specify the classification type
      // Types:
      // MultiLabel: Multiple labels are allowed for one example.
      // MultiClass: At most one label is allowed per example.
      ClassificationType classificationType = ClassificationType.MULTILABEL;
      ImageClassificationDatasetMetadata metadata =
          ImageClassificationDatasetMetadata.newBuilder()
              .setClassificationType(classificationType)
              .build();
      Dataset dataset =
          Dataset.newBuilder()
              .setDisplayName(displayName)
              .setImageClassificationDatasetMetadata(metadata)
              .build();
      OperationFuture<Dataset, OperationMetadata> future =
          client.createDatasetAsync(projectLocation, dataset);

      Dataset createdDataset = future.get();

      // Display the dataset information.
      System.out.format("Dataset name: %s\n", createdDataset.getName());
      // To get the dataset id, you have to parse it out of the `name` field. As dataset Ids are
      // required for other methods.
      // Name Form: `projects/{project_id}/locations/{location_id}/datasets/{dataset_id}`
      String[] names = createdDataset.getName().split("/");
      String datasetId = names[names.length - 1];
      System.out.format("Dataset id: %s\n", datasetId);
    }
  }
}

Node.js

このサンプルを試す前に、クライアント ライブラリ ページを参照して、この言語の設定手順を完了してください。

/**
 * TODO(developer): Uncomment these variables before running the sample.
 */
// const projectId = 'YOUR_PROJECT_ID';
// const location = 'us-central1';
// const displayName = 'YOUR_DISPLAY_NAME';

// Imports the Google Cloud AutoML library
const {AutoMlClient} = require('@google-cloud/automl').v1;

// Instantiates a client
const client = new AutoMlClient();

async function createDataset() {
  // Construct request
  // Specify the classification type
  // Types:
  // MultiLabel: Multiple labels are allowed for one example.
  // MultiClass: At most one label is allowed per example.
  const request = {
    parent: client.locationPath(projectId, location),
    dataset: {
      displayName: displayName,
      imageClassificationDatasetMetadata: {
        classificationType: 'MULTILABEL',
      },
    },
  };

  // Create dataset
  const [operation] = await client.createDataset(request);

  // Wait for operation to complete.
  const [response] = await operation.promise();

  console.log(`Dataset name: ${response.name}`);
  console.log(`
    Dataset id: ${
      response.name
        .split('/')
        [response.name.split('/').length - 1].split('\n')[0]
    }`);
}

createDataset();

Python

このサンプルを試す前に、クライアント ライブラリ ページを参照して、この言語の設定手順を完了してください。

from google.cloud import automl

# TODO(developer): Uncomment and set the following variables
# project_id = "YOUR_PROJECT_ID"
# display_name = "your_datasets_display_name"

client = automl.AutoMlClient()

# A resource that represents Google Cloud Platform location.
project_location = f"projects/{project_id}/locations/us-central1"
# Specify the classification type
# Types:
# MultiLabel: Multiple labels are allowed for one example.
# MultiClass: At most one label is allowed per example.
# https://cloud.google.com/automl/docs/reference/rpc/google.cloud.automl.v1#classificationtype
metadata = automl.ImageClassificationDatasetMetadata(
    classification_type=automl.ClassificationType.MULTILABEL
)
dataset = automl.Dataset(
    display_name=display_name,
    image_classification_dataset_metadata=metadata,
)

# Create a dataset with the dataset metadata in the region.
response = client.create_dataset(
    parent=project_location, dataset=dataset, timeout=300
)

created_dataset = response.result()

# Display the dataset information
print(f"Dataset name: {created_dataset.name}")
print("Dataset id: {}".format(created_dataset.name.split("/")[-1]))

その他の言語

C#: クライアント ライブラリ ページの C# の設定手順を行ってから、.NET 用の AutoML Vision リファレンス ドキュメントをご覧ください。

PHP: クライアント ライブラリ ページの PHP の設定手順を行ってから、PHP 用の AutoML Vision リファレンス ドキュメントをご覧ください。

Ruby: クライアント ライブラリ ページの Ruby の設定手順を行ってから、Ruby 用の AutoML Vision リファレンス ドキュメントをご覧ください。

データセットへの項目のインポート

データセットを作成したら、Google Cloud Storage バケットに保存されている CSV ファイルから項目の URI とラベルをインポートできます。データの準備とインポート用の CSV ファイルの作成の詳細については、トレーニング データの準備をご覧ください。

空のデータセットに項目をインポートすることも、既存のデータセットに追加項目をインポートすることもできます。

ウェブ UI

AutoML Vision UI を使用すると、新しいデータセットの作成とデータセットへの項目のインポートを同じページで行うことができます。詳細はデータセットの作成をご覧ください。以下の手順では、既存のデータセットに項目をインポートします。

  1. Vision Dashboard を開き、[データセット] ページでデータセットを選択します。

    データセット一覧ページ

  2. [Images] ページで、タイトルバーの [Add items] をクリックし、プルダウン リストからインポート方式を選択します。

    次を行えます。

    • トレーニング画像と関連するカテゴリラベルを含む .csv ファイルをローカル PC または Google Cloud Storage からアップロードします。

    • トレーニング画像を含む .txt または .zip ファイルをローカル PC からアップロードします。

  3. インポートするファイルを選択します。

REST

リクエストのデータを使用する前に、次のように置き換えます。

  • project-id: GCP プロジェクト ID
  • dataset-id: データセットの IDこの ID は、データセットの名前の最後の要素です。例:
    • データセット名: projects/project-id/locations/location-id/datasets/3104518874390609379
    • データセット ID: 3104518874390609379
  • input-storage-path: Google Cloud Storage に保存されている CSV ファイルへのパス。リクエスト元のユーザーには、少なくともバケットに対する読み取り権限が必要です。

HTTP メソッドと URL:

POST https://automl.googleapis.com/v1/projects/PROJECT_ID/locations/us-central1/datasets/DATASET_ID:importData

リクエストの本文(JSON):

{
  "inputConfig": {
    "gcsSource": {
      "inputUris": [INPUT_STORAGE_PATH]
    }
  }
}

リクエストを送信するには、次のいずれかのオプションを選択します。

curl

リクエスト本文を request.json という名前のファイルに保存して、次のコマンドを実行します。

curl -X POST \
-H "Authorization: Bearer $(gcloud auth print-access-token)" \
-H "x-goog-user-project: project-id" \
-H "Content-Type: application/json; charset=utf-8" \
-d @request.json \
"https://automl.googleapis.com/v1/projects/PROJECT_ID/locations/us-central1/datasets/DATASET_ID:importData"

PowerShell

リクエスト本文を request.json という名前のファイルに保存して、次のコマンドを実行します。

$cred = gcloud auth print-access-token
$headers = @{ "Authorization" = "Bearer $cred"; "x-goog-user-project" = "project-id" }

Invoke-WebRequest `
-Method POST `
-Headers $headers `
-ContentType: "application/json; charset=utf-8" `
-InFile request.json `
-Uri "https://automl.googleapis.com/v1/projects/PROJECT_ID/locations/us-central1/datasets/DATASET_ID:importData" | Select-Object -Expand Content

出力は次のようになります。タスクのステータスは、オペレーション ID(この場合は ICN3819960680614725486)を使用して取得できます。例については、長時間実行オペレーションによる作業をご覧ください。

{
  "name": "projects/PROJECT_ID/locations/us-central1/operations/OPERATION_ID",
  "metadata": {
    "@type": "type.googleapis.com/google.cloud.automl.v1.OperationMetadata",
    "createTime": "2018-10-29T15:56:29.176485Z",
    "updateTime": "2018-10-29T15:56:29.176485Z",
    "importDataDetails": {}
  }
}

Go

このサンプルを試す前に、クライアント ライブラリ ページを参照して、この言語の設定手順を完了してください。

import (
	"context"
	"fmt"
	"io"

	automl "cloud.google.com/go/automl/apiv1"
	"cloud.google.com/go/automl/apiv1/automlpb"
)

// importDataIntoDataset imports data into a dataset.
func importDataIntoDataset(w io.Writer, projectID string, location string, datasetID string, inputURI string) error {
	// projectID := "my-project-id"
	// location := "us-central1"
	// datasetID := "TRL123456789..."
	// inputURI := "gs://BUCKET_ID/path_to_training_data.csv"

	ctx := context.Background()
	client, err := automl.NewClient(ctx)
	if err != nil {
		return fmt.Errorf("NewClient: %w", err)
	}
	defer client.Close()

	req := &automlpb.ImportDataRequest{
		Name: fmt.Sprintf("projects/%s/locations/%s/datasets/%s", projectID, location, datasetID),
		InputConfig: &automlpb.InputConfig{
			Source: &automlpb.InputConfig_GcsSource{
				GcsSource: &automlpb.GcsSource{
					InputUris: []string{inputURI},
				},
			},
		},
	}

	op, err := client.ImportData(ctx, req)
	if err != nil {
		return fmt.Errorf("ImportData: %w", err)
	}
	fmt.Fprintf(w, "Processing operation name: %q\n", op.Name())

	if err := op.Wait(ctx); err != nil {
		return fmt.Errorf("Wait: %w", err)
	}

	fmt.Fprintf(w, "Data imported.\n")

	return nil
}

Java

このサンプルを試す前に、クライアント ライブラリ ページを参照して、この言語の設定手順を完了してください。

import com.google.api.gax.longrunning.OperationFuture;
import com.google.cloud.automl.v1.AutoMlClient;
import com.google.cloud.automl.v1.DatasetName;
import com.google.cloud.automl.v1.GcsSource;
import com.google.cloud.automl.v1.InputConfig;
import com.google.cloud.automl.v1.OperationMetadata;
import com.google.protobuf.Empty;
import java.io.IOException;
import java.util.Arrays;
import java.util.concurrent.ExecutionException;
import java.util.concurrent.TimeUnit;
import java.util.concurrent.TimeoutException;

class ImportDataset {

  public static void main(String[] args)
      throws IOException, ExecutionException, InterruptedException, TimeoutException {
    // TODO(developer): Replace these variables before running the sample.
    String projectId = "YOUR_PROJECT_ID";
    String datasetId = "YOUR_DATASET_ID";
    String path = "gs://BUCKET_ID/path_to_training_data.csv";
    importDataset(projectId, datasetId, path);
  }

  // Import a dataset
  static void importDataset(String projectId, String datasetId, String path)
      throws IOException, ExecutionException, InterruptedException, TimeoutException {
    // Initialize client that will be used to send requests. This client only needs to be created
    // once, and can be reused for multiple requests. After completing all of your requests, call
    // the "close" method on the client to safely clean up any remaining background resources.
    try (AutoMlClient client = AutoMlClient.create()) {
      // Get the complete path of the dataset.
      DatasetName datasetFullId = DatasetName.of(projectId, "us-central1", datasetId);

      // Get multiple Google Cloud Storage URIs to import data from
      GcsSource gcsSource =
          GcsSource.newBuilder().addAllInputUris(Arrays.asList(path.split(","))).build();

      // Import data from the input URI
      InputConfig inputConfig = InputConfig.newBuilder().setGcsSource(gcsSource).build();
      System.out.println("Processing import...");

      // Start the import job
      OperationFuture<Empty, OperationMetadata> operation =
          client.importDataAsync(datasetFullId, inputConfig);

      System.out.format("Operation name: %s%n", operation.getName());

      // If you want to wait for the operation to finish, adjust the timeout appropriately. The
      // operation will still run if you choose not to wait for it to complete. You can check the
      // status of your operation using the operation's name.
      Empty response = operation.get(45, TimeUnit.MINUTES);
      System.out.format("Dataset imported. %s%n", response);
    } catch (TimeoutException e) {
      System.out.println("The operation's polling period was not long enough.");
      System.out.println("You can use the Operation's name to get the current status.");
      System.out.println("The import job is still running and will complete as expected.");
      throw e;
    }
  }
}

Node.js

このサンプルを試す前に、クライアント ライブラリ ページを参照して、この言語の設定手順を完了してください。

/**
 * TODO(developer): Uncomment these variables before running the sample.
 */
// const projectId = 'YOUR_PROJECT_ID';
// const location = 'us-central1';
// const datasetId = 'YOUR_DISPLAY_ID';
// const path = 'gs://BUCKET_ID/path_to_training_data.csv';

// Imports the Google Cloud AutoML library
const {AutoMlClient} = require('@google-cloud/automl').v1;

// Instantiates a client
const client = new AutoMlClient();

async function importDataset() {
  // Construct request
  const request = {
    name: client.datasetPath(projectId, location, datasetId),
    inputConfig: {
      gcsSource: {
        inputUris: path.split(','),
      },
    },
  };

  // Import dataset
  console.log('Proccessing import');
  const [operation] = await client.importData(request);

  // Wait for operation to complete.
  const [response] = await operation.promise();
  console.log(`Dataset imported: ${response}`);
}

importDataset();

Python

このサンプルを試す前に、クライアント ライブラリ ページを参照して、この言語の設定手順を完了してください。

from google.cloud import automl

# TODO(developer): Uncomment and set the following variables
# project_id = "YOUR_PROJECT_ID"
# dataset_id = "YOUR_DATASET_ID"
# path = "gs://YOUR_BUCKET_ID/path/to/data.csv"

client = automl.AutoMlClient()
# Get the full path of the dataset.
dataset_full_id = client.dataset_path(project_id, "us-central1", dataset_id)
# Get the multiple Google Cloud Storage URIs
input_uris = path.split(",")
gcs_source = automl.GcsSource(input_uris=input_uris)
input_config = automl.InputConfig(gcs_source=gcs_source)
# Import data from the input URI
response = client.import_data(name=dataset_full_id, input_config=input_config)

print("Processing import...")
print(f"Data imported. {response.result()}")

トレーニング項目のラベル付け

モデルのトレーニングで役立つように、データセット内の各項目には少なくとも 1 つのカテゴリラベルが割り当てられている必要があります。AutoML Vision は、カテゴリラベルのない項目を無視します。トレーニング項目には、次の 3 つの方法でラベルを付けることができます。

  1. .csv ファイルにラベルを含める
  2. AutoML Vision UI で項目にラベルを付ける
  3. Google の AI Platform Data Labeling Service など、人間によるラベル付けサービスをリクエストする。

UI でのラベル付け

ウェブ UI

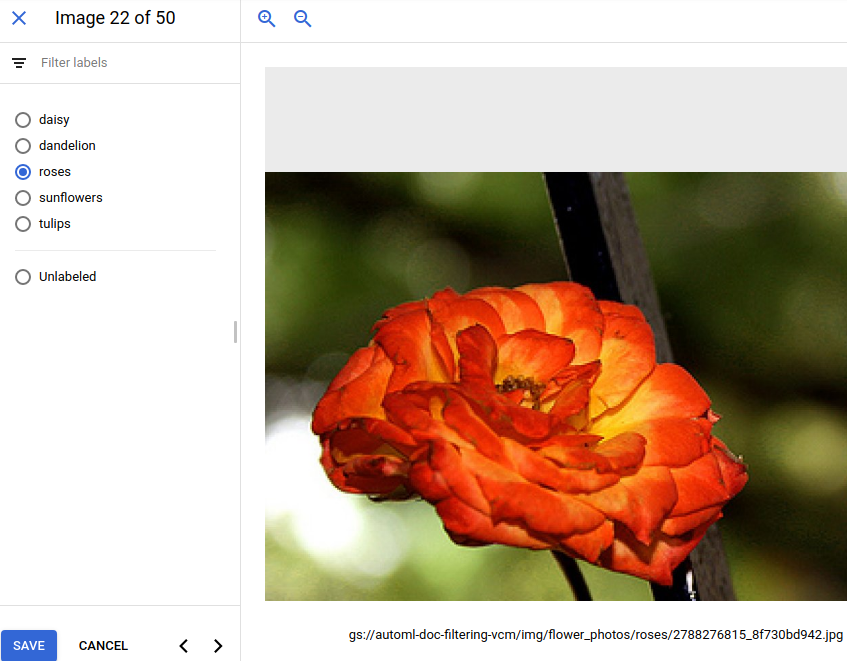
AutoML Vision UI で項目にラベルを付けるには、データセットの一覧ページからデータセットを選択してデータセットの詳細を表示します。

サイドバーには、ラベル付き項目数とラベルなし項目数の要約が表示されます。ここでは、項目の一覧をラベル別にフィルタリングしたり、[新しいラベルを追加] を選択して新しいラベルを作成したりできます。

画像ページ

この画面では、画像のラベルを追加または変更することもできます。

ラベルを追加または変更する画像を選択します。

画像ラベルの追加または変更画面

ラベル付けのリクエスト

Google の AI Platform Data Labeling Service を活用して、画像にラベルを付けることができます。詳しくはプロダクト ドキュメントをご覧ください。

長時間実行オペレーションによる作業

長時間実行オペレーションのステータスを取得するには、次のコードサンプルを使用します。

REST

リクエストのデータを使用する前に、次のように置き換えます。

  • project-id: GCP プロジェクト ID
  • operation-id: オペレーションの IDこの ID は、オペレーションの名前の最後の要素です。例:
    • オペレーション名: projects/project-id/locations/location-id/operations/IOD5281059901324392598
    • オペレーション ID: IOD5281059901324392598

HTTP メソッドと URL:

GET https://automl.googleapis.com/v1/projects/PROJECT_ID/locations/us-central1/operations/OPERATION_ID

リクエストを送信するには、次のいずれかのオプションを選択します。

curl

次のコマンドを実行します。

curl -X GET \
-H "Authorization: Bearer $(gcloud auth print-access-token)" \
-H "x-goog-user-project: project-id" \
"https://automl.googleapis.com/v1/projects/PROJECT_ID/locations/us-central1/operations/OPERATION_ID"

PowerShell

次のコマンドを実行します。

$cred = gcloud auth print-access-token
$headers = @{ "Authorization" = "Bearer $cred"; "x-goog-user-project" = "project-id" }

Invoke-WebRequest `
-Method GET `
-Headers $headers `
-Uri "https://automl.googleapis.com/v1/projects/PROJECT_ID/locations/us-central1/operations/OPERATION_ID" | Select-Object -Expand Content
完了したインポート オペレーションの場合、出力は次のようになります。
{
  "name": "projects/PROJECT_ID/locations/us-central1/operations/OPERATION_ID",
  "metadata": {
    "@type": "type.googleapis.com/google.cloud.automl.v1.OperationMetadata",
    "createTime": "2018-10-29T15:56:29.176485Z",
    "updateTime": "2018-10-29T16:10:41.326614Z",
    "importDataDetails": {}
  },
  "done": true,
  "response": {
    "@type": "type.googleapis.com/google.protobuf.Empty"
  }
}

完了したモデル作成オペレーションの場合、出力は次のようになります。

{
  "name": "projects/PROJECT_ID/locations/us-central1/operations/OPERATION_ID",
  "metadata": {
    "@type": "type.googleapis.com/google.cloud.automl.v1.OperationMetadata",
    "createTime": "2019-07-22T18:35:06.881193Z",
    "updateTime": "2019-07-22T19:58:44.972235Z",
    "createModelDetails": {}
  },
  "done": true,
  "response": {
    "@type": "type.googleapis.com/google.cloud.automl.v1.Model",
    "name": "projects/PROJECT_ID/locations/us-central1/models/MODEL_ID"
  }
}

Go

このサンプルを試す前に、[API とリファレンス] > [クライアント ライブラリ] ページを参照して、この言語の設定手順を完了してください。

import (
	"context"
	"fmt"
	"io"

	automl "cloud.google.com/go/automl/apiv1"
	"cloud.google.com/go/automl/apiv1/automlpb"
)

// getOperationStatus gets an operation's status.
func getOperationStatus(w io.Writer, projectID string, location string, datasetID string, modelName string) error {
	// projectID := "my-project-id"
	// location := "us-central1"
	// datasetID := "ICN123456789..."
	// modelName := "model_display_name"

	ctx := context.Background()
	client, err := automl.NewClient(ctx)
	if err != nil {
		return fmt.Errorf("NewClient: %w", err)
	}
	defer client.Close()

	req := &automlpb.CreateModelRequest{
		Parent: fmt.Sprintf("projects/%s/locations/%s", projectID, location),
		Model: &automlpb.Model{
			DisplayName: modelName,
			DatasetId:   datasetID,
			ModelMetadata: &automlpb.Model_ImageClassificationModelMetadata{
				ImageClassificationModelMetadata: &automlpb.ImageClassificationModelMetadata{
					TrainBudgetMilliNodeHours: 1000, // 1000 milli-node hours are 1 hour
				},
			},
		},
	}

	op, err := client.CreateModel(ctx, req)
	if err != nil {
		return err
	}
	fmt.Fprintf(w, "Name: %v\n", op.Name())

	// Wait for the longrunning operation complete.
	resp, err := op.Wait(ctx)
	if err != nil && !op.Done() {
		fmt.Println("failed to fetch operation status", err)
		return err
	}
	if err != nil && op.Done() {
		fmt.Println("operation completed with error", err)
		return err
	}
	fmt.Fprintf(w, "Response: %v\n", resp)

	return nil
}

Java

このサンプルを試す前に、[API とリファレンス] > [クライアント ライブラリ] ページを参照して、この言語の設定手順を完了してください。

import com.google.cloud.automl.v1.AutoMlClient;
import com.google.longrunning.Operation;
import java.io.IOException;

class GetOperationStatus {

  static void getOperationStatus() throws IOException {
    // TODO(developer): Replace these variables before running the sample.
    String operationFullId = "projects/[projectId]/locations/us-central1/operations/[operationId]";
    getOperationStatus(operationFullId);
  }

  // Get the status of an operation
  static void getOperationStatus(String operationFullId) throws IOException {
    // Initialize client that will be used to send requests. This client only needs to be created
    // once, and can be reused for multiple requests. After completing all of your requests, call
    // the "close" method on the client to safely clean up any remaining background resources.
    try (AutoMlClient client = AutoMlClient.create()) {
      // Get the latest state of a long-running operation.
      Operation operation = client.getOperationsClient().getOperation(operationFullId);

      // Display operation details.
      System.out.println("Operation details:");
      System.out.format("\tName: %s\n", operation.getName());
      System.out.format("\tMetadata Type Url: %s\n", operation.getMetadata().getTypeUrl());
      System.out.format("\tDone: %s\n", operation.getDone());
      if (operation.hasResponse()) {
        System.out.format("\tResponse Type Url: %s\n", operation.getResponse().getTypeUrl());
      }
      if (operation.hasError()) {
        System.out.println("\tResponse:");
        System.out.format("\t\tError code: %s\n", operation.getError().getCode());
        System.out.format("\t\tError message: %s\n", operation.getError().getMessage());
      }
    }
  }
}

Node.js

このサンプルを試す前に、[API とリファレンス] > [クライアント ライブラリ] ページを参照して、この言語の設定手順を完了してください。

/**
 * TODO(developer): Uncomment these variables before running the sample.
 */
// const projectId = 'YOUR_PROJECT_ID';
// const location = 'us-central1';
// const operationId = 'YOUR_OPERATION_ID';

// Imports the Google Cloud AutoML library
const {AutoMlClient} = require('@google-cloud/automl').v1;

// Instantiates a client
const client = new AutoMlClient();

async function getOperationStatus() {
  // Construct request
  const request = {
    name: `projects/${projectId}/locations/${location}/operations/${operationId}`,
  };

  const [response] = await client.operationsClient.getOperation(request);

  console.log(`Name: ${response.name}`);
  console.log('Operation details:');
  console.log(`${response}`);
}

getOperationStatus();

Python

このサンプルを試す前に、[API とリファレンス] > [クライアント ライブラリ] ページを参照して、この言語の設定手順を完了してください。

from google.cloud import automl

# TODO(developer): Uncomment and set the following variables
# operation_full_id = \
#     "projects/[projectId]/locations/us-central1/operations/[operationId]"

client = automl.AutoMlClient()
# Get the latest state of a long-running operation.
response = client._transport.operations_client.get_operation(operation_full_id)

print(f"Name: {response.name}")
print("Operation details:")
print(response)

その他の言語

C#: クライアント ライブラリ ページの C# の設定手順を行ってから、.NET 用の AutoML Vision リファレンス ドキュメントをご覧ください。

PHP: クライアント ライブラリ ページの PHP の設定手順を行ってから、PHP 用の AutoML Vision リファレンス ドキュメントをご覧ください。

Ruby: クライアント ライブラリ ページの Ruby の設定手順を行ってから、Ruby 用の AutoML Vision リファレンス ドキュメントをご覧ください。