準備したデータセットを使用してモデルをトレーニングし、カスタムモデルを作成します。 データセット AutoML Vision はデータセットの項目を使用してモデルをトレーニング、テストし、モデルのパフォーマンスを評価します。その結果を確認し、必要に応じてトレーニング データセットを調整して、改善されたデータセットで新しいモデルをトレーニングします。
モデルのトレーニングが完了するまで数時間かかることがあります。AutoML API を使用すると、トレーニングのステータスを確認できます。
AutoML Vision ではトレーニングを開始するたびに新しいモデルが作成されるため、プロジェクトに多数のモデルが含まれる場合があります。プロジェクト内のモデルの一覧を取得し、不要になったモデルを削除することが可能です。
モデルの一覧表示
このセクションでは、プロジェクトで使用できるモデルを一覧表示する方法を説明します。
ウェブ UI
Vision Dashboard を使用して使用可能なモデルを一覧表示するには、左側のナビゲーション バーにある電球アイコンをクリックします。
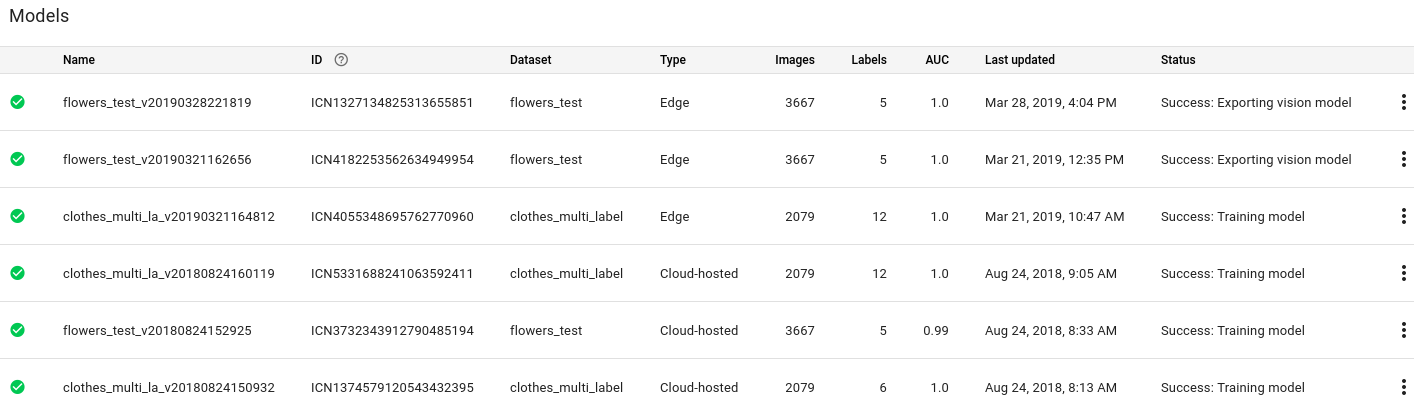
別のプロジェクトのモデルを表示するには、タイトルバーの右上にあるプルダウン リストからプロジェクトを選択します。
REST
リクエストのデータを使用する前に、次のように置き換えます。
- project-id: GCP プロジェクト ID
HTTP メソッドと URL:
GET https://automl.googleapis.com/v1/projects/PROJECT_ID/locations/us-central1/models
リクエストを送信するには、次のいずれかのオプションを選択します。
curl
次のコマンドを実行します。
curl -X GET \
    -H "Authorization: Bearer $(gcloud auth print-access-token)" \
    -H "x-goog-user-project: project-id" \
    "https://automl.googleapis.com/v1/projects/PROJECT_ID/locations/us-central1/models"
PowerShell
次のコマンドを実行します。
$cred = gcloud auth print-access-token
$headers = @{ "Authorization" = "Bearer $cred"; "x-goog-user-project" = "project-id" }

Invoke-WebRequest `
    -Method GET `
    -Headers $headers `
    -Uri "https://automl.googleapis.com/v1/projects/PROJECT_ID/locations/us-central1/models" | Select-Object -Expand Content
次の例のような JSON レスポンスが返されます。このレスポンスには、クラウドでホストされる 2 つのモデルに関する情報が示されます。
    {
  "model": [
    {
      "name": "projects/project-id/locations/us-central1/models/model-id-1",
      "displayName": "display-name-1",
      "datasetId": "dataset-id",
      "createTime": "2019-10-30T20:06:08.253243Z",
      "deploymentState": "UNDEPLOYED",
      "updateTime": "2019-10-30T20:54:50.472328Z",
      "imageClassificationModelMetadata": {
        "trainBudget": "1",
        "modelType": "mobile-low-latency-1",
        "nodeQps": 3.2
      }
    },
    {
      "name": "projects/project-id/locations/us-central1/models/model-id-2",
      "displayName": "display-name-2",
      "datasetId": "dataset-id",
      "createTime": "2019-10-29T19:06:38.048492Z",
      "deploymentState": "UNDEPLOYED",
      "updateTime": "2019-10-29T19:35:19.104716Z",
      "imageClassificationModelMetadata": {
        "trainBudget": "1",
        "modelType": "cloud",
        "nodeQps": 3.2
      }
    }
  ]
}
Go
このサンプルを試す前に、クライアント ライブラリ ページを参照して、この言語の設定手順を完了してください。
Java
このサンプルを試す前に、クライアント ライブラリ ページを参照して、この言語の設定手順を完了してください。
Node.js
このサンプルを試す前に、クライアント ライブラリ ページを参照して、この言語の設定手順を完了してください。
Python
このサンプルを試す前に、クライアント ライブラリ ページを参照して、この言語の設定手順を完了してください。
その他の言語
C#: クライアント ライブラリ ページの C# の設定手順を行ってから、.NET 用の AutoML Vision リファレンス ドキュメントをご覧ください。
PHP: クライアント ライブラリ ページの PHP の設定手順を行ってから、PHP 用の AutoML Vision リファレンス ドキュメントをご覧ください。
Ruby: クライアント ライブラリ ページの Ruby の設定手順を行ってから、Ruby 用の AutoML Vision リファレンス ドキュメントをご覧ください。
モデルに関する情報の取得
次のコードサンプルを使用して、特定のトレーニング済みモデルに関する情報を取得します。このリクエストから返された情報を使用して、モードの変更や予測リクエストの送信を行うことができます。
REST
リクエストのデータを使用する前に、次のように置き換えます。
- project-id: GCP プロジェクト ID
- model-id: モデルを作成したときにレスポンスで返されたモデルの ID。この ID は、モデルの名前の最後の要素です。例:
- モデル名:
projects/project-id/locations/location-id/models/IOD4412217016962778756 - モデル ID:
IOD4412217016962778756
- モデル名:
HTTP メソッドと URL:
GET https://automl.googleapis.com/v1/projects/project-id/locations/us-central1/models/model-id
リクエストを送信するには、次のいずれかのオプションを選択します。
curl
次のコマンドを実行します。
curl -X GET \
    -H "Authorization: Bearer $(gcloud auth print-access-token)" \
    -H "x-goog-user-project: project-id" \
    "https://automl.googleapis.com/v1/projects/project-id/locations/us-central1/models/model-id"
PowerShell
次のコマンドを実行します。
$cred = gcloud auth print-access-token
$headers = @{ "Authorization" = "Bearer $cred"; "x-goog-user-project" = "project-id" }

Invoke-WebRequest `
    -Method GET `
    -Headers $headers `
    -Uri "https://automl.googleapis.com/v1/projects/project-id/locations/us-central1/models/model-id" | Select-Object -Expand Content
次のような JSON レスポンスが返されます。
    {
  "name": "projects/project-id/locations/us-central1/models/model-id",
  "displayName": "display-name",
  "datasetId": "dataset-id",
  "createTime": "2019-10-29T19:06:38.048492Z",
  "deploymentState": "UNDEPLOYED",
  "updateTime": "2019-10-29T19:35:19.104716Z",
  "imageClassificationModelMetadata": {
    "trainBudget": "1",
    "modelType": "cloud",
    "nodeQps": 3.2
  }
}
Go
このサンプルを試す前に、クライアント ライブラリ ページを参照して、この言語の設定手順を完了してください。
Java
このサンプルを試す前に、クライアント ライブラリ ページを参照して、この言語の設定手順を完了してください。
Node.js
このサンプルを試す前に、クライアント ライブラリ ページを参照して、この言語の設定手順を完了してください。
Python
このサンプルを試す前に、クライアント ライブラリ ページを参照して、この言語の設定手順を完了してください。
その他の言語
C#: クライアント ライブラリ ページの C# の設定手順を行ってから、.NET 用の AutoML Vision Object Detection リファレンス ドキュメントをご覧ください。
PHP: クライアント ライブラリ ページの PHP の設定手順を行ってから、PHP 用の AutoML Vision Object Detection リファレンス ドキュメントをご覧ください。
Ruby: クライアント ライブラリ ページの Ruby の設定手順を行ってから、Ruby 用の AutoML Vision Object Detection リファレンス ドキュメントをご覧ください。
モデルのノード番号の更新
トレーニング済みのモデルをデプロイした後に、トラフィック量に応じて、モデルがデプロイされるノードの数を更新できます。たとえば、このような操作は秒間クエリ数(QPS)が予想より多い場合などに行います。
モデルのデプロイを解除しなくても、ノード番号を変更できます。デプロイを更新すると、配信された予測トラフィックを中断せずにノード番号が変更されます。
ウェブ UI
Vision Dashboard で、左側のナビゲーション バーの [モデル] タブを選択して、使用可能なモデルを表示します。
別のプロジェクトのモデルを表示するには、タイトルバーの右上にあるプルダウン リストからプロジェクトを選択します。
- デプロイしたトレーニング済みモデルを選択します。
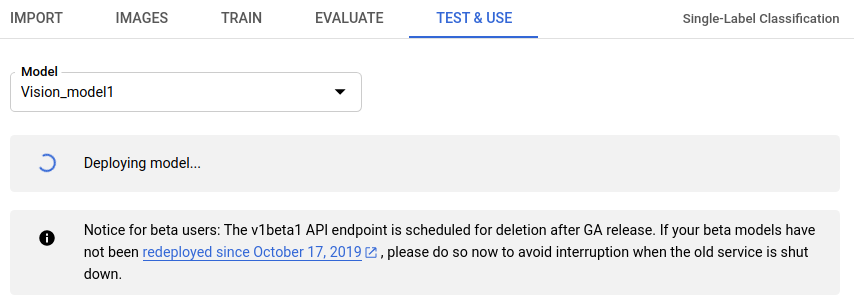
- タイトルバーのすぐ下にある [テストと使用] タブを選択します。
-
ページ上部のボックスに、「モデルはデプロイされているため、オンライン予測リクエストに使用できます。」というメッセージが表示されます。このテキストの隣にある [デプロイの更新] オプションを選択します。
![[デプロイの更新] ボタンの画像](https://cloud.google.com/static/vision/automl/object-detection/docs/images/update_deployment_button.png?hl=ja)
- [デプロイの更新] ウィンドウが開きます。モデルをデプロイする新しいノード番号をリストから選択します。ノード番号と一緒に予測の秒間クエリ数(QPS)の概算が表示されます。
![[デプロイの更新] ポップアップ ウィンドウの画像](https://cloud.google.com/static/vision/automl/docs/images/update_deployment_window.png?hl=ja)
リストから新しいノード番号を選択したら、[デプロイの更新] を選択して、モデルがデプロイされているノード番号を更新します。
![新しいノード番号を選択した後の [デプロイの更新] ウィンドウ](https://cloud.google.com/static/vision/automl/docs/images/update_deployment_window2.png?hl=ja)
- [テストと使用] ウィンドウに戻ります。テキスト ボックスに「モデルをデプロイしています...」が表示されます。
新しいノード番号にモデルが正常にデプロイされると、プロジェクトに関連付けられたアドレスにメールが届きます。
REST
モデルのデプロイに最初に使用した際と同じ方法で、デプロイ済みモデルのノード番号を変更します。リクエストのデータを使用する前に、次のように置き換えます。
- project-id: GCP プロジェクト ID
- model-id: モデルを作成したときにレスポンスで返されたモデルの ID。この ID は、モデルの名前の最後の要素です。例:
- モデル名:
projects/project-id/locations/location-id/models/IOD4412217016962778756 - モデル ID:
IOD4412217016962778756
- モデル名:
フィールドの考慮事項:
nodeCount- モデルをデプロイするノードの数。値は 1~100 にする必要があります(両端を含む)。ノードはマシンリソースの抽象化で、モデルのqps_per_nodeで指定されたオンライン予測秒間クエリ数(QPS)を処理できます。
HTTP メソッドと URL:
POST https://automl.googleapis.com/v1/projects/PROJECT_ID/locations/us-central1/models/MODEL_ID:deploy
リクエストの本文(JSON):
{
  "imageClassificationModelDeploymentMetadata": {
    "nodeCount": 2
  }
}
リクエストを送信するには、次のいずれかのオプションを選択します。
curl
リクエスト本文を request.json という名前のファイルに保存して、次のコマンドを実行します。
curl -X POST \
    -H "Authorization: Bearer $(gcloud auth print-access-token)" \
    -H "x-goog-user-project: project-id" \
    -H "Content-Type: application/json; charset=utf-8" \
    -d @request.json \
    "https://automl.googleapis.com/v1/projects/PROJECT_ID/locations/us-central1/models/MODEL_ID:deploy"
PowerShell
リクエスト本文を request.json という名前のファイルに保存して、次のコマンドを実行します。
$cred = gcloud auth print-access-token
$headers = @{ "Authorization" = "Bearer $cred"; "x-goog-user-project" = "project-id" }

Invoke-WebRequest `
    -Method POST `
    -Headers $headers `
    -ContentType: "application/json; charset=utf-8" `
    -InFile request.json `
    -Uri "https://automl.googleapis.com/v1/projects/PROJECT_ID/locations/us-central1/models/MODEL_ID:deploy" | Select-Object -Expand Content
出力は次のようになります。オペレーション ID を使用して、タスクのステータスを取得できます。例については、長時間実行オペレーションによる作業をご覧ください。
{
  "name": "projects/PROJECT_ID/locations/us-central1/operations/OPERATION_ID",
  "metadata": {
    "@type": "type.googleapis.com/google.cloud.automl.v1.OperationMetadata",
    "createTime": "2019-08-07T22:00:20.692109Z",
    "updateTime": "2019-08-07T22:00:20.692109Z",
    "deployModelDetails": {}
  }
}
次の HTTP メソッドと URL を使用すると、オペレーションのステータスを取得できます。
GET https://automl.googleapis.com/v1/projects/PROJECT_ID/locations/us-central1/operations/OPERATION_ID
終了したオペレーションのステータスは、次のようになります。
{
  "name": "projects/PROJECT_ID/locations/us-central1/operations/OPERATION_ID",
  "metadata": {
    "@type": "type.googleapis.com/google.cloud.automl.v1.OperationMetadata",
    "createTime": "2019-06-21T16:47:21.704674Z",
    "updateTime": "2019-06-21T17:01:00.802505Z",
    "deployModelDetails": {}
  },
  "done": true,
  "response": {
    "@type": "type.googleapis.com/google.protobuf.Empty"
  }
}
Go
このサンプルを試す前に、クライアント ライブラリ ページを参照して、この言語の設定手順を完了してください。
Java
このサンプルを試す前に、クライアント ライブラリ ページを参照して、この言語の設定手順を完了してください。
Node.js
このサンプルを試す前に、クライアント ライブラリ ページを参照して、この言語の設定手順を完了してください。
Python
このサンプルを試す前に、クライアント ライブラリ ページを参照して、この言語の設定手順を完了してください。
その他の言語
C#: クライアント ライブラリ ページの C# の設定手順を行ってから、.NET 用の AutoML Vision リファレンス ドキュメントをご覧ください。
PHP: クライアント ライブラリ ページの PHP の設定手順を行ってから、PHP 用の AutoML Vision リファレンス ドキュメントをご覧ください。
Ruby: クライアント ライブラリ ページの Ruby の設定手順を行ってから、Ruby 用の AutoML Vision リファレンス ドキュメントをご覧ください。
モデルの削除
次の例では、モデルを削除します。
ウェブ UI
Vision Dashboard の左側のナビゲーション メニューにある電球アイコンをクリックして、使用可能なモデルのリストを表示します。
削除する行の右端にあるその他メニューをクリックし、[モデルの削除] を選択します。
確認ダイアログ ボックスで [削除] をクリックします。

REST
リクエストのデータを使用する前に、次のように置き換えます。
- project-id: GCP プロジェクト ID
- model-id: モデルを作成したときにレスポンスで返されたモデルの ID。この ID は、モデルの名前の最後の要素です。例:
- モデル名:
projects/project-id/locations/location-id/models/IOD4412217016962778756 - モデル ID:
IOD4412217016962778756
- モデル名:
HTTP メソッドと URL:
DELETE https://automl.googleapis.com/v1/projects/PROJECT_ID/locations/us-
central1/models/MODEL_ID
リクエストを送信するには、次のいずれかのオプションを選択します。
curl
次のコマンドを実行します。
curl -X DELETE \
    -H "Authorization: Bearer $(gcloud auth print-access-token)" \
    -H "x-goog-user-project: project-id" \
    "https://automl.googleapis.com/v1/projects/PROJECT_ID/locations/us-
central1/models/MODEL_ID"
PowerShell
次のコマンドを実行します。
$cred = gcloud auth print-access-token
$headers = @{ "Authorization" = "Bearer $cred"; "x-goog-user-project" = "project-id" }

Invoke-WebRequest `
    -Method DELETE `
    -Headers $headers `
    -Uri "https://automl.googleapis.com/v1/projects/PROJECT_ID/locations/us-
central1/models/MODEL_ID" | Select-Object -Expand Content
出力は次のようになります。オペレーション ID を使用して、タスクのステータスを取得できます。例については、長時間実行オペレーションによる作業をご覧ください。
{
  "name": "projects/PROJECT_ID/locations/us-central1/operations/OPERATION_ID",
  "metadata": {
    "@type": "type.googleapis.com/google.cloud.automl.v1.OperationMetadata",
    "createTime": "2018-11-01T15:59:36.196506Z",
    "updateTime": "2018-11-01T15:59:36.196506Z",
    "deleteDetails": {}
  }
}
Go
このサンプルを試す前に、クライアント ライブラリ ページを参照して、この言語の設定手順を完了してください。
Java
このサンプルを試す前に、クライアント ライブラリ ページを参照して、この言語の設定手順を完了してください。
Node.js
このサンプルを試す前に、クライアント ライブラリ ページを参照して、この言語の設定手順を完了してください。
Python
このサンプルを試す前に、クライアント ライブラリ ページを参照して、この言語の設定手順を完了してください。