模型训练完毕后,AutoML Vision 会使用测试集中的内容来评估新模型的质量和准确率。
评估概览
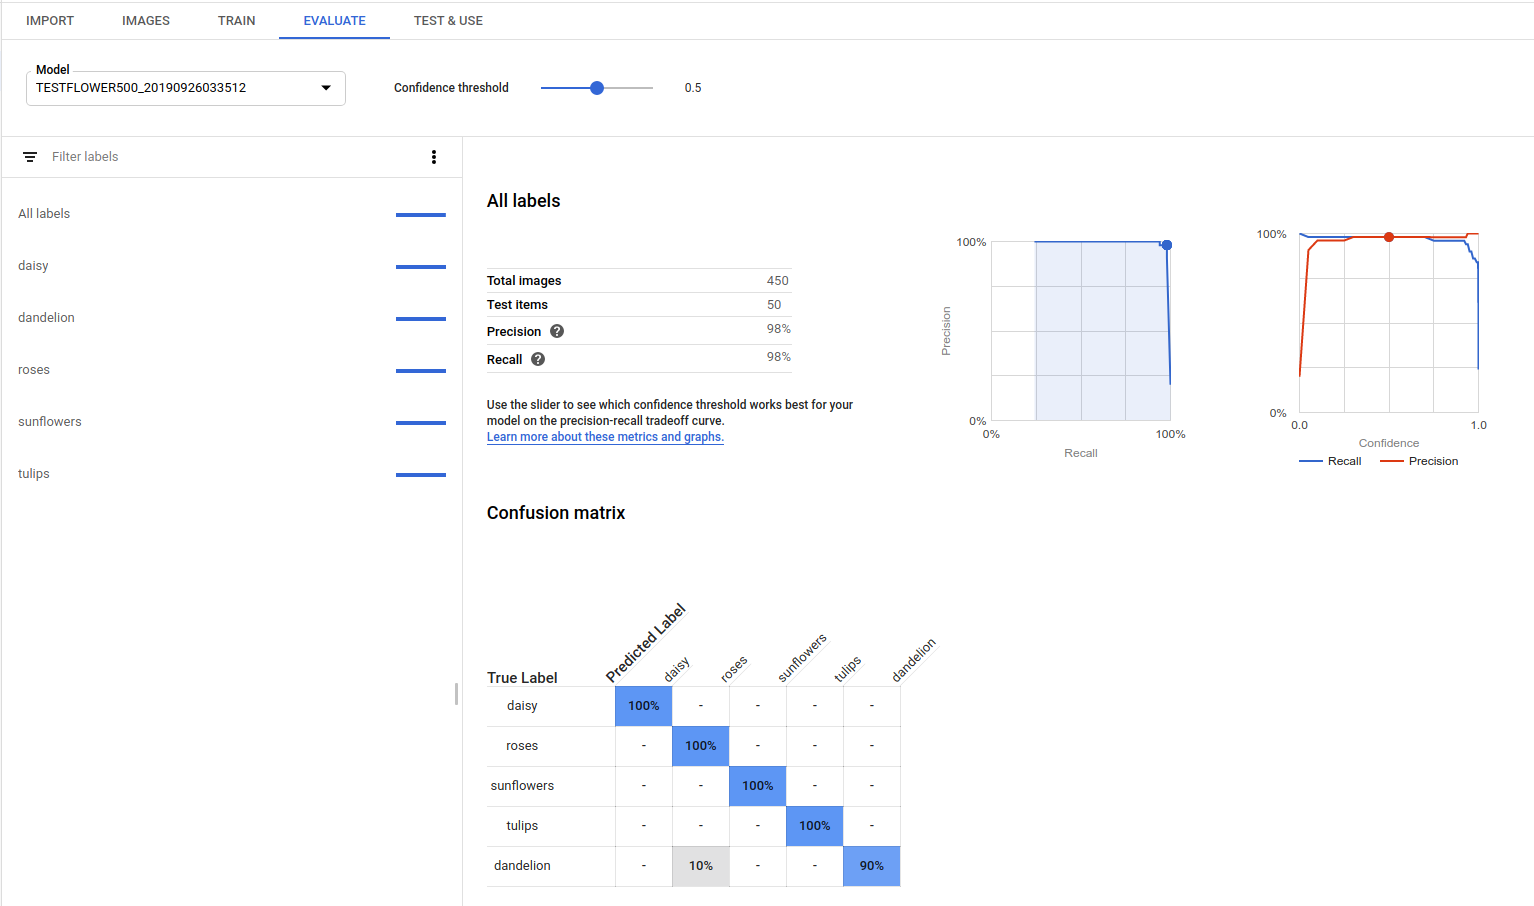
AutoML Vision 提供了一组总体评估指标以及针对每个类别标签的评估指标;前者指示模型的整体表现,后者指示模型在该标签上的表现。
AuPRC:精确率/召回率曲线下的面积,亦称为“平均精确率”。通常介于 0.5 和 1.0 之间。数值越高,表示模型越准确。
置信度阈值曲线显示不同的置信度阈值对精确率、召回率、真正例率和假正例率有何影响。请了解精确率和召回率的关系。
混淆矩阵:仅适用于每张图片只有一个标签的模型。它表示评估期间每个标签被预测为训练集内各个标签的次数百分比。

理想情况下,标签
one只会分配给归类为one标签的图片,以此类推;因此,完美的矩阵应如下所示:100 0 0 0 0 100 0 0 0 0 100 0 0 0 0 100在上面的示例中,如果图片被归类为
one,但模型预测为two,则第一行将变为如下所示:99 1 0 0如需了解详情,请搜索“confusion matrix machine learning”。
AutoML Vision 最多为 10 个标签创建混淆矩阵。 如果标签数量超过 10 个,则该矩阵会包含最容易混淆(预测错误)的 10 个标签。
您可利用这些数据来评估您的模型的就绪情况。如果混淆率高、AUC 得分低,或者精确率和召回率得分低,这可能表明您的模型需要额外的训练数据或标签不一致。如果 AUC 得分非常高,并且精确率和召回率也很完美,这可能表明数据过于简单,模型可能无法有效泛化。
列出模型评估结果
训练模型后,可列出该模型的评估指标。
网页界面
打开 AutoML Vision 界面,点击左侧导航栏中的模型标签页(带有灯泡图标)以显示可用的模型。
如需查看其他项目的模型,请从标题栏右上角的下拉列表中选择该项目。
点击待评估模型所在的行。
如果需要,请点击标题栏正下方的评估标签。
如果该模型已完成训练,则 AutoML Vision 会显示其评估指标。

REST
在使用任何请求数据之前,请先进行以下替换:
- project-id:您的 GCP 项目 ID。
- model-id:您的模型的 ID(从创建模型时返回的响应中获取)。此 ID 是模型名称的最后一个元素。
例如:
- 模型名称:
projects/project-id/locations/location-id/models/IOD4412217016962778756 - 模型 ID:
IOD4412217016962778756
- 模型名称:
- model-evaluation-id:模型评估的 ID 值。您可以从
list模型评估操作中获取模型评估 ID。
HTTP 方法和网址:
GET https://automl.googleapis.com/v1/projects/PROJECT_ID/locations/us-central1/models/MODEL_ID/modelEvaluations/MODEL_EVALUATION_ID
如需发送请求,请选择以下方式之一:
curl
执行以下命令:
curl -X GET \
     -H "Authorization: Bearer $(gcloud auth print-access-token)" \
     -H "x-goog-user-project: project-id" \
     "https://automl.googleapis.com/v1/projects/PROJECT_ID/locations/us-central1/models/MODEL_ID/modelEvaluations/MODEL_EVALUATION_ID"
PowerShell
执行以下命令:
$cred = gcloud auth print-access-token
$headers = @{ "Authorization" = "Bearer $cred"; "x-goog-user-project" = "project-id" }

Invoke-WebRequest `
    -Method GET `
    -Headers $headers `
    -Uri "https://automl.googleapis.com/v1/projects/PROJECT_ID/locations/us-central1/models/MODEL_ID/modelEvaluations/MODEL_EVALUATION_ID" | Select-Object -Expand Content
您应该会收到类似以下示例的 JSON 响应。关键对象检测的专属字段以粗体显示,并且为清楚起见,显示 classificationEvaluationMetrics 条目的缩短版本:
Go
在试用此示例之前,请按照客户端库页面中与此编程语言对应的设置说明执行操作。
Java
在试用此示例之前,请按照客户端库页面中与此编程语言对应的设置说明执行操作。
Node.js
在试用此示例之前,请按照客户端库页面中与此编程语言对应的设置说明执行操作。
Python
在试用此示例之前,请按照客户端库页面中与此编程语言对应的设置说明执行操作。
其他语言
C#: 请按照客户端库页面上的 C# 设置说明操作,然后访问 .NET 版 AutoML Vision 参考文档。
PHP: 请按照客户端库页面上的 PHP 设置说明操作,然后访问 PHP 版 AutoML Vision 参考文档。
Ruby 版: 请按照客户端库页面上的 Ruby 设置说明操作,然后访问 Ruby 版 AutoML Vision 参考文档。
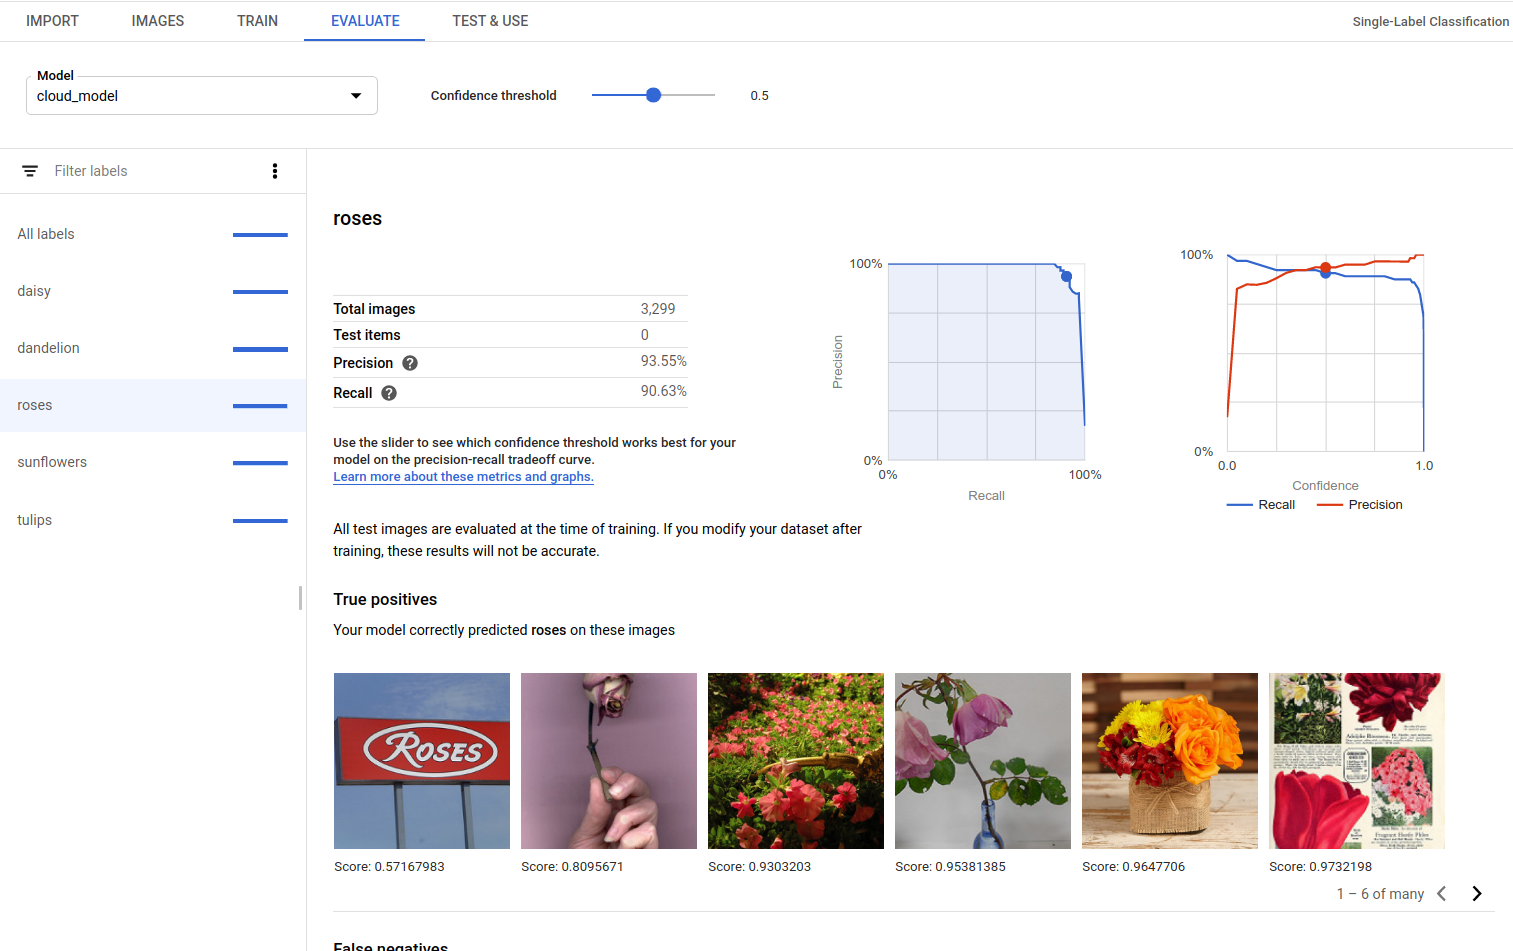
获取模型评估值
您还可以使用评估 ID 获取针对标签 (displayName) 的特定模型评估。如需获取模型评估 ID,请运行列出模型评估中显示的列出模型评估函数。
网页界面
打开 Vision Dashboard,然后点击左侧导航栏中的灯泡图标以显示可用的模型。
如需查看其他项目的模型,请从标题栏右上角的下拉列表中选择该项目。
点击待评估模型所在的行。
如果需要,请点击标题栏正下方的评估标签。
如果该模型已完成训练,则 AutoML Vision 会显示其评估指标。
如需查看特定标签的指标,请从页面下部的标签列表中选择标签名称。
REST
要只获取特定标签的评估指标,请从响应中将 /{MODEL_EVALUATION_ID} 添加到上述请求。
例如,您可以在列表操作返回的评估名称中找到 rose 标签 (displayName) 的模型评估 ID:
"name": "projects/PROJECT_ID/locations/us-central1/models/MODEL_ID/modelEvaluations/858136867710915695"
在使用任何请求数据之前,请先进行以下替换:
- project-id:您的 GCP 项目 ID。
- model-id:您的模型的 ID(从创建模型时返回的响应中获取)。此 ID 是模型名称的最后一个元素。
例如:
- 模型名称:
projects/project-id/locations/location-id/models/IOD4412217016962778756 - 模型 ID:
IOD4412217016962778756
- 模型名称:
- model-evaluation-id:模型评估的 ID 值。您可以从
list模型评估操作中获取模型评估 ID。
HTTP 方法和网址:
GET https://automl.googleapis.com/v1/projects/PROJECT_ID/locations/us-central1/models/MODEL_ID/modelEvaluations/MODEL_EVALUATION_ID
如需发送请求,请选择以下方式之一:
curl
执行以下命令:
curl -X GET \
     -H "Authorization: Bearer $(gcloud auth print-access-token)" \
     -H "x-goog-user-project: project-id" \
     "https://automl.googleapis.com/v1/projects/PROJECT_ID/locations/us-central1/models/MODEL_ID/modelEvaluations/MODEL_EVALUATION_ID"
PowerShell
执行以下命令:
$cred = gcloud auth print-access-token
$headers = @{ "Authorization" = "Bearer $cred"; "x-goog-user-project" = "project-id" }

Invoke-WebRequest `
    -Method GET `
    -Headers $headers `
    -Uri "https://automl.googleapis.com/v1/projects/PROJECT_ID/locations/us-central1/models/MODEL_ID/modelEvaluations/MODEL_EVALUATION_ID" | Select-Object -Expand Content
您应该收到类似以下内容的 JSON 响应:
Go
在试用此示例之前,请按照客户端库页面中与此编程语言对应的设置说明执行操作。
Java
在试用此示例之前,请按照客户端库页面中与此编程语言对应的设置说明执行操作。
Node.js
在试用此示例之前,请按照客户端库页面中与此编程语言对应的设置说明执行操作。
Python
在试用此示例之前,请按照客户端库页面中与此编程语言对应的设置说明执行操作。
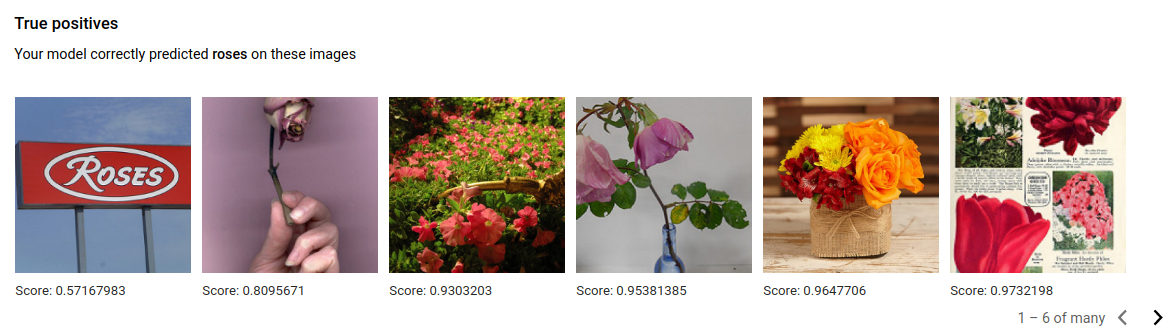
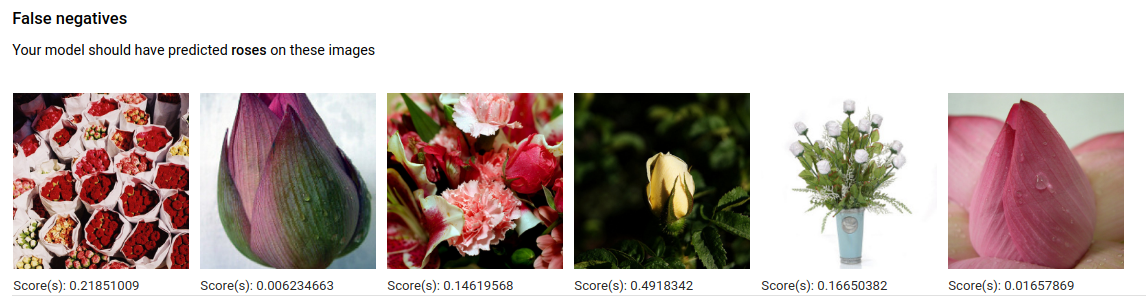
真正例、假负例和假正例(仅限界面)
在界面中,您可以观察模型性能的具体示例,即来自训练集和验证集的真正例 (TP)、假负例 (FN) 和假正例 (FP) 实例。
网页界面
在试用此示例之前,请按照客户端库页面中与此编程语言对应的设置说明执行操作。
您可在界面中选择评估标签页,然后选择任何特定标签,以访问 TP、FN 和 FP 视图。
通过查看这些预测中的趋势,您可以修改训练集来提高模型的性能。
真正例图片是提供给已训练的模型的示例图片,且模型已正确注释这些图片。
假负例图片同样提供给已训练的模型,但对给定标签而言,模型未能正确注释图片。
最后,假正例图片提供给已训练的模型,这些图片已使用给定标签注释,但却本不该被注释。
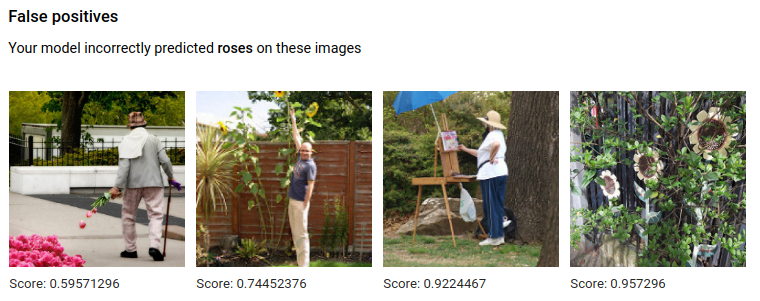
模型选择了一些有意思的极端情况,这使您有机会优化自己的定义和标签,帮助模型理解您的标签解释。例如,更严格的定义可帮助模型理解您是否将一副玫瑰抽象画看作是“玫瑰”。
借助重复的标签、训练和评估循环,您的模型将找出您数据中的其它此类不够明确的场景。
您也可以在界面的此视图中调整得分阈值,而显示的 TP、FN 和 FP 图片将反映阈值的更改:

迭代模型
如果您对质量水平不满意,则可以重新执行前述步骤以提高质量:
- 借助 AutoML Vision,您可以按照模型的“混淆”程度、真实标签及预测标签对图片进行排序。仔细查看这些图片,确保它们获得正确标记。
- 考虑向任意低质量的标签添加更多图片。
- 您可能需要添加不同类型的图片(例如,更宽的角度、更高或更低的分辨率、不同的视角)。
- 如果您没有足够多的训练图片,请考虑完全移除相应标签。
- 请记住,机器无法读取您的标签名称;对于机器而言,这只是一串随机的字母。如果您有一个名为“door”的标签和另一个名为“door_with_knob”的标签,那么除了您提供的图片以外,机器无法确定其他细微差别。
- 用更多的真正例和真负例示例来扩充您的数据。 接近决策边界(即可能产生混淆,但仍获得正确标记)的示例尤为重要。
- 指定您自己的训练、测试和验证划分比例。该工具会随机分配图片,但相似的重复项可能会归入训练和验证类别,而这可能导致过拟合,进而使测试集性能不佳。
一旦进行了更改,请训练并评估新模型,直到达到足够高的质量水平为止。