모델 평가

AutoML Vision은 모델을 학습시킨 후 TEST 세트의 항목을 사용하여 새 모델의 품질과 정확성을 평가합니다.

평가 개요

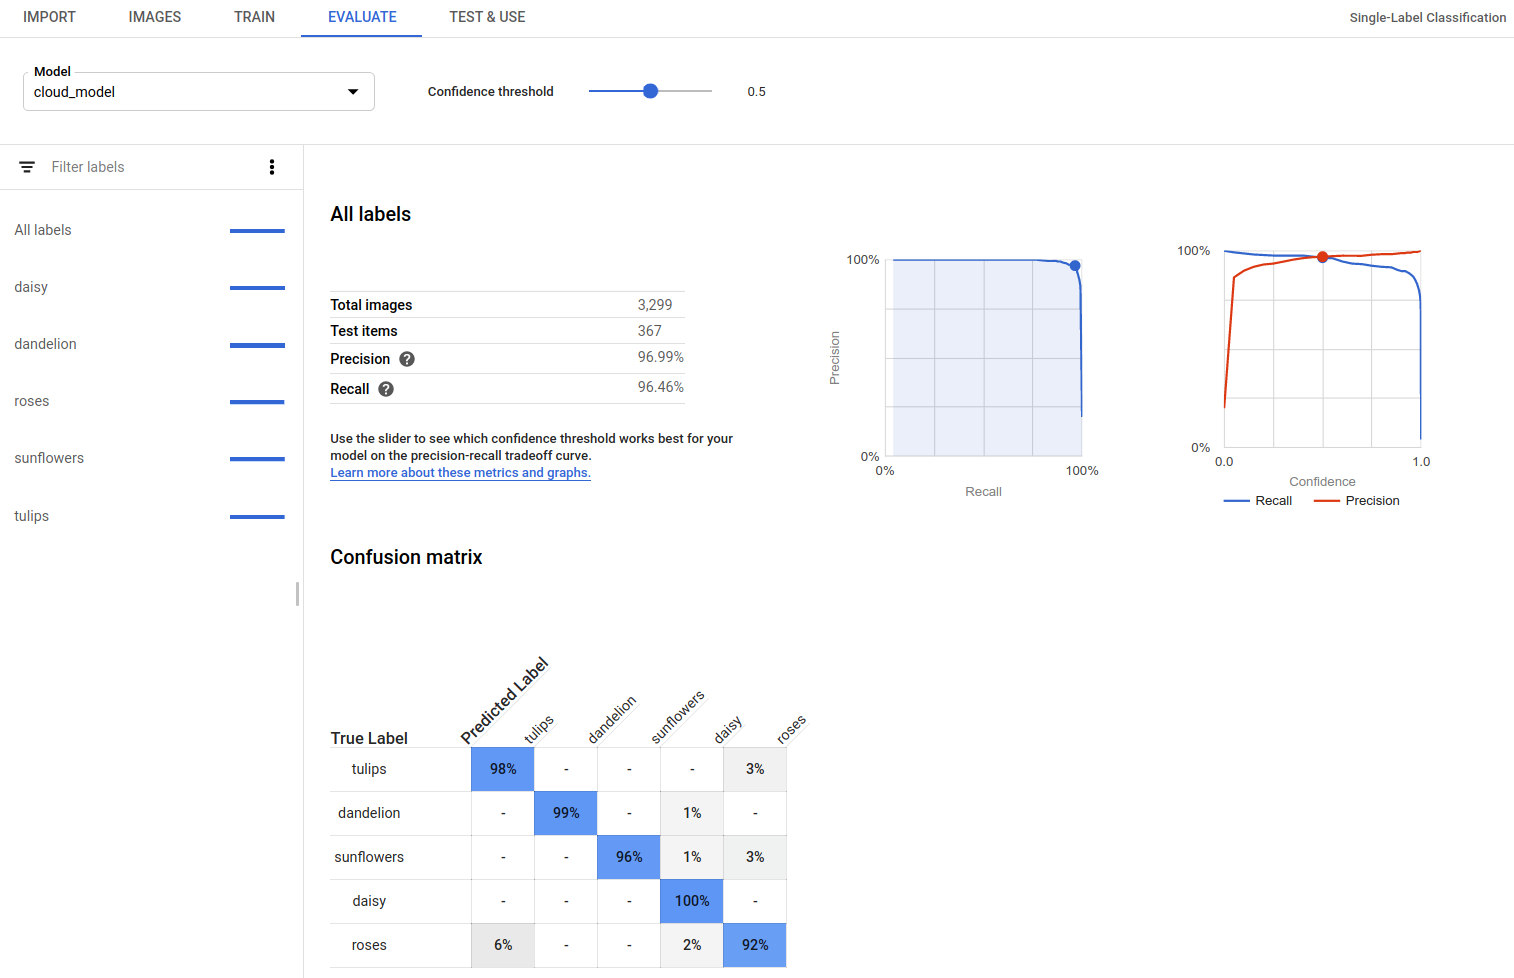
AutoML Vision은 모델의 전반적인 성능을 나타내는 종합적인 평가 측정항목과 모델의 해당 라벨에 대한 성능을 나타내는 카테고리 라벨별 평가 측정항목을 제공합니다.

  • AuPRC: 정밀도/재현율 곡선 아래 영역으로, '평균 정밀도'라고도 합니다. 일반적으로 0.5에서 1.0 사이이며 값이 클수록 모델이 정확한 것입니다.

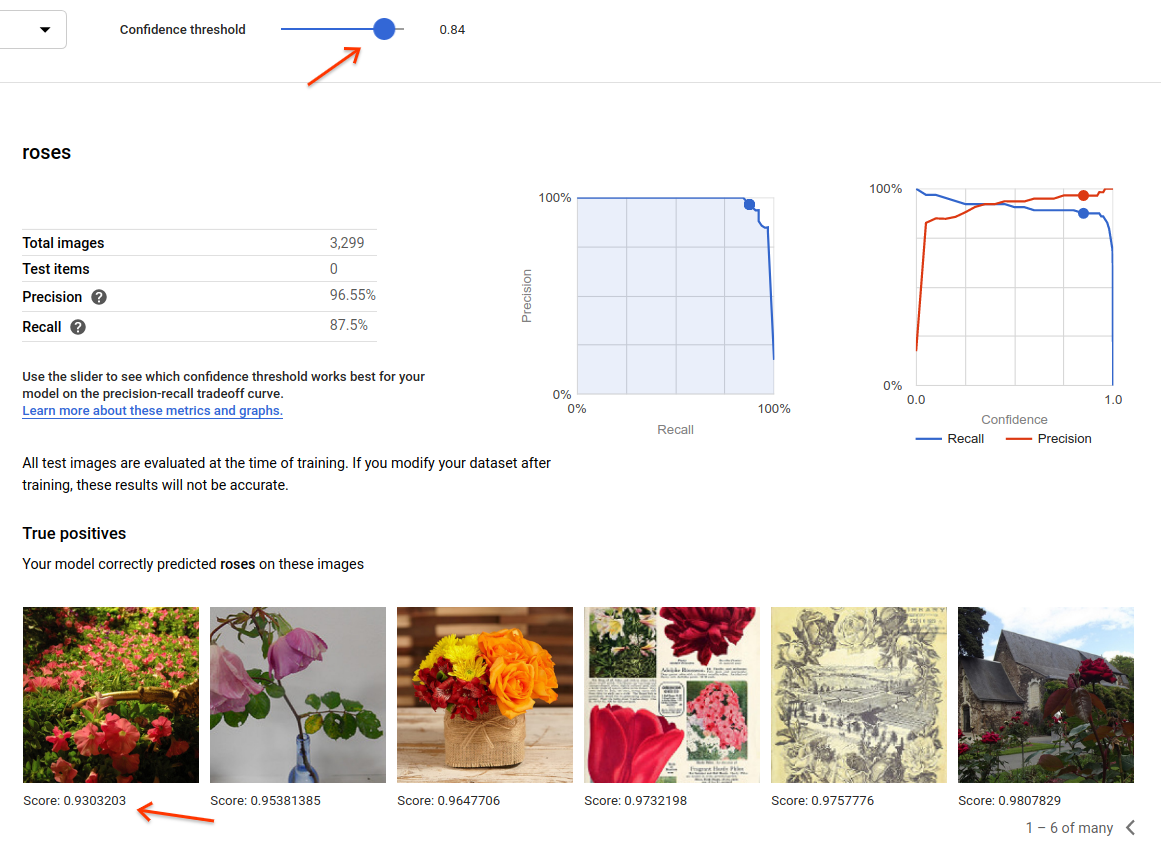
  • 신뢰도 기준 곡선은 신뢰도 기준의 변화가 정밀도, 재현율, 참양성률, 거짓양성률에 미치는 영향을 보여줍니다. 정밀도와 재현율의 관계를 참조하세요.

  • 혼동행렬: 이미지당 라벨이 하나인 모델에만 있습니다. 평가 중에 학습 세트의 각 라벨이 예측된 횟수의 백분율을 나타냅니다.
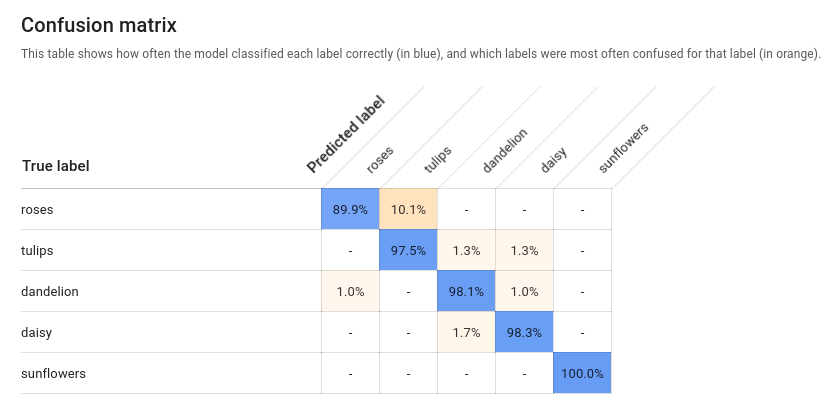
    샘플 혼동 행렬

    이상적인 경우 라벨 one은 라벨 one으로 분류된 이미지에만 할당되므로 완벽한 행렬의 모양은 다음과 같습니다.

    100  0   0   0
     0  100  0   0
     0   0  100  0
     0   0   0  100
    

    위의 예시에서 이미지는 one으로 분류되었지만 모델이 two로 예측했다면 첫 행이 다음과 같이 달라집니다.

    99  1  0  0
    

    '혼동 행렬 머신러닝'으로 검색하여 자세한 내용을 알아보시기 바랍니다.

    AutoML Vision은 최대 10개의 라벨에 대한 혼동 행렬을 생성합니다. 라벨이 10개 이상인 경우 행렬에는 혼동이 가장 많은(예측이 부정확한) 라벨 10개가 포함됩니다.

이 데이터를 사용하여 모델의 준비 상태를 평가합니다. 혼동이 높거나, AUC 점수가 낮거나, 정밀도/재현율 점수가 낮다면 모델에 학습 데이터가 더 많이 필요한 경우일 수 있습니다. AUC 점수가 너무 높고 정밀도 및 재현율이 완벽하다면 데이터가 너무 쉬워서 일반화가 잘 되지 않는 경우일 수 있습니다.

모델 평가 나열

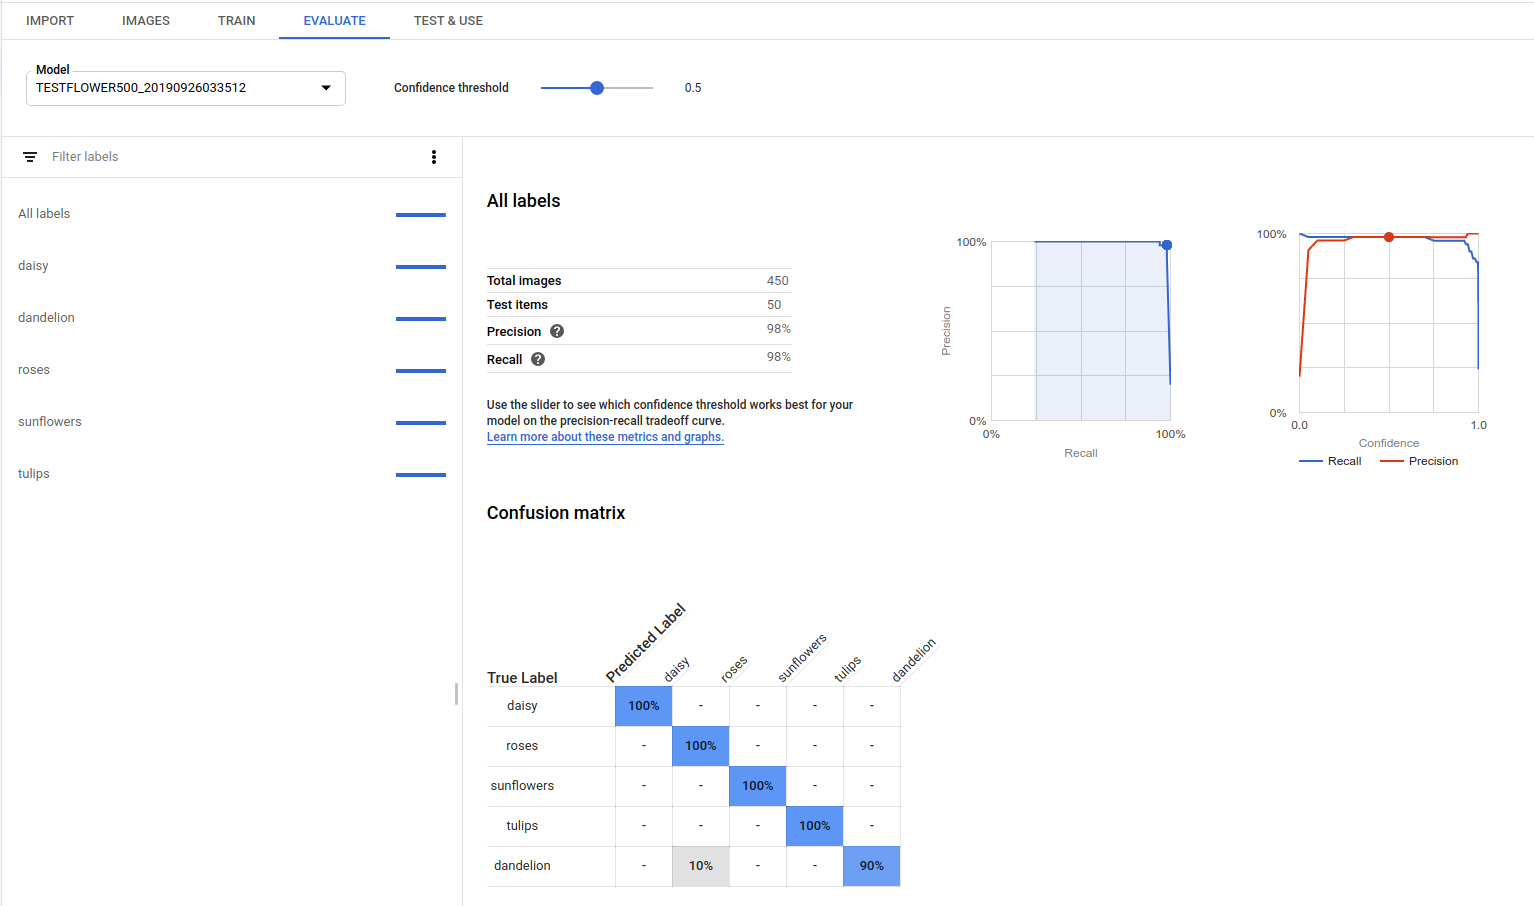
모델을 학습시키면 해당 모델에 대한 평가 측정항목을 나열할 수 있습니다.

웹 UI

  1. AutoML Vision UI를 열고 왼쪽 탐색 메뉴에서 모델 탭(전구 아이콘이 있음)을 클릭하여 사용 가능한 모델을 표시합니다.

    다른 프로젝트의 모델을 보려면 제목 표시줄 오른쪽 위에 있는 드롭다운 목록에서 프로젝트를 선택하세요.

  2. 평가하려는 모델의 행을 클릭합니다.

  3. 필요하면 제목 표시줄 아래에 있는 평가 탭을 클릭합니다.

    모델의 학습이 완료되면 AutoML Vision에서 평가 측정항목이 표시됩니다.

    모델 평가 페이지

REST

요청 데이터를 사용하기 전에 다음을 바꿉니다.

  • project-id: GCP 프로젝트 ID입니다.
  • model-id: 모델을 만들 때의 응답에서 모델의 ID입니다. ID는 모델 이름의 마지막 요소입니다. 예를 들면 다음과 같습니다.
    • 모델 이름: projects/project-id/locations/location-id/models/IOD4412217016962778756
    • 모델 ID: IOD4412217016962778756
  • model-evaluation-id: 모델 평가의 ID 값입니다. list 모델 평가 작업에서 모델 평가 ID를 가져올 수 있습니다.

HTTP 메서드 및 URL:

GET https://automl.googleapis.com/v1/projects/PROJECT_ID/locations/us-central1/models/MODEL_ID/modelEvaluations/MODEL_EVALUATION_ID

요청을 보내려면 다음 옵션 중 하나를 선택합니다.

curl

다음 명령어를 실행합니다.

curl -X GET \
-H "Authorization: Bearer $(gcloud auth print-access-token)" \
-H "x-goog-user-project: project-id" \
"https://automl.googleapis.com/v1/projects/PROJECT_ID/locations/us-central1/models/MODEL_ID/modelEvaluations/MODEL_EVALUATION_ID"

PowerShell

다음 명령어를 실행합니다.

$cred = gcloud auth print-access-token
$headers = @{ "Authorization" = "Bearer $cred"; "x-goog-user-project" = "project-id" }

Invoke-WebRequest `
-Method GET `
-Headers $headers `
-Uri "https://automl.googleapis.com/v1/projects/PROJECT_ID/locations/us-central1/models/MODEL_ID/modelEvaluations/MODEL_EVALUATION_ID" | Select-Object -Expand Content

다음 샘플과 유사한 JSON 응답이 표시됩니다. 키 객체 감지 관련 필드는 굵게 표시되며 명확성을 위해 짧은 버전의 classificationEvaluationMetrics 항목이 표시됩니다.

Go

이 샘플을 사용해 보기 전에 클라이언트 라이브러리 페이지에서 언어 설정 안내를 따르세요.

import (
	"context"
	"fmt"
	"io"

	automl "cloud.google.com/go/automl/apiv1"
	"cloud.google.com/go/automl/apiv1/automlpb"
	"google.golang.org/api/iterator"
)

// listModelEvaluation lists existing model evaluations.
func listModelEvaluations(w io.Writer, projectID string, location string, modelID string) error {
	// projectID := "my-project-id"
	// location := "us-central1"
	// modelID := "TRL123456789..."

	ctx := context.Background()
	client, err := automl.NewClient(ctx)
	if err != nil {
		return fmt.Errorf("NewClient: %w", err)
	}
	defer client.Close()

	req := &automlpb.ListModelEvaluationsRequest{
		Parent: fmt.Sprintf("projects/%s/locations/%s/models/%s", projectID, location, modelID),
	}

	it := client.ListModelEvaluations(ctx, req)

	// Iterate over all results
	for {
		evaluation, err := it.Next()
		if err == iterator.Done {
			break
		}
		if err != nil {
			return fmt.Errorf("ListModelEvaluations.Next: %w", err)
		}

		fmt.Fprintf(w, "Model evaluation name: %v\n", evaluation.GetName())
		fmt.Fprintf(w, "Model annotation spec id: %v\n", evaluation.GetAnnotationSpecId())
		fmt.Fprintf(w, "Create Time:\n")
		fmt.Fprintf(w, "\tseconds: %v\n", evaluation.GetCreateTime().GetSeconds())
		fmt.Fprintf(w, "\tnanos: %v\n", evaluation.GetCreateTime().GetNanos())
		fmt.Fprintf(w, "Evaluation example count: %v\n", evaluation.GetEvaluatedExampleCount())
		fmt.Fprintf(w, "Classification model evaluation metrics: %v\n", evaluation.GetClassificationEvaluationMetrics())
	}

	return nil
}

Java

이 샘플을 사용해 보기 전에 클라이언트 라이브러리 페이지에서 언어 설정 안내를 따르세요.


import com.google.cloud.automl.v1.AutoMlClient;
import com.google.cloud.automl.v1.ListModelEvaluationsRequest;
import com.google.cloud.automl.v1.ModelEvaluation;
import com.google.cloud.automl.v1.ModelName;
import java.io.IOException;

class ListModelEvaluations {

  public static void main(String[] args) throws IOException {
    // TODO(developer): Replace these variables before running the sample.
    String projectId = "YOUR_PROJECT_ID";
    String modelId = "YOUR_MODEL_ID";
    listModelEvaluations(projectId, modelId);
  }

  // List model evaluations
  static void listModelEvaluations(String projectId, String modelId) throws IOException {
    // Initialize client that will be used to send requests. This client only needs to be created
    // once, and can be reused for multiple requests. After completing all of your requests, call
    // the "close" method on the client to safely clean up any remaining background resources.
    try (AutoMlClient client = AutoMlClient.create()) {
      // Get the full path of the model.
      ModelName modelFullId = ModelName.of(projectId, "us-central1", modelId);
      ListModelEvaluationsRequest modelEvaluationsrequest =
          ListModelEvaluationsRequest.newBuilder().setParent(modelFullId.toString()).build();

      // List all the model evaluations in the model by applying filter.
      System.out.println("List of model evaluations:");
      for (ModelEvaluation modelEvaluation :
          client.listModelEvaluations(modelEvaluationsrequest).iterateAll()) {

        System.out.format("Model Evaluation Name: %s\n", modelEvaluation.getName());
        System.out.format("Model Annotation Spec Id: %s", modelEvaluation.getAnnotationSpecId());
        System.out.println("Create Time:");
        System.out.format("\tseconds: %s\n", modelEvaluation.getCreateTime().getSeconds());
        System.out.format("\tnanos: %s", modelEvaluation.getCreateTime().getNanos() / 1e9);
        System.out.format(
            "Evalution Example Count: %d\n", modelEvaluation.getEvaluatedExampleCount());
        System.out.format(
            "Classification Model Evaluation Metrics: %s\n",
            modelEvaluation.getClassificationEvaluationMetrics());
      }
    }
  }
}

Node.js

이 샘플을 사용해 보기 전에 클라이언트 라이브러리 페이지에서 언어 설정 안내를 따르세요.

/**
 * TODO(developer): Uncomment these variables before running the sample.
 */
// const projectId = 'YOUR_PROJECT_ID';
// const location = 'us-central1';
// const modelId = 'YOUR_MODEL_ID';

// Imports the Google Cloud AutoML library
const {AutoMlClient} = require('@google-cloud/automl').v1;

// Instantiates a client
const client = new AutoMlClient();

async function listModelEvaluations() {
  // Construct request
  const request = {
    parent: client.modelPath(projectId, location, modelId),
    filter: '',
  };

  const [response] = await client.listModelEvaluations(request);

  console.log('List of model evaluations:');
  for (const evaluation of response) {
    console.log(`Model evaluation name: ${evaluation.name}`);
    console.log(`Model annotation spec id: ${evaluation.annotationSpecId}`);
    console.log(`Model display name: ${evaluation.displayName}`);
    console.log('Model create time');
    console.log(`\tseconds ${evaluation.createTime.seconds}`);
    console.log(`\tnanos ${evaluation.createTime.nanos / 1e9}`);
    console.log(
      `Evaluation example count: ${evaluation.evaluatedExampleCount}`
    );
    console.log(
      `Classification model evaluation metrics: ${evaluation.classificationEvaluationMetrics}`
    );
  }
}

listModelEvaluations();

Python

이 샘플을 사용해 보기 전에 클라이언트 라이브러리 페이지에서 언어 설정 안내를 따르세요.

from google.cloud import automl

# TODO(developer): Uncomment and set the following variables
# project_id = "YOUR_PROJECT_ID"
# model_id = "YOUR_MODEL_ID"

client = automl.AutoMlClient()
# Get the full path of the model.
model_full_id = client.model_path(project_id, "us-central1", model_id)

print("List of model evaluations:")
for evaluation in client.list_model_evaluations(parent=model_full_id, filter=""):
    print(f"Model evaluation name: {evaluation.name}")
    print(f"Model annotation spec id: {evaluation.annotation_spec_id}")
    print(f"Create Time: {evaluation.create_time}")
    print(f"Evaluation example count: {evaluation.evaluated_example_count}")
    print(
        "Classification model evaluation metrics: {}".format(
            evaluation.classification_evaluation_metrics
        )
    )

추가 언어

C#: 클라이언트 라이브러리 페이지의 C# 설정 안내를 따른 다음 .NET용 AutoML Vision 참고 문서를 참조하세요.

PHP: 클라이언트 라이브러리 페이지의 PHP 설정 안내를 따른 다음 PHP용 AutoML Vision 참고 문서를 참조하세요.

Ruby: 클라이언트 라이브러리 페이지의 Ruby 설정 안내를 따른 다음 Ruby용 AutoML Vision 참고 문서를 참조하세요.

모델 평가값 가져오기

평가 ID를 사용하여 라벨(displayName)의 특정 모델 평가를 가져올 수도 있습니다. 모델 평가 ID를 가져오려면 모델 평가 나열에 표시된 모델 평가 나열 함수를 실행합니다.

웹 UI

  1. Vision Dashboard를 열고 왼쪽 탐색 메뉴에서 전구 아이콘을 클릭하여 사용 가능한 모델을 표시합니다.

    다른 프로젝트의 모델을 보려면 제목 표시줄 오른쪽 위에 있는 드롭다운 목록에서 프로젝트를 선택하세요.

  2. 평가하려는 모델의 행을 클릭합니다.

  3. 필요하면 제목 표시줄 아래에 있는 평가 탭을 클릭합니다.

    모델의 학습이 완료되면 AutoML Vision에서 평가 측정항목이 표시됩니다.

    updated evaluate page
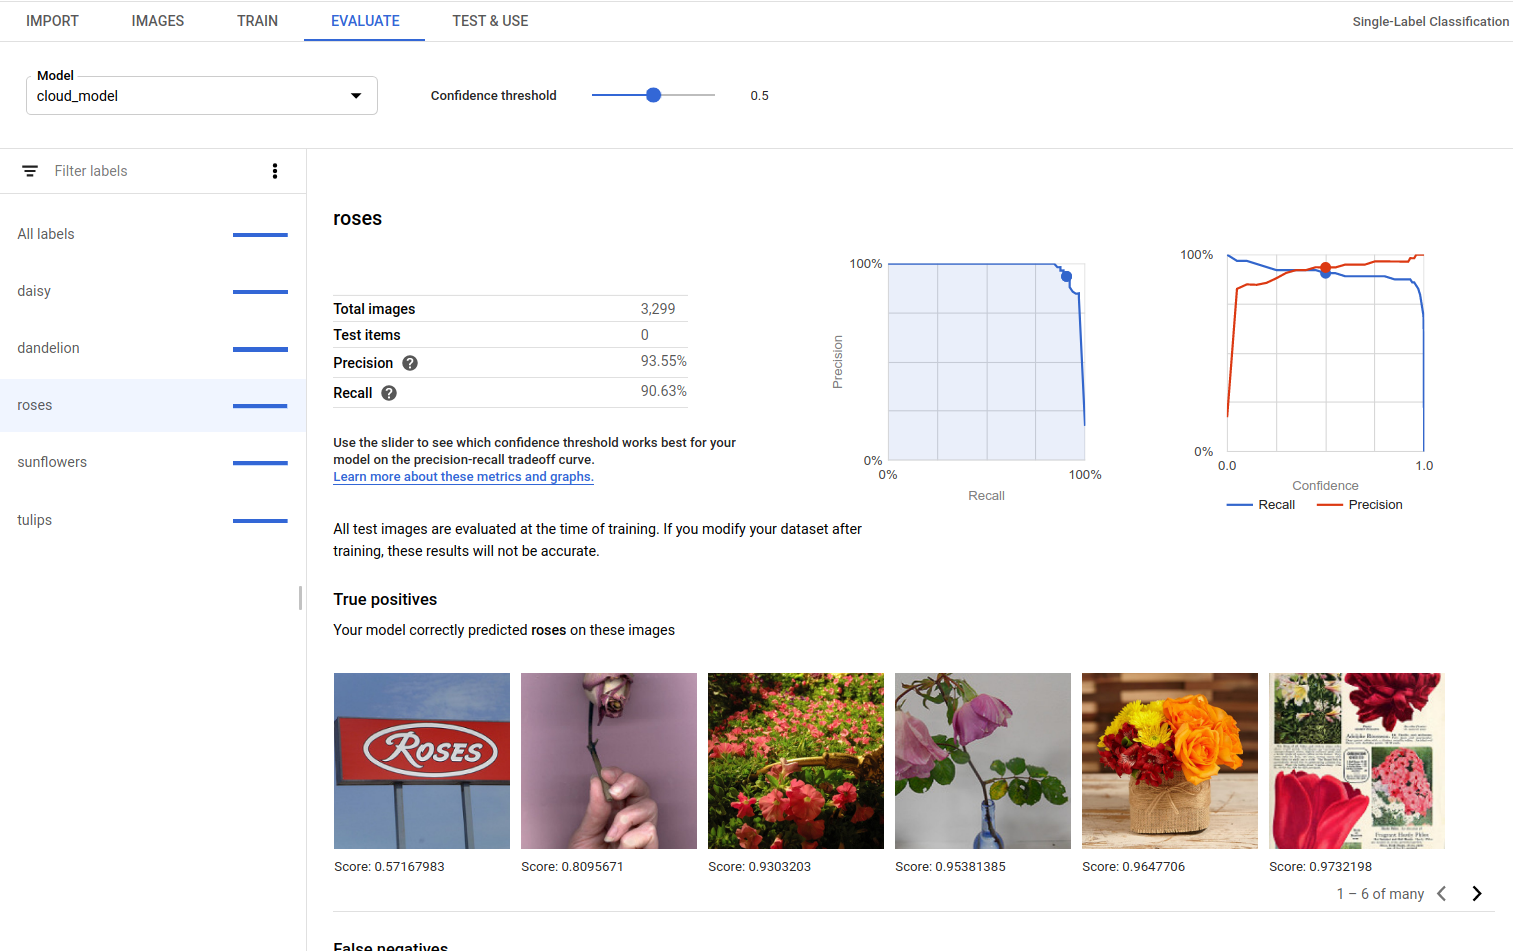
  4. 특정 라벨의 측정항목을 보려면 페이지 하단에 있는 라벨 목록에서 라벨 이름을 선택합니다.

    모델 평가 페이지 특정 라벨

REST

특정 라벨의 평가 측정항목만 가져오려면 응답에서 위 요청에 /{MODEL_EVALUATION_ID}를 추가합니다.

예를 들어 나열 작업에서 반환된 평가 이름에서 rose 라벨의 모델 평가 ID(displayName)를 찾을 수 있습니다.

  • "name": "projects/PROJECT_ID/locations/us-central1/models/MODEL_ID/modelEvaluations/858136867710915695"

요청 데이터를 사용하기 전에 다음을 바꿉니다.

  • project-id: GCP 프로젝트 ID입니다.
  • model-id: 모델을 만들 때의 응답에서 모델의 ID입니다. ID는 모델 이름의 마지막 요소입니다. 예를 들면 다음과 같습니다.
    • 모델 이름: projects/project-id/locations/location-id/models/IOD4412217016962778756
    • 모델 ID: IOD4412217016962778756
  • model-evaluation-id: 모델 평가의 ID 값입니다. list 모델 평가 작업에서 모델 평가 ID를 가져올 수 있습니다.

HTTP 메서드 및 URL:

GET https://automl.googleapis.com/v1/projects/PROJECT_ID/locations/us-central1/models/MODEL_ID/modelEvaluations/MODEL_EVALUATION_ID

요청을 보내려면 다음 옵션 중 하나를 선택합니다.

curl

다음 명령어를 실행합니다.

curl -X GET \
-H "Authorization: Bearer $(gcloud auth print-access-token)" \
-H "x-goog-user-project: project-id" \
"https://automl.googleapis.com/v1/projects/PROJECT_ID/locations/us-central1/models/MODEL_ID/modelEvaluations/MODEL_EVALUATION_ID"

PowerShell

다음 명령어를 실행합니다.

$cred = gcloud auth print-access-token
$headers = @{ "Authorization" = "Bearer $cred"; "x-goog-user-project" = "project-id" }

Invoke-WebRequest `
-Method GET `
-Headers $headers `
-Uri "https://automl.googleapis.com/v1/projects/PROJECT_ID/locations/us-central1/models/MODEL_ID/modelEvaluations/MODEL_EVALUATION_ID" | Select-Object -Expand Content

다음과 비슷한 JSON 응답이 표시됩니다.

Go

이 샘플을 사용해 보기 전에 클라이언트 라이브러리 페이지에서 언어 설정 안내를 따르세요.

import (
	"context"
	"fmt"
	"io"

	automl "cloud.google.com/go/automl/apiv1"
	"cloud.google.com/go/automl/apiv1/automlpb"
)

// getModelEvaluation gets a model evaluation.
func getModelEvaluation(w io.Writer, projectID string, location string, modelID string, modelEvaluationID string) error {
	// projectID := "my-project-id"
	// location := "us-central1"
	// modelID := "TRL123456789..."
	// modelEvaluationID := "123456789..."

	ctx := context.Background()
	client, err := automl.NewClient(ctx)
	if err != nil {
		return fmt.Errorf("NewClient: %w", err)
	}
	defer client.Close()

	req := &automlpb.GetModelEvaluationRequest{
		Name: fmt.Sprintf("projects/%s/locations/%s/models/%s/modelEvaluations/%s", projectID, location, modelID, modelEvaluationID),
	}

	evaluation, err := client.GetModelEvaluation(ctx, req)
	if err != nil {
		return fmt.Errorf("GetModelEvaluation: %w", err)
	}

	fmt.Fprintf(w, "Model evaluation name: %v\n", evaluation.GetName())
	fmt.Fprintf(w, "Model annotation spec id: %v\n", evaluation.GetAnnotationSpecId())
	fmt.Fprintf(w, "Create Time:\n")
	fmt.Fprintf(w, "\tseconds: %v\n", evaluation.GetCreateTime().GetSeconds())
	fmt.Fprintf(w, "\tnanos: %v\n", evaluation.GetCreateTime().GetNanos())
	fmt.Fprintf(w, "Evaluation example count: %v\n", evaluation.GetEvaluatedExampleCount())
	fmt.Fprintf(w, "Classification model evaluation metrics: %v\n", evaluation.GetClassificationEvaluationMetrics())

	return nil
}

Java

이 샘플을 사용해 보기 전에 클라이언트 라이브러리 페이지에서 언어 설정 안내를 따르세요.


import com.google.cloud.automl.v1.AutoMlClient;
import com.google.cloud.automl.v1.ModelEvaluation;
import com.google.cloud.automl.v1.ModelEvaluationName;
import java.io.IOException;

class GetModelEvaluation {

  static void getModelEvaluation() throws IOException {
    // TODO(developer): Replace these variables before running the sample.
    String projectId = "YOUR_PROJECT_ID";
    String modelId = "YOUR_MODEL_ID";
    String modelEvaluationId = "YOUR_MODEL_EVALUATION_ID";
    getModelEvaluation(projectId, modelId, modelEvaluationId);
  }

  // Get a model evaluation
  static void getModelEvaluation(String projectId, String modelId, String modelEvaluationId)
      throws IOException {
    // Initialize client that will be used to send requests. This client only needs to be created
    // once, and can be reused for multiple requests. After completing all of your requests, call
    // the "close" method on the client to safely clean up any remaining background resources.
    try (AutoMlClient client = AutoMlClient.create()) {
      // Get the full path of the model evaluation.
      ModelEvaluationName modelEvaluationFullId =
          ModelEvaluationName.of(projectId, "us-central1", modelId, modelEvaluationId);

      // Get complete detail of the model evaluation.
      ModelEvaluation modelEvaluation = client.getModelEvaluation(modelEvaluationFullId);

      System.out.format("Model Evaluation Name: %s\n", modelEvaluation.getName());
      System.out.format("Model Annotation Spec Id: %s", modelEvaluation.getAnnotationSpecId());
      System.out.println("Create Time:");
      System.out.format("\tseconds: %s\n", modelEvaluation.getCreateTime().getSeconds());
      System.out.format("\tnanos: %s", modelEvaluation.getCreateTime().getNanos() / 1e9);
      System.out.format(
          "Evalution Example Count: %d\n", modelEvaluation.getEvaluatedExampleCount());
      System.out.format(
          "Classification Model Evaluation Metrics: %s\n",
          modelEvaluation.getClassificationEvaluationMetrics());
    }
  }
}

Node.js

이 샘플을 사용해 보기 전에 클라이언트 라이브러리 페이지에서 언어 설정 안내를 따르세요.

/**
 * TODO(developer): Uncomment these variables before running the sample.
 */
// const projectId = 'YOUR_PROJECT_ID';
// const location = 'us-central1';
// const modelId = 'YOUR_MODEL_ID';
// const modelEvaluationId = 'YOUR_MODEL_EVALUATION_ID';

// Imports the Google Cloud AutoML library
const {AutoMlClient} = require('@google-cloud/automl').v1;

// Instantiates a client
const client = new AutoMlClient();

async function getModelEvaluation() {
  // Construct request
  const request = {
    name: client.modelEvaluationPath(
      projectId,
      location,
      modelId,
      modelEvaluationId
    ),
  };

  const [response] = await client.getModelEvaluation(request);

  console.log(`Model evaluation name: ${response.name}`);
  console.log(`Model annotation spec id: ${response.annotationSpecId}`);
  console.log(`Model display name: ${response.displayName}`);
  console.log('Model create time');
  console.log(`\tseconds ${response.createTime.seconds}`);
  console.log(`\tnanos ${response.createTime.nanos / 1e9}`);
  console.log(`Evaluation example count: ${response.evaluatedExampleCount}`);
  console.log(
    `Classification model evaluation metrics: ${response.classificationEvaluationMetrics}`
  );
}

getModelEvaluation();

Python

이 샘플을 사용해 보기 전에 클라이언트 라이브러리 페이지에서 언어 설정 안내를 따르세요.

from google.cloud import automl

# TODO(developer): Uncomment and set the following variables
# project_id = "YOUR_PROJECT_ID"
# model_id = "YOUR_MODEL_ID"
# model_evaluation_id = "YOUR_MODEL_EVALUATION_ID"

client = automl.AutoMlClient()
# Get the full path of the model evaluation.
model_path = client.model_path(project_id, "us-central1", model_id)
model_evaluation_full_id = f"{model_path}/modelEvaluations/{model_evaluation_id}"

# Get complete detail of the model evaluation.
response = client.get_model_evaluation(name=model_evaluation_full_id)

print(f"Model evaluation name: {response.name}")
print(f"Model annotation spec id: {response.annotation_spec_id}")
print(f"Create Time: {response.create_time}")
print(f"Evaluation example count: {response.evaluated_example_count}")
print(
    "Classification model evaluation metrics: {}".format(
        response.classification_evaluation_metrics
    )
)

참양성, 거짓음성, 거짓양성(UI 전용)

사용자 인터페이스에서 TRAINING 및 VALIDATION 세트의 특정 모델 성능 예시, 즉 참양성(TP), 거짓음성(FN), 거짓양성(FP) 인스턴스를 확인할 수 있습니다.

웹 UI

이 샘플을 사용해 보기 전에 클라이언트 라이브러리 페이지에서 언어 설정 안내를 따르세요.

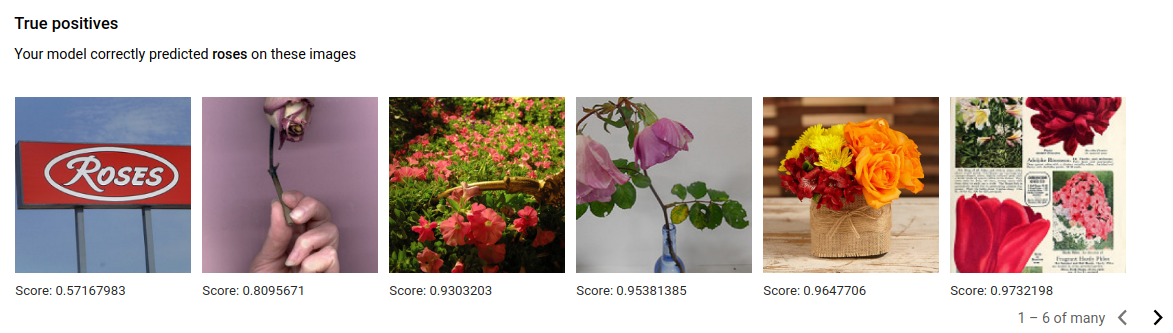
평가 탭을 선택한 다음 특정 라벨을 선택하여 UI에서 TP, FN, FP 보기에 액세스할 수 있습니다.

이러한 예측의 추세를 보면서 학습 세트를 수정하여 모델의 성능을 개선할 수 있습니다.

참양성 이미지는 학습된 모델에 제공된 이미지 중에서 모델이 올바르게 주석을 추가한 샘플 이미지입니다.

참양성

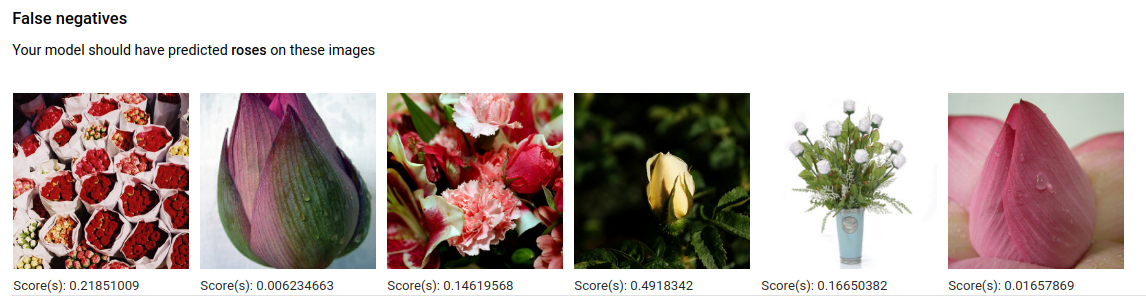
거짓음성 이미지도 학습된 모델에 제공되지만 모델이 해당 라벨에 대해 이미지에 올바르게 주석을 추가할 수 없습니다.

거짓음성

마지막으로 거짓양성 이미지는 학습된 모델에 제공된 이미지 중에서 해당 라벨 주석이 추가되었지만 사실은 주석이 추가되지 않아야 하는 이미지입니다.

거짓양성

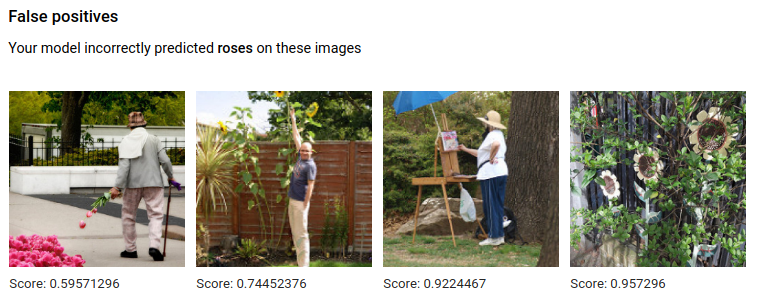
이 모델은 흥미로운 특수 상황을 선택하여 모델이 라벨 해석을 이해할 수 있도록 정의와 라벨을 세분화할 수 있는 기회를 제공합니다. 예를 들어 더 엄격한 정의를 사용하면 모델이 장미 추상화를 '장미'로 간주할 것인지 아닌지를 판단하는 데 도움이 됩니다.

라벨, 학습, 평가 루프를 반복하면 모델에서 데이터의 다른 모호성이 드러납니다.

이 보기의 점수 기준을 사용자 인터페이스에서 조정할 수도 있으며 표시되는 TP, FN, FP 이미지는 기준 변경사항을 반영합니다.

기준점이 업데이트된 참양성

모델 반복 학습

품질 수준이 만족스럽지 않은 경우 이전 단계로 돌아가서 다음과 같이 품질을 높일 수 있습니다.

  • AutoML Vision을 사용하면 모델의 '혼동' 수준, 실제 라벨, 예측된 라벨을 기준으로 이미지를 정렬할 수 있습니다. 정렬된 이미지를 살펴보면서 라벨이 올바른지 확인하세요.
  • 품질이 낮은 라벨에 이미지를 더 추가해 봅니다.
  • 여러 가지 유형의 이미지(예: 더 넓은 시각, 고해상도 또는 저해상도, 다른 시점)를 추가해야 할 수 있습니다.
  • 학습 이미지가 부족한 라벨을 모두 삭제해 봅니다.
  • 컴퓨터는 라벨 이름을 이해하지 못하며, 무작위로 나열된 글자로 인식할 뿐입니다. 'door' 라벨과 'door_with_knob' 라벨이 있는 경우 컴퓨터는 그 의미의 차이를 알지 못하며 오로지 제공되는 이미지만 구분합니다.
  • 참양성, 참음성의 예를 추가하여 데이터를 보강합니다. 결정 경계에 가까운 예, 즉 혼동이 발생하기 쉽지만 라벨이 정확히 지정된 예가 특히 중요합니다.
  • TRAIN, TEST, VALIDATION 분할을 직접 지정합니다. 도구는 이미지를 무작위로 할당하지만, TRAIN과 VALIDATION에 거의 같은 이미지가 할당되면 과적합이 발생하여 TEST 세트의 성능이 저하될 수 있습니다.

변경을 마친 후 품질 수준이 충분히 향상될 때까지 모델을 학습하고 평가합니다.