モデルのデプロイ

モデルの初期デプロイ

モデルを作成(トレーニング)した後、そのモデルにオンライン(または同期)呼び出しをできるようにするには、モデルをデプロイする必要があります。

また、追加のオンライン予測の容量が必要な場合には、モデルのデプロイを更新できるようにもなります。

ウェブ UI

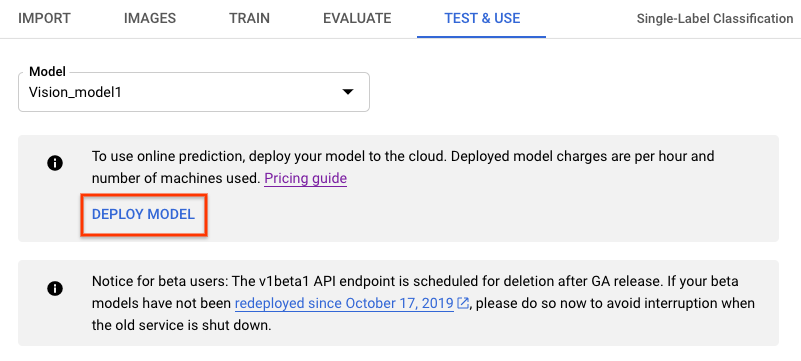
  1. タイトルバーの下にある [テストと使用] タブに移動します。
  2. [モデルのデプロイ] ボタンを選択します。新しいデプロイ オプション ウィンドウが開きます。モデルページをテストして使用する
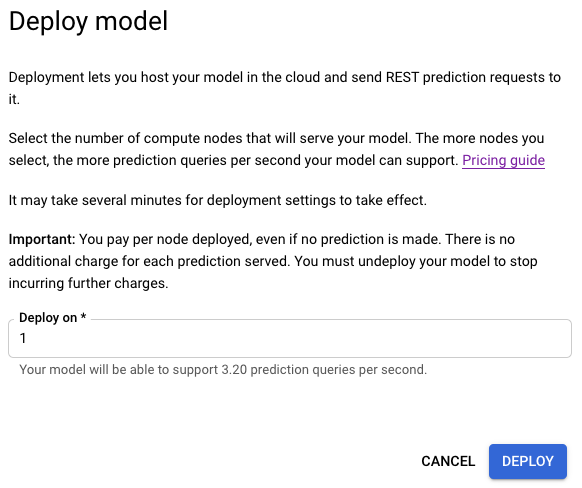
  3. 新しく開いたデプロイ オプション ウィンドウで、デプロイするノードの数を指定します。各ノードでは、特定数の予測秒間クエリ数(QPS)がサポートされます。

    試験運用版トラフィックのほとんどは、通常 1 ノードで十分です。

    デプロイ ポップアップ メニュー
  4. [デプロイ] を選択して、モデルのデプロイを開始します。

    モデルのデプロイ
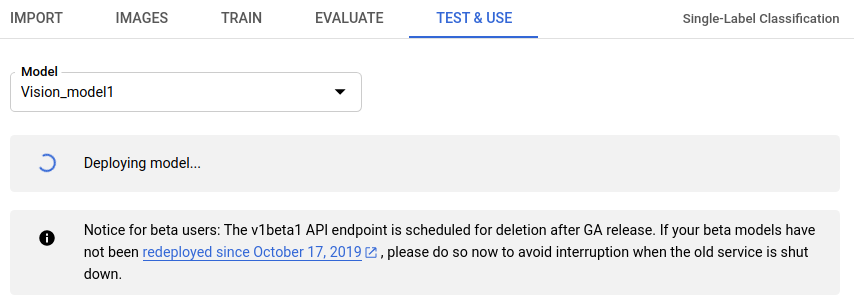
  5. モデルのデプロイが完了すると、メールが届きます。

REST

リクエストのデータを使用する前に、次のように置き換えます。

  • project-id: GCP プロジェクト ID
  • model-id: モデルを作成したときにレスポンスで返されたモデルの ID。この ID は、モデルの名前の最後の要素です。例:
    • モデル名: projects/project-id/locations/location-id/models/IOD4412217016962778756
    • モデル ID: IOD4412217016962778756

フィールドの考慮事項:

  • nodeCount - モデルをデプロイするノードの数。値は 1~100 にする必要があります(両端を含む)。ノードはマシンリソースの抽象化で、モデルの qps_per_node で指定されたオンライン予測秒間クエリ数(QPS)を処理できます。

HTTP メソッドと URL:

POST https://automl.googleapis.com/v1/projects/PROJECT_ID/locations/us-central1/models/MODEL_ID:deploy

リクエストの本文(JSON):

{
  "imageClassificationModelDeploymentMetadata": {
    "nodeCount": 2
  }
}

リクエストを送信するには、次のいずれかのオプションを選択します。

curl

リクエスト本文を request.json という名前のファイルに保存して、次のコマンドを実行します。

curl -X POST \
-H "Authorization: Bearer $(gcloud auth print-access-token)" \
-H "x-goog-user-project: project-id" \
-H "Content-Type: application/json; charset=utf-8" \
-d @request.json \
"https://automl.googleapis.com/v1/projects/PROJECT_ID/locations/us-central1/models/MODEL_ID:deploy"

PowerShell

リクエスト本文を request.json という名前のファイルに保存して、次のコマンドを実行します。

$cred = gcloud auth print-access-token
$headers = @{ "Authorization" = "Bearer $cred"; "x-goog-user-project" = "project-id" }

Invoke-WebRequest `
-Method POST `
-Headers $headers `
-ContentType: "application/json; charset=utf-8" `
-InFile request.json `
-Uri "https://automl.googleapis.com/v1/projects/PROJECT_ID/locations/us-central1/models/MODEL_ID:deploy" | Select-Object -Expand Content

出力は次のようになります。オペレーション ID を使用して、タスクのステータスを取得できます。例については、長時間実行オペレーションによる作業をご覧ください。

{
  "name": "projects/PROJECT_ID/locations/us-central1/operations/OPERATION_ID",
  "metadata": {
    "@type": "type.googleapis.com/google.cloud.automl.v1.OperationMetadata",
    "createTime": "2019-08-07T22:00:20.692109Z",
    "updateTime": "2019-08-07T22:00:20.692109Z",
    "deployModelDetails": {}
  }
}

次の HTTP メソッドと URL を使用すると、オペレーションのステータスを取得できます。

GET https://automl.googleapis.com/v1/projects/PROJECT_ID/locations/us-central1/operations/OPERATION_ID

終了したオペレーションのステータスは、次のようになります。

{
  "name": "projects/PROJECT_ID/locations/us-central1/operations/OPERATION_ID",
  "metadata": {
    "@type": "type.googleapis.com/google.cloud.automl.v1.OperationMetadata",
    "createTime": "2019-06-21T16:47:21.704674Z",
    "updateTime": "2019-06-21T17:01:00.802505Z",
    "deployModelDetails": {}
  },
  "done": true,
  "response": {
    "@type": "type.googleapis.com/google.protobuf.Empty"
  }
}

Go

このサンプルを試す前に、クライアント ライブラリ ページを参照して、この言語の設定手順を完了してください。

import (
	"context"
	"fmt"
	"io"

	automl "cloud.google.com/go/automl/apiv1"
	"cloud.google.com/go/automl/apiv1/automlpb"
)

// deployModel deploys a model.
func deployModel(w io.Writer, projectID string, location string, modelID string) error {
	// projectID := "my-project-id"
	// location := "us-central1"
	// modelID := "TRL123456789..."

	ctx := context.Background()
	client, err := automl.NewClient(ctx)
	if err != nil {
		return fmt.Errorf("NewClient: %w", err)
	}
	defer client.Close()

	req := &automlpb.DeployModelRequest{
		Name: fmt.Sprintf("projects/%s/locations/%s/models/%s", projectID, location, modelID),
	}

	op, err := client.DeployModel(ctx, req)
	if err != nil {
		return fmt.Errorf("DeployModel: %w", err)
	}
	fmt.Fprintf(w, "Processing operation name: %q\n", op.Name())

	if err := op.Wait(ctx); err != nil {
		return fmt.Errorf("Wait: %w", err)
	}

	fmt.Fprintf(w, "Model deployed.\n")

	return nil
}

Java

このサンプルを試す前に、クライアント ライブラリ ページを参照して、この言語の設定手順を完了してください。

import com.google.api.gax.longrunning.OperationFuture;
import com.google.cloud.automl.v1.AutoMlClient;
import com.google.cloud.automl.v1.DeployModelRequest;
import com.google.cloud.automl.v1.ModelName;
import com.google.cloud.automl.v1.OperationMetadata;
import com.google.protobuf.Empty;
import java.io.IOException;
import java.util.concurrent.ExecutionException;

class DeployModel {

  public static void main(String[] args)
      throws IOException, ExecutionException, InterruptedException {
    // TODO(developer): Replace these variables before running the sample.
    String projectId = "YOUR_PROJECT_ID";
    String modelId = "YOUR_MODEL_ID";
    deployModel(projectId, modelId);
  }

  // Deploy a model for prediction
  static void deployModel(String projectId, String modelId)
      throws IOException, ExecutionException, InterruptedException {
    // Initialize client that will be used to send requests. This client only needs to be created
    // once, and can be reused for multiple requests. After completing all of your requests, call
    // the "close" method on the client to safely clean up any remaining background resources.
    try (AutoMlClient client = AutoMlClient.create()) {
      // Get the full path of the model.
      ModelName modelFullId = ModelName.of(projectId, "us-central1", modelId);
      DeployModelRequest request =
          DeployModelRequest.newBuilder().setName(modelFullId.toString()).build();
      OperationFuture<Empty, OperationMetadata> future = client.deployModelAsync(request);

      future.get();
      System.out.println("Model deployment finished");
    }
  }
}

Node.js

このサンプルを試す前に、クライアント ライブラリ ページを参照して、この言語の設定手順を完了してください。

/**
 * TODO(developer): Uncomment these variables before running the sample.
 */
// const projectId = 'YOUR_PROJECT_ID';
// const location = 'us-central1';
// const modelId = 'YOUR_MODEL_ID';

// Imports the Google Cloud AutoML library
const {AutoMlClient} = require('@google-cloud/automl').v1;

// Instantiates a client
const client = new AutoMlClient();

async function deployModel() {
  // Construct request
  const request = {
    name: client.modelPath(projectId, location, modelId),
  };

  const [operation] = await client.deployModel(request);

  // Wait for operation to complete.
  const [response] = await operation.promise();
  console.log(`Model deployment finished. ${response}`);
}

deployModel();

Python

このサンプルを試す前に、クライアント ライブラリ ページを参照して、この言語の設定手順を完了してください。

from google.cloud import automl

# TODO(developer): Uncomment and set the following variables
# project_id = "YOUR_PROJECT_ID"
# model_id = "YOUR_MODEL_ID"

client = automl.AutoMlClient()
# Get the full path of the model.
model_full_id = client.model_path(project_id, "us-central1", model_id)
response = client.deploy_model(name=model_full_id)

print(f"Model deployment finished. {response.result()}")

その他の言語

C#: クライアント ライブラリ ページの C# の設定手順を行ってから、.NET 用の AutoML Vision リファレンス ドキュメントをご覧ください。

PHP: クライアント ライブラリ ページの PHP の設定手順を行ってから、PHP 用の AutoML Vision リファレンス ドキュメントをご覧ください。

Ruby: クライアント ライブラリ ページの Ruby の設定手順を行ってから、Ruby 用の AutoML Vision リファレンス ドキュメントをご覧ください。

モデルのノード番号の更新

トレーニング済みのモデルをデプロイした後に、トラフィック量に応じて、モデルがデプロイされるノードの数を更新できます。たとえば、秒間クエリ数(QPS)が予想より多い場合に、このトラフィックの処理用にデプロイされるノード数を調整できます。

モデルのデプロイを解除しなくても、ノード番号を変更できます。デプロイを更新すると、配信された予測トラフィックを中断せずにノード番号が変更されます。

ウェブ UI

  1. Vision Dashboard で、左側のナビゲーション バーの [モデル] タブを選択して、使用可能なモデルを表示します。

    別のプロジェクトのモデルを表示するには、タイトルバーの右上にあるプルダウン リストからプロジェクトを選択します。

  2. デプロイしたトレーニング済みモデルを選択します。
  3. タイトルバーのすぐ下にある [テストと使用] タブを選択します。
  4. ページ上部のボックスに、「モデルはデプロイされているため、オンライン予測リクエストに使用できます。」というメッセージが表示されます。このテキストの隣にある [デプロイの更新] オプションを選択します。

    [デプロイの更新] ボタンの画像
  5. [デプロイの更新] ウィンドウが開きます。モデルをデプロイする新しいノード番号をリストから選択します。ノード番号と一緒に予測の秒間クエリ数(QPS)の概算が表示されます。[デプロイの更新] ポップアップ ウィンドウの画像
  6. リストから新しいノード番号を選択したら、[デプロイの更新] を選択して、モデルがデプロイされているノード番号を更新します。

    新しいノード番号を選択した後の [デプロイの更新] ウィンドウ
  7. [テストと使用] ウィンドウに戻ります。テキスト ボックスに「モデルをデプロイしています...」が表示されます。 モデルのデプロイ
  8. 新しいノード番号にモデルが正常にデプロイされると、プロジェクトに関連付けられたアドレスにメールが届きます。

REST

モデルのデプロイに最初に使用した際と同じ方法で、デプロイ済みモデルのノード番号を変更します。

リクエストのデータを使用する前に、次のように置き換えます。

  • project-id: GCP プロジェクト ID
  • model-id: モデルを作成したときにレスポンスで返されたモデルの ID。この ID は、モデルの名前の最後の要素です。例:
    • モデル名: projects/project-id/locations/location-id/models/IOD4412217016962778756
    • モデル ID: IOD4412217016962778756

フィールドの考慮事項:

  • nodeCount - モデルをデプロイするノードの数。値は 1~100 にする必要があります(両端を含む)。ノードはマシンリソースの抽象化で、モデルの qps_per_node で指定されたオンライン予測秒間クエリ数(QPS)を処理できます。

HTTP メソッドと URL:

POST https://automl.googleapis.com/v1/projects/PROJECT_ID/locations/us-central1/models/MODEL_ID:deploy

リクエストの本文(JSON):

{
  "imageClassificationModelDeploymentMetadata": {
    "nodeCount": 2
  }
}

リクエストを送信するには、次のいずれかのオプションを選択します。

curl

リクエスト本文を request.json という名前のファイルに保存して、次のコマンドを実行します。

curl -X POST \
-H "Authorization: Bearer $(gcloud auth print-access-token)" \
-H "x-goog-user-project: project-id" \
-H "Content-Type: application/json; charset=utf-8" \
-d @request.json \
"https://automl.googleapis.com/v1/projects/PROJECT_ID/locations/us-central1/models/MODEL_ID:deploy"

PowerShell

リクエスト本文を request.json という名前のファイルに保存して、次のコマンドを実行します。

$cred = gcloud auth print-access-token
$headers = @{ "Authorization" = "Bearer $cred"; "x-goog-user-project" = "project-id" }

Invoke-WebRequest `
-Method POST `
-Headers $headers `
-ContentType: "application/json; charset=utf-8" `
-InFile request.json `
-Uri "https://automl.googleapis.com/v1/projects/PROJECT_ID/locations/us-central1/models/MODEL_ID:deploy" | Select-Object -Expand Content

出力は次のようになります。オペレーション ID を使用して、タスクのステータスを取得できます。例については、長時間実行オペレーションによる作業をご覧ください。

{
  "name": "projects/PROJECT_ID/locations/us-central1/operations/OPERATION_ID",
  "metadata": {
    "@type": "type.googleapis.com/google.cloud.automl.v1.OperationMetadata",
    "createTime": "2019-08-07T22:00:20.692109Z",
    "updateTime": "2019-08-07T22:00:20.692109Z",
    "deployModelDetails": {}
  }
}

次の HTTP メソッドと URL を使用すると、オペレーションのステータスを取得できます。

GET https://automl.googleapis.com/v1/projects/PROJECT_ID/locations/us-central1/operations/OPERATION_ID

終了したオペレーションのステータスは、次のようになります。

{
  "name": "projects/PROJECT_ID/locations/us-central1/operations/OPERATION_ID",
  "metadata": {
    "@type": "type.googleapis.com/google.cloud.automl.v1.OperationMetadata",
    "createTime": "2019-06-21T16:47:21.704674Z",
    "updateTime": "2019-06-21T17:01:00.802505Z",
    "deployModelDetails": {}
  },
  "done": true,
  "response": {
    "@type": "type.googleapis.com/google.protobuf.Empty"
  }
}

Go

このサンプルを試す前に、クライアント ライブラリ ページを参照して、この言語の設定手順を完了してください。

import (
	"context"
	"fmt"
	"io"

	automl "cloud.google.com/go/automl/apiv1"
	"cloud.google.com/go/automl/apiv1/automlpb"
)

// visionClassificationDeployModelWithNodeCount deploys a model with node count.
func visionClassificationDeployModelWithNodeCount(w io.Writer, projectID string, location string, modelID string) error {
	// projectID := "my-project-id"
	// location := "us-central1"
	// modelID := "ICN123456789..."

	ctx := context.Background()
	client, err := automl.NewClient(ctx)
	if err != nil {
		return fmt.Errorf("NewClient: %w", err)
	}
	defer client.Close()

	req := &automlpb.DeployModelRequest{
		Name: fmt.Sprintf("projects/%s/locations/%s/models/%s", projectID, location, modelID),
		ModelDeploymentMetadata: &automlpb.DeployModelRequest_ImageClassificationModelDeploymentMetadata{
			ImageClassificationModelDeploymentMetadata: &automlpb.ImageClassificationModelDeploymentMetadata{
				NodeCount: 2,
			},
		},
	}

	op, err := client.DeployModel(ctx, req)
	if err != nil {
		return fmt.Errorf("DeployModel: %w", err)
	}
	fmt.Fprintf(w, "Processing operation name: %q\n", op.Name())

	if err := op.Wait(ctx); err != nil {
		return fmt.Errorf("Wait: %w", err)
	}

	fmt.Fprintf(w, "Model deployed.\n")

	return nil
}

Java

このサンプルを試す前に、クライアント ライブラリ ページを参照して、この言語の設定手順を完了してください。

import com.google.api.gax.longrunning.OperationFuture;
import com.google.cloud.automl.v1.AutoMlClient;
import com.google.cloud.automl.v1.DeployModelRequest;
import com.google.cloud.automl.v1.ImageClassificationModelDeploymentMetadata;
import com.google.cloud.automl.v1.ModelName;
import com.google.cloud.automl.v1.OperationMetadata;
import com.google.protobuf.Empty;
import java.io.IOException;
import java.util.concurrent.ExecutionException;

class VisionClassificationDeployModelNodeCount {

  static void visionClassificationDeployModelNodeCount()
      throws InterruptedException, ExecutionException, IOException {
    // TODO(developer): Replace these variables before running the sample.
    String projectId = "YOUR_PROJECT_ID";
    String modelId = "YOUR_MODEL_ID";
    visionClassificationDeployModelNodeCount(projectId, modelId);
  }

  // Deploy a model for prediction with a specified node count (can be used to redeploy a model)
  static void visionClassificationDeployModelNodeCount(String projectId, String modelId)
      throws IOException, ExecutionException, InterruptedException {
    // Initialize client that will be used to send requests. This client only needs to be created
    // once, and can be reused for multiple requests. After completing all of your requests, call
    // the "close" method on the client to safely clean up any remaining background resources.
    try (AutoMlClient client = AutoMlClient.create()) {
      // Get the full path of the model.
      ModelName modelFullId = ModelName.of(projectId, "us-central1", modelId);
      ImageClassificationModelDeploymentMetadata metadata =
          ImageClassificationModelDeploymentMetadata.newBuilder().setNodeCount(2).build();
      DeployModelRequest request =
          DeployModelRequest.newBuilder()
              .setName(modelFullId.toString())
              .setImageClassificationModelDeploymentMetadata(metadata)
              .build();
      OperationFuture<Empty, OperationMetadata> future = client.deployModelAsync(request);

      future.get();
      System.out.println("Model deployment finished");
    }
  }
}

Node.js

このサンプルを試す前に、クライアント ライブラリ ページを参照して、この言語の設定手順を完了してください。

/**
 * TODO(developer): Uncomment these variables before running the sample.
 */
// const projectId = 'YOUR_PROJECT_ID';
// const location = 'us-central1';
// const modelId = 'YOUR_MODEL_ID';

// Imports the Google Cloud AutoML library
const {AutoMlClient} = require('@google-cloud/automl').v1;

// Instantiates a client
const client = new AutoMlClient();

async function deployModelWithNodeCount() {
  // Construct request
  const request = {
    name: client.modelPath(projectId, location, modelId),
    imageClassificationModelDeploymentMetadata: {
      nodeCount: 2,
    },
  };

  const [operation] = await client.deployModel(request);

  // Wait for operation to complete.
  const [response] = await operation.promise();
  console.log(`Model deployment finished. ${response}`);
}

deployModelWithNodeCount();

Python

このサンプルを試す前に、クライアント ライブラリ ページを参照して、この言語の設定手順を完了してください。

from google.cloud import automl

# TODO(developer): Uncomment and set the following variables
# project_id = "YOUR_PROJECT_ID"
# model_id = "YOUR_MODEL_ID"

client = automl.AutoMlClient()
# Get the full path of the model.
model_full_id = client.model_path(project_id, "us-central1", model_id)

# node count determines the number of nodes to deploy the model on.
# https://cloud.google.com/automl/docs/reference/rpc/google.cloud.automl.v1#imageclassificationmodeldeploymentmetadata
metadata = automl.ImageClassificationModelDeploymentMetadata(node_count=2)

request = automl.DeployModelRequest(
    name=model_full_id, image_classification_model_deployment_metadata=metadata
)
response = client.deploy_model(request=request)

print(f"Model deployment finished. {response.result()}")

その他の言語

C#: クライアント ライブラリ ページの C# の設定手順を行ってから、.NET 用の AutoML Vision リファレンス ドキュメントをご覧ください。

PHP: クライアント ライブラリ ページの PHP の設定手順を行ってから、PHP 用の AutoML Vision リファレンス ドキュメントをご覧ください。

Ruby: クライアント ライブラリ ページの Ruby の設定手順を行ってから、Ruby 用の AutoML Vision リファレンス ドキュメントをご覧ください。