项目可以有多个数据集,每个数据集用于训练单独的模型。您可以获取可用数据集列表、获取特定的数据集、导出数据集,并且可以删除不再需要的数据集。
列出数据集
本部分介绍如何检索项目的可用数据集列表。
网页界面
要使用 Vision Dashboard 查看可用数据集列表,请点击左侧导航菜单顶部的数据集链接。
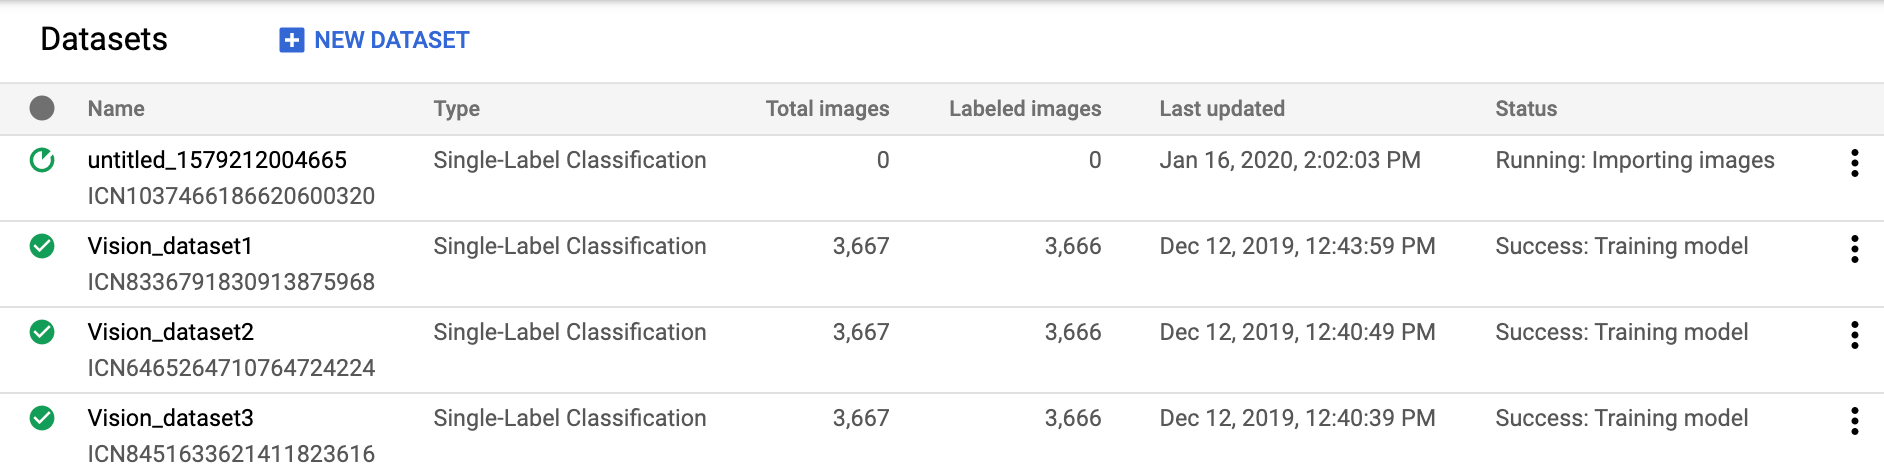
要查看其他项目的数据集,请从标题栏右上角的下拉列表中选择该项目。
REST
在使用任何请求数据之前,请先进行以下替换:
- project-id:您的 GCP 项目 ID。
HTTP 方法和网址:
GET https://automl.googleapis.com/v1/projects/PROJECT_ID/locations/us-central1/datasets
如需发送请求,请选择以下方式之一:
curl
执行以下命令:
curl -X GET \
     -H "Authorization: Bearer $(gcloud auth print-access-token)" \
     -H "x-goog-user-project: project-id" \
     "https://automl.googleapis.com/v1/projects/PROJECT_ID/locations/us-central1/datasets"
PowerShell
执行以下命令:
$cred = gcloud auth print-access-token
$headers = @{ "Authorization" = "Bearer $cred"; "x-goog-user-project" = "project-id" }

Invoke-WebRequest `
    -Method GET `
    -Headers $headers `
    -Uri "https://automl.googleapis.com/v1/projects/PROJECT_ID/locations/us-central1/datasets" | Select-Object -Expand Content
您应该收到类似以下内容的 JSON 响应:
    {
  "datasets": [
    {
      "name": "projects/project-id/locations/us-central1/datasets/dataset-id",
      "displayName": "my_new_dataset",
      "createTime": "2019-10-29T17:31:12.010290Z",
      "etag": "AB3BwFpNUaguCwKeQWtUKLBPQhZr7omCCUBz77pACPIINFpyFe7vbGhp9oZLEEGhIeM=",
      "exampleCount": 3667,
      "imageClassificationDatasetMetadata": {
        "classificationType": "MULTICLASS"
      }
    },
    {
      "name": "projects/project-id/locations/us-central1/datasets/dataset-id",
      "displayName": "new_dataset",
      "createTime": "2019-10-02T00:44:57.821275Z",
      "etag": "AB3BwFpU_ueMZtTD_8dt-9r8BWqunqMC76YbAbmQYQsQEbtQTxs6U3rPpgAMDCXhYPGq",
      "imageClassificationDatasetMetadata": {
        "classificationType": "MULTICLASS"
      }
    }
  ]
}
Go
在试用此示例之前,请按照客户端库页面中与此编程语言对应的设置说明执行操作。
Java
在试用此示例之前,请按照客户端库页面中与此编程语言对应的设置说明执行操作。
Node.js
在试用此示例之前,请按照客户端库页面中与此编程语言对应的设置说明执行操作。
Python
在试用此示例之前,请按照客户端库页面中与此编程语言对应的设置说明执行操作。
其他语言
C#: 请按照客户端库页面上的 C# 设置说明操作,然后访问 .NET 版 AutoML Vision 参考文档。
PHP: 请按照客户端库页面上的 PHP 设置说明操作,然后访问 PHP 版 AutoML Vision 参考文档。
Ruby 版: 请按照客户端库页面上的 Ruby 设置说明操作,然后访问 Ruby 版 AutoML Vision 参考文档。
获取数据集
您还可以使用数据集 ID 获取特定的数据集。
网页界面
要使用 AutoML Vision 界面查看可用数据集列表,请点击左侧导航菜单顶部的数据集链接。

要查看其他项目的数据集,请从标题栏左侧的下拉列表中选择该项目。
从列表中选择特定数据集的名称,即可访问该数据集。
REST
在使用任何请求数据之前,请先进行以下替换:
- project-id:您的 GCP 项目 ID。
- dataset-id:您的数据集的 ID。此 ID 是数据集名称的最后一个元素。例如:
- 数据集名称:
projects/project-id/locations/location-id/datasets/3104518874390609379 - 数据集 ID:
3104518874390609379
- 数据集名称:
HTTP 方法和网址:
GET https://automl.googleapis.com/v1/projects/PROJECT_ID/locations/us-central1/datasets/DATASET_ID
如需发送请求,请选择以下方式之一:
curl
执行以下命令:
curl -X GET \
     -H "Authorization: Bearer $(gcloud auth print-access-token)" \
     -H "x-goog-user-project: project-id" \
     "https://automl.googleapis.com/v1/projects/PROJECT_ID/locations/us-central1/datasets/DATASET_ID"
PowerShell
执行以下命令:
$cred = gcloud auth print-access-token
$headers = @{ "Authorization" = "Bearer $cred"; "x-goog-user-project" = "project-id" }

Invoke-WebRequest `
    -Method GET `
    -Headers $headers `
    -Uri "https://automl.googleapis.com/v1/projects/PROJECT_ID/locations/us-central1/datasets/DATASET_ID" | Select-Object -Expand Content
您应该收到类似以下内容的 JSON 响应:
    {
  "name": "projects/project-id/locations/us-central1/datasets/dataset-id",
  "displayName": "display-name",
  "createTime": "2019-10-29T17:31:12.010290Z",
  "etag": "AB3BwFoP09ffuRNnaWMx4UGi8uvYFctvOBjns84OercuMRIdXr0YINNiUqeW85SB3g4=",
  "exampleCount": 3667,
  "imageClassificationDatasetMetadata": {
    "classificationType": "MULTICLASS"
  }
}
Go
在试用此示例之前,请按照客户端库页面中与此编程语言对应的设置说明执行操作。
Java
在试用此示例之前,请按照客户端库页面中与此编程语言对应的设置说明执行操作。
Node.js
在试用此示例之前,请按照客户端库页面中与此编程语言对应的设置说明执行操作。
Python
在试用此示例之前,请按照客户端库页面中与此编程语言对应的设置说明执行操作。
导出数据集
您可以将包含数据集的所有信息的 CSV 文件导出到 Google Cloud Storage 存储分区。
网页界面
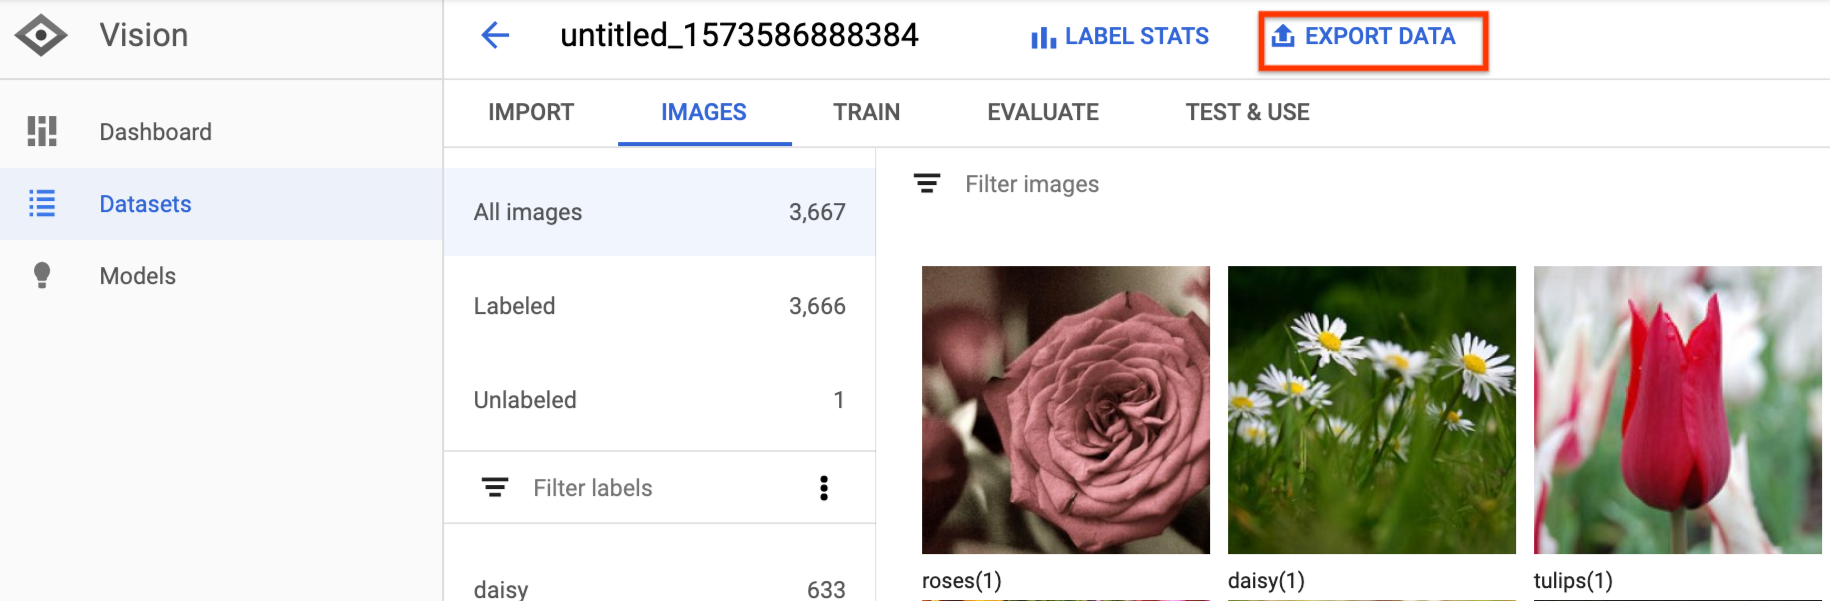
要导出非空数据集,请完成以下步骤:
在数据集页面中,选择非空数据集。
选择非空数据集,即可进入数据集详情 (Dataset details) 页面。

选择“数据集详情”页面顶部的导出数据选项。
此操作会打开一个窗口,供您选择 Google Cloud Storage 存储分区位置,或创建新存储分区并将其指定为 CSV 文件的存储位置。
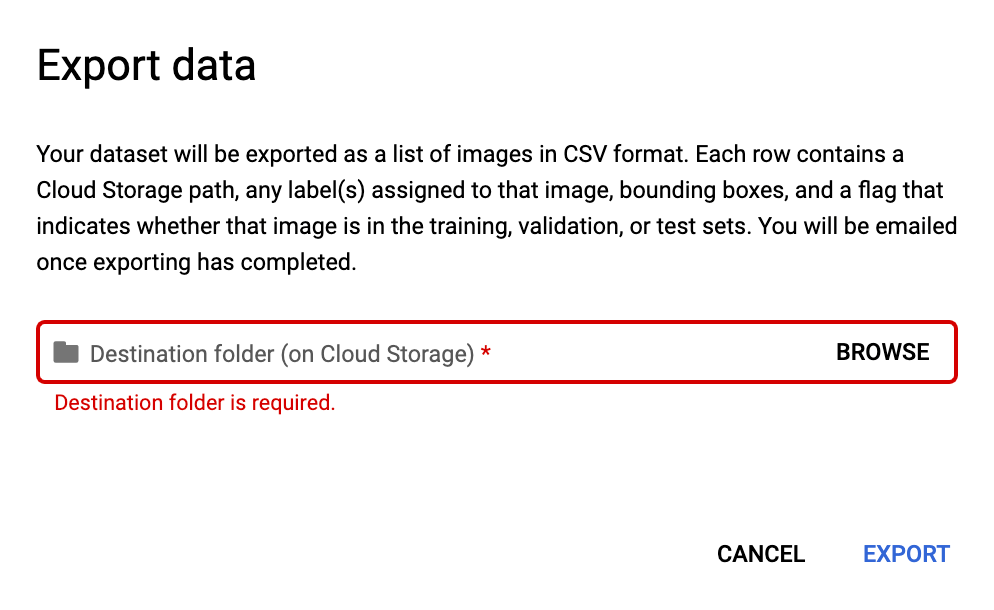
在您选择了新的或现有的 Google Cloud Storage 存储分区位置后,选择导出 CSV。
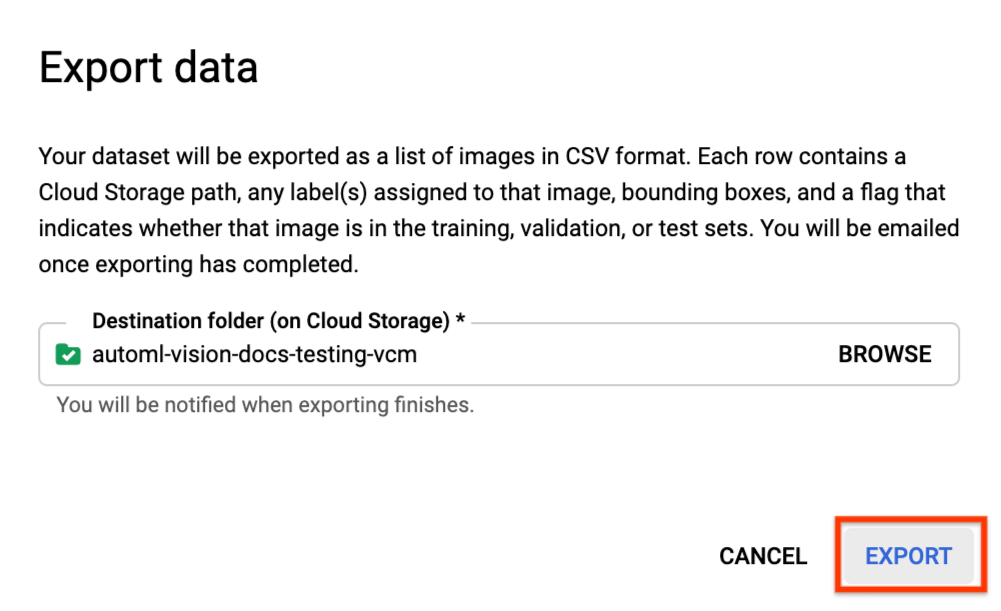
数据导出过程完成后,您会收到电子邮件通知。
REST
在使用任何请求数据之前,请先进行以下替换:
- project-id:您的 GCP 项目 ID。
- dataset-id:您的数据集的 ID。此 ID 是数据集名称的最后一个元素。例如:
- 数据集名称:
projects/project-id/locations/location-id/datasets/3104518874390609379 - 数据集 ID:
3104518874390609379
- 数据集名称:
- output-storage-bucket:用于保存输出文件的 Google Cloud Storage 存储分区/目录,采用以下格式表示:
gs://bucket/directory/。 发出请求的用户必须具有相应存储分区的写入权限。
HTTP 方法和网址:
POST https://automl.googleapis.com/v1/projects/PROJECT_ID/locations/us-central1/datasets/DATASET_ID:exportData
请求 JSON 正文:
{
  "outputConfig": {
    "gcsDestination": {
      "outputUriPrefix": "CLOUD_STORAGE_BUCKET"
    }
  }
}
如需发送请求,请选择以下方式之一:
curl
将请求正文保存在名为 request.json 的文件中,然后执行以下命令:
curl -X POST \
     -H "Authorization: Bearer $(gcloud auth print-access-token)" \
     -H "x-goog-user-project: project-id" \
     -H "Content-Type: application/json; charset=utf-8" \
     -d @request.json \
     "https://automl.googleapis.com/v1/projects/PROJECT_ID/locations/us-central1/datasets/DATASET_ID:exportData"
PowerShell
将请求正文保存在名为 request.json 的文件中,然后执行以下命令:
$cred = gcloud auth print-access-token
$headers = @{ "Authorization" = "Bearer $cred"; "x-goog-user-project" = "project-id" }

Invoke-WebRequest `
    -Method POST `
    -Headers $headers `
    -ContentType: "application/json; charset=utf-8" `
    -InFile request.json `
    -Uri "https://automl.googleapis.com/v1/projects/PROJECT_ID/locations/us-central1/datasets/DATASET_ID:exportData" | Select-Object -Expand Content
您应该会看到类似如下所示的输出。可以使用操作 ID 来获取任务的状态。如需查看示例,请参阅处理长时间运行的操作。
{
  "name": "projects/PROJECT_ID/locations/us-central1/operations/OPERATION_ID",
  "metadata": {
    "@type": "type.googleapis.com/google.cloud.automl.v1.OperationMetadata",
    "createTime": "2019-08-12T18:52:31.637075Z",
    "updateTime": "2019-08-12T18:52:31.637075Z",
    "exportDataDetails": {
      "outputInfo": {
        "gcsOutputDirectory": "CLOUD_STORAGE_BUCKET/export_data-DATASET_NAME-TIMESTAMP_OF_EXPORT_CALL/"
      }
    }
  }
}
Java
在试用此示例之前,请按照客户端库页面中与此编程语言对应的设置说明执行操作。
Node.js
在试用此示例之前,请按照客户端库页面中与此编程语言对应的设置说明执行操作。
Python
在试用此示例之前,请按照客户端库页面中与此编程语言对应的设置说明执行操作。
导出的 CSV 格式
导出的 CSV 文件包含与训练数据导入 CSV 相同的格式:
set,path,label0[,label1,label2,...]
此 CSV 文件保存在已创建的导出文件夹中,该文件夹通过唯一的时间戳进行区分。以下是导出的 CSV 文件中的一些示例行:
my-storage-bucket/export_data-my_dataset_name-2019-11-08T22:28:13.081Z/image_classification_1.csv:
TRAIN,gs://my-storage-bucket/export_data-my_dataset_name-2019-11-08T22:28:13.081Z/files/img874.jpg,dandelion
VALIDATION,gs://my-storage-bucket/export_data-my_dataset_name-2019-11-08T22:28:13.081Z/files/img447.jpg,roses
TRAIN,gs://my-storage-bucket/export_data-my_dataset_name-2019-11-08T22:28:13.081Z/files/img672.jpg,dandelion
VALIDATION,gs://my-storage-bucket/export_data-my_dataset_name-2019-11-08T22:28:13.081Z/files/img421.jpg,sunflowers
TRAIN,gs://my-storage-bucket/export_data-my_dataset_name-2019-11-08T22:28:13.081Z/files/img495.jpg,tulips
TEST,gs://my-storage-bucket/export_data-my_dataset_name-2019-11-08T22:28:13.081Z/files/img014.jpg,sunflowers
删除数据集
您可以在界面中删除不再需要的数据集,或者通过以下代码示例使用数据集的 ID 删除数据集。
网页界面
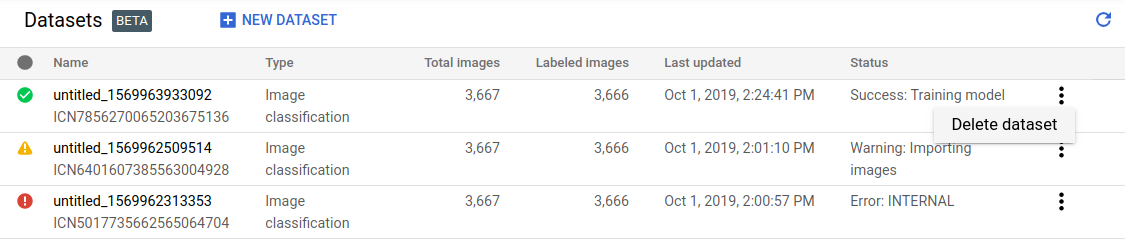
在 Vision Dashboard 中,点击左侧导航菜单顶部的数据集链接以显示可用数据集列表。
点击待删除行最右侧的三点状菜单,然后选择删除数据集。
在确认对话框中点击删除。
REST
在使用任何请求数据之前,请先进行以下替换:
- project-id:您的 GCP 项目 ID。
- dataset-id:您的数据集的 ID。此 ID 是数据集名称的最后一个元素。例如:
- 数据集名称:
projects/project-id/locations/location-id/datasets/3104518874390609379 - 数据集 ID:
3104518874390609379
- 数据集名称:
HTTP 方法和网址:
DELETE https://automl.googleapis.com/v1/projects/PROJECT_ID/locations/us-central1/datasets/DATASET_ID
如需发送请求,请选择以下方式之一:
curl
执行以下命令:
curl -X DELETE \
     -H "Authorization: Bearer $(gcloud auth print-access-token)" \
     -H "x-goog-user-project: project-id" \
     "https://automl.googleapis.com/v1/projects/PROJECT_ID/locations/us-central1/datasets/DATASET_ID"
PowerShell
执行以下命令:
$cred = gcloud auth print-access-token
$headers = @{ "Authorization" = "Bearer $cred"; "x-goog-user-project" = "project-id" }

Invoke-WebRequest `
    -Method DELETE `
    -Headers $headers `
    -Uri "https://automl.googleapis.com/v1/projects/PROJECT_ID/locations/us-central1/datasets/DATASET_ID" | Select-Object -Expand Content
您应该会看到类似如下所示的输出。可以使用操作 ID 来获取任务的状态。如需查看示例,请参阅处理长时间运行的操作。
{
  "name": "projects/PROJECT_ID/locations/us-central1/operations/OPERATION_ID",
  "metadata": {
    "@type": "type.googleapis.com/google.cloud.automl.v1.OperationMetadata",
    "createTime": "2019-11-08T22:37:19.822128Z",
    "updateTime": "2019-11-08T22:37:19.822128Z",
    "deleteDetails": {}
  },
  "done": true,
  "response": {
    "@type": "type.googleapis.com/google.protobuf.Empty"
  }
}
Go
在试用此示例之前,请按照客户端库页面中与此编程语言对应的设置说明执行操作。
Java
在试用此示例之前,请按照客户端库页面中与此编程语言对应的设置说明执行操作。
Node.js
在试用此示例之前,请按照客户端库页面中与此编程语言对应的设置说明执行操作。
Python
在试用此示例之前,请按照客户端库页面中与此编程语言对应的设置说明执行操作。