Datasets verwalten

Ein Projekt kann mehrere Datasets enthalten, die jeweils zum Trainieren eines separaten Modells verwendet werden. Sie können eine Liste der verfügbaren Datasets oder ein bestimmtes Dataset abrufen, ein Dataset exportieren und ein Dataset löschen, das Sie nicht mehr benötigen.

Datasets auflisten

In diesem Abschnitt wird beschrieben, wie Sie eine Liste der verfügbaren Datasets für ein Projekt abrufen.

Web-UI

Zum Aufrufen einer Liste der verfügbaren Datasets mithilfe des Vision Dashboard klicken Sie links oben im Navigationsmenü auf den Link Datasets.

Seite mit Dataset-Liste

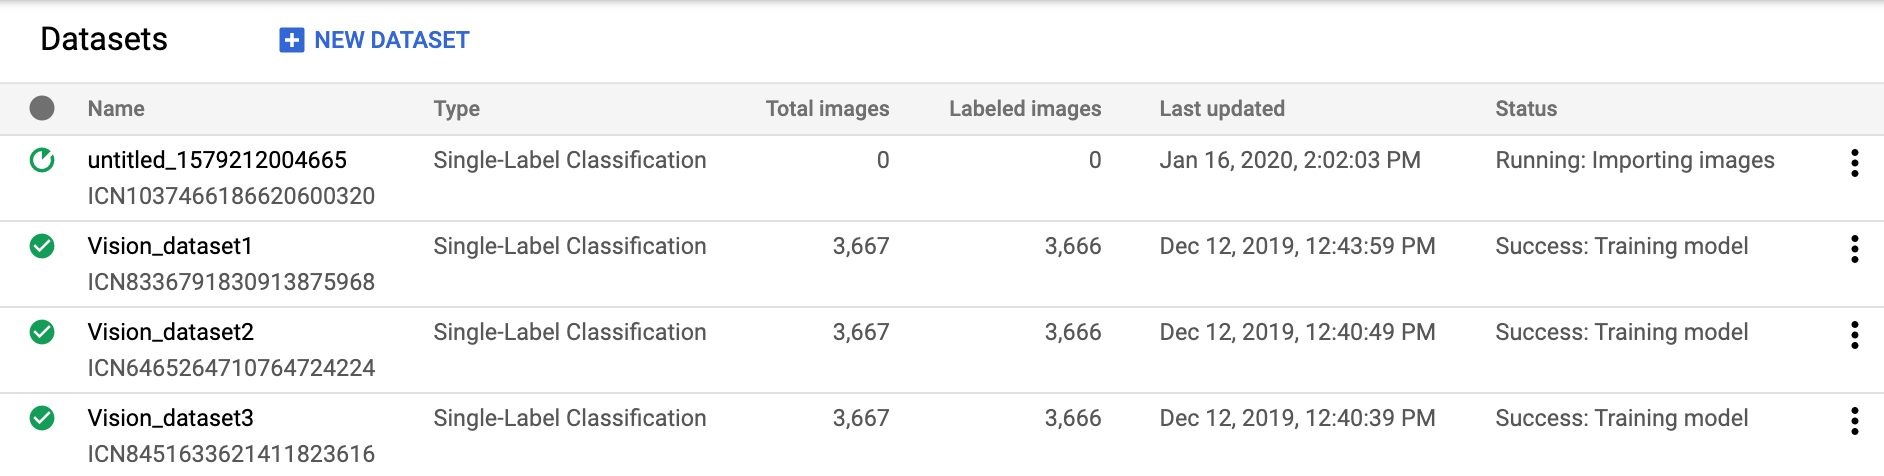
Um die Datasets für ein anderes Projekt aufzurufen, wählen Sie aus der Drop-down-Liste rechts oben in der Titelleiste das betreffende Projekt aus.

REST

Ersetzen Sie dabei folgende Werte für die Anfragedaten:

  • project-id: die ID Ihres GCP-Projekts.

HTTP-Methode und URL:

GET https://automl.googleapis.com/v1/projects/PROJECT_ID/locations/us-central1/datasets

Senden Sie die Anfrage mithilfe einer der folgenden Optionen:

curl

Führen Sie folgenden Befehl aus:

curl -X GET \
-H "Authorization: Bearer $(gcloud auth print-access-token)" \
-H "x-goog-user-project: project-id" \
"https://automl.googleapis.com/v1/projects/PROJECT_ID/locations/us-central1/datasets"

PowerShell

Führen Sie folgenden Befehl aus:

$cred = gcloud auth print-access-token
$headers = @{ "Authorization" = "Bearer $cred"; "x-goog-user-project" = "project-id" }

Invoke-WebRequest `
-Method GET `
-Headers $headers `
-Uri "https://automl.googleapis.com/v1/projects/PROJECT_ID/locations/us-central1/datasets" | Select-Object -Expand Content

Sie sollten eine JSON-Antwort ähnlich wie diese erhalten:


    {
  "datasets": [
    {
      "name": "projects/project-id/locations/us-central1/datasets/dataset-id",
      "displayName": "my_new_dataset",
      "createTime": "2019-10-29T17:31:12.010290Z",
      "etag": "AB3BwFpNUaguCwKeQWtUKLBPQhZr7omCCUBz77pACPIINFpyFe7vbGhp9oZLEEGhIeM=",
      "exampleCount": 3667,
      "imageClassificationDatasetMetadata": {
        "classificationType": "MULTICLASS"
      }
    },
    {
      "name": "projects/project-id/locations/us-central1/datasets/dataset-id",
      "displayName": "new_dataset",
      "createTime": "2019-10-02T00:44:57.821275Z",
      "etag": "AB3BwFpU_ueMZtTD_8dt-9r8BWqunqMC76YbAbmQYQsQEbtQTxs6U3rPpgAMDCXhYPGq",
      "imageClassificationDatasetMetadata": {
        "classificationType": "MULTICLASS"
      }
    }
  ]
}

Go

Bevor Sie dieses Beispiel ausprobieren, folgen Sie der Einrichtungsanleitung für diese Sprache auf der Seite Clientbibliotheken.

import (
	"context"
	"fmt"
	"io"

	automl "cloud.google.com/go/automl/apiv1"
	"cloud.google.com/go/automl/apiv1/automlpb"
	"google.golang.org/api/iterator"
)

// listDatasets lists existing datasets.
func listDatasets(w io.Writer, projectID string, location string) error {
	// projectID := "my-project-id"
	// location := "us-central1"

	ctx := context.Background()
	client, err := automl.NewClient(ctx)
	if err != nil {
		return fmt.Errorf("NewClient: %w", err)
	}
	defer client.Close()

	req := &automlpb.ListDatasetsRequest{
		Parent: fmt.Sprintf("projects/%s/locations/%s", projectID, location),
	}

	it := client.ListDatasets(ctx, req)

	// Iterate over all results
	for {
		dataset, err := it.Next()
		if err == iterator.Done {
			break
		}
		if err != nil {
			return fmt.Errorf("ListGlossaries.Next: %w", err)
		}

		fmt.Fprintf(w, "Dataset name: %v\n", dataset.GetName())
		fmt.Fprintf(w, "Dataset display name: %v\n", dataset.GetDisplayName())
		fmt.Fprintf(w, "Dataset create time:\n")
		fmt.Fprintf(w, "\tseconds: %v\n", dataset.GetCreateTime().GetSeconds())
		fmt.Fprintf(w, "\tnanos: %v\n", dataset.GetCreateTime().GetNanos())

		// Vision classification
		if metadata := dataset.GetImageClassificationDatasetMetadata(); metadata != nil {
			fmt.Fprintf(w, "Image classification dataset metadata: %v\n", metadata)
		}

	}

	return nil
}

Java

Bevor Sie dieses Beispiel ausprobieren, folgen Sie der Einrichtungsanleitung für diese Sprache auf der Seite Clientbibliotheken.

import com.google.cloud.automl.v1.AutoMlClient;
import com.google.cloud.automl.v1.Dataset;
import com.google.cloud.automl.v1.ListDatasetsRequest;
import com.google.cloud.automl.v1.LocationName;
import java.io.IOException;

class ListDatasets {

  static void listDatasets() throws IOException {
    // TODO(developer): Replace these variables before running the sample.
    String projectId = "YOUR_PROJECT_ID";
    listDatasets(projectId);
  }

  // List the datasets
  static void listDatasets(String projectId) throws IOException {
    // Initialize client that will be used to send requests. This client only needs to be created
    // once, and can be reused for multiple requests. After completing all of your requests, call
    // the "close" method on the client to safely clean up any remaining background resources.
    try (AutoMlClient client = AutoMlClient.create()) {
      // A resource that represents Google Cloud Platform location.
      LocationName projectLocation = LocationName.of(projectId, "us-central1");
      ListDatasetsRequest request =
          ListDatasetsRequest.newBuilder().setParent(projectLocation.toString()).build();

      // List all the datasets available in the region by applying filter.
      System.out.println("List of datasets:");
      for (Dataset dataset : client.listDatasets(request).iterateAll()) {
        // Display the dataset information
        System.out.format("\nDataset name: %s\n", dataset.getName());
        // To get the dataset id, you have to parse it out of the `name` field. As dataset Ids are
        // required for other methods.
        // Name Form: `projects/{project_id}/locations/{location_id}/datasets/{dataset_id}`
        String[] names = dataset.getName().split("/");
        String retrievedDatasetId = names[names.length - 1];
        System.out.format("Dataset id: %s\n", retrievedDatasetId);
        System.out.format("Dataset display name: %s\n", dataset.getDisplayName());
        System.out.println("Dataset create time:");
        System.out.format("\tseconds: %s\n", dataset.getCreateTime().getSeconds());
        System.out.format("\tnanos: %s\n", dataset.getCreateTime().getNanos());
        System.out.format(
            "Image classification dataset metadata: %s\n",
            dataset.getImageClassificationDatasetMetadata());
      }
    }
  }
}

Node.js

Bevor Sie dieses Beispiel ausprobieren, folgen Sie der Einrichtungsanleitung für diese Sprache auf der Seite Clientbibliotheken.

/**
 * TODO(developer): Uncomment these variables before running the sample.
 */
// const projectId = 'YOUR_PROJECT_ID';
// const location = 'us-central1';

// Imports the Google Cloud AutoML library
const {AutoMlClient} = require('@google-cloud/automl').v1;

// Instantiates a client
const client = new AutoMlClient();

async function listDatasets() {
  // Construct request
  const request = {
    parent: client.locationPath(projectId, location),
    filter: 'translation_dataset_metadata:*',
  };

  const [response] = await client.listDatasets(request);

  console.log('List of datasets:');
  for (const dataset of response) {
    console.log(`Dataset name: ${dataset.name}`);
    console.log(
      `Dataset id: ${
        dataset.name.split('/')[dataset.name.split('/').length - 1]
      }`
    );
    console.log(`Dataset display name: ${dataset.displayName}`);
    console.log('Dataset create time');
    console.log(`\tseconds ${dataset.createTime.seconds}`);
    console.log(`\tnanos ${dataset.createTime.nanos / 1e9}`);
    console.log(
      `Image classification dataset metadata: ${dataset.imageClassificationDatasetMetadata}`
    );
  }
}

listDatasets();

Python

Bevor Sie dieses Beispiel ausprobieren, folgen Sie der Einrichtungsanleitung für diese Sprache auf der Seite Clientbibliotheken.

from google.cloud import automl

# TODO(developer): Uncomment and set the following variables
# project_id = "YOUR_PROJECT_ID"

client = automl.AutoMlClient()
# A resource that represents Google Cloud Platform location.
project_location = f"projects/{project_id}/locations/us-central1"

# List all the datasets available in the region.
request = automl.ListDatasetsRequest(parent=project_location, filter="")
response = client.list_datasets(request=request)

print("List of datasets:")
for dataset in response:
    print(f"Dataset name: {dataset.name}")
    print("Dataset id: {}".format(dataset.name.split("/")[-1]))
    print(f"Dataset display name: {dataset.display_name}")
    print(f"Dataset create time: {dataset.create_time}")
    print(
        "Image classification dataset metadata: {}".format(
            dataset.image_classification_dataset_metadata
        )
    )

Weitere Sprachen

C#: Folgen Sie der Anleitung zur Einrichtung von C# auf der Seite der Clientbibliotheken und rufen Sie dann die AutoML Vision-Referenzdokumentation für .NET auf.

PHP: Folgen Sie der Anleitung zur Einrichtung von PHP auf der Seite der Clientbibliotheken und rufen Sie dann die AutoML Vision-Referenzdokumentation für PHP auf.

Ruby: Folgen Sie der Anleitung zur Einrichtung von Ruby auf der Seite der Clientbibliotheken und rufen Sie dann die AutoML Vision-Referenzdokumentation für Ruby auf.

Dataset abrufen

Sie können auch ein bestimmtes Dataset mithilfe einer Dataset-ID abrufen.

Web-UI

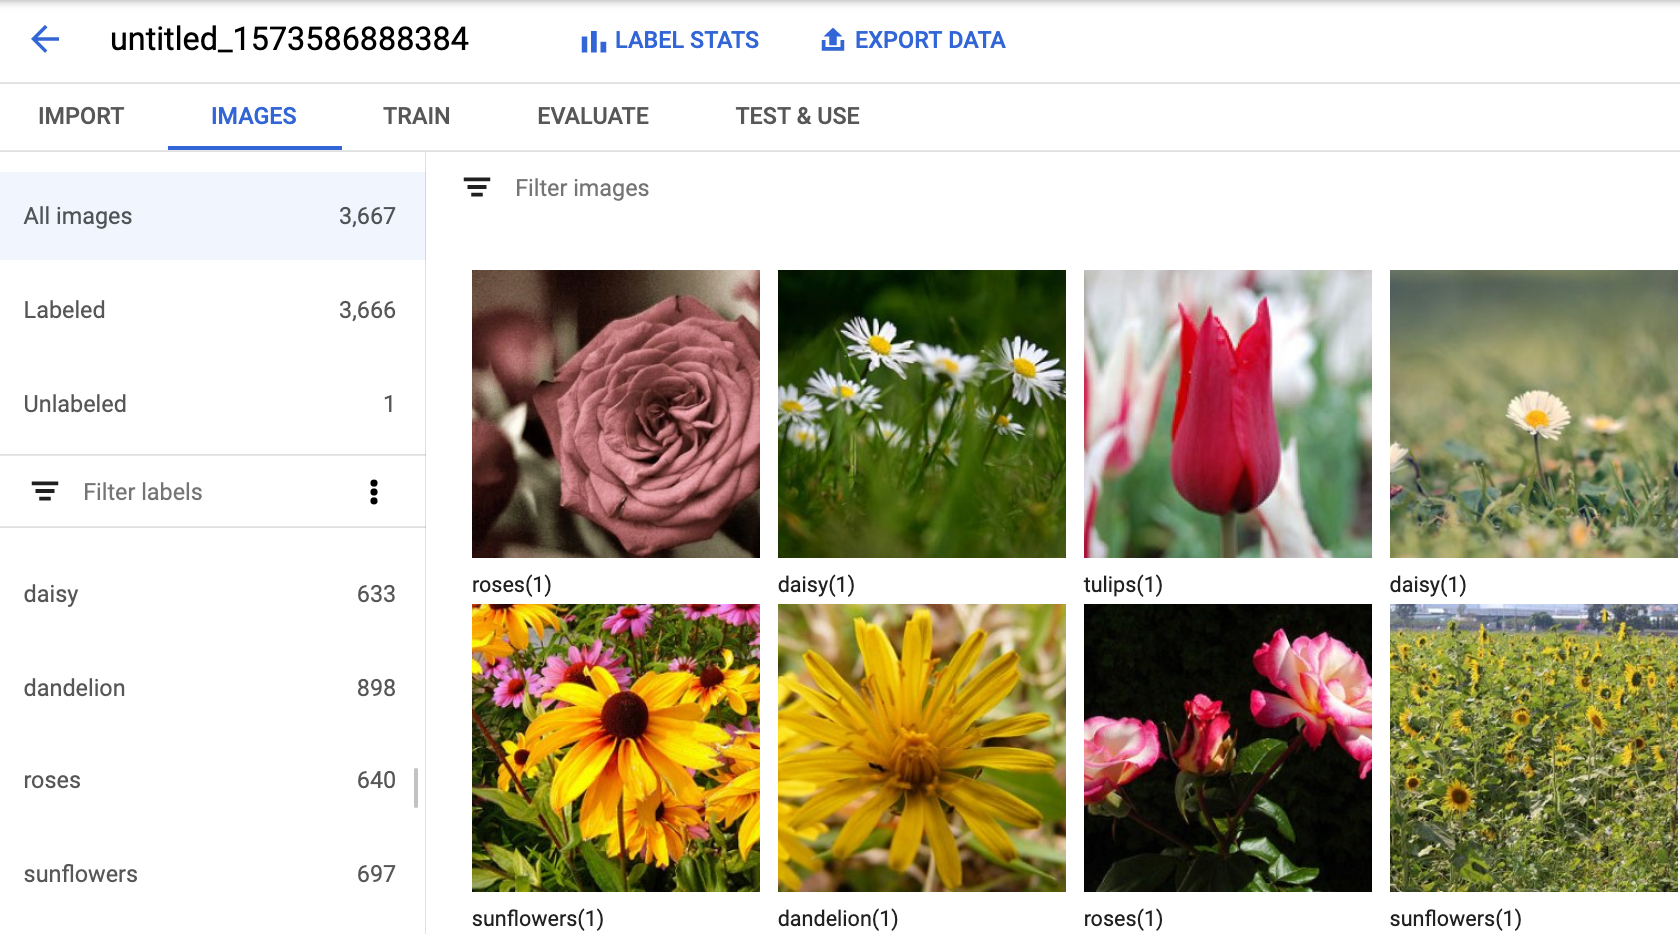
Wenn Sie über die AutoML Vision-UI eine Liste der verfügbaren Datasets aufrufen möchten, klicken Sie links oben im Navigationsmenü auf den Link Datasets.

Seite mit Dataset-Liste

Zum Aufrufen der Datasets für ein anderes Projekt wählen Sie das Projekt aus der Drop-down-Liste auf der linken Seite der Titelleiste aus.

Der Zugriff auf ein bestimmtes Dataset erfolgt durch Auswahl seines Namens aus der Liste.

REST

Ersetzen Sie dabei folgende Werte für die Anfragedaten:

  • project-id: die ID Ihres GCP-Projekts.
  • dataset-id: die ID Ihres Datasets. Die ID ist das letzte Element des Dataset-Namens. Beispiel:
    • Dataset-Name: projects/project-id/locations/location-id/datasets/3104518874390609379
    • Dataset-ID: 3104518874390609379

HTTP-Methode und URL:

GET https://automl.googleapis.com/v1/projects/PROJECT_ID/locations/us-central1/datasets/DATASET_ID

Senden Sie die Anfrage mithilfe einer der folgenden Optionen:

curl

Führen Sie folgenden Befehl aus:

curl -X GET \
-H "Authorization: Bearer $(gcloud auth print-access-token)" \
-H "x-goog-user-project: project-id" \
"https://automl.googleapis.com/v1/projects/PROJECT_ID/locations/us-central1/datasets/DATASET_ID"

PowerShell

Führen Sie folgenden Befehl aus:

$cred = gcloud auth print-access-token
$headers = @{ "Authorization" = "Bearer $cred"; "x-goog-user-project" = "project-id" }

Invoke-WebRequest `
-Method GET `
-Headers $headers `
-Uri "https://automl.googleapis.com/v1/projects/PROJECT_ID/locations/us-central1/datasets/DATASET_ID" | Select-Object -Expand Content

Sie sollten eine JSON-Antwort ähnlich wie diese erhalten:


    {
  "name": "projects/project-id/locations/us-central1/datasets/dataset-id",
  "displayName": "display-name",
  "createTime": "2019-10-29T17:31:12.010290Z",
  "etag": "AB3BwFoP09ffuRNnaWMx4UGi8uvYFctvOBjns84OercuMRIdXr0YINNiUqeW85SB3g4=",
  "exampleCount": 3667,
  "imageClassificationDatasetMetadata": {
    "classificationType": "MULTICLASS"
  }
}

Go

Bevor Sie dieses Beispiel ausprobieren, folgen Sie der Einrichtungsanleitung für diese Sprache auf der Seite Clientbibliotheken.

import (
	"context"
	"fmt"
	"io"

	automl "cloud.google.com/go/automl/apiv1"
	"cloud.google.com/go/automl/apiv1/automlpb"
)

// getDataset gets a dataset.
func getDataset(w io.Writer, projectID string, location string, datasetID string) error {
	// projectID := "my-project-id"
	// location := "us-central1"
	// datasetID := "TRL123456789..."

	ctx := context.Background()
	client, err := automl.NewClient(ctx)
	if err != nil {
		return fmt.Errorf("NewClient: %w", err)
	}
	defer client.Close()

	req := &automlpb.GetDatasetRequest{
		Name: fmt.Sprintf("projects/%s/locations/%s/datasets/%s", projectID, location, datasetID),
	}

	dataset, err := client.GetDataset(ctx, req)
	if err != nil {
		return fmt.Errorf("DeleteDataset: %w", err)
	}

	fmt.Fprintf(w, "Dataset name: %v\n", dataset.GetName())
	fmt.Fprintf(w, "Dataset display name: %v\n", dataset.GetDisplayName())
	fmt.Fprintf(w, "Dataset create time:\n")
	fmt.Fprintf(w, "\tseconds: %v\n", dataset.GetCreateTime().GetSeconds())
	fmt.Fprintf(w, "\tnanos: %v\n", dataset.GetCreateTime().GetNanos())

	// Vision classification
	if metadata := dataset.GetImageClassificationDatasetMetadata(); metadata != nil {
		fmt.Fprintf(w, "Image classification dataset metadata: %v\n", metadata)
	}

	return nil
}

Java

Bevor Sie dieses Beispiel ausprobieren, folgen Sie der Einrichtungsanleitung für diese Sprache auf der Seite Clientbibliotheken.

import com.google.cloud.automl.v1.AutoMlClient;
import com.google.cloud.automl.v1.Dataset;
import com.google.cloud.automl.v1.DatasetName;
import java.io.IOException;

class GetDataset {

  static void getDataset() throws IOException {
    // TODO(developer): Replace these variables before running the sample.
    String projectId = "YOUR_PROJECT_ID";
    String datasetId = "YOUR_DATASET_ID";
    getDataset(projectId, datasetId);
  }

  // Get a dataset
  static void getDataset(String projectId, String datasetId) throws IOException {
    // Initialize client that will be used to send requests. This client only needs to be created
    // once, and can be reused for multiple requests. After completing all of your requests, call
    // the "close" method on the client to safely clean up any remaining background resources.
    try (AutoMlClient client = AutoMlClient.create()) {
      // Get the complete path of the dataset.
      DatasetName datasetFullId = DatasetName.of(projectId, "us-central1", datasetId);
      Dataset dataset = client.getDataset(datasetFullId);

      // Display the dataset information
      System.out.format("Dataset name: %s\n", dataset.getName());
      // To get the dataset id, you have to parse it out of the `name` field. As dataset Ids are
      // required for other methods.
      // Name Form: `projects/{project_id}/locations/{location_id}/datasets/{dataset_id}`
      String[] names = dataset.getName().split("/");
      String retrievedDatasetId = names[names.length - 1];
      System.out.format("Dataset id: %s\n", retrievedDatasetId);
      System.out.format("Dataset display name: %s\n", dataset.getDisplayName());
      System.out.println("Dataset create time:");
      System.out.format("\tseconds: %s\n", dataset.getCreateTime().getSeconds());
      System.out.format("\tnanos: %s\n", dataset.getCreateTime().getNanos());
      System.out.format(
          "Image classification dataset metadata: %s\n",
          dataset.getImageClassificationDatasetMetadata());
    }
  }
}

Node.js

Bevor Sie dieses Beispiel ausprobieren, folgen Sie der Einrichtungsanleitung für diese Sprache auf der Seite Clientbibliotheken.

/**
 * TODO(developer): Uncomment these variables before running the sample.
 */
// const projectId = 'YOUR_PROJECT_ID';
// const location = 'us-central1';
// const datasetId = 'YOUR_DATASET_ID';

// Imports the Google Cloud AutoML library
const {AutoMlClient} = require('@google-cloud/automl').v1;

// Instantiates a client
const client = new AutoMlClient();

async function getDataset() {
  // Construct request
  const request = {
    name: client.datasetPath(projectId, location, datasetId),
  };

  const [response] = await client.getDataset(request);

  console.log(`Dataset name: ${response.name}`);
  console.log(
    `Dataset id: ${
      response.name.split('/')[response.name.split('/').length - 1]
    }`
  );
  console.log(`Dataset display name: ${response.displayName}`);
  console.log('Dataset create time');
  console.log(`\tseconds ${response.createTime.seconds}`);
  console.log(`\tnanos ${response.createTime.nanos / 1e9}`);
  console.log(
    `Image classification dataset metadata: ${response.imageClassificationDatasetMetadata}`
  );
}

getDataset();

Python

Bevor Sie dieses Beispiel ausprobieren, folgen Sie der Einrichtungsanleitung für diese Sprache auf der Seite Clientbibliotheken.

from google.cloud import automl

# TODO(developer): Uncomment and set the following variables
# project_id = "YOUR_PROJECT_ID"
# dataset_id = "YOUR_DATASET_ID"

client = automl.AutoMlClient()
# Get the full path of the dataset
dataset_full_id = client.dataset_path(project_id, "us-central1", dataset_id)
dataset = client.get_dataset(name=dataset_full_id)

# Display the dataset information
print(f"Dataset name: {dataset.name}")
print("Dataset id: {}".format(dataset.name.split("/")[-1]))
print(f"Dataset display name: {dataset.display_name}")
print(f"Dataset create time: {dataset.create_time}")
print(
    "Image classification dataset metadata: {}".format(
        dataset.image_classification_dataset_metadata
    )
)

Dataset exportieren

Sie können eine CSV-Datei mit allen Informationen eines Datasets in einen Google Cloud Storage-Bucket exportieren.

Web-UI

Führen Sie die folgenden Schritte aus, um ein nicht leeres Dataset zu exportieren:

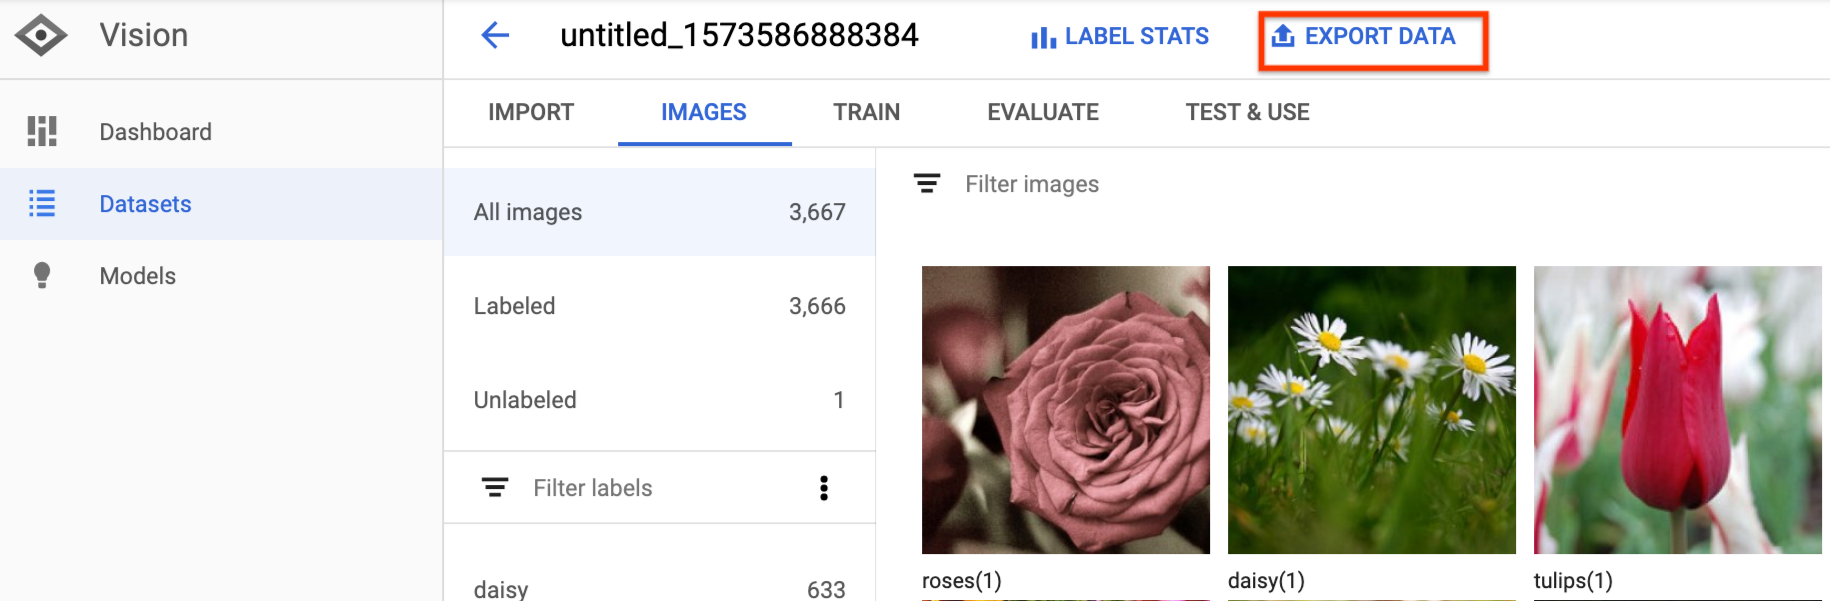
  1. Wählen Sie das nicht leere Dataset auf der Seite Datasets aus.

    Seite mit Dataset-Liste

    Nach Auswahl des nicht leeren Datasets gelangen Sie zur Seite mit den Dataset-Details.

    UI für Trainingsbilder mit Labels

  2. Wählen Sie auf der Seite mit den Dataset-Details die Option Export data (Daten exportieren) aus.

    Schaltfläche zum Exportieren des Datasets

    Daraufhin wird ein Fenster geöffnet, in dem Sie den Speicherort eines Google Cloud Storage-Buckets auswählen oder einen neuen Bucket erstellen und als Speicherort für die CSV-Datei festlegen können.

    Pop-up-Fenster mit Labelstatistik

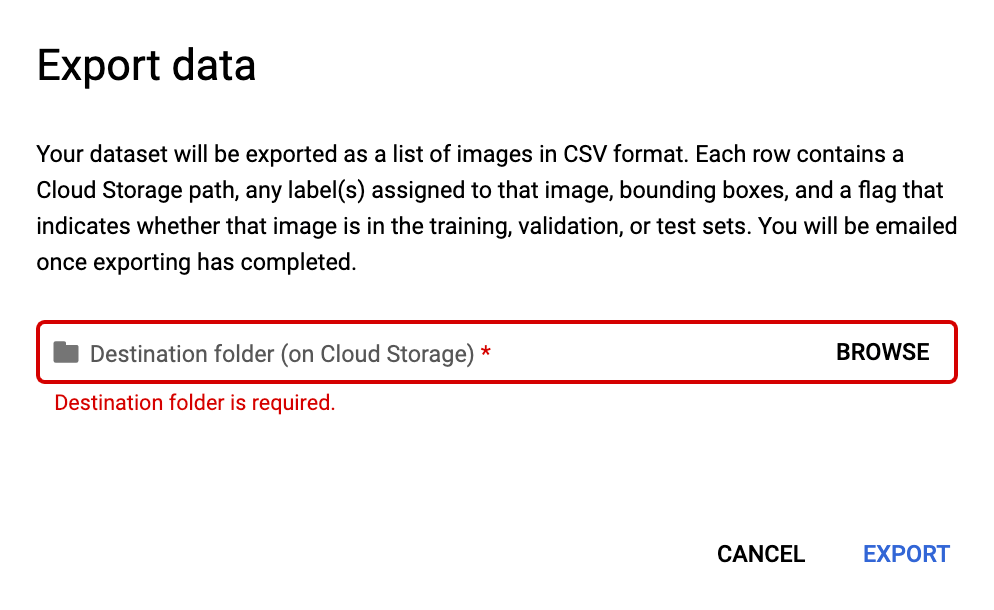
  3. Wählen Sie Export CSV (CSV-Datei exportieren) aus, nachdem Sie einen neuen oder vorhandenen Speicherort für einen Google Cloud Storage-Bucket ausgewählt haben.

    Schaltfläche zum Exportieren der CSV-Datei

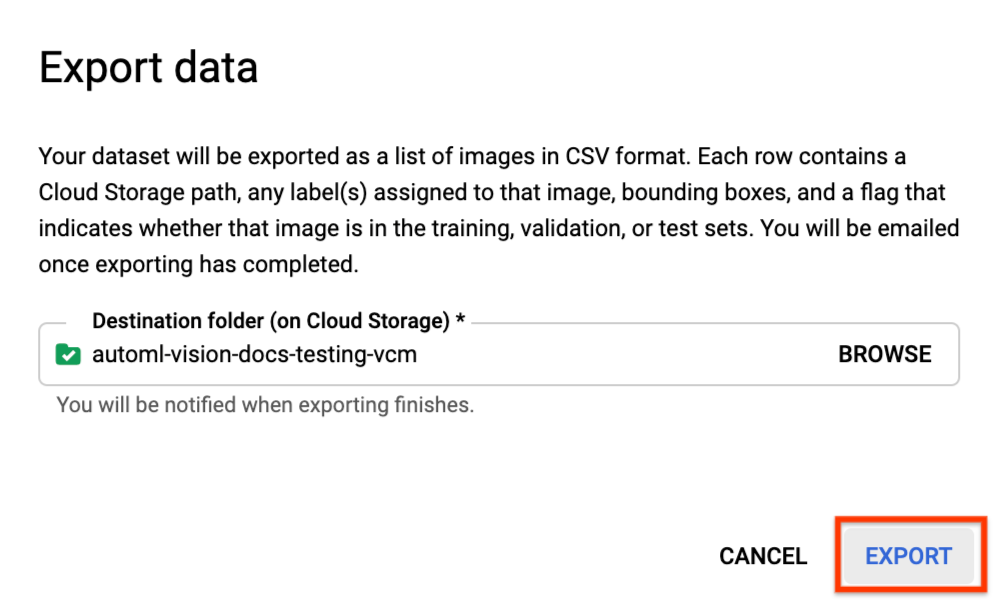
  4. Sie erhalten eine E-Mail, sobald der Datenexport abgeschlossen ist.

REST

Ersetzen Sie dabei folgende Werte für die Anfragedaten:

  • project-id: die ID Ihres GCP-Projekts.
  • dataset-id: die ID Ihres Datasets. Die ID ist das letzte Element des Dataset-Namens. Beispiel:
    • Dataset-Name: projects/project-id/locations/location-id/datasets/3104518874390609379
    • Dataset-ID: 3104518874390609379
  • output-storage-bucket: ein Google Cloud Storage-Bucket/-Verzeichnis, in dem Ausgabedateien gespeichert werden. Dies wird in folgender Form angegeben: gs://bucket/directory/. Der anfragende Nutzer muss Schreibberechtigung für den Bucket haben.

HTTP-Methode und URL:

POST https://automl.googleapis.com/v1/projects/PROJECT_ID/locations/us-central1/datasets/DATASET_ID:exportData

JSON-Text der Anfrage:

{
  "outputConfig": {
    "gcsDestination": {
      "outputUriPrefix": "CLOUD_STORAGE_BUCKET"
    }
  }
}

Wenn Sie die Anfrage senden möchten, wählen Sie eine der folgenden Optionen aus:

curl

Speichern Sie den Anfragetext in einer Datei mit dem Namen request.json und führen Sie den folgenden Befehl aus:

curl -X POST \
-H "Authorization: Bearer $(gcloud auth print-access-token)" \
-H "x-goog-user-project: project-id" \
-H "Content-Type: application/json; charset=utf-8" \
-d @request.json \
"https://automl.googleapis.com/v1/projects/PROJECT_ID/locations/us-central1/datasets/DATASET_ID:exportData"

PowerShell

Speichern Sie den Anfragetext in einer Datei mit dem Namen request.json und führen Sie den folgenden Befehl aus:

$cred = gcloud auth print-access-token
$headers = @{ "Authorization" = "Bearer $cred"; "x-goog-user-project" = "project-id" }

Invoke-WebRequest `
-Method POST `
-Headers $headers `
-ContentType: "application/json; charset=utf-8" `
-InFile request.json `
-Uri "https://automl.googleapis.com/v1/projects/PROJECT_ID/locations/us-central1/datasets/DATASET_ID:exportData" | Select-Object -Expand Content

Die Ausgabe sieht in etwa so aus: Sie können den Status der Aufgabe anhand der Vorgangs-ID abrufen. Ein Beispiel finden Sie unter Mit lang andauernden Vorgängen arbeiten.

{
  "name": "projects/PROJECT_ID/locations/us-central1/operations/OPERATION_ID",
  "metadata": {
    "@type": "type.googleapis.com/google.cloud.automl.v1.OperationMetadata",
    "createTime": "2019-08-12T18:52:31.637075Z",
    "updateTime": "2019-08-12T18:52:31.637075Z",
    "exportDataDetails": {
      "outputInfo": {
        "gcsOutputDirectory": "CLOUD_STORAGE_BUCKET/export_data-DATASET_NAME-TIMESTAMP_OF_EXPORT_CALL/"
      }
    }
  }
}

Java

Bevor Sie dieses Beispiel ausprobieren, folgen Sie der Einrichtungsanleitung für diese Sprache auf der Seite Clientbibliotheken.

import com.google.cloud.automl.v1.AutoMlClient;
import com.google.cloud.automl.v1.DatasetName;
import com.google.cloud.automl.v1.GcsDestination;
import com.google.cloud.automl.v1.OutputConfig;
import com.google.protobuf.Empty;
import java.io.IOException;
import java.util.concurrent.ExecutionException;

class ExportDataset {

  static void exportDataset() throws IOException, ExecutionException, InterruptedException {
    // TODO(developer): Replace these variables before running the sample.
    String projectId = "YOUR_PROJECT_ID";
    String datasetId = "YOUR_DATASET_ID";
    String gcsUri = "gs://BUCKET_ID/path_to_export/";
    exportDataset(projectId, datasetId, gcsUri);
  }

  // Export a dataset to a GCS bucket
  static void exportDataset(String projectId, String datasetId, String gcsUri)
      throws IOException, ExecutionException, InterruptedException {
    // Initialize client that will be used to send requests. This client only needs to be created
    // once, and can be reused for multiple requests. After completing all of your requests, call
    // the "close" method on the client to safely clean up any remaining background resources.
    try (AutoMlClient client = AutoMlClient.create()) {
      // Get the complete path of the dataset.
      DatasetName datasetFullId = DatasetName.of(projectId, "us-central1", datasetId);
      GcsDestination gcsDestination =
          GcsDestination.newBuilder().setOutputUriPrefix(gcsUri).build();

      // Export the dataset to the output URI.
      OutputConfig outputConfig =
          OutputConfig.newBuilder().setGcsDestination(gcsDestination).build();

      System.out.println("Processing export...");
      Empty response = client.exportDataAsync(datasetFullId, outputConfig).get();
      System.out.format("Dataset exported. %s\n", response);
    }
  }
}

Node.js

Bevor Sie dieses Beispiel ausprobieren, folgen Sie der Einrichtungsanleitung für diese Sprache auf der Seite Clientbibliotheken.

/**
 * TODO(developer): Uncomment these variables before running the sample.
 */
// const projectId = 'YOUR_PROJECT_ID';
// const location = 'us-central1';
// const datasetId = 'YOUR_DATASET_ID';
// const gcsUri = 'gs://BUCKET_ID/path_to_export/';

// Imports the Google Cloud AutoML library
const {AutoMlClient} = require('@google-cloud/automl').v1;

// Instantiates a client
const client = new AutoMlClient();

async function exportDataset() {
  // Construct request
  const request = {
    name: client.datasetPath(projectId, location, datasetId),
    outputConfig: {
      gcsDestination: {
        outputUriPrefix: gcsUri,
      },
    },
  };

  const [operation] = await client.exportData(request);
  // Wait for operation to complete.
  const [response] = await operation.promise();
  console.log(`Dataset exported: ${response}`);
}

exportDataset();

Python

Bevor Sie dieses Beispiel ausprobieren, folgen Sie der Einrichtungsanleitung für diese Sprache auf der Seite Clientbibliotheken.

from google.cloud import automl

# TODO(developer): Uncomment and set the following variables
# project_id = "YOUR_PROJECT_ID"
# dataset_id = "YOUR_DATASET_ID"
# gcs_uri = "gs://YOUR_BUCKET_ID/path/to/export/"

client = automl.AutoMlClient()

# Get the full path of the dataset
dataset_full_id = client.dataset_path(project_id, "us-central1", dataset_id)

gcs_destination = automl.GcsDestination(output_uri_prefix=gcs_uri)
output_config = automl.OutputConfig(gcs_destination=gcs_destination)

response = client.export_data(name=dataset_full_id, output_config=output_config)
print(f"Dataset exported. {response.result()}")

Exportiertes CSV-Format

Die exportierte CSV-Datei hat dasselbe Format wie die CSV-Datei zum Importieren der Trainingsdaten:

set,path,label0[,label1,label2,...]

Diese CSV-Datei wird in einem erstellten Exportordner gespeichert, der durch einen eindeutigen Zeitstempel gekennzeichnet ist. Im Folgenden sehen Sie einige Beispielzeilen aus einer exportierten CSV-Datei:

my-storage-bucket/export_data-my_dataset_name-2019-11-08T22:28:13.081Z/image_classification_1.csv:

TRAIN,gs://my-storage-bucket/export_data-my_dataset_name-2019-11-08T22:28:13.081Z/files/img874.jpg,dandelion
VALIDATION,gs://my-storage-bucket/export_data-my_dataset_name-2019-11-08T22:28:13.081Z/files/img447.jpg,roses
TRAIN,gs://my-storage-bucket/export_data-my_dataset_name-2019-11-08T22:28:13.081Z/files/img672.jpg,dandelion
VALIDATION,gs://my-storage-bucket/export_data-my_dataset_name-2019-11-08T22:28:13.081Z/files/img421.jpg,sunflowers
TRAIN,gs://my-storage-bucket/export_data-my_dataset_name-2019-11-08T22:28:13.081Z/files/img495.jpg,tulips
TEST,gs://my-storage-bucket/export_data-my_dataset_name-2019-11-08T22:28:13.081Z/files/img014.jpg,sunflowers

Dataset löschen

Sie können ein nicht mehr benötigtes Dataset über die UI oder mit der ID des Datasets anhand der folgenden Codebeispiele löschen.

Web-UI

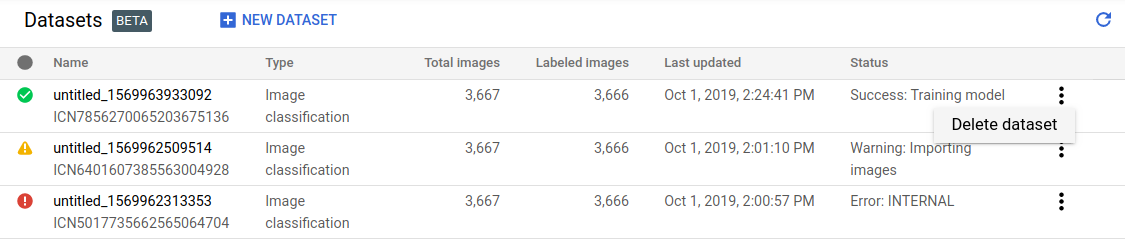
  1. Klicken Sie im Vision Dashboard links oben im Navigationsmenü auf den Link Datasets, um die Liste der verfügbaren Datasets aufzurufen.

  2. Klicken Sie auf das Dreipunkt-Menü ganz rechts in der zu löschenden Zeile und wählen Sie Delete dataset (Dataset löschen) aus.

  3. Klicken Sie im Dialogfeld zur Bestätigung auf Delete (Löschen).

    Seite „Dataset-Liste“

REST

Ersetzen Sie dabei folgende Werte für die Anfragedaten:

  • project-id: die ID Ihres GCP-Projekts.
  • dataset-id: die ID Ihres Datasets. Die ID ist das letzte Element des Dataset-Namens. Beispiel:
    • Dataset-Name: projects/project-id/locations/location-id/datasets/3104518874390609379
    • Dataset-ID: 3104518874390609379

HTTP-Methode und URL:

DELETE https://automl.googleapis.com/v1/projects/PROJECT_ID/locations/us-central1/datasets/DATASET_ID

Senden Sie die Anfrage mithilfe einer der folgenden Optionen:

curl

Führen Sie folgenden Befehl aus:

curl -X DELETE \
-H "Authorization: Bearer $(gcloud auth print-access-token)" \
-H "x-goog-user-project: project-id" \
"https://automl.googleapis.com/v1/projects/PROJECT_ID/locations/us-central1/datasets/DATASET_ID"

PowerShell

Führen Sie folgenden Befehl aus:

$cred = gcloud auth print-access-token
$headers = @{ "Authorization" = "Bearer $cred"; "x-goog-user-project" = "project-id" }

Invoke-WebRequest `
-Method DELETE `
-Headers $headers `
-Uri "https://automl.googleapis.com/v1/projects/PROJECT_ID/locations/us-central1/datasets/DATASET_ID" | Select-Object -Expand Content

Die Ausgabe sieht in etwa so aus: Sie können den Status der Aufgabe anhand der Vorgangs-ID abrufen. Ein Beispiel finden Sie unter Mit lang andauernden Vorgängen arbeiten.

{
  "name": "projects/PROJECT_ID/locations/us-central1/operations/OPERATION_ID",
  "metadata": {
    "@type": "type.googleapis.com/google.cloud.automl.v1.OperationMetadata",
    "createTime": "2019-11-08T22:37:19.822128Z",
    "updateTime": "2019-11-08T22:37:19.822128Z",
    "deleteDetails": {}
  },
  "done": true,
  "response": {
    "@type": "type.googleapis.com/google.protobuf.Empty"
  }
}

Go

Bevor Sie dieses Beispiel ausprobieren, folgen Sie der Einrichtungsanleitung für diese Sprache auf der Seite Clientbibliotheken.

import (
	"context"
	"fmt"
	"io"

	automl "cloud.google.com/go/automl/apiv1"
	"cloud.google.com/go/automl/apiv1/automlpb"
)

// deleteDataset deletes a dataset.
func deleteDataset(w io.Writer, projectID string, location string, datasetID string) error {
	// projectID := "my-project-id"
	// location := "us-central1"
	// datasetID := "TRL123456789..."

	ctx := context.Background()
	client, err := automl.NewClient(ctx)
	if err != nil {
		return fmt.Errorf("NewClient: %w", err)
	}
	defer client.Close()

	req := &automlpb.DeleteDatasetRequest{
		Name: fmt.Sprintf("projects/%s/locations/%s/datasets/%s", projectID, location, datasetID),
	}

	op, err := client.DeleteDataset(ctx, req)
	if err != nil {
		return fmt.Errorf("DeleteDataset: %w", err)
	}
	fmt.Fprintf(w, "Processing operation name: %q\n", op.Name())

	if err := op.Wait(ctx); err != nil {
		return fmt.Errorf("Wait: %w", err)
	}

	fmt.Fprintf(w, "Dataset deleted.\n")

	return nil
}

Java

Bevor Sie dieses Beispiel ausprobieren, folgen Sie der Einrichtungsanleitung für diese Sprache auf der Seite Clientbibliotheken.

import com.google.cloud.automl.v1.AutoMlClient;
import com.google.cloud.automl.v1.DatasetName;
import com.google.protobuf.Empty;
import java.io.IOException;
import java.util.concurrent.ExecutionException;

class DeleteDataset {

  static void deleteDataset() throws IOException, ExecutionException, InterruptedException {
    // TODO(developer): Replace these variables before running the sample.
    String projectId = "YOUR_PROJECT_ID";
    String datasetId = "YOUR_DATASET_ID";
    deleteDataset(projectId, datasetId);
  }

  // Delete a dataset
  static void deleteDataset(String projectId, String datasetId)
      throws IOException, ExecutionException, InterruptedException {
    // Initialize client that will be used to send requests. This client only needs to be created
    // once, and can be reused for multiple requests. After completing all of your requests, call
    // the "close" method on the client to safely clean up any remaining background resources.
    try (AutoMlClient client = AutoMlClient.create()) {
      // Get the full path of the dataset.
      DatasetName datasetFullId = DatasetName.of(projectId, "us-central1", datasetId);
      Empty response = client.deleteDatasetAsync(datasetFullId).get();
      System.out.format("Dataset deleted. %s\n", response);
    }
  }
}

Node.js

Bevor Sie dieses Beispiel ausprobieren, folgen Sie der Einrichtungsanleitung für diese Sprache auf der Seite Clientbibliotheken.

/**
 * TODO(developer): Uncomment these variables before running the sample.
 */
// const projectId = 'YOUR_PROJECT_ID';
// const location = 'us-central1';
// const datasetId = 'YOUR_DATASET_ID';

// Imports the Google Cloud AutoML library
const {AutoMlClient} = require('@google-cloud/automl').v1;

// Instantiates a client
const client = new AutoMlClient();

async function deleteDataset() {
  // Construct request
  const request = {
    name: client.datasetPath(projectId, location, datasetId),
  };

  const [operation] = await client.deleteDataset(request);

  // Wait for operation to complete.
  const [response] = await operation.promise();
  console.log(`Dataset deleted: ${response}`);
}

deleteDataset();

Python

Bevor Sie dieses Beispiel ausprobieren, folgen Sie der Einrichtungsanleitung für diese Sprache auf der Seite Clientbibliotheken.

from google.cloud import automl

# TODO(developer): Uncomment and set the following variables
# project_id = "YOUR_PROJECT_ID"
# dataset_id = "YOUR_DATASET_ID"

client = automl.AutoMlClient()
# Get the full path of the dataset
dataset_full_id = client.dataset_path(project_id, "us-central1", dataset_id)
response = client.delete_dataset(name=dataset_full_id)

print(f"Dataset deleted. {response.result()}")