データセットの管理

1 つのプロジェクトに複数のデータセットを含めることができ、それぞれ別個のモデルのトレーニングに使用されます。使用可能なデータセットの一覧表示、特定のデータセットの取得、データセットのエクスポート、不要になったデータセットの削除を行うことができます。

データセットの一覧表示

このセクションでは、プロジェクトで使用できるデータセットを一覧表示する方法を説明します。

ウェブ UI

Vision Dashboard を使用して利用可能なデータセットを一覧表示するには、左側のナビゲーション メニューの上部にある [データセット] リンクをクリックします。

データセット一覧ページ

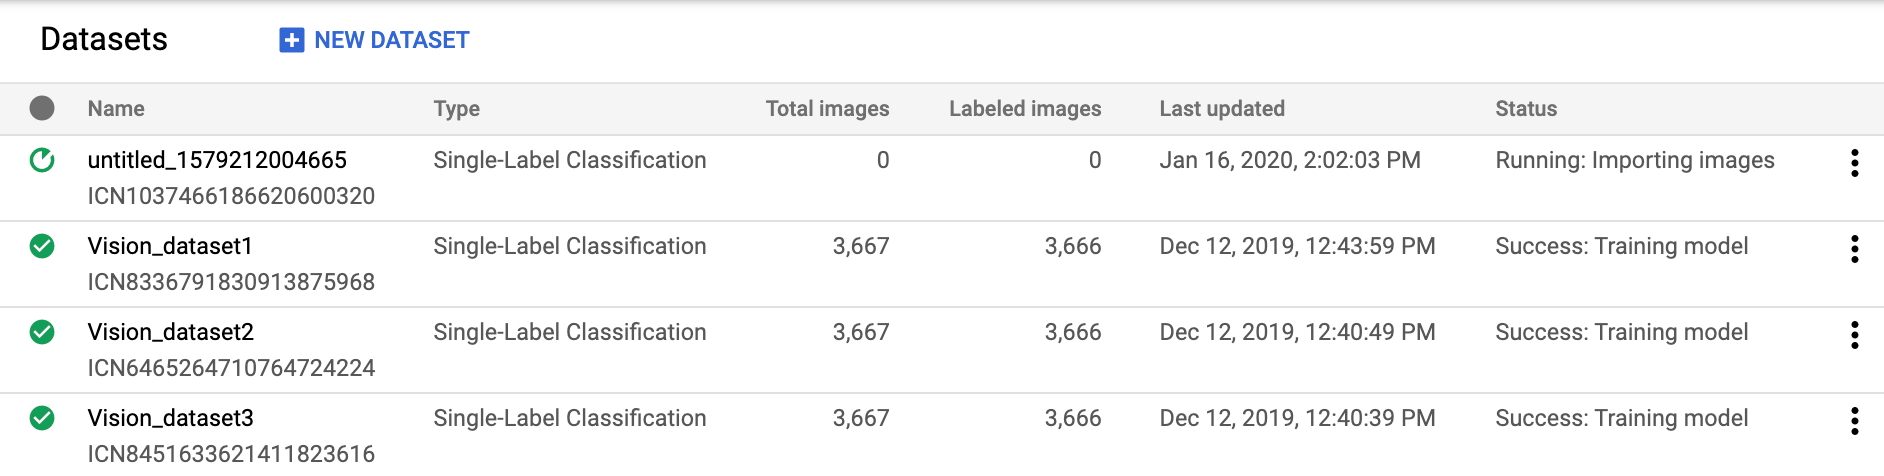
別のプロジェクトのデータセットを表示するには、タイトルバーの右上にあるプルダウン リストからプロジェクトを選択します。

REST

リクエストのデータを使用する前に、次のように置き換えます。

  • project-id: GCP プロジェクト ID

HTTP メソッドと URL:

GET https://automl.googleapis.com/v1/projects/PROJECT_ID/locations/us-central1/datasets

リクエストを送信するには、次のいずれかのオプションを選択します。

curl

次のコマンドを実行します。

curl -X GET \
-H "Authorization: Bearer $(gcloud auth print-access-token)" \
-H "x-goog-user-project: project-id" \
"https://automl.googleapis.com/v1/projects/PROJECT_ID/locations/us-central1/datasets"

PowerShell

次のコマンドを実行します。

$cred = gcloud auth print-access-token
$headers = @{ "Authorization" = "Bearer $cred"; "x-goog-user-project" = "project-id" }

Invoke-WebRequest `
-Method GET `
-Headers $headers `
-Uri "https://automl.googleapis.com/v1/projects/PROJECT_ID/locations/us-central1/datasets" | Select-Object -Expand Content

次のような JSON レスポンスが返されます。


    {
  "datasets": [
    {
      "name": "projects/project-id/locations/us-central1/datasets/dataset-id",
      "displayName": "my_new_dataset",
      "createTime": "2019-10-29T17:31:12.010290Z",
      "etag": "AB3BwFpNUaguCwKeQWtUKLBPQhZr7omCCUBz77pACPIINFpyFe7vbGhp9oZLEEGhIeM=",
      "exampleCount": 3667,
      "imageClassificationDatasetMetadata": {
        "classificationType": "MULTICLASS"
      }
    },
    {
      "name": "projects/project-id/locations/us-central1/datasets/dataset-id",
      "displayName": "new_dataset",
      "createTime": "2019-10-02T00:44:57.821275Z",
      "etag": "AB3BwFpU_ueMZtTD_8dt-9r8BWqunqMC76YbAbmQYQsQEbtQTxs6U3rPpgAMDCXhYPGq",
      "imageClassificationDatasetMetadata": {
        "classificationType": "MULTICLASS"
      }
    }
  ]
}

Go

このサンプルを試す前に、クライアント ライブラリ ページを参照して、この言語の設定手順を完了してください。

import (
	"context"
	"fmt"
	"io"

	automl "cloud.google.com/go/automl/apiv1"
	"cloud.google.com/go/automl/apiv1/automlpb"
	"google.golang.org/api/iterator"
)

// listDatasets lists existing datasets.
func listDatasets(w io.Writer, projectID string, location string) error {
	// projectID := "my-project-id"
	// location := "us-central1"

	ctx := context.Background()
	client, err := automl.NewClient(ctx)
	if err != nil {
		return fmt.Errorf("NewClient: %w", err)
	}
	defer client.Close()

	req := &automlpb.ListDatasetsRequest{
		Parent: fmt.Sprintf("projects/%s/locations/%s", projectID, location),
	}

	it := client.ListDatasets(ctx, req)

	// Iterate over all results
	for {
		dataset, err := it.Next()
		if err == iterator.Done {
			break
		}
		if err != nil {
			return fmt.Errorf("ListGlossaries.Next: %w", err)
		}

		fmt.Fprintf(w, "Dataset name: %v\n", dataset.GetName())
		fmt.Fprintf(w, "Dataset display name: %v\n", dataset.GetDisplayName())
		fmt.Fprintf(w, "Dataset create time:\n")
		fmt.Fprintf(w, "\tseconds: %v\n", dataset.GetCreateTime().GetSeconds())
		fmt.Fprintf(w, "\tnanos: %v\n", dataset.GetCreateTime().GetNanos())

		// Vision classification
		if metadata := dataset.GetImageClassificationDatasetMetadata(); metadata != nil {
			fmt.Fprintf(w, "Image classification dataset metadata: %v\n", metadata)
		}

	}

	return nil
}

Java

このサンプルを試す前に、クライアント ライブラリ ページを参照して、この言語の設定手順を完了してください。

import com.google.cloud.automl.v1.AutoMlClient;
import com.google.cloud.automl.v1.Dataset;
import com.google.cloud.automl.v1.ListDatasetsRequest;
import com.google.cloud.automl.v1.LocationName;
import java.io.IOException;

class ListDatasets {

  static void listDatasets() throws IOException {
    // TODO(developer): Replace these variables before running the sample.
    String projectId = "YOUR_PROJECT_ID";
    listDatasets(projectId);
  }

  // List the datasets
  static void listDatasets(String projectId) throws IOException {
    // Initialize client that will be used to send requests. This client only needs to be created
    // once, and can be reused for multiple requests. After completing all of your requests, call
    // the "close" method on the client to safely clean up any remaining background resources.
    try (AutoMlClient client = AutoMlClient.create()) {
      // A resource that represents Google Cloud Platform location.
      LocationName projectLocation = LocationName.of(projectId, "us-central1");
      ListDatasetsRequest request =
          ListDatasetsRequest.newBuilder().setParent(projectLocation.toString()).build();

      // List all the datasets available in the region by applying filter.
      System.out.println("List of datasets:");
      for (Dataset dataset : client.listDatasets(request).iterateAll()) {
        // Display the dataset information
        System.out.format("\nDataset name: %s\n", dataset.getName());
        // To get the dataset id, you have to parse it out of the `name` field. As dataset Ids are
        // required for other methods.
        // Name Form: `projects/{project_id}/locations/{location_id}/datasets/{dataset_id}`
        String[] names = dataset.getName().split("/");
        String retrievedDatasetId = names[names.length - 1];
        System.out.format("Dataset id: %s\n", retrievedDatasetId);
        System.out.format("Dataset display name: %s\n", dataset.getDisplayName());
        System.out.println("Dataset create time:");
        System.out.format("\tseconds: %s\n", dataset.getCreateTime().getSeconds());
        System.out.format("\tnanos: %s\n", dataset.getCreateTime().getNanos());
        System.out.format(
            "Image classification dataset metadata: %s\n",
            dataset.getImageClassificationDatasetMetadata());
      }
    }
  }
}

Node.js

このサンプルを試す前に、クライアント ライブラリ ページを参照して、この言語の設定手順を完了してください。

/**
 * TODO(developer): Uncomment these variables before running the sample.
 */
// const projectId = 'YOUR_PROJECT_ID';
// const location = 'us-central1';

// Imports the Google Cloud AutoML library
const {AutoMlClient} = require('@google-cloud/automl').v1;

// Instantiates a client
const client = new AutoMlClient();

async function listDatasets() {
  // Construct request
  const request = {
    parent: client.locationPath(projectId, location),
    filter: 'translation_dataset_metadata:*',
  };

  const [response] = await client.listDatasets(request);

  console.log('List of datasets:');
  for (const dataset of response) {
    console.log(`Dataset name: ${dataset.name}`);
    console.log(
      `Dataset id: ${
        dataset.name.split('/')[dataset.name.split('/').length - 1]
      }`
    );
    console.log(`Dataset display name: ${dataset.displayName}`);
    console.log('Dataset create time');
    console.log(`\tseconds ${dataset.createTime.seconds}`);
    console.log(`\tnanos ${dataset.createTime.nanos / 1e9}`);
    console.log(
      `Image classification dataset metadata: ${dataset.imageClassificationDatasetMetadata}`
    );
  }
}

listDatasets();

Python

このサンプルを試す前に、クライアント ライブラリ ページを参照して、この言語の設定手順を完了してください。

from google.cloud import automl

# TODO(developer): Uncomment and set the following variables
# project_id = "YOUR_PROJECT_ID"

client = automl.AutoMlClient()
# A resource that represents Google Cloud Platform location.
project_location = f"projects/{project_id}/locations/us-central1"

# List all the datasets available in the region.
request = automl.ListDatasetsRequest(parent=project_location, filter="")
response = client.list_datasets(request=request)

print("List of datasets:")
for dataset in response:
    print(f"Dataset name: {dataset.name}")
    print("Dataset id: {}".format(dataset.name.split("/")[-1]))
    print(f"Dataset display name: {dataset.display_name}")
    print(f"Dataset create time: {dataset.create_time}")
    print(
        "Image classification dataset metadata: {}".format(
            dataset.image_classification_dataset_metadata
        )
    )

その他の言語

C#: クライアント ライブラリ ページの C# の設定手順を行ってから、.NET 用の AutoML Vision リファレンス ドキュメントをご覧ください。

PHP: クライアント ライブラリ ページの PHP の設定手順を行ってから、PHP 用の AutoML Vision リファレンス ドキュメントをご覧ください。

Ruby: クライアント ライブラリ ページの Ruby の設定手順を行ってから、Ruby 用の AutoML Vision リファレンス ドキュメントをご覧ください。

データセットの取得

データセット ID を使用して、特定のデータセットを取得できます。

ウェブ UI

AutoML Vision UI を使用して使用可能なデータセットを一覧表示するには、左側のナビゲーション メニューの上部にある [データセット] リンクをクリックします。

データセット一覧ページ

別のプロジェクトのデータセットを表示するには、タイトルバーの左側にあるプルダウン リストからプロジェクトを選択します。

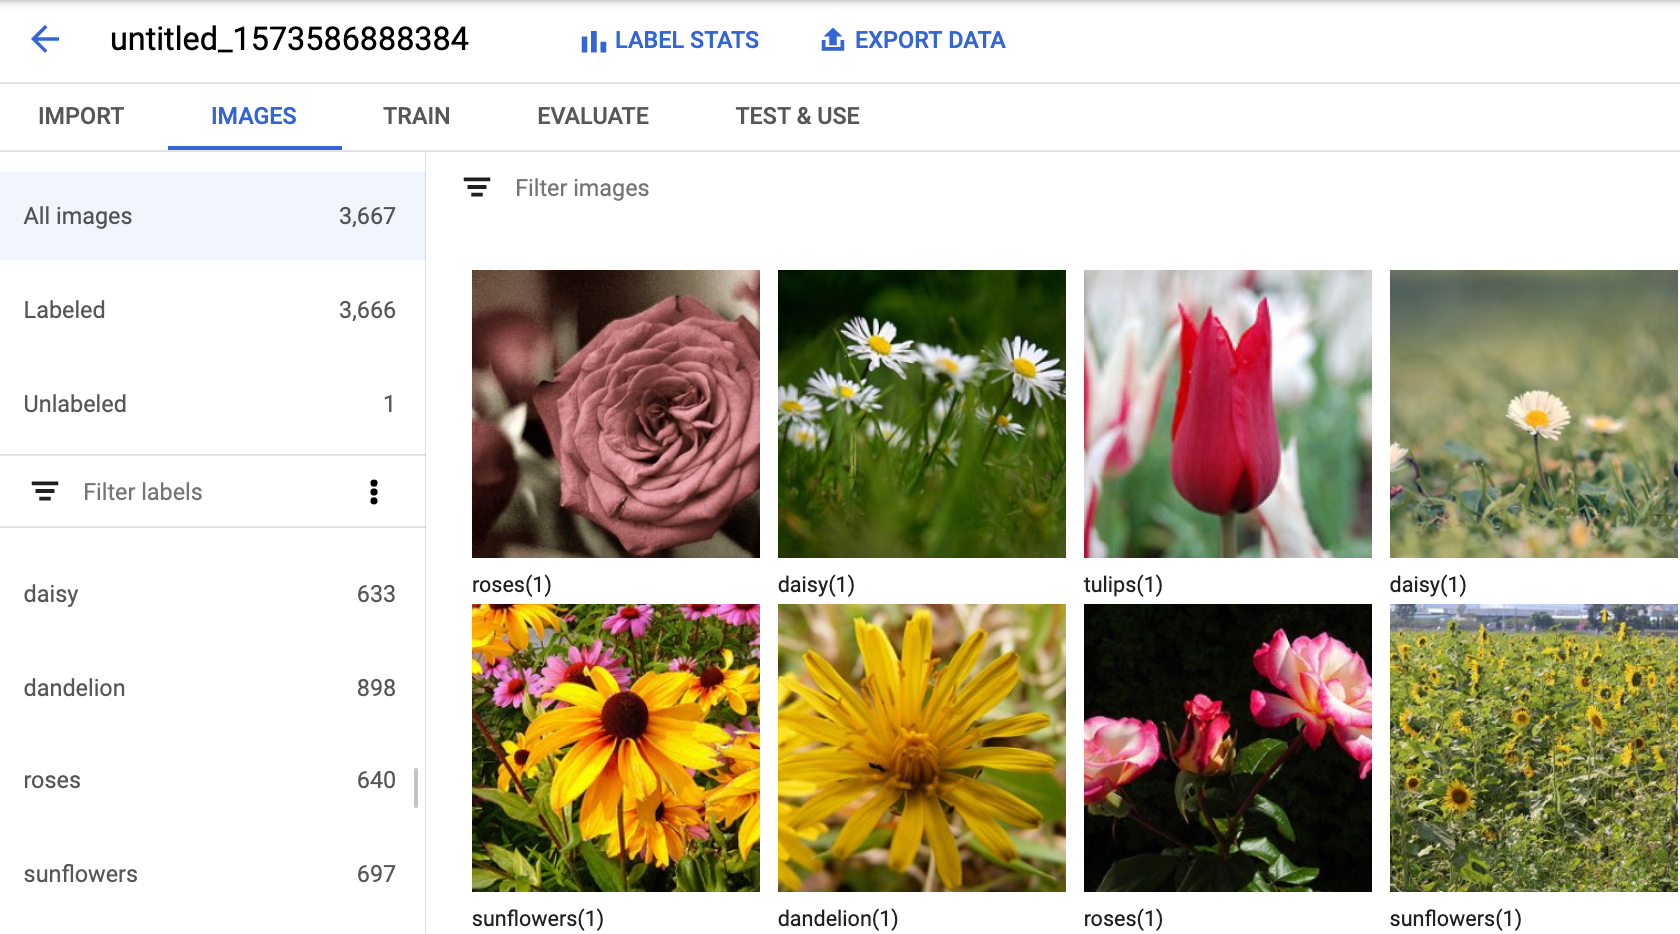
リストから名前を選択して、特定のデータセットにアクセスします。

REST

リクエストのデータを使用する前に、次のように置き換えます。

  • project-id: GCP プロジェクト ID
  • dataset-id: データセットの IDこの ID は、データセットの名前の最後の要素です。例:
    • データセット名: projects/project-id/locations/location-id/datasets/3104518874390609379
    • データセット ID: 3104518874390609379

HTTP メソッドと URL:

GET https://automl.googleapis.com/v1/projects/PROJECT_ID/locations/us-central1/datasets/DATASET_ID

リクエストを送信するには、次のいずれかのオプションを選択します。

curl

次のコマンドを実行します。

curl -X GET \
-H "Authorization: Bearer $(gcloud auth print-access-token)" \
-H "x-goog-user-project: project-id" \
"https://automl.googleapis.com/v1/projects/PROJECT_ID/locations/us-central1/datasets/DATASET_ID"

PowerShell

次のコマンドを実行します。

$cred = gcloud auth print-access-token
$headers = @{ "Authorization" = "Bearer $cred"; "x-goog-user-project" = "project-id" }

Invoke-WebRequest `
-Method GET `
-Headers $headers `
-Uri "https://automl.googleapis.com/v1/projects/PROJECT_ID/locations/us-central1/datasets/DATASET_ID" | Select-Object -Expand Content

次のような JSON レスポンスが返されます。


    {
  "name": "projects/project-id/locations/us-central1/datasets/dataset-id",
  "displayName": "display-name",
  "createTime": "2019-10-29T17:31:12.010290Z",
  "etag": "AB3BwFoP09ffuRNnaWMx4UGi8uvYFctvOBjns84OercuMRIdXr0YINNiUqeW85SB3g4=",
  "exampleCount": 3667,
  "imageClassificationDatasetMetadata": {
    "classificationType": "MULTICLASS"
  }
}

Go

このサンプルを試す前に、クライアント ライブラリ ページを参照して、この言語の設定手順を完了してください。

import (
	"context"
	"fmt"
	"io"

	automl "cloud.google.com/go/automl/apiv1"
	"cloud.google.com/go/automl/apiv1/automlpb"
)

// getDataset gets a dataset.
func getDataset(w io.Writer, projectID string, location string, datasetID string) error {
	// projectID := "my-project-id"
	// location := "us-central1"
	// datasetID := "TRL123456789..."

	ctx := context.Background()
	client, err := automl.NewClient(ctx)
	if err != nil {
		return fmt.Errorf("NewClient: %w", err)
	}
	defer client.Close()

	req := &automlpb.GetDatasetRequest{
		Name: fmt.Sprintf("projects/%s/locations/%s/datasets/%s", projectID, location, datasetID),
	}

	dataset, err := client.GetDataset(ctx, req)
	if err != nil {
		return fmt.Errorf("DeleteDataset: %w", err)
	}

	fmt.Fprintf(w, "Dataset name: %v\n", dataset.GetName())
	fmt.Fprintf(w, "Dataset display name: %v\n", dataset.GetDisplayName())
	fmt.Fprintf(w, "Dataset create time:\n")
	fmt.Fprintf(w, "\tseconds: %v\n", dataset.GetCreateTime().GetSeconds())
	fmt.Fprintf(w, "\tnanos: %v\n", dataset.GetCreateTime().GetNanos())

	// Vision classification
	if metadata := dataset.GetImageClassificationDatasetMetadata(); metadata != nil {
		fmt.Fprintf(w, "Image classification dataset metadata: %v\n", metadata)
	}

	return nil
}

Java

このサンプルを試す前に、クライアント ライブラリ ページを参照して、この言語の設定手順を完了してください。

import com.google.cloud.automl.v1.AutoMlClient;
import com.google.cloud.automl.v1.Dataset;
import com.google.cloud.automl.v1.DatasetName;
import java.io.IOException;

class GetDataset {

  static void getDataset() throws IOException {
    // TODO(developer): Replace these variables before running the sample.
    String projectId = "YOUR_PROJECT_ID";
    String datasetId = "YOUR_DATASET_ID";
    getDataset(projectId, datasetId);
  }

  // Get a dataset
  static void getDataset(String projectId, String datasetId) throws IOException {
    // Initialize client that will be used to send requests. This client only needs to be created
    // once, and can be reused for multiple requests. After completing all of your requests, call
    // the "close" method on the client to safely clean up any remaining background resources.
    try (AutoMlClient client = AutoMlClient.create()) {
      // Get the complete path of the dataset.
      DatasetName datasetFullId = DatasetName.of(projectId, "us-central1", datasetId);
      Dataset dataset = client.getDataset(datasetFullId);

      // Display the dataset information
      System.out.format("Dataset name: %s\n", dataset.getName());
      // To get the dataset id, you have to parse it out of the `name` field. As dataset Ids are
      // required for other methods.
      // Name Form: `projects/{project_id}/locations/{location_id}/datasets/{dataset_id}`
      String[] names = dataset.getName().split("/");
      String retrievedDatasetId = names[names.length - 1];
      System.out.format("Dataset id: %s\n", retrievedDatasetId);
      System.out.format("Dataset display name: %s\n", dataset.getDisplayName());
      System.out.println("Dataset create time:");
      System.out.format("\tseconds: %s\n", dataset.getCreateTime().getSeconds());
      System.out.format("\tnanos: %s\n", dataset.getCreateTime().getNanos());
      System.out.format(
          "Image classification dataset metadata: %s\n",
          dataset.getImageClassificationDatasetMetadata());
    }
  }
}

Node.js

このサンプルを試す前に、クライアント ライブラリ ページを参照して、この言語の設定手順を完了してください。

/**
 * TODO(developer): Uncomment these variables before running the sample.
 */
// const projectId = 'YOUR_PROJECT_ID';
// const location = 'us-central1';
// const datasetId = 'YOUR_DATASET_ID';

// Imports the Google Cloud AutoML library
const {AutoMlClient} = require('@google-cloud/automl').v1;

// Instantiates a client
const client = new AutoMlClient();

async function getDataset() {
  // Construct request
  const request = {
    name: client.datasetPath(projectId, location, datasetId),
  };

  const [response] = await client.getDataset(request);

  console.log(`Dataset name: ${response.name}`);
  console.log(
    `Dataset id: ${
      response.name.split('/')[response.name.split('/').length - 1]
    }`
  );
  console.log(`Dataset display name: ${response.displayName}`);
  console.log('Dataset create time');
  console.log(`\tseconds ${response.createTime.seconds}`);
  console.log(`\tnanos ${response.createTime.nanos / 1e9}`);
  console.log(
    `Image classification dataset metadata: ${response.imageClassificationDatasetMetadata}`
  );
}

getDataset();

Python

このサンプルを試す前に、クライアント ライブラリ ページを参照して、この言語の設定手順を完了してください。

from google.cloud import automl

# TODO(developer): Uncomment and set the following variables
# project_id = "YOUR_PROJECT_ID"
# dataset_id = "YOUR_DATASET_ID"

client = automl.AutoMlClient()
# Get the full path of the dataset
dataset_full_id = client.dataset_path(project_id, "us-central1", dataset_id)
dataset = client.get_dataset(name=dataset_full_id)

# Display the dataset information
print(f"Dataset name: {dataset.name}")
print("Dataset id: {}".format(dataset.name.split("/")[-1]))
print(f"Dataset display name: {dataset.display_name}")
print(f"Dataset create time: {dataset.create_time}")
print(
    "Image classification dataset metadata: {}".format(
        dataset.image_classification_dataset_metadata
    )
)

データセットのエクスポート

データセットのすべての情報を含む CSV ファイルを Google Cloud Storage バケットにエクスポートできます。

ウェブ UI

空でないデータセットをエクスポートするには、次の操作を行います。

  1. [データセット] ページから空でないデータセットを選択します。

    データセット一覧ページ

    空でないデータセットを選択すると、データセットの詳細ページが表示されます。

    ラベルのトレーニング画像の UI

  2. データセットの詳細ページの上部にある [データをエクスポート] オプションを選択します。

    データセットのエクスポート ボタン

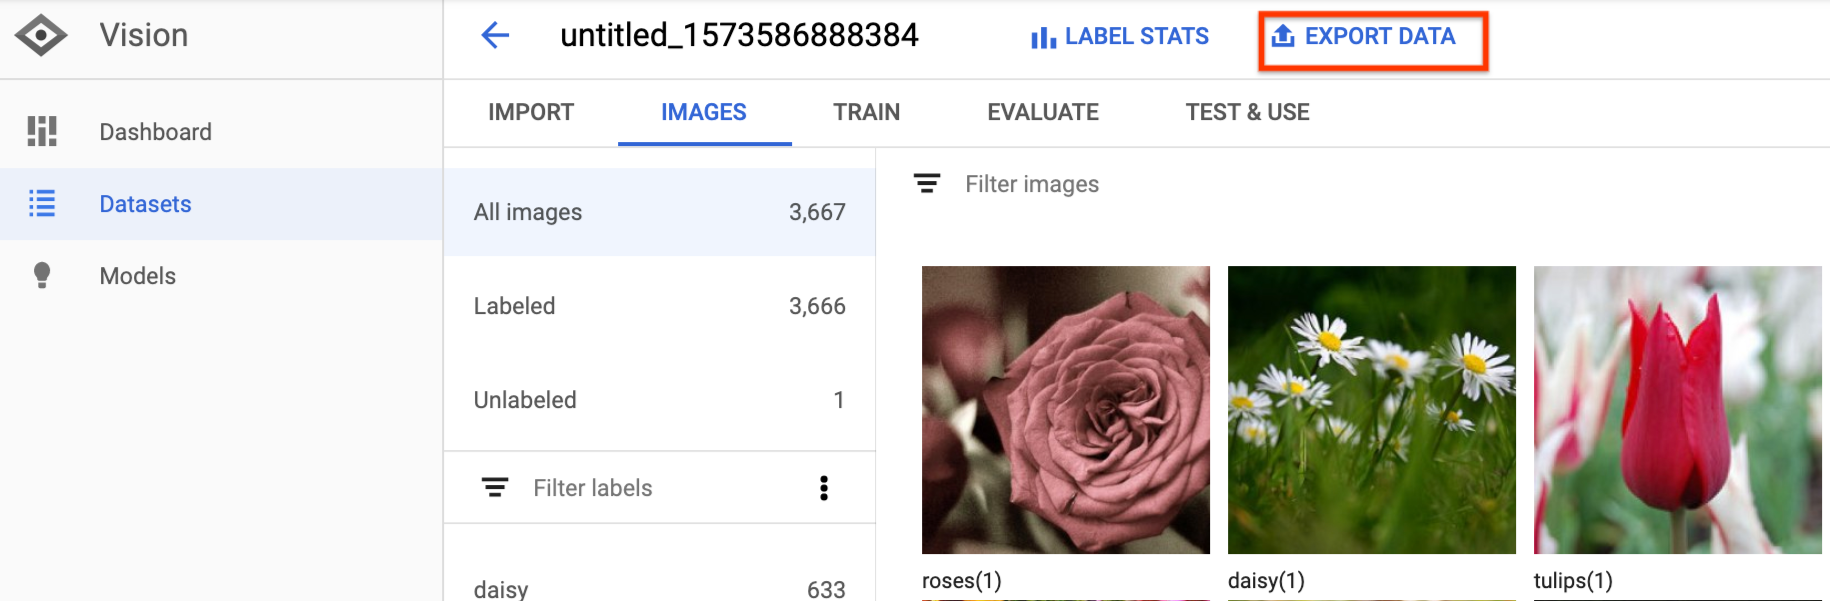
    表示されたウィンドウで、Google Cloud Storage のバケットの場所を選択するか、新しいバケットを作成して CSV ファイルの保存場所として指定します。

    ラベルの統計データのポップアウト ウィンドウ

  3. 新規または既存の Google Cloud Storage バケットの場所を選択したら、[CSV でエクスポート] を選択します。

    [CSV でエクスポート] ボタン

  4. データのエクスポートが完了すると、メールが届きます。

REST

リクエストのデータを使用する前に、次のように置き換えます。

  • project-id: GCP プロジェクト ID
  • dataset-id: データセットの IDこの ID は、データセットの名前の最後の要素です。例:
    • データセット名: projects/project-id/locations/location-id/datasets/3104518874390609379
    • データセット ID: 3104518874390609379
  • output-storage-bucket: 次の形式で出力ファイルを保存する Google Cloud Storage バケット/ディレクトリ。gs://bucket/directory/リクエスト元のユーザーには、バケットへの書き込み権限が必要です。

HTTP メソッドと URL:

POST https://automl.googleapis.com/v1/projects/PROJECT_ID/locations/us-central1/datasets/DATASET_ID:exportData

リクエストの本文(JSON):

{
  "outputConfig": {
    "gcsDestination": {
      "outputUriPrefix": "CLOUD_STORAGE_BUCKET"
    }
  }
}

リクエストを送信するには、次のいずれかのオプションを選択します。

curl

リクエスト本文を request.json という名前のファイルに保存して、次のコマンドを実行します。

curl -X POST \
-H "Authorization: Bearer $(gcloud auth print-access-token)" \
-H "x-goog-user-project: project-id" \
-H "Content-Type: application/json; charset=utf-8" \
-d @request.json \
"https://automl.googleapis.com/v1/projects/PROJECT_ID/locations/us-central1/datasets/DATASET_ID:exportData"

PowerShell

リクエスト本文を request.json という名前のファイルに保存して、次のコマンドを実行します。

$cred = gcloud auth print-access-token
$headers = @{ "Authorization" = "Bearer $cred"; "x-goog-user-project" = "project-id" }

Invoke-WebRequest `
-Method POST `
-Headers $headers `
-ContentType: "application/json; charset=utf-8" `
-InFile request.json `
-Uri "https://automl.googleapis.com/v1/projects/PROJECT_ID/locations/us-central1/datasets/DATASET_ID:exportData" | Select-Object -Expand Content

出力は次のようになります。オペレーション ID を使用して、タスクのステータスを取得できます。例については、長時間実行オペレーションによる作業をご覧ください。

{
  "name": "projects/PROJECT_ID/locations/us-central1/operations/OPERATION_ID",
  "metadata": {
    "@type": "type.googleapis.com/google.cloud.automl.v1.OperationMetadata",
    "createTime": "2019-08-12T18:52:31.637075Z",
    "updateTime": "2019-08-12T18:52:31.637075Z",
    "exportDataDetails": {
      "outputInfo": {
        "gcsOutputDirectory": "CLOUD_STORAGE_BUCKET/export_data-DATASET_NAME-TIMESTAMP_OF_EXPORT_CALL/"
      }
    }
  }
}

Java

このサンプルを試す前に、クライアント ライブラリ ページを参照して、この言語の設定手順を完了してください。

import com.google.cloud.automl.v1.AutoMlClient;
import com.google.cloud.automl.v1.DatasetName;
import com.google.cloud.automl.v1.GcsDestination;
import com.google.cloud.automl.v1.OutputConfig;
import com.google.protobuf.Empty;
import java.io.IOException;
import java.util.concurrent.ExecutionException;

class ExportDataset {

  static void exportDataset() throws IOException, ExecutionException, InterruptedException {
    // TODO(developer): Replace these variables before running the sample.
    String projectId = "YOUR_PROJECT_ID";
    String datasetId = "YOUR_DATASET_ID";
    String gcsUri = "gs://BUCKET_ID/path_to_export/";
    exportDataset(projectId, datasetId, gcsUri);
  }

  // Export a dataset to a GCS bucket
  static void exportDataset(String projectId, String datasetId, String gcsUri)
      throws IOException, ExecutionException, InterruptedException {
    // Initialize client that will be used to send requests. This client only needs to be created
    // once, and can be reused for multiple requests. After completing all of your requests, call
    // the "close" method on the client to safely clean up any remaining background resources.
    try (AutoMlClient client = AutoMlClient.create()) {
      // Get the complete path of the dataset.
      DatasetName datasetFullId = DatasetName.of(projectId, "us-central1", datasetId);
      GcsDestination gcsDestination =
          GcsDestination.newBuilder().setOutputUriPrefix(gcsUri).build();

      // Export the dataset to the output URI.
      OutputConfig outputConfig =
          OutputConfig.newBuilder().setGcsDestination(gcsDestination).build();

      System.out.println("Processing export...");
      Empty response = client.exportDataAsync(datasetFullId, outputConfig).get();
      System.out.format("Dataset exported. %s\n", response);
    }
  }
}

Node.js

このサンプルを試す前に、クライアント ライブラリ ページを参照して、この言語の設定手順を完了してください。

/**
 * TODO(developer): Uncomment these variables before running the sample.
 */
// const projectId = 'YOUR_PROJECT_ID';
// const location = 'us-central1';
// const datasetId = 'YOUR_DATASET_ID';
// const gcsUri = 'gs://BUCKET_ID/path_to_export/';

// Imports the Google Cloud AutoML library
const {AutoMlClient} = require('@google-cloud/automl').v1;

// Instantiates a client
const client = new AutoMlClient();

async function exportDataset() {
  // Construct request
  const request = {
    name: client.datasetPath(projectId, location, datasetId),
    outputConfig: {
      gcsDestination: {
        outputUriPrefix: gcsUri,
      },
    },
  };

  const [operation] = await client.exportData(request);
  // Wait for operation to complete.
  const [response] = await operation.promise();
  console.log(`Dataset exported: ${response}`);
}

exportDataset();

Python

このサンプルを試す前に、クライアント ライブラリ ページを参照して、この言語の設定手順を完了してください。

from google.cloud import automl

# TODO(developer): Uncomment and set the following variables
# project_id = "YOUR_PROJECT_ID"
# dataset_id = "YOUR_DATASET_ID"
# gcs_uri = "gs://YOUR_BUCKET_ID/path/to/export/"

client = automl.AutoMlClient()

# Get the full path of the dataset
dataset_full_id = client.dataset_path(project_id, "us-central1", dataset_id)

gcs_destination = automl.GcsDestination(output_uri_prefix=gcs_uri)
output_config = automl.OutputConfig(gcs_destination=gcs_destination)

response = client.export_data(name=dataset_full_id, output_config=output_config)
print(f"Dataset exported. {response.result()}")

CSV 形式でエクスポートされたファイル

エクスポートされた CSV ファイルは、トレーニング データのインポート CSV と同じフォーマットになります。

set,path,label0[,label1,label2,...]

この CSV ファイルは、固有のタイムスタンプが付いたエクスポート フォルダに保存されます。以下に、エクスポートされた CSV ファイルの例を示します。

my-storage-bucket/export_data-my_dataset_name-2019-11-08T22:28:13.081Z/image_classification_1.csv:

TRAIN,gs://my-storage-bucket/export_data-my_dataset_name-2019-11-08T22:28:13.081Z/files/img874.jpg,dandelion
VALIDATION,gs://my-storage-bucket/export_data-my_dataset_name-2019-11-08T22:28:13.081Z/files/img447.jpg,roses
TRAIN,gs://my-storage-bucket/export_data-my_dataset_name-2019-11-08T22:28:13.081Z/files/img672.jpg,dandelion
VALIDATION,gs://my-storage-bucket/export_data-my_dataset_name-2019-11-08T22:28:13.081Z/files/img421.jpg,sunflowers
TRAIN,gs://my-storage-bucket/export_data-my_dataset_name-2019-11-08T22:28:13.081Z/files/img495.jpg,tulips
TEST,gs://my-storage-bucket/export_data-my_dataset_name-2019-11-08T22:28:13.081Z/files/img014.jpg,sunflowers

データセットの削除

不要になったデータセットは UI から削除できます。また、次のようなコードにデータセット ID を指定して削除することもできます。

ウェブ UI

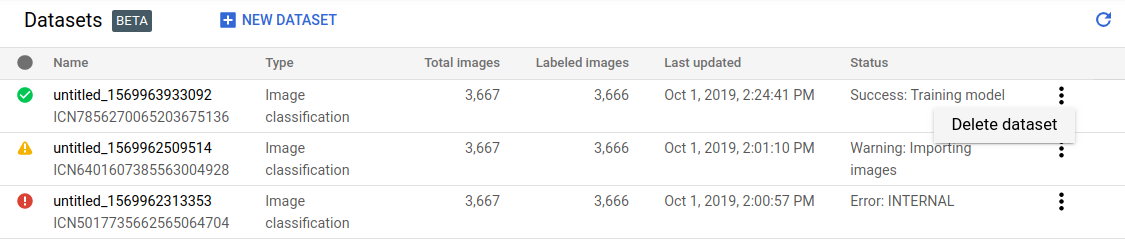
  1. Vision Dashboard で、左側のナビゲーション メニューの上部にある [データセット] リンクをクリックし、使用可能なデータセットを一覧表示します。

  2. 削除する行の右端にあるその他メニューをクリックし、[データセットの削除] を選択します。

  3. 確認ダイアログ ボックスで [削除] をクリックします。

    データセット一覧ページ

REST

リクエストのデータを使用する前に、次のように置き換えます。

  • project-id: GCP プロジェクト ID
  • dataset-id: データセットの IDこの ID は、データセットの名前の最後の要素です。例:
    • データセット名: projects/project-id/locations/location-id/datasets/3104518874390609379
    • データセット ID: 3104518874390609379

HTTP メソッドと URL:

DELETE https://automl.googleapis.com/v1/projects/PROJECT_ID/locations/us-central1/datasets/DATASET_ID

リクエストを送信するには、次のいずれかのオプションを選択します。

curl

次のコマンドを実行します。

curl -X DELETE \
-H "Authorization: Bearer $(gcloud auth print-access-token)" \
-H "x-goog-user-project: project-id" \
"https://automl.googleapis.com/v1/projects/PROJECT_ID/locations/us-central1/datasets/DATASET_ID"

PowerShell

次のコマンドを実行します。

$cred = gcloud auth print-access-token
$headers = @{ "Authorization" = "Bearer $cred"; "x-goog-user-project" = "project-id" }

Invoke-WebRequest `
-Method DELETE `
-Headers $headers `
-Uri "https://automl.googleapis.com/v1/projects/PROJECT_ID/locations/us-central1/datasets/DATASET_ID" | Select-Object -Expand Content

出力は次のようになります。オペレーション ID を使用して、タスクのステータスを取得できます。例については、長時間実行オペレーションによる作業をご覧ください。

{
  "name": "projects/PROJECT_ID/locations/us-central1/operations/OPERATION_ID",
  "metadata": {
    "@type": "type.googleapis.com/google.cloud.automl.v1.OperationMetadata",
    "createTime": "2019-11-08T22:37:19.822128Z",
    "updateTime": "2019-11-08T22:37:19.822128Z",
    "deleteDetails": {}
  },
  "done": true,
  "response": {
    "@type": "type.googleapis.com/google.protobuf.Empty"
  }
}

Go

このサンプルを試す前に、クライアント ライブラリ ページを参照して、この言語の設定手順を完了してください。

import (
	"context"
	"fmt"
	"io"

	automl "cloud.google.com/go/automl/apiv1"
	"cloud.google.com/go/automl/apiv1/automlpb"
)

// deleteDataset deletes a dataset.
func deleteDataset(w io.Writer, projectID string, location string, datasetID string) error {
	// projectID := "my-project-id"
	// location := "us-central1"
	// datasetID := "TRL123456789..."

	ctx := context.Background()
	client, err := automl.NewClient(ctx)
	if err != nil {
		return fmt.Errorf("NewClient: %w", err)
	}
	defer client.Close()

	req := &automlpb.DeleteDatasetRequest{
		Name: fmt.Sprintf("projects/%s/locations/%s/datasets/%s", projectID, location, datasetID),
	}

	op, err := client.DeleteDataset(ctx, req)
	if err != nil {
		return fmt.Errorf("DeleteDataset: %w", err)
	}
	fmt.Fprintf(w, "Processing operation name: %q\n", op.Name())

	if err := op.Wait(ctx); err != nil {
		return fmt.Errorf("Wait: %w", err)
	}

	fmt.Fprintf(w, "Dataset deleted.\n")

	return nil
}

Java

このサンプルを試す前に、クライアント ライブラリ ページを参照して、この言語の設定手順を完了してください。

import com.google.cloud.automl.v1.AutoMlClient;
import com.google.cloud.automl.v1.DatasetName;
import com.google.protobuf.Empty;
import java.io.IOException;
import java.util.concurrent.ExecutionException;

class DeleteDataset {

  static void deleteDataset() throws IOException, ExecutionException, InterruptedException {
    // TODO(developer): Replace these variables before running the sample.
    String projectId = "YOUR_PROJECT_ID";
    String datasetId = "YOUR_DATASET_ID";
    deleteDataset(projectId, datasetId);
  }

  // Delete a dataset
  static void deleteDataset(String projectId, String datasetId)
      throws IOException, ExecutionException, InterruptedException {
    // Initialize client that will be used to send requests. This client only needs to be created
    // once, and can be reused for multiple requests. After completing all of your requests, call
    // the "close" method on the client to safely clean up any remaining background resources.
    try (AutoMlClient client = AutoMlClient.create()) {
      // Get the full path of the dataset.
      DatasetName datasetFullId = DatasetName.of(projectId, "us-central1", datasetId);
      Empty response = client.deleteDatasetAsync(datasetFullId).get();
      System.out.format("Dataset deleted. %s\n", response);
    }
  }
}

Node.js

このサンプルを試す前に、クライアント ライブラリ ページを参照して、この言語の設定手順を完了してください。

/**
 * TODO(developer): Uncomment these variables before running the sample.
 */
// const projectId = 'YOUR_PROJECT_ID';
// const location = 'us-central1';
// const datasetId = 'YOUR_DATASET_ID';

// Imports the Google Cloud AutoML library
const {AutoMlClient} = require('@google-cloud/automl').v1;

// Instantiates a client
const client = new AutoMlClient();

async function deleteDataset() {
  // Construct request
  const request = {
    name: client.datasetPath(projectId, location, datasetId),
  };

  const [operation] = await client.deleteDataset(request);

  // Wait for operation to complete.
  const [response] = await operation.promise();
  console.log(`Dataset deleted: ${response}`);
}

deleteDataset();

Python

このサンプルを試す前に、クライアント ライブラリ ページを参照して、この言語の設定手順を完了してください。

from google.cloud import automl

# TODO(developer): Uncomment and set the following variables
# project_id = "YOUR_PROJECT_ID"
# dataset_id = "YOUR_DATASET_ID"

client = automl.AutoMlClient()
# Get the full path of the dataset
dataset_full_id = client.dataset_path(project_id, "us-central1", dataset_id)
response = client.delete_dataset(name=dataset_full_id)

print(f"Dataset deleted. {response.result()}")