Sebuah set data adalah yang berisi sampel perwakilan dari jenis konten yang ingin Anda klasifikasikan, yang dilabeli dengan label kategori yang Anda inginkan untuk model kustom anda. Set data berfungsi sebagai input untuk melatih sebuah model.
Langkah-langkah utama untuk membangun sebuah set data adalah:
- Buat set data dan tentukan apakah akan mengizinkan adanya label lebih dari satu untuk setiap item.
- Impor item data ke dalam set data.
- Memberi label pada item.
Jika Anda mengimpor item dengan label yang telah ditetapkan sebelumnya, langkah 2 dan 3 akan dilakukan pada saat yang sama.
Membuat set data
Langkah pertama dalam membuat sebuah model kustom adalah dengan membuat set data kosong yang akan menyimpan data pelatihan untuk model tersebut. Saat membuat set data, tentukan jenis klasifikasi yang ingin dijalankan oleh model kustom Anda:
- MULTICLASS akan menetapkan hanya satu label ke setiap gambar yang diklasifikasikan
- MULTILABEL akan memungkinkan sebuah gambar diberi lebih dari satu label
Mulai dari AutoML API versi v1, permintaan ini menampilkan ID operasi yang berjalan lama.
Setelah operasi yang berjalan lama telah selesai, Anda dapat mengimpor gambar ke dalamnya. Set data yang baru dibuat tidak berisi data apa pun sebelum Anda mengimpor gambar ke dalamnya.
Simpan ID set data dari set data baru (dari respons) untuk digunakan dengan operasi lain, seperti mengimpor gambar ke set data Anda dan melatih model.
UI Web
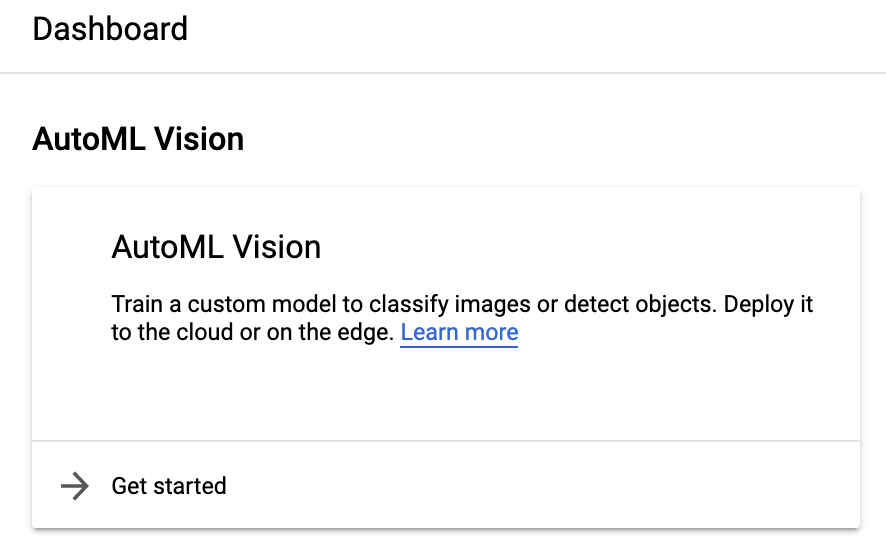
Buka Dasbor Vision.
Anda juga dapat mengakses halaman ini dari konsol melalui item menu navigasi Kecerdasan Buatan > Vision. Ini akan membawa anda ke dasbor Vision yang terintegrasi. Pilih kartu AutoML Vision.
Pilih Set Data dari menu navigasi sebelah kiri.
Pilih tombol Set Data Baru di bagian atas, perbarui nama set data (opsional), lalu pilih klasifikasi label tunggal atau label majemuk berdasarkan data yang Anda miliki.
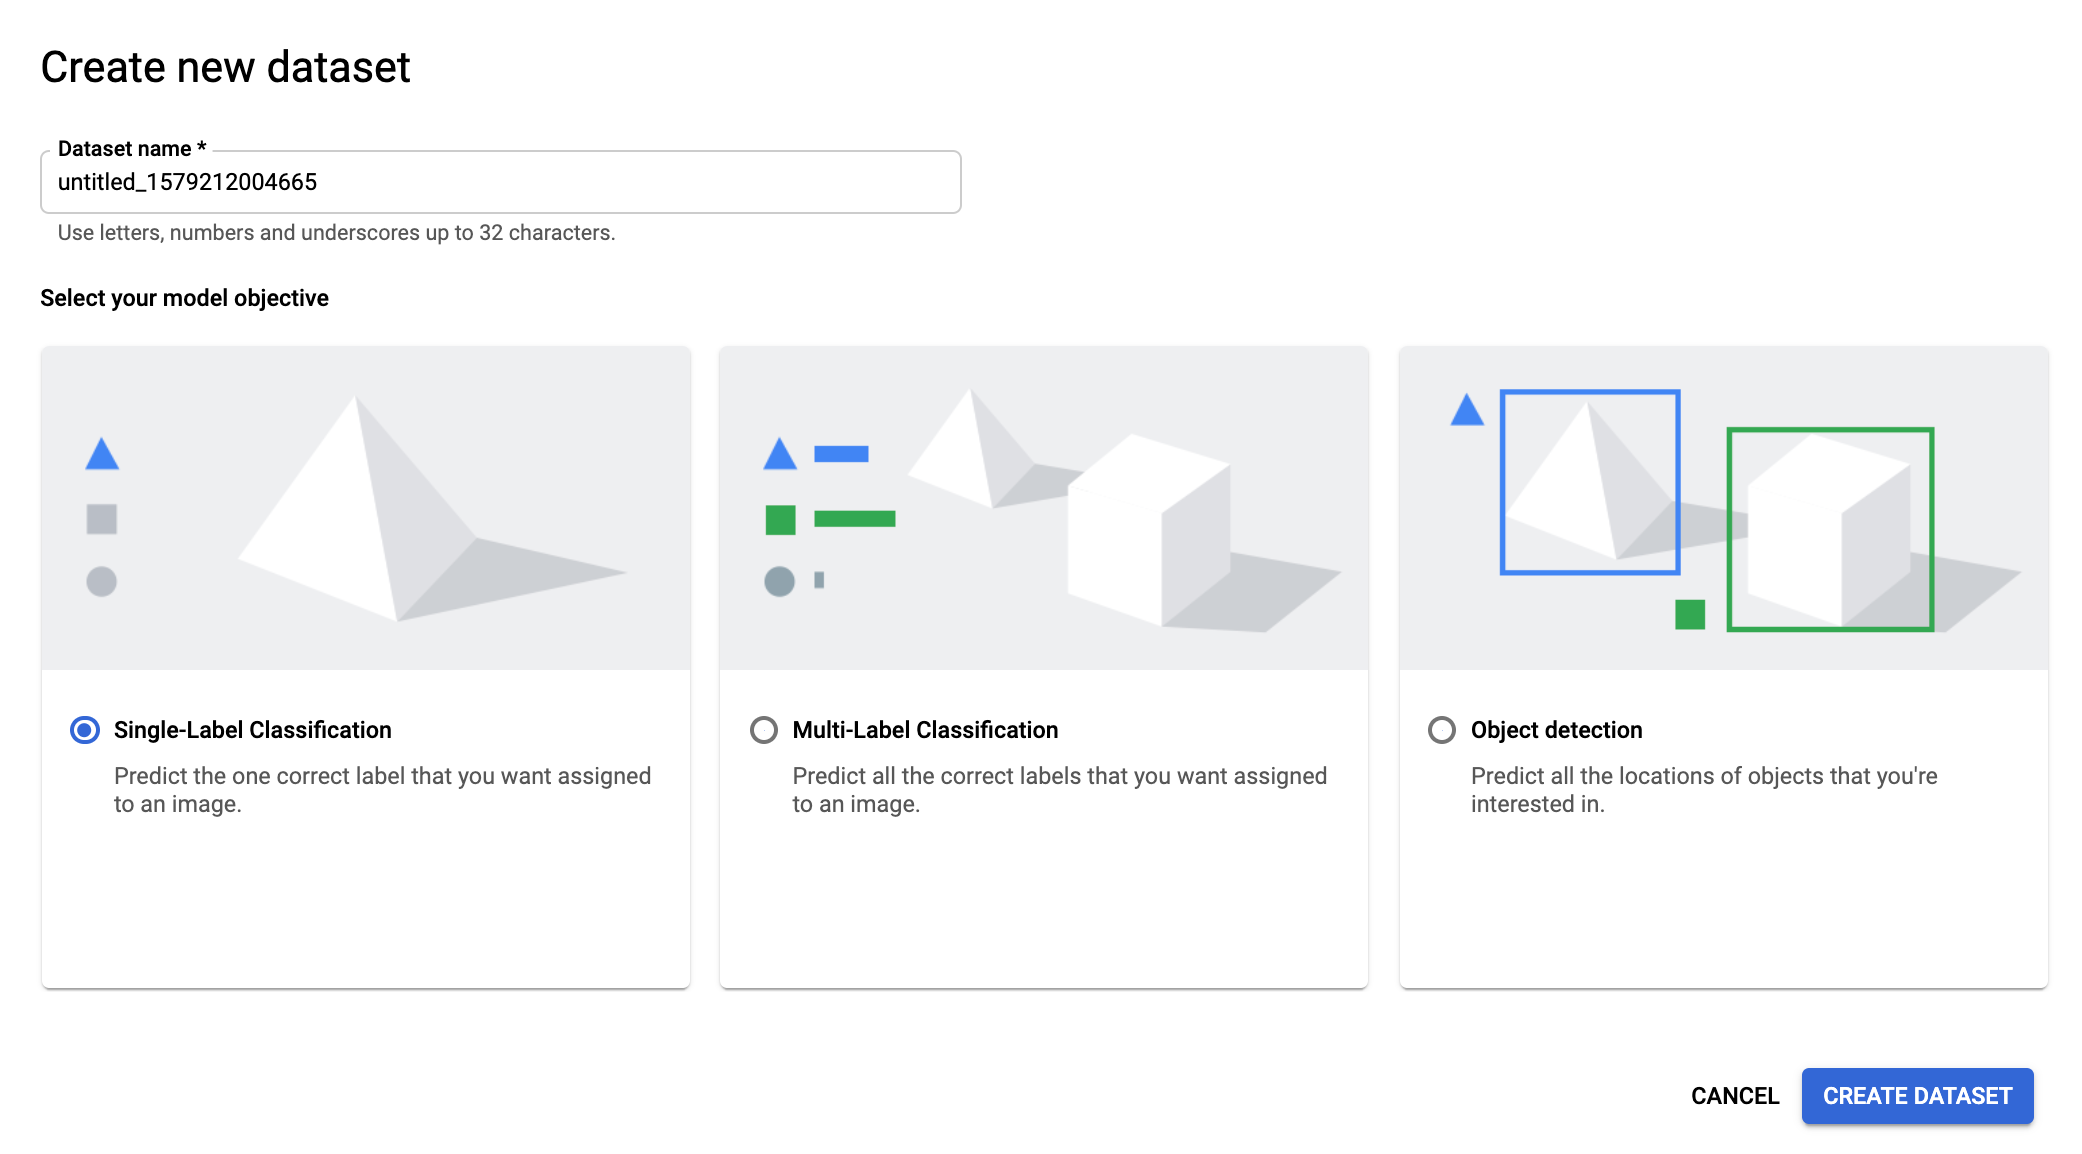
Setelah menentukan jenis klasifikasi, pilih Buat Set Data.
Pada halaman Buat Set Data, Anda dapat memilih sebuah file CSV dari Google Cloud Storage, atau file gambar lokal untuk diimpor ke dalam set data.
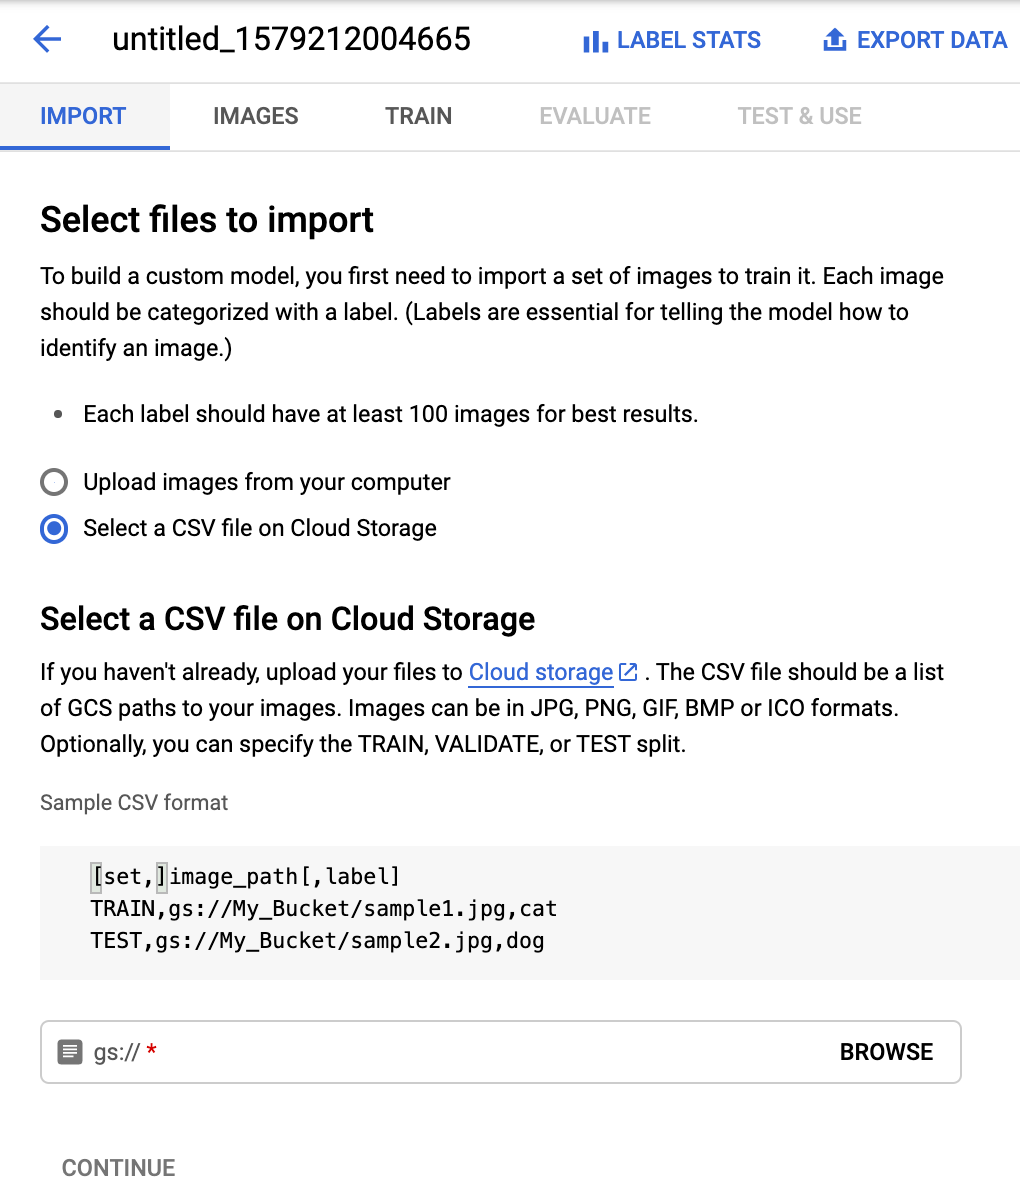
Pilih Lanjut untuk memulai impor gambar ke set data Anda. Saat impor dimulai, set data akan menampilkan status Sedang Menjalankan: Mengimpor gambar.
Anda akan menerima email saat proses impor telah selesai.
REST
Contoh di bawah ini membuat set data yang mendukung satu label per item (lihat MULTICLASS).
Set data yang baru saja dibuat tidak berisi data apa pun sampai Anda mengimpor item ke dalamnya.
Simpan "name" dari set data baru (dari respons) untuk digunakan saat operasi
lain, seperti mengimpor item ke set data Anda dan melatih sebuah model.
Sebelum menggunakan salah satu data permintaan, lakukan penggantian berikut:
- project-id: project ID GCP Anda.
- display-name: nama tampilan string pilihan Anda.
Metode HTTP dan URL:
POST https://automl.googleapis.com/v1/projects/PROJECT_ID/locations/us-central1/datasets
Isi JSON permintaan:
{
  "displayName": "DISPLAY_NAME",
  "imageClassificationDatasetMetadata": {
    "classificationType": "MULTICLASS"
  }
}
Untuk mengirim permintaan Anda, pilih salah satu opsi berikut:
curl
Simpan isi permintaan dalam file bernama request.json,
dan jalankan perintah berikut:
curl -X POST \
     -H "Authorization: Bearer $(gcloud auth print-access-token)" \
     -H "x-goog-user-project: project-id" \
     -H "Content-Type: application/json; charset=utf-8" \
     -d @request.json \
     "https://automl.googleapis.com/v1/projects/PROJECT_ID/locations/us-central1/datasets"
PowerShell
Simpan isi permintaan dalam file bernama request.json,
dan jalankan perintah berikut:
$cred = gcloud auth print-access-token
$headers = @{ "Authorization" = "Bearer $cred"; "x-goog-user-project" = "project-id" }

Invoke-WebRequest `
    -Method POST `
    -Headers $headers `
    -ContentType: "application/json; charset=utf-8" `
    -InFile request.json `
    -Uri "https://automl.googleapis.com/v1/projects/PROJECT_ID/locations/us-central1/datasets" | Select-Object -Expand Content
Anda akan melihat output yang serupa dengan berikut ini: Anda dapat menggunakan ID operasi
(dalam hal ini, ICN3819960680614725486) untuk mendapatkan status tugas. Sebagai
contoh, lihat Bekerja dengan operasi yang berjalan lama:
{
  "name": "projects/PROJECT_ID/locations/us-central1/operations/ICN3819960680614725486",
  "metadata": {
    "@type": "type.googleapis.com/google.cloud.automl.v1.OperationMetadata",
    "createTime": "2019-11-14T16:49:13.667526Z",
    "updateTime": "2019-11-14T16:49:13.667526Z",
    "createDatasetDetails": {}
  }
}
Setelah operasi yang berjalan lama selesai, Anda bisa mendapatkan ID set data dengan permintaan status operasi yang sama. Responsnya akan terlihat seperti berikut:
{
  "name": "projects/PROJECT_ID/locations/us-central1/operations/ICN3819960680614725486",
  "metadata": {
    "@type": "type.googleapis.com/google.cloud.automl.v1.OperationMetadata",
    "createTime": "2019-11-14T16:49:13.667526Z",
    "updateTime": "2019-11-14T16:49:17.975314Z",
    "createDatasetDetails": {}
  },
  "done": true,
  "response": {
    "@type": "type.googleapis.com/google.cloud.automl.v1.Dataset",
    "name": "projects/PROJECT_ID/locations/us-central1/datasets/ICN5496445433112696489"
  }
}
Go
Sebelum mencoba contoh ini, ikuti petunjuk penyiapan untuk bahasa ini di halaman Library Klien.
Java
Sebelum mencoba contoh ini, ikuti petunjuk penyiapan untuk bahasa ini di halaman Library Klien.
Node.js
Sebelum mencoba contoh ini, ikuti petunjuk penyiapan untuk bahasa ini di halaman Library Klien.
Python
Sebelum mencoba contoh ini, ikuti petunjuk penyiapan untuk bahasa ini di halaman Library Klien.
Bahasa tambahan
C# : Ikuti Petunjuk penyiapan C# di halaman library klien, lalu kunjungi dokumentasi referensi AutoML Vision untuk .NET.
PHP : Ikuti Petunjuk penyiapan PHP di halaman library klien, lalu kunjungi dokumentasi referensi AutoML Vision untuk PHP.
Ruby : Harap ikuti Petunjuk penyiapan Ruby di halaman library klien, lalu kunjungi Dokumentasi referensi AutoML Vision untuk Ruby.
Mengimpor item ke dalam set data
Setelah membuat set data, Anda dapat mengimpor URI dan label item untuk item dari file CSV yang disimpan dalam sebuah bucket Google Cloud Storage. Untuk mengetahui detail tentang cara menyiapkan data dan membuat file CSV untuk diimpor, lihat Menyiapkan data pelatihan.
Anda dapat mengimpor item ke set data kosong atau mengimpor item tambahan ke set data yang ada.
UI Web
UI AutoML Vision memungkinkan Anda membuat set data baru dan mengimpor item ke dalamnya dari halaman yang sama; lihat Membuat set data. Langkah-langkah di bawah ini menunjukkan cara mengimpor item ke set data yang telah ada.
Buka Vision Dashboard, lalu pilih set data dari halaman Set Data.
Di halaman Gambar, klik Tambahkan item di batang judul lalu pilih metode impor dari menu drop-down.
Anda dapat:
Upload file .csv yang berisi gambar pelatihan dan label kategori yang terkait dari komputer lokal atau dari Google Cloud Storage.
Upload file .txt atau .zip yang berisi gambar pelatihan dari komputer lokal Anda.
Pilih file yang akan diimpor.
REST
Sebelum menggunakan salah satu data permintaan, lakukan penggantian berikut:
- project-id: project ID GCP Anda.
- dataset-id: ID set data Anda. ID adalah elemen terakhir dari nama
set data Anda. Contoh:
- nama set data:
projects/project-id/locations/location-id/datasets/3104518874390609379 - id set data:
3104518874390609379
- nama set data:
- input-storage-path: jalur ke file CSV yang disimpan di Google Cloud Storage. Pengguna yang meminta setidaknya harus memiliki izin baca ke bucket.
Metode HTTP dan URL:
POST https://automl.googleapis.com/v1/projects/PROJECT_ID/locations/us-central1/datasets/DATASET_ID:importData
Isi JSON permintaan:
{
  "inputConfig": {
    "gcsSource": {
      "inputUris": [INPUT_STORAGE_PATH]
    }
  }
}
Untuk mengirim permintaan Anda, pilih salah satu opsi berikut:
curl
Simpan isi permintaan dalam file bernama request.json,
dan jalankan perintah berikut:
curl -X POST \
     -H "Authorization: Bearer $(gcloud auth print-access-token)" \
     -H "x-goog-user-project: project-id" \
     -H "Content-Type: application/json; charset=utf-8" \
     -d @request.json \
     "https://automl.googleapis.com/v1/projects/PROJECT_ID/locations/us-central1/datasets/DATASET_ID:importData"
PowerShell
Simpan isi permintaan dalam file bernama request.json,
dan jalankan perintah berikut:
$cred = gcloud auth print-access-token
$headers = @{ "Authorization" = "Bearer $cred"; "x-goog-user-project" = "project-id" }

Invoke-WebRequest `
    -Method POST `
    -Headers $headers `
    -ContentType: "application/json; charset=utf-8" `
    -InFile request.json `
    -Uri "https://automl.googleapis.com/v1/projects/PROJECT_ID/locations/us-central1/datasets/DATASET_ID:importData" | Select-Object -Expand Content
Anda akan melihat output yang serupa dengan berikut ini: Anda dapat menggunakan ID operasi
(dalam contoh ini, ICN3819960680614725486) untuk mendapatkan status tugas tersebut. Sebagai
contoh, lihat Bekerja dengan operasi yang berjalan lama.
{
  "name": "projects/PROJECT_ID/locations/us-central1/operations/OPERATION_ID",
  "metadata": {
    "@type": "type.googleapis.com/google.cloud.automl.v1.OperationMetadata",
    "createTime": "2018-10-29T15:56:29.176485Z",
    "updateTime": "2018-10-29T15:56:29.176485Z",
    "importDataDetails": {}
  }
}
Go
Sebelum mencoba contoh ini, ikuti petunjuk penyiapan untuk bahasa ini di halaman Library Klien.
Java
Sebelum mencoba contoh ini, ikuti petunjuk penyiapan untuk bahasa ini di halaman Library Klien.
Node.js
Sebelum mencoba contoh ini, ikuti petunjuk penyiapan untuk bahasa ini di halaman Library Klien.
Python
Sebelum mencoba contoh ini, ikuti petunjuk penyiapan untuk bahasa ini di halaman Library Klien.
Memberi label item pelatihan
Agar berguna untuk melatih model, setiap item dalam set data harus memiliki minimal satu label kategori yang ditetapkan padanya. AutoML Vision akan mengabaikan item yang tidak mempunyai label kategori. Anda dapat memberikan label untuk item pelatihan dengan tiga cara:
- Menyertakan label di file .csv Anda
- Untuk mengetahui detail tentang cara melabeli item di file .csv, lihat Menyiapkan data pelatihan Anda.
- Memberikan label pada item di UI AutoML Vision
- Meminta pelabelan dari layanan pelabelan oleh manusia seperti Layanan Pelabelan Data AI Platform dari Google.
Pelabelan di UI
UI web
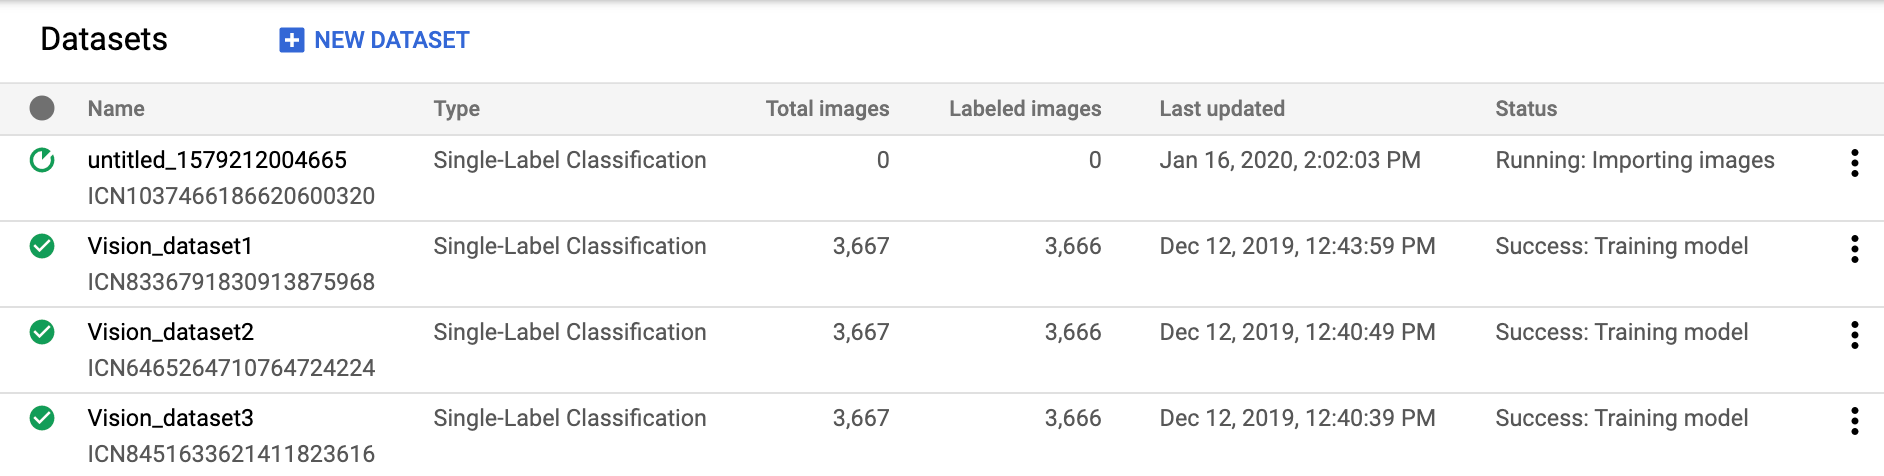
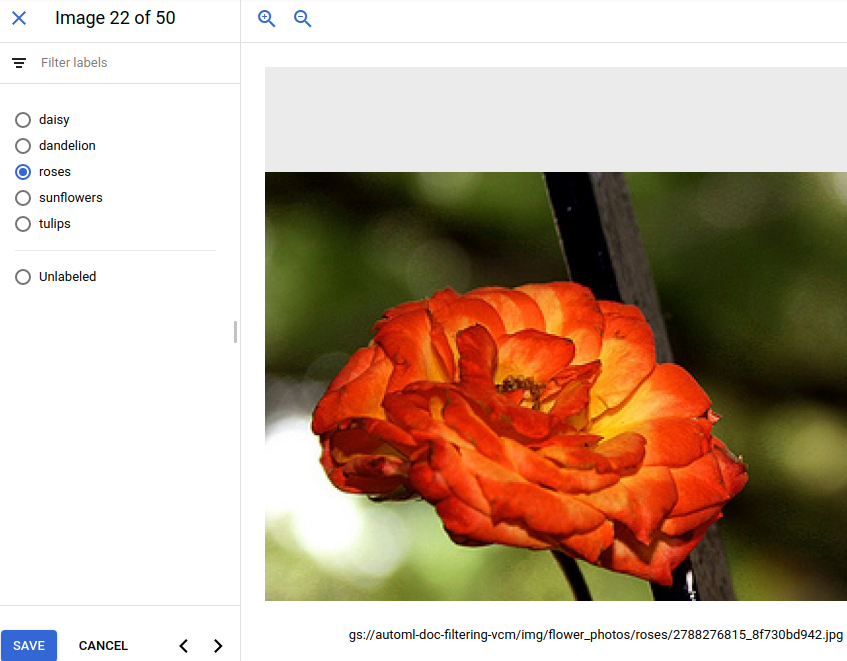
Untuk melabeli item di UI AutoML Vision, pilih set data dari halaman listingan Set Data untuk melihat detailnya.
Panel samping meringkas jumlah item yang berlabel dan yang tidak berlabel. Di sini, Anda dapat memfilter daftar item menurut label, atau memilih Tambahkan label baru untuk membuat label baru.
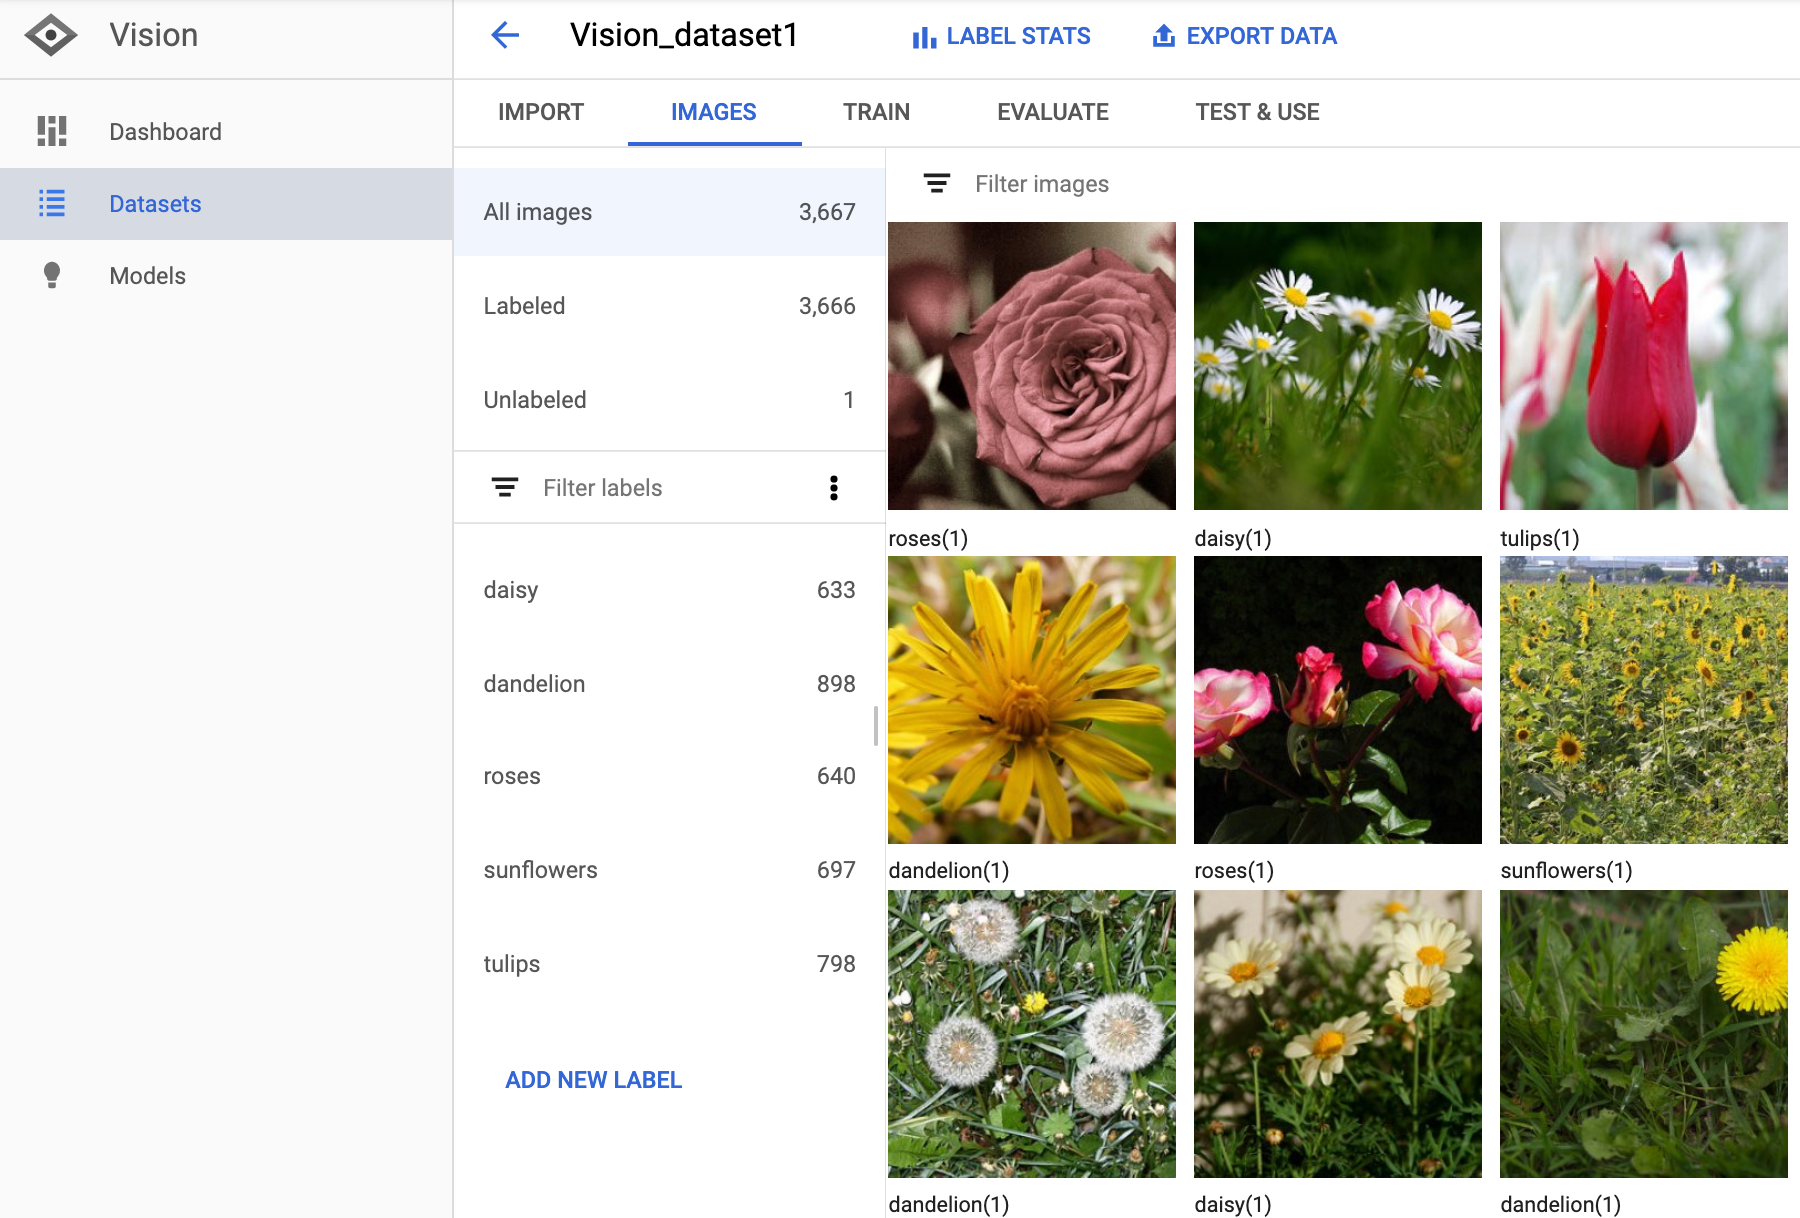
Dari layar tampian ini Anda juga dapat menambahkan atau mengubah label dari sebuah gambar.
Pilih gambar untuk menambahkan atau mengubah labelnya.
Meminta pelabelan
Anda dapat memanfaatkan Layanan Pelabelan Data AI Platform Google untuk melabeli gambar-gambar Anda. Lihat dokumentasi produk untuk informasi selengkapnya.
Menangani operasi yang berjalan lama
Anda dapat mengetahui status dari sebuah operasi yang berjalan lama menggunakan contoh kode berikut.
REST
Sebelum menggunakan salah satu data permintaan, lakukan penggantian berikut:
- project-id: project ID GCP Anda.
- operation-id: ID operasi Anda. ID tersebut adalah elemen terakhir dari nama
operasi Anda. Contoh:
- nama operasi:
projects/project-id/locations/location-id/operations/IOD5281059901324392598 - ID Operasi:
IOD5281059901324392598
- nama operasi:
Metode HTTP dan URL:
GET https://automl.googleapis.com/v1/projects/PROJECT_ID/locations/us-central1/operations/OPERATION_ID
Untuk mengirim permintaan Anda, pilih salah satu opsi berikut:
curl
Jalankan perintah berikut:
curl -X GET \
     -H "Authorization: Bearer $(gcloud auth print-access-token)" \
     -H "x-goog-user-project: project-id" \
     "https://automl.googleapis.com/v1/projects/PROJECT_ID/locations/us-central1/operations/OPERATION_ID"
PowerShell
Jalankan perintah berikut:
$cred = gcloud auth print-access-token
$headers = @{ "Authorization" = "Bearer $cred"; "x-goog-user-project" = "project-id" }

Invoke-WebRequest `
    -Method GET `
    -Headers $headers `
    -Uri "https://automl.googleapis.com/v1/projects/PROJECT_ID/locations/us-central1/operations/OPERATION_ID" | Select-Object -Expand Content
{
  "name": "projects/PROJECT_ID/locations/us-central1/operations/OPERATION_ID",
  "metadata": {
    "@type": "type.googleapis.com/google.cloud.automl.v1.OperationMetadata",
    "createTime": "2018-10-29T15:56:29.176485Z",
    "updateTime": "2018-10-29T16:10:41.326614Z",
    "importDataDetails": {}
  },
  "done": true,
  "response": {
    "@type": "type.googleapis.com/google.protobuf.Empty"
  }
}
Anda akan melihat output yang mirip dengan hal berikut ini untuk membuat operasi model yang telah selesai:
{
  "name": "projects/PROJECT_ID/locations/us-central1/operations/OPERATION_ID",
  "metadata": {
    "@type": "type.googleapis.com/google.cloud.automl.v1.OperationMetadata",
    "createTime": "2019-07-22T18:35:06.881193Z",
    "updateTime": "2019-07-22T19:58:44.972235Z",
    "createModelDetails": {}
  },
  "done": true,
  "response": {
    "@type": "type.googleapis.com/google.cloud.automl.v1.Model",
    "name": "projects/PROJECT_ID/locations/us-central1/models/MODEL_ID"
  }
}
Go
Sebelum mencoba sampel ini, ikuti petunjuk penyiapan untuk bahasa ini di halaman API & Referensi > Library Klien.
Java
Sebelum mencoba sampel ini, ikuti petunjuk penyiapan untuk bahasa ini di halaman API & Referensi > Library Klien.
Node.js
Sebelum mencoba sampel ini, ikuti petunjuk penyiapan untuk bahasa ini di halaman API & Referensi > Library Klien.
Python
Sebelum mencoba sampel ini, ikuti petunjuk penyiapan untuk bahasa ini di halaman API & Referensi > Library Klien.
Bahasa tambahan
C# : Ikuti Petunjuk penyiapan C# di halaman library klien, lalu kunjungi dokumentasi referensi AutoML Vision untuk .NET.
PHP : Ikuti Petunjuk penyiapan PHP di halaman library klien, lalu kunjungi dokumentasi referensi AutoML Vision untuk PHP.
Ruby : Ikuti Petunjuk penyiapan Ruby di halaman library klien, lalu kunjungi dokumentasi referensi AutoML Vision untuk Ruby.