This page walks through serving predictions from your image classification model and viewing these predictions in a web app.
This tutorial has several pages:Serving predictions from a custom image classification model.
Each page assumes that you have already performed the instructions from the previous pages of the tutorial.
The rest of this document assumes that you are using the same Cloud Shell environment that you created when following the first page of this tutorial. If your original Cloud Shell session is no longer open, you can return to the environment by doing the following:-
In the Google Cloud console, activate Cloud Shell.
-
In the Cloud Shell session, run the following command:
cd hello-custom-sample
Create an endpoint
To get online predictions from the ML model that you trained when following the previous page of this tutorial, create a Vertex AI endpoint. Endpoints serve online predictions from one or more models.
In the Google Cloud console, in the Vertex AI section, go to the Models page.
Find the row of the model that you trained in the previous step of this tutorial,
hello_custom, and click the model's name to open the model detail page.On the Deploy & test tab, click Deploy to endpoint to open the Deploy to endpoint pane.
On the Define your endpoint step, add some basic information for your endpoint:
Select Create new endpoint.
In the Endpoint name field, enter
hello_custom.In the Model settings section, ensure that you see the name of your model, which is also called
hello_custom. Specify the following model settings:In the Traffic split field, enter
100. Vertex AI supports splitting traffic for an endpoint to multiple models, but this tutorial doesn't use that feature.In the Minimum number of compute nodes field, enter
1.In the Machine type drop-down list, select n1-standard-2 from the Standard section.
Click Done.
In the Logging section, ensure that both types of prediction logging are enabled.
Click Continue.
On the Endpoint details step, confirm that your endpoint will be deployed to
us-central1 (Iowa).Do not select the Use a customer-managed encryption key (CMEK) checkbox. This tutorial does not use CMEK.
Click Deploy to create the endpoint and deploy your model to the endpoint.
After a few minutes, appears next to the new endpoint in the Endpoints table. At the same time, you also receive an email indicating that you have successfully created the endpoint and deployed your model to the endpoint.
Deploy a Cloud Function
You can get predictions from the Vertex AI endpoint that you just
created by sending requests to the Vertex AI API's REST interface. However, only
principals with the aiplatform.endpoints.predict
permission can send online prediction requests. You
cannot make the endpoint public for anybody to send requests to, for example via
a web app.
In this section, deploy code to Cloud Functions to handle
unauthenticated requests. The sample code that you downloaded when you read the
first page of this tutorial contains code for this
Cloud Function in the function/ directory. Optionally, run the
following command to explore the Cloud Function code:
less function/main.py
Deploying the function serves the following purposes:
You can configure a Cloud Function to receive unauthenticated requests. Additionally, functions run using a service account with the Editor role by default, which includes the
aiplatform.endpoints.predictpermission necessary to get predictions from your Vertex AI endpoint.This function also performs useful preprocessing on requests. The Vertex AI endpoint expects prediction requests in the format of the trained TensorFlow Keras graph's first layer: a tensor of normalized floats with fixed dimensions. The function takes the URL of an image as input and preprocesses the image into this format before requesting a prediction from the Vertex AI endpoint.
To deploy the Cloud Function, do the following:
In the Google Cloud console, in the Vertex AI section, go to the Endpoints page.
Find the row of the endpoint that you created in the previous section, named
hello_custom. In this row, click Sample request to open the Sample request pane.In the Sample request pane, find the line of shell code that matches the following pattern:
ENDPOINT_ID="ENDPOINT_ID"
ENDPOINT_ID is a number that identifies this particular endpoint.
Copy this line of code, and run it in your Cloud Shell session to set the
ENDPOINT_IDvariable.Run the following command in your Cloud Shell session to deploy the Cloud Function:
gcloud functions deploy classify_flower \
  --region=us-central1 \
  --source=function \
  --runtime=python37 \
  --memory=2048MB \
  --trigger-http \
  --allow-unauthenticated \
  --set-env-vars=ENDPOINT_ID=${ENDPOINT_ID}
Deploy a web app to send prediction requests
Finally, host a static web app on Cloud Storage to get predictions from your trained ML model. The web app sends requests to your Cloud Function, which preprocesses them and gets predictions from the Vertex AI endpoint.
The webapp directory of the sample code that you downloaded contains a sample
web app. In your Cloud Shell session, run the following commands
to prepare and deploy the web app:
Set a couple of shell variables for commands in following steps to use:
PROJECT_ID=PROJECT_ID
BUCKET_NAME=BUCKET_NAME
Replace the following:
- PROJECT_ID: Your Google Cloud project ID.
- BUCKET_NAME: The name of the Cloud Storage bucket that you created when following the first page of this tutorial.
Edit the app to provide it with the trigger URL of your Cloud Function:
echo "export const CLOUD_FUNCTION_URL = 'https://us-central1-${PROJECT_ID}.cloudfunctions.net/classify_flower';" \
  > webapp/function-url.js
Upload the
webappdirectory to your Cloud Storage bucket:gsutil -m cp -r webapp gs://${BUCKET_NAME}/Make the web app files that you just uploaded publicly readable:
gsutil -m acl ch -u AllUsers:R gs://${BUCKET_NAME}/webapp/**You can now navigate to the following URL to open web app and get predictions:
https://storage.googleapis.com/BUCKET_NAME/webapp/index.html
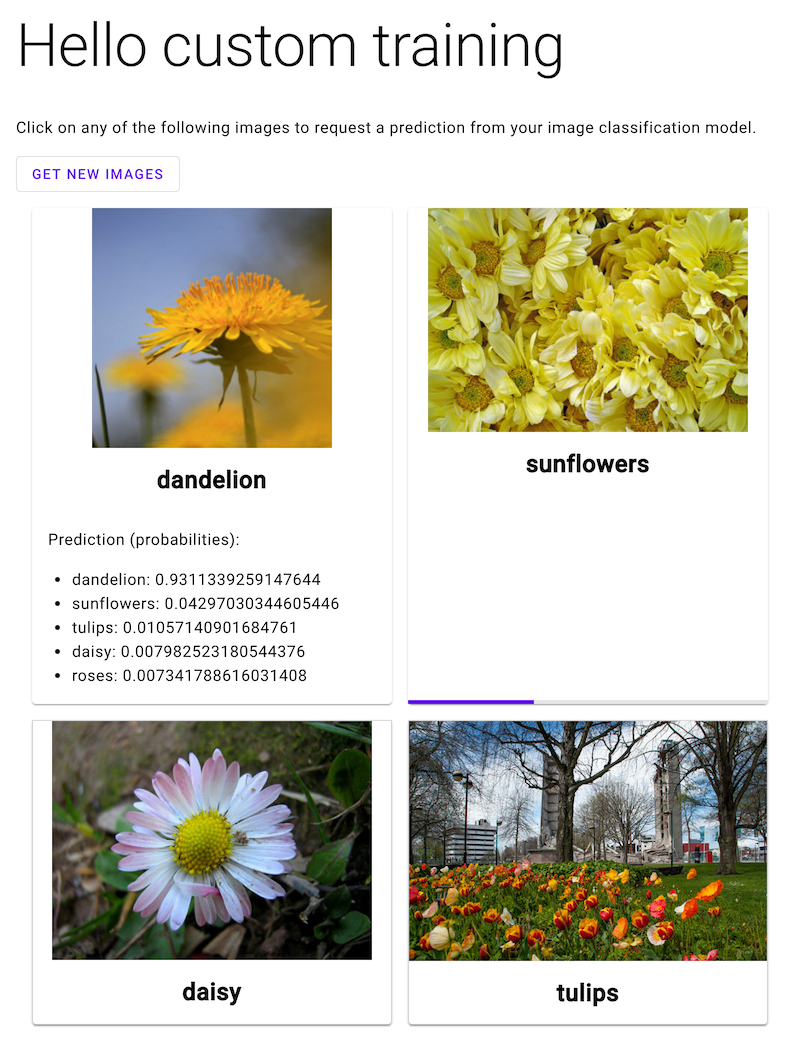
Open the web app and click an image of a flower to see your ML model's classification of the flower type. The web app presents the prediction as a list of flower types and the probability that the image contains each type of flower.
In the following screenshot, the web app has already gotten one prediction and is in the process of sending another prediction request.
What's next
Follow the last page of the tutorial to clean up resources that you have created.