使用术语表翻译和朗读照片中的文本(高级版)


本页面介绍了如何检测图片中的文本、如何进行个性化翻译,以及如何从文本生成合成语音。 本教程使用 Cloud Vision 检测图片文件中的文本。随后,本教程介绍了如何使用 Cloud Translation 对检测到的文本进行自定义翻译。最后,本教程使用 Text-to-Speech 提供译文的机器口录。

目标

  1. 将 Cloud Vision API 识别的文本传递给 Cloud Translation API。

  2. 创建并使用 Cloud Translation 术语表来进行个性化 Cloud Translation API 翻译。

  3. 使用 Text-to-Speech API 创建译文的音频。

费用

每个 Google Cloud API 使用单独的价格结构。

如需了解价格详情,请参阅 Cloud Vision 价格指南Cloud Translation 价格指南Text-to-Speech 价格指南

准备工作

确保您已具备以下条件:

下载代码示例

本教程使用 Python 版 Cloud 客户端库samples/snippets/hybrid_glossaries 目录内的代码。

如需下载并导航到本教程的代码,请从终端运行以下命令。

git clone https://github.com/googleapis/python-translate.git
cd samples/snippets/hybrid_glossaries/

设置客户端库

本教程使用 Vision 客户端库、Translation 客户端库、Text-to-Speech 客户端库。

如需安装相关的客户端库,请从终端运行以下命令。

pip install --upgrade google-cloud-vision
pip install --upgrade google-cloud-translate
pip install --upgrade google-cloud-texttospeech

设置创建术语表的权限

如需创建 Translation 术语表,必须使用具有“Cloud Translation API Editor”权限的服务账号密钥。

如需设置具有 Cloud Translation API Editor 权限的服务账号密钥,请执行以下操作:

  1. 创建服务账号:

    1. 在 Google Cloud 控制台中,转到服务账号页面。

      转到“服务账号”

    2. 选择您的项目。

    3. 点击创建服务账号

    4. 服务账号名称字段中,输入一个名称。Google Cloud 控制台会根据此名称填充服务账号 ID 字段。

    5. 可选:在服务账号说明字段中,输入服务账号的说明。

    6. 点击创建并继续

    7. 点击选择角色字段,然后选择 Cloud Translation > Cloud Translation API Editor

    8. 点击完成以完成服务账号的创建过程。

      不要关闭浏览器窗口。您将在下一步骤中用到它。

  2. 下载刚刚创建的服务账号的 JSON 密钥:

    1. 在 Google Cloud 控制台中,点击您创建的服务账号的电子邮件地址。
    2. 点击密钥
    3. 依次点击添加密钥创建新密钥
    4. 点击创建。JSON 密钥文件将下载到您的计算机上。

      务必要安全存储密钥文件,因为它能够以服务账号的身份进行身份验证。您可以根据需要移动并重命名此文件。

    5. 点击关闭

  3. 在终端的 hybrid_glossaries 文件夹中,使用以下命令设置 GOOGLE_APPLICATION_CREDENTIALS 变量。将 path_to_key 替换为包含新服务账号密钥的已下载 JSON 文件的路径。

    Linux 或 macOS

    export GOOGLE_APPLICATION_CREDENTIALS=path_to_key

    Windows

    set GOOGLE_APPLICATION_CREDENTIALS=path_to_key

导入库

本教程使用以下系统导入操作和客户端库导入操作。

import html
import os

# Imports the Google Cloud client libraries
from google.api_core.exceptions import AlreadyExists
from google.cloud import texttospeech
from google.cloud import translate_v3beta1 as translate
from google.cloud import vision

设置您的项目 ID

您必须将 Google Cloud 项目与每个 Google Cloud API 请求相关联。通过从终端设置 GOOGLE_CLOUD_PROJECT 环境变量,指定您的 Google Cloud 项目

在以下命令中,将 PROJECT_NUMBER_OR_ID 替换为您的 Google Cloud 项目编号或 ID。从终端运行以下命令。

Linux 或 macOS

export GOOGLE_CLOUD_PROJECT=PROJECT_NUMBER_OR_ID

Windows

set GOOGLE_CLOUD_PROJECT=PROJECT_NUMBER_OR_ID

本教程使用以下全局项目 ID 变量。

# extract GCP project id
PROJECT_ID = os.environ["GOOGLE_CLOUD_PROJECT"]

使用 Vision 检测图片中的文本

使用 Vision API 检测和提取图片中的文本。Vision API 使用光学字符识别 (OCR) 技术支持两种文本检测功能:密集文本检测 (DOCUMENT_TEXT_DETECTION) 和稀疏文本检测 (TEXT_DETECTION)。

以下代码展示了如何使用 Vision API DOCUMENT_TEXT_DETECTION 功能检测包含密集文本的照片中的文本。

def pic_to_text(infile: str) -> str:
    """Detects text in an image file

    Args:
    infile: path to image file

    Returns:
    String of text detected in image
    """

    # Instantiates a client
    client = vision.ImageAnnotatorClient()

    # Opens the input image file
    with open(infile, "rb") as image_file:
        content = image_file.read()

    image = vision.Image(content=content)

    # For dense text, use document_text_detection
    # For less dense text, use text_detection
    response = client.document_text_detection(image=image)
    text = response.full_text_annotation.text
    print(f"Detected text: {text}")

    return text

将 Translation 与术语表搭配使用

从图片中提取文本后,请使用 Translation 术语表对提取的文本进行个性化翻译。术语表提供了预定义翻译,用于替换指定术语的 Cloud Translation API 翻译。

术语表用例包括以下内容:

  • 产品名称:例如,“Google Home”必须翻译为“Google Home”。

  • 多义词:例如,“bat”一词可能表示一种体育用品或动物。如果您知道自己正在翻译有关体育的字词,您可能需要使用术语表向 Cloud Translation API 提供“bat”的体育用品译文(而不是其动物译文)。

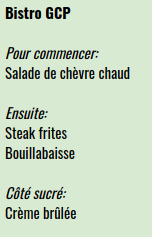
  • 外来词:例如,法语的“bouillabaisse”翻译为英语的“bouillabaisse”;英语借用了法语中的“bouillabaisse”一词。一个说英语的人,如果欠缺法国文化背景知识,可能不知道 bouillabaisse 是一种法国浓味鱼肉汤。术语表可以替换译文,以便将法语的“bouillabaisse”翻译为英语的“fish stew”。

创建术语表文件

Cloud Translation API 接受 TSV、CSV 或 TMX 术语表文件。本教程使用上传到 Cloud Storage 的 CSV 文件来定义几组等效术语。

如需创建术语表 CSV 文件,请执行以下操作:

  1. 在 CSV 文件的第一行中使用 ISO-639BCP-47 语言代码指定列的语言

    fr,en,

  2. 在 CSV 文件的每一行中列出等效术语对。使用英文逗号分隔术语。以下示例定义了几个法语烹饪词汇的英语翻译。

    fr,en,
    chèvre,goat cheese,
    crème brulée,crème brulée,
    bouillabaisse,fish stew,
    steak frites,steak with french fries,
    

  3. 定义词汇的变体。Cloud Translation API 区分大小写,并且会区分特殊字符(例如重音词)。通过明确定义词汇的不同拼写,确保术语表能够处理词汇的变体。

    fr,en,
    chevre,goat cheese,
    Chevre,Goat cheese,
    chèvre,goat cheese,
    Chèvre,Goat cheese,
    crème brulée,crème brulée,
    Crème brulée,Crème brulée,
    Crème Brulée,Crème Brulée,
    bouillabaisse,fish stew,
    Bouillabaisse,Fish stew,
    steak frites,steak with french fries,
    Steak frites,Steak with french fries,
    Steak Frites,Steak with French Fries,
    

  4. 将术语表上传Cloud Storage 存储分区。在本教程中,您不需要将术语表文件上传到 Cloud Storage 存储分区,也不需要创建 Cloud Storage 存储分区。您只需使用为本教程创建的公开提供的术语表文件即可,以避免产生任何 Cloud Storage 费用。将 Cloud Storage 中的术语表文件的 URI 发送到 Cloud Translation API,以创建术语表资源。本教程中公开提供的术语表文件的 URI 为 gs://cloud-samples-data/translation/bistro_glossary.csv。如需下载该术语表,请点击上面的 URI 链接,但不要在新标签页中打开它。

创建术语表资源

如需使用术语表,您必须使用 Cloud Translation API 创建术语表资源。如需创建术语表资源,请将 Cloud Storage 中的术语表文件的 URI 发送到 Cloud Translation API。

请确保您使用的是具有“Cloud Translation API Editor”权限的服务账号密钥,并确保您已从终端设置您的项目 ID

以下函数会创建一个术语表资源。借助此术语表资源,您可以在本教程的下一步中对翻译请求进行个性化设置。

def create_glossary(
    languages: list,
    project_id: str,
    glossary_name: str,
    glossary_uri: str,
) -> str:
    """Creates a GCP glossary resource
    Assumes you've already manually uploaded a glossary to Cloud Storage

    Args:
    languages: list of languages in the glossary
    project_id: GCP project id
    glossary_name: name you want to give this glossary resource
    glossary_uri: the uri of the glossary you uploaded to Cloud Storage

    Returns:
    name of the created or existing glossary
    """

    # Instantiates a client
    client = translate.TranslationServiceClient()

    # Designates the data center location that you want to use
    location = "us-central1"

    # Set glossary resource name
    name = client.glossary_path(project_id, location, glossary_name)

    # Set language codes
    language_codes_set = translate.Glossary.LanguageCodesSet(language_codes=languages)

    gcs_source = translate.GcsSource(input_uri=glossary_uri)

    input_config = translate.GlossaryInputConfig(gcs_source=gcs_source)

    # Set glossary resource information
    glossary = translate.Glossary(
        name=name, language_codes_set=language_codes_set, input_config=input_config
    )

    parent = f"projects/{project_id}/locations/{location}"

    # Create glossary resource
    # Handle exception for case in which a glossary
    #  with glossary_name already exists
    try:
        operation = client.create_glossary(parent=parent, glossary=glossary)
        operation.result(timeout=90)
        print("Created glossary " + glossary_name + ".")
    except AlreadyExists:
        print(
            "The glossary "
            + glossary_name
            + " already exists. No new glossary was created."
        )

    return glossary_name

使用术语表进行翻译

创建术语表资源后,您可以使用该术语表资源对发送到 Cloud Translation API 的文本进行个性化翻译。

以下函数使用您之前创建的术语表资源对文本进行个性化翻译。

def translate_text(
    text: str,
    source_language_code: str,
    target_language_code: str,
    project_id: str,
    glossary_name: str,
) -> str:
    """Translates text to a given language using a glossary

    Args:
    text: String of text to translate
    source_language_code: language of input text
    target_language_code: language of output text
    project_id: GCP project id
    glossary_name: name you gave your project's glossary
        resource when you created it

    Return:
    String of translated text
    """

    # Instantiates a client
    client = translate.TranslationServiceClient()

    # Designates the data center location that you want to use
    location = "us-central1"

    glossary = client.glossary_path(project_id, location, glossary_name)

    glossary_config = translate.TranslateTextGlossaryConfig(glossary=glossary)

    parent = f"projects/{project_id}/locations/{location}"

    result = client.translate_text(
        request={
            "parent": parent,
            "contents": [text],
            "mime_type": "text/plain",  # mime types: text/plain, text/html
            "source_language_code": source_language_code,
            "target_language_code": target_language_code,
            "glossary_config": glossary_config,
        }
    )

    # Extract translated text from API response
    return result.glossary_translations[0].translated_text

将 Text-to-Speech 与语音合成标记语言搭配使用

现在,您已经对图片中检测到的文本进行了个性化翻译,接下来就可以使用 Text-to-Speech API 了。Text-to-Speech API 可以创建译文的合成音频。

Text-to-Speech API 可以根据纯文本字符串或使用语音合成标记语言 (SSML) 标记的文本字符串生成合成音频。SSML 是一种标记语言,该语言支持使用 SSML 标记来注释文本。您可以使用 SSML 标记来影响 Text-to-Speech API 对合成语音内容的格式设置

以下函数将 SSML 字符串转换为合成语音的 MP3 文件。

def text_to_speech(text: str, outfile: str) -> str:
    """Converts plaintext to SSML and
    generates synthetic audio from SSML

    Args:

    text: text to synthesize
    outfile: filename to use to store synthetic audio

    Returns:
    String of synthesized audio
    """

    # Replace special characters with HTML Ampersand Character Codes
    # These Codes prevent the API from confusing text with
    # SSML commands
    # For example, '<' --> '&lt;' and '&' --> '&amp;'
    escaped_lines = html.escape(text)

    # Convert plaintext to SSML in order to wait two seconds
    #   between each line in synthetic speech
    ssml = "<speak>{}</speak>".format(
        escaped_lines.replace("\n", '\n<break time="2s"/>')
    )

    # Instantiates a client
    client = texttospeech.TextToSpeechClient()

    # Sets the text input to be synthesized
    synthesis_input = texttospeech.SynthesisInput(ssml=ssml)

    # Builds the voice request, selects the language code ("en-US") and
    # the SSML voice gender ("MALE")
    voice = texttospeech.VoiceSelectionParams(
        language_code="en-US", ssml_gender=texttospeech.SsmlVoiceGender.MALE
    )

    # Selects the type of audio file to return
    audio_config = texttospeech.AudioConfig(
        audio_encoding=texttospeech.AudioEncoding.MP3
    )

    # Performs the text-to-speech request on the text input with the selected
    # voice parameters and audio file type

    request = texttospeech.SynthesizeSpeechRequest(
        input=synthesis_input, voice=voice, audio_config=audio_config
    )

    response = client.synthesize_speech(request=request)

    # Writes the synthetic audio to the output file.
    with open(outfile, "wb") as out:
        out.write(response.audio_content)
        print("Audio content written to file " + outfile)

综合应用

在前面的步骤中,您在 hybrid_glossaries.py 中定义了使用 Vision、Translation、Text-to-Speech 的函数。现在,您可以使用这些函数从以下照片生成译文的合成语音。

下面的代码调用 hybrid_glossaries.py 中定义的函数以执行以下操作:

  • 创建 Cloud Translation API 术语表资源

  • 使用 Vision API 检测上图中的文本

  • 使用 Cloud Translation API 术语表对检测到的文本进行翻译

  • 生成译文的 Text-to-Speech 合成语音

def main() -> None:
    """This method is called when the tutorial is run in the Google Cloud
    Translation API. It creates a glossary, translates text to
    French, and speaks the translated text.

    Args:
    None

    Returns:
    None
    """
    # Photo from which to extract text
    infile = "resources/example.png"
    # Name of file that will hold synthetic speech
    outfile = "resources/example.mp3"

    # Defines the languages in the glossary
    # This list must match the languages in the glossary
    #   Here, the glossary includes French and English
    glossary_langs = ["fr", "en"]
    # Name that will be assigned to your project's glossary resource
    glossary_name = "bistro-glossary"
    # uri of .csv file uploaded to Cloud Storage
    glossary_uri = "gs://cloud-samples-data/translation/bistro_glossary.csv"

    created_glossary_name = create_glossary(
        glossary_langs, PROJECT_ID, glossary_name, glossary_uri
    )

    # photo -> detected text
    text_to_translate = pic_to_text(infile)
    # detected text -> translated text
    text_to_speak = translate_text(
        text_to_translate, "fr", "en", PROJECT_ID, created_glossary_name
    )
    # translated text -> synthetic audio
    text_to_speech(text_to_speak, outfile)

运行代码

如需运行代码,请通过终端在克隆的 hybrid_glossaries 目录中输入以下命令:

python hybrid_tutorial.py

此时会显示以下输出:

Created glossary bistro-glossary.
Audio content written to file resources/example.mp3

运行 hybrid_glossaries.py 后,从 hybrid_glossaries 目录导航到 resources 目录。在 resources 目录中查找 example.mp3 文件。

聆听以下音频剪辑,以确认 example.mp3 文件的语音正是您所期望的语音。


对错误消息进行问题排查

  • 403 IAM permission 'cloudtranslate.glossaries.create' denied.

    如果使用没有“Cloud Translation API Editor”权限的服务账号密钥,则会引发此异常。

  • KeyError: 'GOOGLE_CLOUD_PROJECT'

    如果未设置 GOOGLE_CLOUD_PROJECT 变量,则会导致此错误。

  • 400 Invalid resource name project id

    如果使用的术语表名称包含小写字母、数字、句点、英文冒号或连字符以外的其他字符,或者如果使用没有“Cloud Translation API Editor”权限的服务账号密钥,则会引发此异常。

  • File filename was not found.

    如果将 GOOGLE_APPLICATION_CREDENTIALS 变量设置为无效的文件路径,则会引发此异常。

  • Could not automatically determine credentials. Please set GOOGLE_APPLICATION_CREDENTIALS or explicitly create credentials and re-run the application

    如果未设置 GOOGLE_APPLICATION_CREDENTIALS 变量,则会引发此异常。

  • Forbidden: 403 POST API has not been used or is disabled

    如果在没有启用相应 API 的情况下调用 Cloud Translation API、Cloud Vision API 或 Text-to-Speech API,则会导致此警告。

  • AttributeError: 'module' object has no attribute 'escape'

    Python 2.7.10 或更早版本与 HTML 不兼容。如需消除此错误,请使用 Python 虚拟环境。该虚拟环境将使用最新版本的 Python。

  • UnicodeEncodeError

    Python 2.7.10 或更早版本与 HTML 不兼容。如需消除此错误,请使用 Python 虚拟环境。该虚拟环境将使用最新版本的 Python。

清理

使用 Google Cloud 控制台删除不需要的项目。删除项目可以避免您的 Cloud Billing 账号因本教程中使用的资源产生额外费用。

删除项目

  1. Google Cloud 控制台中,转到“项目”页面。
  2. 在项目列表中,选择要删除的项目,然后点击删除
  3. 在对话框中输入项目 ID,然后点击关停以删除项目。

后续步骤

恭喜!您刚刚使用了 Vision OCR 检测图片中的文本。然后,您创建了 Translation 术语表,并使用该术语表进行了翻译。之后,您使用了 Text-to-Speech 生成译文的合成音频。

如需进一步熟悉 Vision、Cloud Translation、Text-to-Speech,请执行以下操作: