Before you begin, you must enable billing and APIs and set up private service access; otherwise, the volume creation process fails.
To successfully create an NFS volume, you must create the NFS volume and mount your NFS exports to Compute Engine instances.
Considerations
An NFS volume can use NFSv3 or NFSv4.1. The following considerations apply:
About NFS versions: NFSv3 can handle a variety of use cases and is commonly deployed in most enterprise applications. You should validate what version (NFSv3 or NFSv4.1) your application requires and create your volume using the appropriate version—for example, if you use Apache ActiveMQ, file locking with NFSv4.1 is recommended over NFSv3.
Security: Support for UNIX mode bits—read, write, and execute—is available for NFSv3 and NFSv4.1. Root-level access is required on the NFS client to mount NFS volumes. The root inode is owned by
root:rootand default permissions are set to0770for CVS-Performance service type and0777for the CVS service type.Local user/group and LDAP support for NFSv4.1: Currently, NFSv4.1 supports root access to volumes only.
After you create an NFS volume, you cannot change the protocol type between NFSv3 and NFSv4.1.
The CVS service type does not currently support NFSv4.1. If you want to use NFSv4.1, use the CVS-Performance type to create a NFSv4.1 volume.
When using NFSv4.1, the domain parameter needs to be configured in
/etc/idmapd.conf. For volumes configured to use LDAP, use the Active Directory domain as the domain name. For volumes without LDAP, usedefaultv4iddomain.comas the domain name.
For information about managing local users for an NFS volume, see the Linux
manual pages for the
passwd and
group commands.
NFS users are generally limited to 16 group identifiers. The CVS-Performance service type supports a larger number of group identifiers through extended groups support with LDAP. All group identifiers sent by the client are ignored and those fetched from an LDAP server are used instead. For more information, see Set up Active Directory for NFS.
Create an NFS volume
You can create an NFS volume with either the general-purpose CVS service type or the CVS-Performance service type. The service type that you select for a volume depends on the workload needs that you have for that volume. By default, an NFS volume is created using the CVS service type. For more information, see Service types.
In the Google Cloud console, go to the Volumes page.
Click Create.
On the Create File System page, specify the name and options for your volume as indicated in the following table.
Required fields are marked with an asterisk (*).
Field Description CVS CVS-Performance Name* Name displayed for the volume. Billing Label Adds a label to the volume for billing reports and queries.
Service Type* CVS or CVS-Performance service type.
Each service type offers different service levels, and the service levels are offered in different regions. For details, see Service types.
Replication Select to create volume as a destination target for volume replication. These volumes are read-only and aren't intended for active workloads. Region* Google Cloud region for your volume. For more information, see Best practices for Compute Engine region selection. Zone* Google Cloud zone for your volume. Volume Path* The system automatically generates a recommended volume path. The name must be unique across all of your cloud volumes. Service Level* - For the CVS service type, select the level of availability for the volume.
- For the CVS-Performance service type, select the level of performance for the volume.
Snapshot Allows you to create and manage a volume based on a snapshot. Allocated Capacity* Size of the cloud volume. The minimum size is 1,024 GiB (1 TiB). Protocol Type* The NFS protocol that applies to your service type: NFSv3, NFSv4.1, or Both (NFSv3/NFSv4.1). NFSv3 only Make snapshot directory (.snapshot) visible Makes your snapshot directory visible to the client as a hidden .snapshotdirectory in the root of the mapped share. Enables Previous Versions access in Windows Explorer.Enable LDAP Enables extended group support per volume. Ignores GIDs sent by the client and uses GIDs fetched from LDAP instead. Block volume from deletion when clients are connected Required for volumes used as Google Cloud VMware Engine datastores. After this option is enabled for a volume, the only way to disable it is by opening a support case. NFSv3 only In the Network Details section, specify the following:
Shared VPC configuration: The VPC network can be part of a host project in a shared VPC network, or it can be a standalone project. If you have a host project and shared VPC topology, select Shared VPC configuration. For standalone projects, leave the box cleared.
VPC Network Name: Select the network from which the volume is accessible.
If this is the first time that you're setting up VPC network peering for Cloud Volumes Service, you receive the following prompt indicating that you need to set up network peering:

Click the View commands how to set up network peering button. To configure VPC network peering, follow the steps in the dialog that appears.
In the dialog, you can optionally select Use Custom Address Range. This option lets you, for example, specify a CIDR range that doesn't overlap with your on-premises CIDR blocks. To allow for future flexibility, choose a larger CIDR block size (prefix range).
To manage export policy rules for the volume, expand Show export policy and do the following:
Click Add Rule to define the allowed clients and their access type.
In the Allowed clients field, enter a comma-separated list of IPv4 CIDR ranges or IPv4 host addresses that are allowed to connect to the volume. The maximum length of the list of IPv4 CIDR ranges or IPv4 host addresses is 4,096 characters.
To select the type of access these IP addresses have to the cloud volume, select Read & Write or Read Only.
Root Access is enabled by default and is only available for the CVS-Performance service type. This setting corresponds to the
no_root_squashoption on other NFS servers.To disable this option, select Off.
Select the checkbox for the corresponding NFS version for which you want to give access. You can add additional rules as needed.
The protocol type allowed for the export must match the protocol type that you previously selected. A warning appears if the protocol type you select to allow for export does not match the protocol type selected for the volume.
You can't access your NFS volumes unless you add an export policy.
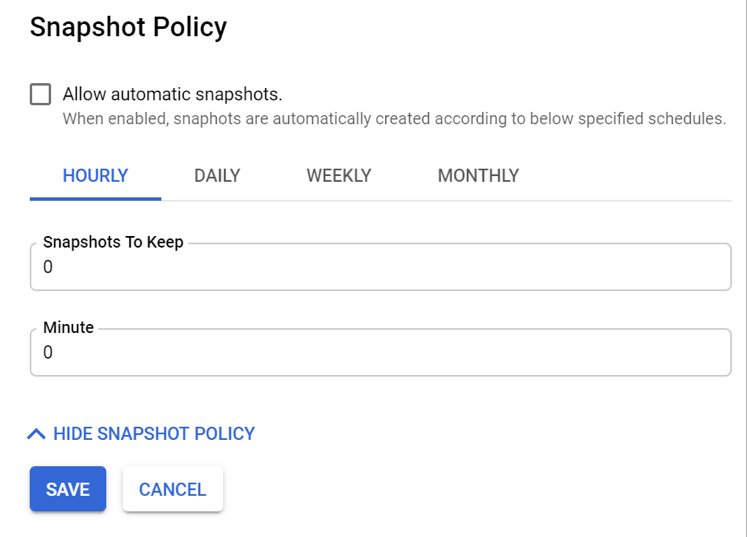
To manage the snapshot policy for the volume, expand Show snapshot policy, select Allow automatic snapshots, specify the snapshot schedules, and specify the number of snapshots to keep.
For details, see Create or modify a snapshot policy.
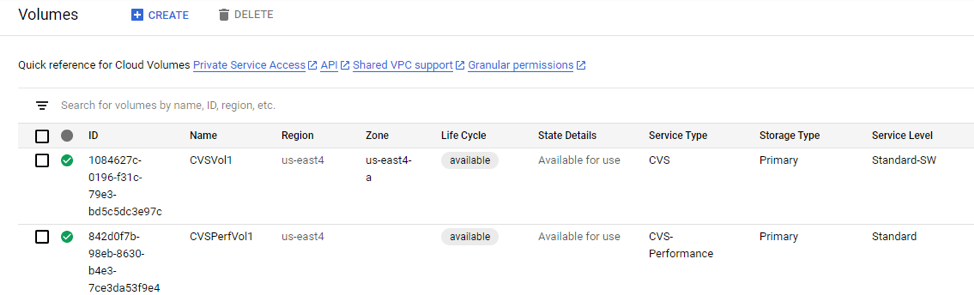
Click Save to create the volume.
The new volume appears in the Volumes list.
Mount NFS exports to Compute Engine instances
Use the following instructions to mount your NFS exports to Compute Engine instances:
In the Google Cloud console, go to the Volumes page.
Click the NFS volume for which you want to mount NFS exports.
Click More. more_vert, and then click Mount Instructions.
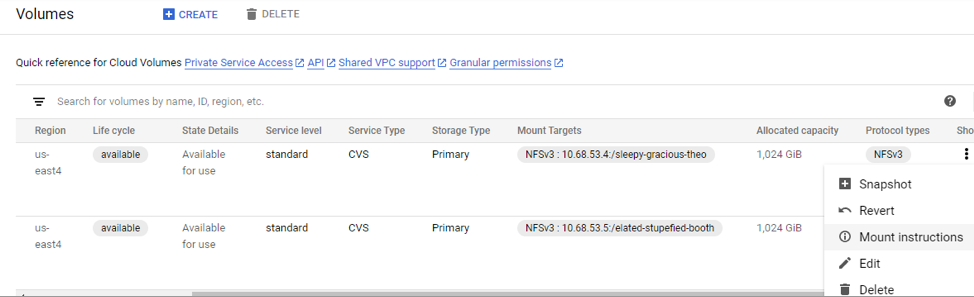
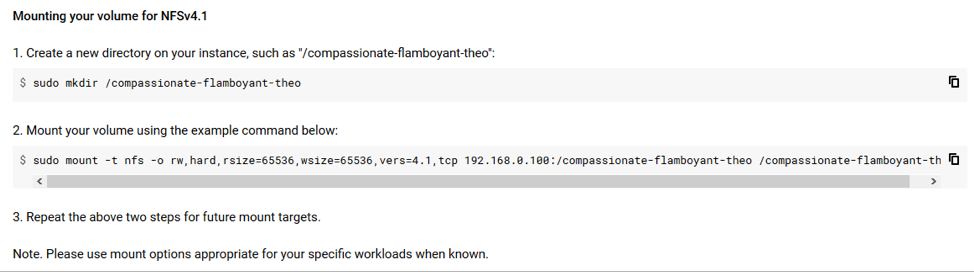
Follow the instructions in the Mount Instructions for NFS window.
The mounting instructions may be slightly different depending on which NFS protocol you have configured for the volume. The following example is for NFSv4.1.
Disable root access to the volume
By default, root access to a volume is enabled. This corresponds to the
no_root_squash option on other NFS servers.
You can disable root access to a volume with the UI or the API. This option is only available for volumes of the CVS-Performance service type.
You can enable or disable root access when you create or edit a volume.
For details of enabling or disabling root access with the UI, see Create an NFS volume.
For an example of disabling root access with the API, see
Update volume with rootAccess disabled.
Configure NFSv4.1 name resolution
NFSv4.x uses UTF-8 encoded strings for the owner and owner_group values,
which take the form of user@dns_domain. To resolve these identity strings,
NFS clients and servers need access to the same name service. This name service
is used to translate between usernames and user IDs and between group
names and group IDs. Cloud Volumes Service uses Active Directory LDAP as
the name service. For more information, see
Manage LDAP POSIX attributes.
For easier backward compatibility with NFSv3, you can choose for your NFSv4.x server to use numeric values (numeric IDs). Using numeric IDs reduces the dependency on the correct setup for resolution between user names and UIDs and between group names and group IDs, which makes LDAP optional for user ID and group ID translation. Recent Linux clients support numeric IDs and typically use them by default unless name resolution is configured.
To check your Linux client setting, run the following as root:
modprobe nfs
cat /sys/module/nfs/parameters/nfs4_disable_idmapping
A result of Y indicates that numeric ID support is enabled.
Cloud Volumes Service supports use of NFSv4 identity strings and numeric IDs.
NFSv4.1 without LDAP
If LDAP isn't configured, an NFSv4.1 volume automatically uses numeric IDs,
user IDs, and group IDs to operate. The only exception is the root user.
The root user functions properly as root, but it's displayed as UID=4294967294
(nobody) in the ls output. To fix this, you can edit the /etc/idmapd.conf
configuration file in your client to contain the following:
domain = defaultv4iddomain.com
NFSv4.1 with LDAP
Using NFSv4.1 with LDAP is a prerequisite for using NFSv4 access control lists (ACLs) and/or NFSv4.1 with Kerberos.
When you
set up Active Directory for NFS,
you can enable name resolution using POSIX attributes stored in the Active
Directory LDAP server. When name resolution is enabled, your NFS client can send
name@dns-domain identities to the NFS server. With LDAP enabled, Cloud
Volumes Service uses the Active Directory domain name as the NFSv4 domain name.
To make sure that your client works properly, reconfigure your client to fetch
identities from Active Directory and change the domain in the /etc/idmapd.conf
configuration file to reflect your Active Directory DNS domain name:
domain = example.com
Configure NFSv4.1 Kerberos
Cloud Volumes service supports NFSv4.1 volumes with Kerberos modes krb5
(authentication), krb5i (integrity), and krb5p (privacy). Kerberos mode
krb5i is used for datagram signing, ensuring that the data isn’t modified in
transit. Kerberos mode krb5p encrypts the data in transit using AES-256
encryption.
Cloud Volumes Service supports NFS client encryption in Kerberos modes krb5, krb5i, and krb5p, with AES-256 encryption.
You can enable NFSv4.1 Kerberos when you create a volume using the Google Cloud console or with the API.
To enable Kerberos when you create an NFSv4.1 volume for the CVS-Performance service type in the Google Cloud console, select Enable Kerberos in the volume details.
For more information about NFS Kerberos in ONTAP, see the ONTAP technical report (PDF).
Enable Kerberos encryption with the console UI
When you create the NFSv4.1 volume for the CVS-Performance service type, select Enable Kerberos in the Volume details section of the Create file system page.