This tutorial describes how to migrate from Amazon DynamoDB to Spanner. It is primarily intended for app owners who want to move from a NoSQL system to Spanner, a fully relational, fault-tolerant, highly scalable SQL database system that supports transactions. If you have consistent Amazon DynamoDB table usage, in terms of types and layout, mapping to Spanner is straightforward. If your Amazon DynamoDB tables contain arbitrary data types and values, it might be simpler to move to other NoSQL services, such as Datastore or Firestore.
This tutorial assumes that you are familiar with database schemas, data types, the fundamentals of NoSQL, and relational database systems. The tutorial relies on running predefined tasks to perform an example migration. After the tutorial, you can modify the provided code and steps to match your environment.
The following architectural diagram outlines the components used in the tutorial to migrate data:

Objectives
- Migrate data from Amazon DynamoDB to Spanner.
- Create a Spanner database and migration table.
- Map a NoSQL schema to a relational schema.
- Create and export a sample dataset that uses Amazon DynamoDB.
- Transfer data between Amazon S3 and Cloud Storage.
- Use Dataflow to load data into Spanner.
Costs
This tutorial uses the following billable components of Google Cloud:
Spanner charges are based on the amount of compute capacity in your instance and the amount of data stored during the monthly billing cycle. During the tutorial, you use a minimal configuration of these resources, which are cleaned up at the end. For real-world scenarios, estimate your throughput and storage requirements, and then use the Spanner instances documentation to determine the amount of compute capacity that you need.
In addition to Google Cloud resources, this tutorial uses the following Amazon Web Services (AWS) resources:
- AWS Lambda
- Amazon S3
- Amazon DynamoDB
These services are only needed during the migration process. At the end of the tutorial, follow the instructions to clean up all resources to prevent unnecessary charges. Use the AWS pricing calculator to estimate these costs.
To generate a cost estimate based on your projected usage, use the pricing calculator.
Before you begin
- Sign in to your Google Cloud account. If you're new to Google Cloud, create an account to evaluate how our products perform in real-world scenarios. New customers also get $300 in free credits to run, test, and deploy workloads.
-
In the Google Cloud console, on the project selector page, select or create a Google Cloud project.
-
Make sure that billing is enabled for your Google Cloud project.
-
Enable the Spanner, Pub/Sub, Compute Engine, and Dataflow APIs.
-
In the Google Cloud console, on the project selector page, select or create a Google Cloud project.
-
Make sure that billing is enabled for your Google Cloud project.
-
Enable the Spanner, Pub/Sub, Compute Engine, and Dataflow APIs.
When you finish the tasks that are described in this document, you can avoid continued billing by deleting the resources that you created. For more information, see Clean up.
Prepare your environment
In this tutorial, you run commands in Cloud Shell. Cloud Shell gives you access to the command line in Google Cloud, and includes the Google Cloud CLI and other tools that you need for Google Cloud development. Cloud Shell can take several minutes to initialize.
-
In the Google Cloud console, activate Cloud Shell.
At the bottom of the Google Cloud console, a Cloud Shell session starts and displays a command-line prompt. Cloud Shell is a shell environment with the Google Cloud CLI already installed and with values already set for your current project. It can take a few seconds for the session to initialize.
- Set the default Compute Engine zone. For example,
us-central1-b.<pre class="devsite-click-to-copy"> gcloud config set compute/zone us-central1-b </pre></li> - Clone the GitHub repository containing the sample code.
<pre class="devsite-click-to-copy"> git clone https://github.com/GoogleCloudPlatform/dynamodb-spanner-migration.git </pre></li> - Go to the cloned directory.
<pre class="devsite-click-to-copy"> cd dynamodb-spanner-migration </pre></li> - Create a Python virtual environment.
<pre class="devsite-click-to-copy"> pip3 install virtualenv virtualenv env </pre></li> - Activate the virtual environment.
<pre class="devsite-click-to-copy"> source env/bin/activate </pre></li> - Install the required Python modules.
<pre class="devsite-click-to-copy">
pip3 install -r requirements.txt
</pre></li>
Configure AWS access
In this tutorial, you create and delete Amazon DynamoDB tables, Amazon S3 buckets, and other resources. To access these resources, you first need to create the required AWS Identity and Access Management (IAM) permissions. You can use a test or sandbox AWS account to avoid affecting production resources in the same account.
Create an AWS IAM role for AWS Lambda
In this section, you create an AWS IAM role that AWS Lambda uses at a later step in the tutorial.
- In the AWS console, go to the IAM section, click Roles, and then select Create role.
- Under Trusted entity type, ensure that AWS service is selected.
- Under Use case, select Lambda, and then click Next.
- In the Permission policies filter box, enter
AWSLambdaDynamoDBExecutionRoleand pressReturnto search. - Select the AWSLambdaDynamoDBExecutionRole checkbox, and then click Next.
- In the Role name box, enter
dynamodb-spanner-lambda-role, and then click Create role.
Create an AWS IAM user
Follow these steps to create an AWS IAM user with programmatic access to AWS resources, which are used throughout the tutorial.
- While you are still in the IAM section of the AWS console, click Users, and then select Add users.
- In the User name box, enter
dynamodb-spanner-migration. Under Access type, select the checkbox to the left of Access key - Programmatic access.
Click Next: Permissions.
Click Attach existing policies directly, and using the Search box to filter, select the checkbox next to each of the following three policies:
AmazonDynamoDBFullAccessAmazonS3FullAccessAWSLambda_FullAccess
Click Next: Tags and Next: Review, and then click Create user.
Click Show to view the credentials. The access key ID and secret access key are displayed for the newly created user. Leave this window open for now because the credentials are needed in the following section. Safely store these credentials because with them, you can make changes to your account and affect your environment. At the end of this tutorial, you can delete the IAM user.
Configure AWS command-line interface
In Cloud Shell, configure the AWS Command Line Interface (CLI).
aws configure
The following output appears:
AWS Access Key ID [None]: PASTE_YOUR_ACCESS_KEY_ID
AWS Secret Access Key [None]: PASTE_YOUR_SECRET_ACCESS_KEY
Default region name [None]: us-west-2
Default output format [None]:
- Enter the
ACCESS KEY IDandSECRET ACCESS KEYfrom the AWS IAM account that you created. - In the Default region name field, enter
us-west-2. Leave other fields at their default values.
- Enter the
Close the AWS IAM console window.
Understand the data model
The following section outlines the similarities and differences between data types, keys, and indexes for Amazon DynamoDB and Spanner.
Data types
Spanner uses GoogleSQL data types. The following table describes how Amazon DynamoDB data types map to Spanner data types.
| Amazon DynamoDB | Spanner |
|---|---|
| Number | Depending on precision or intended usage, might be mapped to INT64, FLOAT64, TIMESTAMP, or DATE. |
| String | String |
| Boolean | BOOL |
| Null | No explicit type. Columns can contain null values. |
| Binary | Bytes |
| Sets | Array |
| Map and List | Struct if the structure is consistent and can be described by using table DDL syntax. |
Primary key
An Amazon DynamoDB primary key establishes uniqueness and can be either a hash key or a combination of a hash key plus a range key. This tutorial starts by demonstrating the migration of a Amazon DynamoDB table whose primary key is a hash key. This hash key becomes the primary key of your Spanner table. Later, in the section on interleaved tables, you model a situation where an Amazon DynamoDB table uses a primary key composed of a hash key and a range key.
Secondary indexes
Both Amazon DynamoDB and Spanner support creating an index on a non-primary key attribute. Take note of any secondary indexes in your Amazon DynamoDB table so that you can create them on your Spanner table, which is covered in a later section of this tutorial.
Sample table
To facilitate this tutorial, you migrate the following sample table from Amazon DynamoDB to Spanner:
| Amazon DynamoDB | Spanner | |
|---|---|---|
| Table name |
Migration
|
Migration
|
| Primary key |
"Username" : String
|
"Username" : STRING(1024)
|
| Key type | Hash | n/a |
| Other fields |
Zipcode: Number
Subscribed: Boolean
ReminderDate: String
PointsEarned: Number
|
Zipcode: INT64
Subscribed: BOOL
ReminderDate: DATE
PointsEarned: INT64
|
Prepare the Amazon DynamoDB table
In the following section, you create an Amazon DynamoDB source table and populate it with data.
In Cloud Shell, create an Amazon DynamoDB table that uses the sample table attributes.
aws dynamodb create-table --table-name Migration \
    --attribute-definitions AttributeName=Username,AttributeType=S \
    --key-schema AttributeName=Username,KeyType=HASH \
    --provisioned-throughput ReadCapacityUnits=75,WriteCapacityUnits=75
Verify that the table status is
ACTIVE.aws dynamodb describe-table --table-name Migration \ --query 'Table.TableStatus'Populate the table with sample data.
python3 make-fake-data.py --table Migration --items 25000
Create a Spanner database
You create a Spanner instance with the smallest possible compute capacity: 100 processing units. This compute capacity is sufficient for the scope of this tutorial. For a production deployment, refer to the documentation for Spanner instances to determine the appropriate compute capacity to meet your database performance requirements.
In this example, you create a table schema at the same time as the database. It is also possible, and common, to carry out schema updates after you create the database.
Create a Spanner instance in the same region where you set the default Compute Engine zone. For example,
us-central1.gcloud beta spanner instances create spanner-migration \ --config=regional-us-central1 --processing-units=100 \ --description="Migration Demo"Create a database in the Spanner instance along with the sample table.
gcloud spanner databases create migrationdb \
    --instance=spanner-migration \
    --ddl "CREATE TABLE Migration ( \
            Username STRING(1024) NOT NULL, \
            PointsEarned INT64, \
            ReminderDate DATE, \
            Subscribed BOOL, \
            Zipcode INT64, \
         ) PRIMARY KEY (Username)"
Prepare the migration
The next sections show you how to export the Amazon DynamoDB source table and set Pub/Sub replication to capture any changes to the database that occur while you export it.
Stream changes to Pub/Sub
You use an AWS Lambda function to stream database changes to Pub/Sub.
In Cloud Shell, enable Amazon DynamoDB streams on your source table.
aws dynamodb update-table --table-name Migration \
    --stream-specification StreamEnabled=true,StreamViewType=NEW_AND_OLD_IMAGES
Set up a Pub/Sub topic to receive the changes.
gcloud pubsub topics create spanner-migration
The following output appears:
Created topic [projects/your-project/topics/spanner-migration].
Create an IAM service account to push table updates to the Pub/Sub topic.
gcloud iam service-accounts create spanner-migration \
    --display-name="Spanner Migration"
The following output appears:
Created service account [spanner-migration].
Create an IAM policy binding so that the service account has permission to publish to Pub/Sub. Replace
GOOGLE_CLOUD_PROJECTwith the name of your Google Cloud project.gcloud projects add-iam-policy-binding GOOGLE_CLOUD_PROJECT \ --role roles/pubsub.publisher \ --member serviceAccount:spanner-migration@GOOGLE_CLOUD_PROJECT.iam.gserviceaccount.comThe following output appears:
bindings:
(...truncated...)
- members:
  - serviceAccount:spanner-migration@solution-z.iam.gserviceaccount.com
  role: roles/pubsub.publisher
Create credentials for the service account.
gcloud iam service-accounts keys create credentials.json \
    --iam-account spanner-migration@GOOGLE_CLOUD_PROJECT.iam.gserviceaccount.com
The following output appears:
created key [5e559d9f6bd8293da31b472d85a233a3fd9b381c] of type [json] as [credentials.json] for [spanner-migration@your-project.iam.gserviceaccount.com]
Prepare and package the AWS Lambda function to push Amazon DynamoDB table changes to the Pub/Sub topic.
pip3 install --ignore-installed --target=lambda-deps google-cloud-pubsub
cd lambda-deps; zip -r9 ../pubsub-lambda.zip *; cd -
zip -g pubsub-lambda.zip ddbpubsub.py
Create a variable to capture the Amazon Resource Name (ARN) of the Lambda execution role that you created earlier.
LAMBDA_ROLE=$(aws iam list-roles \
    --query 'Roles[?RoleName==`dynamodb-spanner-lambda-role`].[Arn]' \
    --output text)
Use the
pubsub-lambda.zippackage to create the AWS Lambda function.aws lambda create-function --function-name dynamodb-spanner-lambda \ --runtime python3.9 --role ${LAMBDA_ROLE} \ --handler ddbpubsub.lambda_handler --zip fileb://pubsub-lambda.zip \ --environment Variables="{SVCACCT=$(base64 -w 0 credentials.json),PROJECT=GOOGLE_CLOUD_PROJECT,TOPIC=spanner-migration}"The following output appears:
{
    "FunctionName": "dynamodb-spanner-lambda",
    "LastModified": "2022-03-17T23:45:26.445+0000",
    "RevisionId": "e58e8408-cd3a-4155-a184-4efc0da80bfb",
    "MemorySize": 128,
... truncated output...
    "PackageType": "Zip",
    "Architectures": [
        "x86_64"
    ]
}
Create a variable to capture the ARN of the Amazon DynamoDB stream for your table.
STREAMARN=$(aws dynamodb describe-table \
    --table-name Migration \
    --query "Table.LatestStreamArn" \
    --output text)
Attach the Lambda function to the Amazon DynamoDB table.
aws lambda create-event-source-mapping --event-source ${STREAMARN} \
    --function-name dynamodb-spanner-lambda --enabled \
    --starting-position TRIM_HORIZON
To optimize responsiveness during testing, add
--batch-size 1to the end of the previous command, which triggers the function every time you create, update, or delete an item.You will see output similar to the following:
{
    "UUID": "44e4c2bf-493a-4ba2-9859-cde0ae5c5e92",
    "StateTransitionReason": "User action",
    "LastModified": 1530662205.549,
    "BatchSize": 100,
    "EventSourceArn": "arn:aws:dynamodb:us-west-2:accountid:table/Migration/stream/2018-07-03T15:09:57.725",
    "FunctionArn": "arn:aws:lambda:us-west-2:accountid:function:dynamodb-spanner-lambda",
    "State": "Creating",
    "LastProcessingResult": "No records processed"
... truncated output...
Export the Amazon DynamoDB table to Amazon S3
In Cloud Shell, create a variable for a bucket name that you use in several of the following sections.
BUCKET=${DEVSHELL_PROJECT_ID}-dynamodb-spanner-exportCreate an Amazon S3 bucket to receive the DynamoDB export.
aws s3 mb s3://${BUCKET}In the AWS Management Console, go to DynamoDB, and click Tables.
Click the
Migrationtable.Under the Exports and stream tab, click Export to S3.
Enable
point-in-time-recovery(PITR) if prompted.Click Browse S3 to choose the S3 bucket you created earlier.
Click Export.
Click the Refresh icon to update the status of the export job. The job takes several minutes to finish exporting.
When the process finishes, look at the output bucket.
aws s3 ls --recursive s3://${BUCKET}Expect this step to take about 5 minutes. After it is complete, you see output like the following:
2022-02-17 04:41:46          0 AWSDynamoDB/01645072900758-ee1232a3/_started
2022-02-17 04:46:04     500441 AWSDynamoDB/01645072900758-ee1232a3/data/xygt7i2gje4w7jtdw5652s43pa.json.gz
2022-02-17 04:46:17        199 AWSDynamoDB/01645072900758-ee1232a3/manifest-files.json
2022-02-17 04:46:17         24 AWSDynamoDB/01645072900758-ee1232a3/manifest-files.md5
2022-02-17 04:46:17        639 AWSDynamoDB/01645072900758-ee1232a3/manifest-summary.json
2022-02-17 04:46:18         24 AWSDynamoDB/01645072900758-ee1232a3/manifest-summary.md5
Perform the migration
Now that the Pub/Sub delivery is in place, you can push forward any table changes that occurred after the export.
Copy the exported table to Cloud Storage
In Cloud Shell, create a Cloud Storage bucket to receive the exported files from Amazon S3.
gsutil mb gs://${BUCKET}Sync the files from Amazon S3 into Cloud Storage. For most copy operations, the
rsynccommand is effective. If your export files are large (several GBs or more), use the Cloud Storage transfer service to manage the transfer in the background.gsutil rsync -d -r s3://${BUCKET} gs://${BUCKET}
Batch import the data
To write the data from the exported files into the Spanner table, run a Dataflow job with sample Apache Beam code.
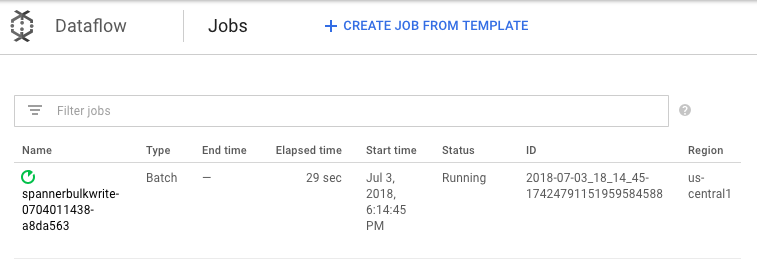
cd dataflow
mvn compile
mvn exec:java \
-Dexec.mainClass=com.example.spanner_migration.SpannerBulkWrite \
-Pdataflow-runner \
-Dexec.args="--project=GOOGLE_CLOUD_PROJECT \
             --instanceId=spanner-migration \
             --databaseId=migrationdb \
             --table=Migration \
             --importBucket=$BUCKET \
             --runner=DataflowRunner \
             --region=us-central1"
To watch the progress of the import job, in the Google Cloud console, go to Dataflow.
While the job is running, you can watch the execution graph to examine the logs. Click the job that shows the Status of Running.
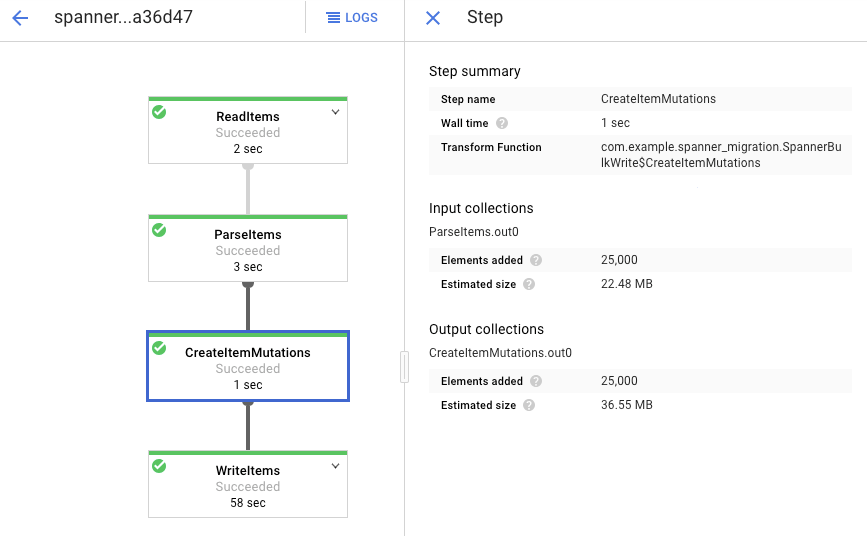
Click each stage to see how many elements have been processed. The import is complete when all stages say Succeeded. The same number of elements that were created in your Amazon DynamoDB table display as processed at each stage.
Verify that the number of records in the destination Spanner table matches the number of items in the Amazon DynamoDB table.
aws dynamodb describe-table --table-name Migration --query Table.ItemCount
gcloud spanner databases execute-sql migrationdb \
--instance=spanner-migration --sql="select count(*) from Migration"
The following output appears:
$ aws dynamodb describe-table --table-name Migration --query Table.ItemCount
25000
$ gcloud spanner databases execute-sql migrationdb --instance=spanner-migration --sql="select count(*) from Migration"
25000
Sample random entries in each table to make sure the data is consistent.
gcloud spanner databases execute-sql migrationdb \
    --instance=spanner-migration \
    --sql="select * from Migration limit 1"
The following output appears:
 Username: aadams4495
 PointsEarned: 5247
 ReminderDate: 2022-03-14
 Subscribed: True
 Zipcode: 58057
Query the Amazon DynamoDB table with the same
Usernamethat was returned from the Spanner query in the previous step. For example,aallen2538. The value is specific to the sample data in your database.aws dynamodb get-item --table-name Migration \ --key '{"Username": {"S": "aadams4495"}}'The values of the other fields should match those from the Spanner output. The following output appears:
{
    "Item": {
        "Username": {
            "S": "aadams4495"
        },
        "ReminderDate": {
            "S": "2018-06-18"
        },
        "PointsEarned": {
            "N": "1606"
        },
        "Zipcode": {
            "N": "17303"
        },
        "Subscribed": {
            "BOOL": false
        }
    }
}
Replicate new changes
When the batch import job is complete, you set up a streaming job to write ongoing updates from the source table into Spanner. You subscribe to the events from Pub/Sub and write them to Spanner
The Lambda function you created is configured to capture changes to the source Amazon DynamoDB table and publish them to Pub/Sub.
Create a subscription to the Pub/Sub topic that AWS Lambda sends events to.
gcloud pubsub subscriptions create spanner-migration \
    --topic spanner-migration
The following output appears:
Created subscription [projects/your-project/subscriptions/spanner-migration].
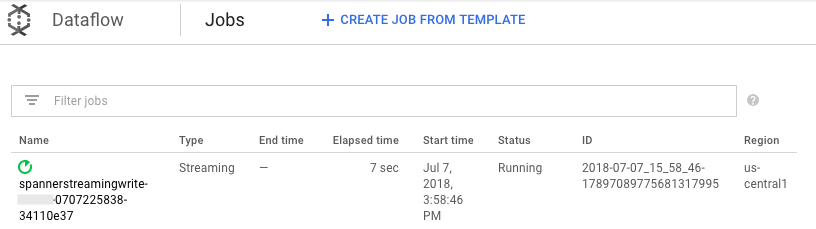
To stream the changes coming into Pub/Sub to write to the Spanner table, run the Dataflow job from Cloud Shell.
mvn exec:java \ -Dexec.mainClass=com.example.spanner_migration.SpannerStreamingWrite \ -Pdataflow-runner \ -Dexec.args="--project=GOOGLE_CLOUD_PROJECT \ --instanceId=spanner-migration \ --databaseId=migrationdb \ --table=Migration \ --experiments=allow_non_updatable_job \ --subscription=projects/GOOGLE_CLOUD_PROJECT/subscriptions/spanner-migration \ --runner=DataflowRunner \ --region=us-central1"Similar to the batch load step, to watch the progress of the job, in the Google Cloud console, go to Dataflow.
Click the job that has the Status of Running.
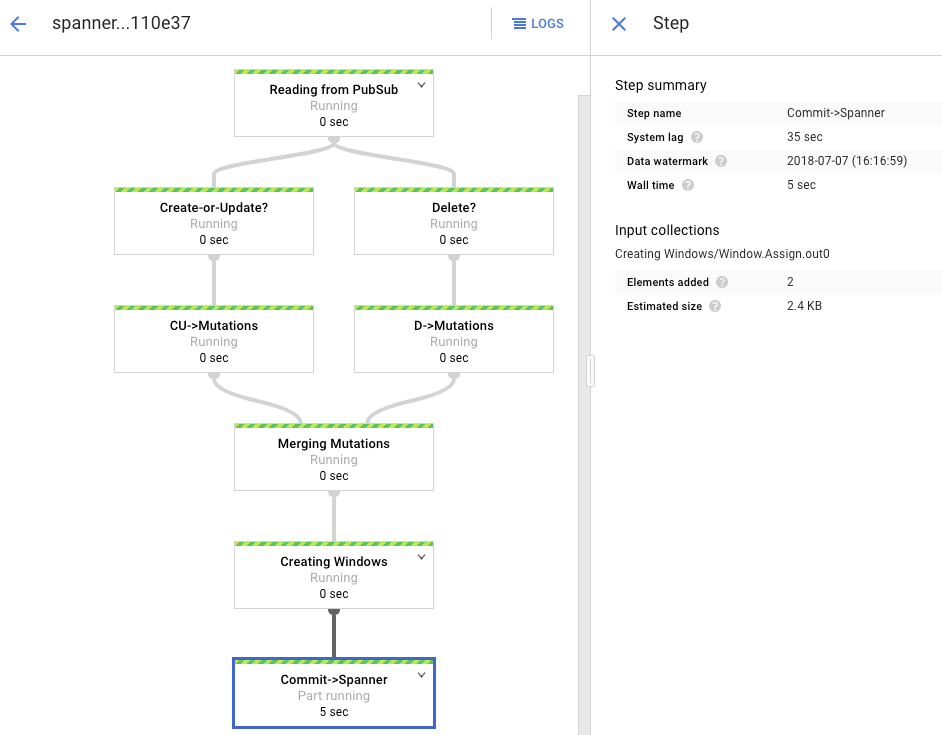
The processing graph shows a similar output as before, but each processed item is counted in the status window. The system lag time is a rough estimate of how much delay to expect before changes appear in the Spanner table.
The Dataflow job that you ran in the batch loading phase was a finite set of input, also known as a bounded dataset. This Dataflow job uses Pub/Sub as a streaming source and is considered unbounded. For more information about these two types of sources, review the section on PCollections in the Apache Beam programming guide. The Dataflow job in this step is meant to stay active, so it does not terminate when finished. The streaming Dataflow job remains in the Running status, instead of the Succeeded status.
Verify replication
You make some changes to the source table to verify that the changes are replicated to the Spanner table.
Query a nonexistent row in Spanner.
gcloud spanner databases execute-sql migrationdb \
    --instance=spanner-migration \
    --sql="SELECT * FROM Migration WHERE Username='my-test-username'"
The operation will not return any results.
Create a record in Amazon DynamoDB with the same key that you used in the Spanner query. If the command runs successfully, there is no output.
aws dynamodb put-item \
    --table-name Migration \
    --item '{"Username" : {"S" : "my-test-username"}, "Subscribed" : {"BOOL" : false}}'
Run that same query again to verify that the row is now in Spanner.
gcloud spanner databases execute-sql migrationdb \
    --instance=spanner-migration \
    --sql="SELECT * FROM Migration WHERE Username='my-test-username'"
The output shows the inserted row:
Username: my-test-username
PointsEarned: None
ReminderDate: None
Subscribed: False
Zipcode:
Change some attributes in the original item and update the Amazon DynamoDB table.
aws dynamodb update-item \
    --table-name Migration \
    --key '{"Username": {"S":"my-test-username"}}' \
    --update-expression "SET PointsEarned = :pts, Subscribed = :sub" \
    --expression-attribute-values '{":pts": {"N":"4500"}, ":sub": {"BOOL":true}}'\
    --return-values ALL_NEW
You will see output similar to the following:
{
    "Attributes": {
        "Username": {
            "S": "my-test-username"
        },
        "PointsEarned": {
            "N": "4500"
        },
        "Subscribed": {
            "BOOL": true
        }
    }
}
Verify that the changes are propagated to the Spanner table.
gcloud spanner databases execute-sql migrationdb \
    --instance=spanner-migration \
    --sql="SELECT * FROM Migration WHERE Username='my-test-username'"
The output appears as follows:
Username          PointsEarned  ReminderDate  Subscribed  Zipcode
my-test-username  4500          None          True
Delete the test item from the Amazon DynamoDB source table.
aws dynamodb delete-item \
    --table-name Migration \
    --key '{"Username": {"S":"my-test-username"}}'
Verify that the corresponding row is deleted from the Spanner table. When the change is propagated, the following command returns zero rows:
gcloud spanner databases execute-sql migrationdb \
    --instance=spanner-migration \
    --sql="SELECT * FROM Migration WHERE Username='my-test-username'"
Use interleaved tables
Spanner supports the concept of interleaving tables. This is a design model where a top-level item has several nested items that relate to that top-level item, such as a customer and their orders, or a player and their game scores. If your Amazon DynamoDB source table uses a primary key composed of a hash key and a range key, you can model an interleaved table schema as shown in the following diagram. This structure lets you efficiently query the interleaved table while joining fields in the parent table.

Apply secondary indexes
It is a best practice to apply secondary indexes to Spanner tables after you load the data. Now that replication is working, you set up a secondary index to speed up queries. Like Spanner tables, Spanner secondary indexes are fully consistent. They are not eventually consistent, which is common in many NoSQL databases. This feature can help simplify your app design
Run a query that does not use any indexes. You are looking for the top N occurrences, given a particular column value. This is a common query in Amazon DynamoDB for database efficiency.
Go to Spanner.
Click Spanner Studio.
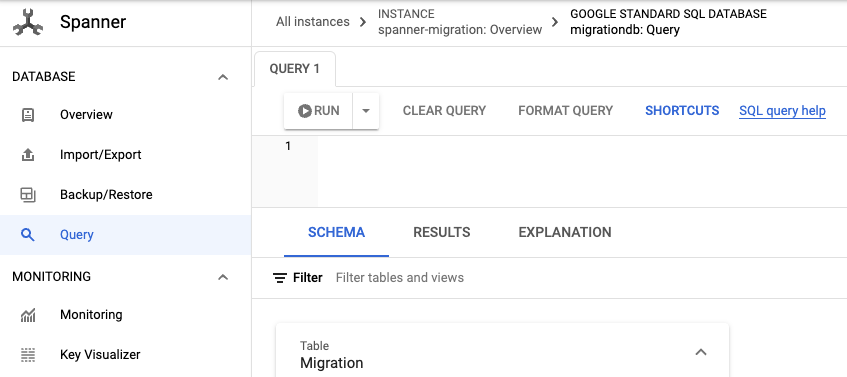
In the Query field, enter the following query, and then click Run query.
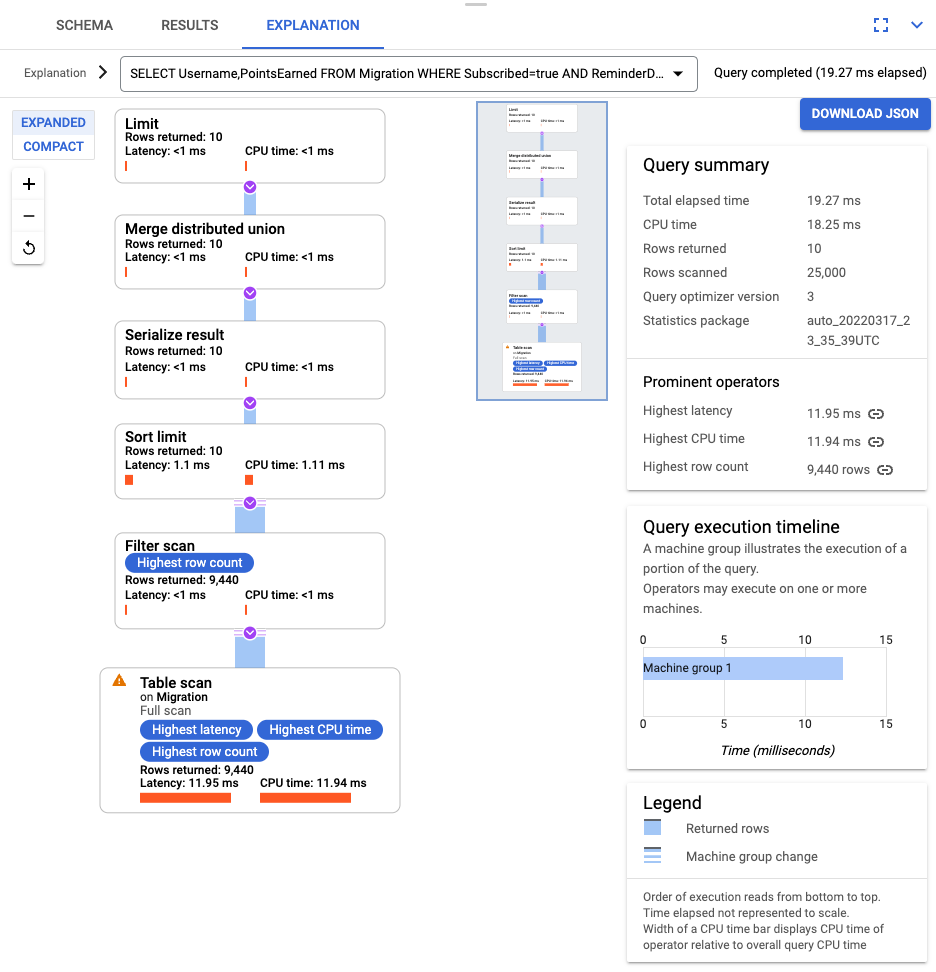
SELECT Username,PointsEarned
  FROM Migration
 WHERE Subscribed=true
   AND ReminderDate > DATE_SUB(DATE(current_timestamp()), INTERVAL 14 DAY)
 ORDER BY ReminderDate DESC
 LIMIT 10
After the query runs, click Explanation and take note of the Rows scanned versus Rows returned. Without an index, Spanner scans the entire table to return a small subset of data that matches the query.
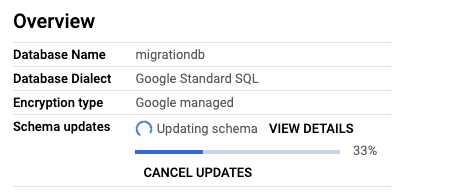
If this represents a commonly occurring query, create a composite index on the Subscribed and ReminderDate columns. On the Spanner console, select Indexes left navigation pane, and then click Create Index.
In the text box, enter the index definition.
CREATE INDEX SubscribedDateDesc
ON Migration (
  Subscribed,
  ReminderDate DESC
)
To begin building the database in the background, click Create.
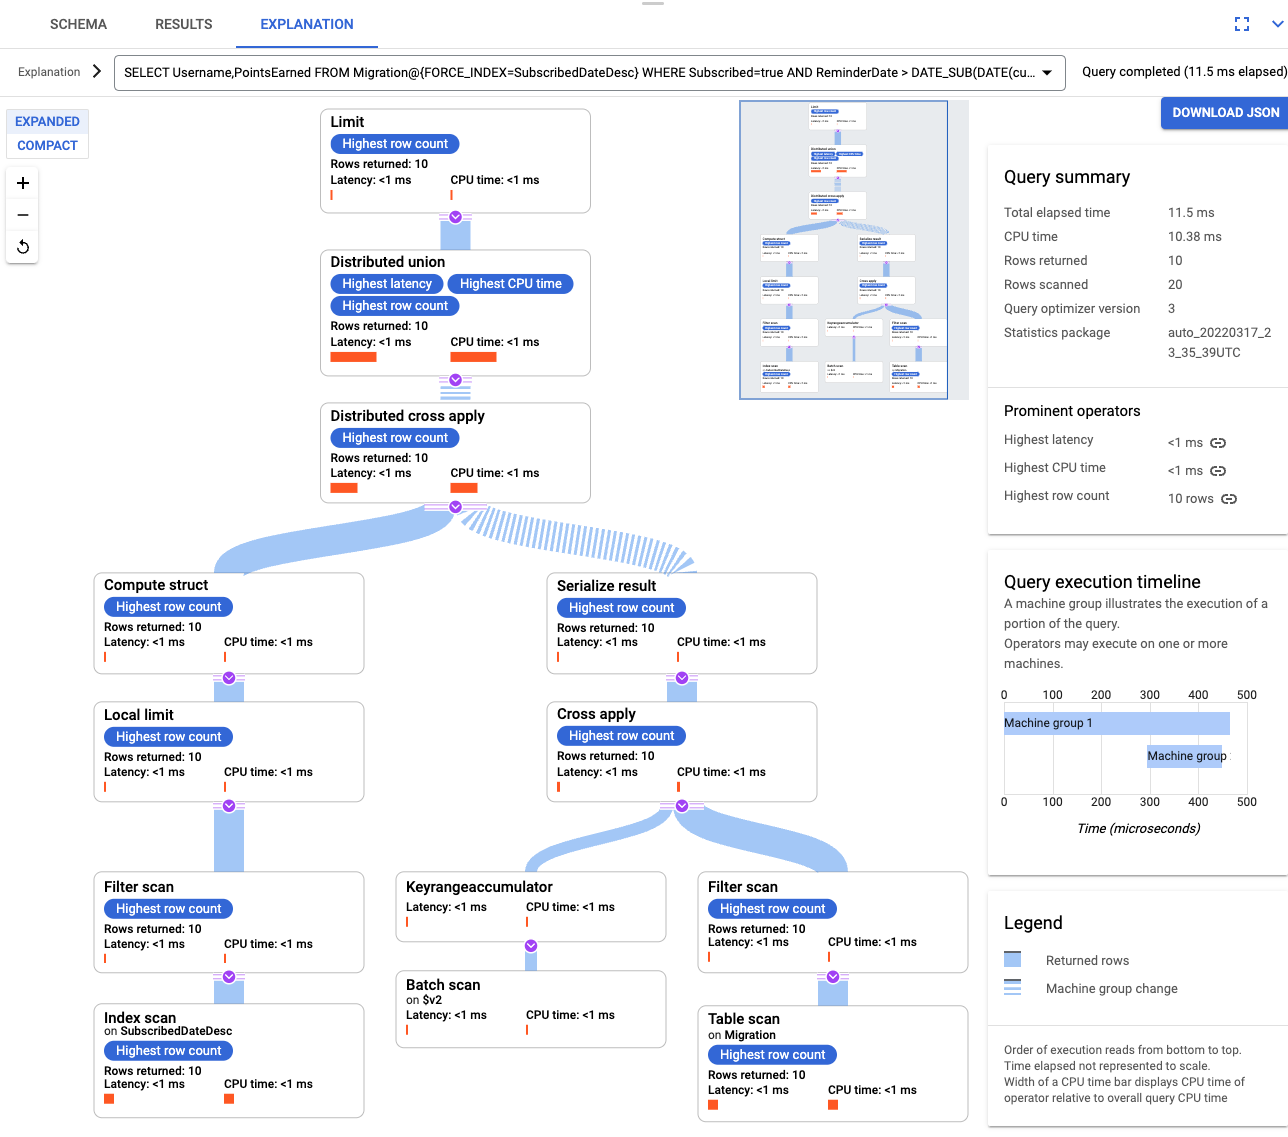
After the index is created, run the query again and add the index.
SELECT Username,PointsEarned
  FROM Migration@{FORCE_INDEX=SubscribedDateDesc}
 WHERE Subscribed=true
   AND ReminderDate > DATE_SUB(DATE(current_timestamp()), INTERVAL 14 DAY)
 ORDER BY ReminderDate DESC
 LIMIT 10
Examine the query explanation again. Notice that the number of Rows scanned has decreased. The Rows returned at each step matches the number returned by the query.
Interleaved indexes
You can set up interleaved indexes in Spanner. The secondary indexes discussed in the previous section are at the root of the database hierarchy, and they use indexes the same way as a conventional database. An interleaved index is within the context of its interleaved row. See index options for more details about where to apply interleaved indexes.
Adjust for your data model
In order to adapt the migration portion of this tutorial to your own situation, modify your Apache Beam source files. It is important that you do not change the source schema during the actual migration window, otherwise you can lose data.
To parse incoming JSON and build mutations, use GSON. Adjust the JSON definition to match your data.
Adjust the corresponding JSON mapping.
In the previous steps, you modified the Apache Beam source code for bulk import. Modify the source code for the streaming part of the pipeline in a similar manner. Finally, adjust the table creation scripts, schemas, and indexes of your Spanner target database.
Clean up
To avoid incurring charges to your Google Cloud account for the resources used in this tutorial, either delete the project that contains the resources, or keep the project and delete the individual resources.
Delete the project
- In the Google Cloud console, go to the Manage resources page.
- In the project list, select the project that you want to delete, and then click Delete.
- In the dialog, type the project ID, and then click Shut down to delete the project.
Delete AWS resources
If your AWS account is used outside of this tutorial, use caution when you delete the following resources:
- Delete the DynamoDB table called Migration.
- Delete the Amazon S3 bucket and Lambda function that you created during the migration steps.
- Finally, delete the AWS IAM user that you created during this tutorial.
What's next
- Read about how to optimize your Spanner schema.
- Learn how to use Dataflow for more complex situations.