このチュートリアルでは、Azure Pipelines、Google Kubernetes Engine(GKE)、Google Container Registry を使用して、ASP.NET MVC ウェブ アプリケーション用の継続的インテグレーション / 継続的デプロイ(CI/CD)パイプラインを作成する方法を示しています。このチュートリアルの目的のために、次の 2 つのサンプル アプリケーションのいずれかを選択できます。
- .NET 6.0 を使用し、Linux で動作する ASP.NET Core ウェブ アプリケーション
- .NET Framework 4 を使用し、Windows で動作する ASP.NET MVC ウェブ アプリケーション
次の図に示すように、CI / CD パイプラインは、開発用と本番環境用の 2 つの GKE クラスタを使用します。

パイプラインの始めに、デベロッパーがサンプル コードベースへの変更を commit します。この操作がトリガーとなり、パイプラインによってリリースが作成され、開発クラスタにデプロイされます。その後リリース管理者がリリースをプロモートし、本番環境クラスタにデプロイします。
このチュートリアルは、デベロッパーと DevOps エンジニアを対象としています。Microsoft .NET、Azure Pipelines、GKE の基本的な知識があることを前提としています。ここでは、Azure DevOps アカウントへの管理アクセス権限も必要となります。
目標
- Docker イメージを公開するために Google Container Registry を Azure Pipelines に接続する。
- GKE にデプロイするための .NET Core サンプルアプリを準備する。
- 従来の認証を使用せずに GKE での認証を安全に実施する。
- Azure Pipelines リリース管理を使用して GKE のデプロイをオーケストレートする。
料金
このドキュメントでは、Google Cloud の次の課金対象のコンポーネントを使用します。
- GKE
- Cloud Load Balancing
- Cloud Storage(Container Registry 用)
料金計算ツールを使うと、予想使用量に基づいて費用の見積もりを生成できます。
このドキュメントに記載されているタスクの完了後、作成したリソースを削除すると、それ以上の請求は発生しません。詳細については、クリーンアップをご覧ください。
Azure DevOps を使用した場合に適用される可能性がある費用については、Azure DevOps の料金ページをご覧ください。
始める前に
Identity and Access Management(IAM)のロールと権限を個別に付与できるようにするため、通常は開発環境と本番環境のワークロードに別個のプロジェクトを使用することをおすすめします。このチュートリアルではわかりやすくするために、開発環境と本番環境の両方の GKE クラスタで 1 つのプロジェクトを使用します。
-
In the Google Cloud console, on the project selector page, select or create a Google Cloud project.
-
Make sure that billing is enabled for your Google Cloud project.
- Azure DevOps アカウントがあり、そのアカウントに対する管理者権限があることを確認します。Azure DevOps アカウントがまだない場合は、Azure DevOps ホームページで登録できます。
Azure DevOps プロジェクトの作成
Azure DevOps を使用して、ソースコードの管理、ビルドとテストの実行、GKE へのデプロイのオーケストレーションを行います。はじめに、Azure DevOps アカウントでプロジェクトを作成します。
- Azure DevOps ホームページ(https://dev.azure.com/YOUR_AZURE_DEVOPS_ACCOUNT_NAME)に移動します。
- [New Project] をクリックします。
CloudDemoなどのプロジェクト名を入力します。- [Visibility] を [Private] に設定してから、[Create] をクリックします。
- プロジェクトを作成したら、左側のメニューで [Repos] をクリックします。
- [Import] をクリックして GitHub から
dotnet-docs-samplesリポジトリを fork し、次の値を設定します。- Repository type:
Git - Clone URL:
https://github.com/GoogleCloudPlatform/dotnet-docs-samples.git
- Repository type:
[Import] をクリックします。
インポート処理が完了すると、
dotnet-docs-samplesリポジトリのソースコードが表示されます。
Google Container Registry に Azure Pipeline を接続する
CloudDemo アプリの継続的インテグレーションを設定する前に、Azure Pipelines を Container Registry に接続する必要があります。この接続により、Azure Pipelines はコンテナ イメージを Container Registry に公開できます。
イメージを公開するためのサービス アカウントを設定する
プロジェクトに Google Cloud サービス アカウントを作成します。
Google Cloud コンソールを開きます。
-
In the Google Cloud console, activate Cloud Shell.
プロジェクト ID と Compute Engine ゾーンの各オプションを入力する時間を節約するために、次のコマンドを実行してデフォルトの構成値を設定します。
gcloud config set project PROJECT_ID
gcloud config set compute/zone us-central1-a
PROJECT_IDは、プロジェクトのプロジェクト ID に置き換えます。プロジェクトで Container Registry API を有効にします。
gcloud services enable containerregistry.googleapis.comAzure Pipelines が Docker イメージの公開に使用するサービス アカウントを作成します。
gcloud iam service-accounts create azure-pipelines-publisher \
    --display-name="Azure Pipelines Publisher"
サービス アカウントにストレージ管理者の IAM ロール(
roles/storage.admin)を付与して、Azure Pipelines が Container Registry に push できるようにします。AZURE_PIPELINES_PUBLISHER=azure-pipelines-publisher@$GOOGLE_CLOUD_PROJECT.iam.gserviceaccount.com gcloud projects add-iam-policy-binding $GOOGLE_CLOUD_PROJECT \ --member serviceAccount:$AZURE_PIPELINES_PUBLISHER \ --role roles/storage.adminサービス アカウント キーを生成します。
gcloud iam service-accounts keys create azure-pipelines-publisher.json \
    --iam-account $AZURE_PIPELINES_PUBLISHER

tr -d '\n' < azure-pipelines-publisher.json > azure-pipelines-publisher-oneline.json
サービス アカウント キーファイルの内容を表示します。
echo $(<azure-pipelines-publisher-oneline.json)次の手順のいずれかでサービス アカウント キーが必要になります。
Google Container Registry 用のサービス接続を作成する
Azure Pipelines で、Container Registry 用の新しいサービス接続を作成します。
- Azure の [DevOps] メニューで、[Project settings] を選択してから、[Pipelines] > [Service connections] の順に選択します。
- [Create service connection] をクリックします。
- リストから [Docker Registry] を選択し、[Next] をクリックします。
- ダイアログの以下のフィールドに値を入力します。
- Registry type: Others
- Docker Registry:
https://gcr.io/PROJECT_ID、PROJECT_IDはプロジェクト名に置き換えます(例:https://gcr.io/azure-pipelines-test-project-12345)。 - Docker ID:
_json_key - Password:
azure-pipelines-publisher-oneline.jsonの内容を貼り付けます。 - Service connection name:
gcr-tutorial
- [Save] をクリックして接続を作成します。
継続的なビルド
この段階で Azure Pipelines を使用して継続的インテグレーションを設定できます。commit によって Git リポジトリへの push を行うたびに、Azure Pipelines によってコードがビルドされ、そのビルドのアーティファクトが Docker コンテナにパッケージ化されます。そのコンテナは Container Registry に公開されます。
リポジトリには、すでに次の Dockerfile が含まれています。
.NET/Linux
.NET Framework / Windows
YAML 構文を使用する新しいパイプラインを作成します。
- Visual Studio またはコマンドライン
gitクライアントを使用して、新しい Git リポジトリのクローンを作成し、mainブランチをチェックアウトします。 - リポジトリのルートで、
azure-pipelines.ymlという名前のファイルを作成します。 次のコードをファイルにコピーします。
.NET/Linux
resources:
- repo: self
  fetchDepth: 1
pool:
  vmImage: ubuntu-20.04
trigger:
- main
variables:
  TargetFramework: 'net6.0'
  BuildConfiguration: 'Release'
  DockerImageName: 'PROJECT_ID/clouddemo'
steps:
- task: DotNetCoreCLI@2
  displayName: Publish
  inputs:
    projects: 'applications/clouddemo/netcore/CloudDemo.MvcCore.sln'
    publishWebProjects: false
    command: publish
    arguments: '--configuration $(BuildConfiguration) --framework=$(TargetFramework)'
    zipAfterPublish: false
    modifyOutputPath: false
- task: CmdLine@1
  displayName: 'Lock image version in deployment.yaml'
  inputs:
    filename: /bin/bash
    arguments: '-c "awk ''{gsub(\"CLOUDDEMO_IMAGE\", \"gcr.io/$(DockerImageName):$(Build.BuildId)\", $0); print}'' applications/clouddemo/netcore/deployment.yaml > $(build.artifactstagingdirectory)/deployment.yaml"'
- task: PublishBuildArtifacts@1
  displayName: 'Publish Artifact'
  inputs:
    PathtoPublish: '$(build.artifactstagingdirectory)'
- task: Docker@2
  displayName: 'Login to Container Registry'
  inputs:
    command: login
    containerRegistry: 'gcr-tutorial'
- task: Docker@2
  displayName: 'Build and push image'
  inputs:
    Dockerfile: 'applications/clouddemo/netcore/Dockerfile'
    command: buildAndPush
    repository: '$(DockerImageName)'
.NET Framework / Windows
resources:
- repo: self
  fetchDepth: 1
pool:
  vmImage: windows-2019     # Matches WINDOWS_LTSC in GKE
  demands:
  - msbuild
  - visualstudio
trigger:
- master
variables:
  Solution: 'applications/clouddemo/net4/CloudDemo.Mvc.sln'
  BuildPlatform: 'Any CPU'
  BuildConfiguration: 'Release'
  DockerImageName: 'PROJECT_ID/clouddemo'
steps:
- task: NuGetCommand@2
  displayName: 'NuGet restore'
  inputs:
    restoreSolution: '$(Solution)'
- task: VSBuild@1
  displayName: 'Build solution'
  inputs:
    solution: '$(Solution)'
    msbuildArgs: '/p:DeployOnBuild=true /p:PublishProfile=FolderProfile'
    platform: '$(BuildPlatform)'
    configuration: '$(BuildConfiguration)'
- task: PowerShell@2
  displayName: 'Lock image version in deployment.yaml'
  inputs:
    targetType: 'inline'
    script: '(Get-Content applications\clouddemo\net4\deployment.yaml) -replace "CLOUDDEMO_IMAGE","gcr.io/$(DockerImageName):$(Build.BuildId)" | Out-File -Encoding ASCII $(build.artifactstagingdirectory)\deployment.yaml'
- task: PublishBuildArtifacts@1
  displayName: 'Publish Artifact'
  inputs:
    PathtoPublish: '$(build.artifactstagingdirectory)'
- task: Docker@2
  displayName: 'Login to Container Registry'
  inputs:
    command: login
    containerRegistry: 'gcr-tutorial'
- task: Docker@2
  displayName: 'Build and push image'
  inputs:
    Dockerfile: 'applications/clouddemo/net4/Dockerfile'
    command: buildAndPush
    repository: '$(DockerImageName)'
PROJECT_IDをプロジェクトの名前に置き換え、ファイルを保存します。変更を commit し、Azure Pipelines に push します。
Visual Studio
- チーム エクスプローラーを開き、[Home] アイコンをクリックします。
- [変更] をクリックします。
- 「
Add pipeline definition」といった Commit メッセージを入力します。 - [すべてをコミットしてプッシュ] をクリックします。
コマンドライン
変更されたすべてのファイルをステージングします。
git add -Aローカル リポジトリへの変更を commit します。
git commit -m "Add pipeline definition"Azure DevOps への変更を push します。
git push
Azure DevOps のメニューで、[Pipelines] を選択して、[Create Pipeline] をクリックします。
[Azure Reposs Git] を選択します。
リポジトリを選択します。
[Review your pipeline YAML] ページで、[Run] をクリックします。
新しいビルドがトリガーされます。ビルドが完了するまでに 6 分ほどかかる場合があります。
イメージが Container Registry に公開されたことを確認するには、Google Cloud コンソールでプロジェクトに切り替えて、[Container Registry] > [イメージ] の順に選択し、[clouddemo] をクリックします。
1 つのイメージと、そのイメージのタグが表示されます。このタグは、Azure Pipelines で実行されたビルドの数値 ID に対応しています。
継続的デプロイ
commit するたびに Azure Pipelines で自動的にコードのビルドと Docker イメージの公開が実施されるようになったら、デプロイするための操作に移行できます。
他の継続的インテグレーション システムとは異なり、Azure Pipelines ではビルドとデプロイが区別され、デプロイ関連のすべてのタスクに、リリース管理というラベルが付けられた専用のツールセットが提供されます。
Azure Pipelines リリース管理は、次のコンセプトに基づいて構築されています。
- リリースは、通常はビルドプロセスの結果からなる、アプリの特定のバージョンを形成するアーティファクト群である。
- デプロイは、リリースを特定の環境に導入する過程である。
- デプロイによって一連のタスクが実行される。タスクはジョブでグループ化できる。
- ステージによってパイプラインを分割でき、ステージを使用することで、開発環境やテスト環境などの複数の環境へのデプロイをオーケストレートできる。
CloudDemo のビルドプロセスによって生成されるメイン アーティファクトは Docker イメージです。ただし、Docker イメージは Container Registry に公開されるため、Azure Pipelines の対象範囲に含まれません。そのため、Docker イメージをリリースの定義としては利用できません。
Kubernetes をデプロイするには、マニフェストも必要です。マニフェストは部品表(BOM)に似ています。マニフェストは Kubernetes によって作成、管理されるリソースを定義するだけでなく、使用する Docker イメージのバージョンも明示します。Kubernetes マニフェストは、Azure Pipelines リリース管理でリリースを定義するアーティファクトとして適しています。
Kubernetes のデプロイを構成する
Kubernetes で CloudDemo を実行するには、以下のリソースが必要です。
- Deployment。ビルドによって生成された Docker イメージを実行する単一の Pod を定義します。
- NodePort サービス。このサービスによってロードバランサがポッドにアクセスできます。
- Ingress。これにより、Cloud HTTP(S) ロードバランサを使用してアプリケーションが公共のインターネットに公開されます。
リポジトリには、これらのリソースを定義する次の Kubernetes マニフェストがすでに含まれています。
.NET/Linux
.NET Framework / Windows
開発環境と本番環境を設定する
Azure Pipelines リリース管理に戻る前に、GKE クラスタを作成する必要があります。
GKE クラスタを作成する
Cloud Shell インスタンスに戻ります。
プロジェクトの GKE API を有効にします。
gcloud services enable container.googleapis.com
次のコマンドを使用して開発クラスタを作成します。完了するまで数分かかることがあります。
.NET/Linux
gcloud container clusters create azure-pipelines-cicd-dev --enable-ip-alias
.NET Framework / Windows
gcloud container clusters create azure-pipelines-cicd-dev --enable-ip-alias

gcloud container node-pools create azure-pipelines-cicd-dev-win \
    --cluster=azure-pipelines-cicd-dev \
    --image-type=WINDOWS_LTSC \
    --no-enable-autoupgrade \
    --machine-type=n1-standard-2
次のコマンドを使用して本番環境クラスタを作成します。完了するまで数分かかることがあります。
.NET/Linux
gcloud container clusters create azure-pipelines-cicd-prod --enable-ip-alias
.NET Framework / Windows
gcloud container clusters create azure-pipelines-cicd-prod --enable-ip-alias

gcloud container node-pools create azure-pipelines-cicd-prod-win \
    --cluster=azure-pipelines-cicd-prod \
    --image-type=WINDOWS_LTSC \
    --no-enable-autoupgrade \
    --machine-type=n1-standard-2
開発クラスタに Azure Pipeline を接続する
Azure Pipelines を使用すると Container Registry などの外部 Docker レジストリに接続できますが、同様に、Azure Pipelines を使用して外部 Kubernetes クラスタを統合できます。
Google Cloud サービス アカウントを使用して Container Registry を認証することは可能ですが、Azure Pipeline での GKE による認証に Google Cloud サービス アカウントを使用することはできません。Azure Pipeline での GKE による認証には、Kubernetes サービス アカウントを使用する必要があります。
したがって、Azure Pipelines を開発クラスタに接続するには、まず Kubernetes サービス アカウントを作成する必要があります。
Cloud Shell で、開発クラスタに接続します。
gcloud container clusters get-credentials azure-pipelines-cicd-dev
Azure Pipeline 用の Kubernetes サービス アカウントを作成します。
kubectl create serviceaccount azure-pipelines-deploy
Azure Pipeline のトークン認証情報を含む Kubernetes Secret を作成します。
kubectl create secret generic azure-pipelines-deploy-token --type=kubernetes.io/service-account-token --dry-run -o yaml \
  | kubectl annotate --local -o yaml -f - kubernetes.io/service-account.name=azure-pipelines-deploy \
  | kubectl apply -f -
クラスタのロール バインディングを作成して、サービス アカウントに
cluster-adminのロールを割り当てます。kubectl create clusterrolebinding azure-pipelines-deploy --clusterrole=cluster-admin --serviceaccount=default:azure-pipelines-deploy
クラスタの IP アドレスを指定します。
gcloud container clusters describe azure-pipelines-cicd-dev --format=value\(endpoint\)
後でこのアドレスが必要になります。
Azure DevOps のメニューで、[Project settings] を選択し、[Pipelines]、[Service connections] の順に選択します。
[New service connection] をクリックします。
[Kubernetes] を選択して [Next] をクリックします。
以下の設定を構成します。
- Authentication method: サービス アカウント。
- サーバーの URL:
https://PRIMARY_IP。PRIMARY_IPは前に確認した IP アドレスに置き換えます。 - Secret: 事前に作成した Kubernetes Secret。Secret を取得するには、次のコマンドを実行して、Secret を Azure ページにコピーします。
kubectl get secret azure-pipelines-deploy-token -o yaml
- Service connection name:
azure-pipelines-cicd-dev。
[Save] をクリックします。
本番環境クラスタに Azure Pipeline を接続する
Azure Pipelines を本番環境クラスタに接続する場合も、同じ手順を使用できます。
Cloud Shell で、本番環境クラスタに接続します。
gcloud container clusters get-credentials azure-pipelines-cicd-prod
Azure Pipeline 用の Kubernetes サービス アカウントを作成します。
kubectl create serviceaccount azure-pipelines-deploy
クラスタのロール バインディングを作成して、サービス アカウントに
cluster-adminのロールを割り当てます。kubectl create clusterrolebinding azure-pipelines-deploy --clusterrole=cluster-admin --serviceaccount=default:azure-pipelines-deploy
クラスタの IP アドレスを指定します。
gcloud container clusters describe azure-pipelines-cicd-prod --format=value\(endpoint\)
後でこのアドレスが必要になります。
Azure DevOps のメニューで、[Project settings] を選択し、[Pipelines]、[Service connections] の順に選択します。
[New service connection] をクリックします。
[Kubernetes] を選択して [Next] をクリックします。
以下の設定を構成します。
- Authentication method: サービス アカウント。
- サーバーの URL:
https://PRIMARY_IP。PRIMARY_IPは前に確認した IP アドレスに置き換えます。 - Secret: Cloud Shell で次のコマンドを実行し、出力をコピーします。
kubectl get secret $(kubectl get serviceaccounts azure-pipelines-deploy -o custom-columns=":secrets[0].name") -o yaml
- Service connection name:
azure-pipelines-cicd-prod。
[Save] をクリックします。
リリース パイプラインを構成する
GKE インフラストラクチャを設定したら、Azure Pipelines に戻ってデプロイを自動化します。デプロイには以下の操作が含まれます。
- 開発環境にデプロイする。
- 本番環境へのデプロイを開始する前に、手動承認をリクエストする。
- 本番環境にデプロイする。
リリース定義を作成する
最初に、新しいリリース定義を作成します。
- Azure DevOps のメニューで、[Pipelines] > [Releases] の順に選択します。
- [New pipeline] をクリックします。
- テンプレートのリストから [Empty job] を選択します。
- ステージの名前の入力を求められたら、「
Development」と入力します。 - 画面上部でリリースに CloudDemo-KubernetesEngine という名前を付けます。
- パイプライン図で、[Artifacts] の横にある [Add] をクリックします。
[Build] を選択して、次の設定を追加します。
- Source type: ビルド
- Source(build pipeline): ビルド定義を選択します(選択肢は 1 つだけです)
- Default version:
Latest - Source Alias:
manifest
[Add] をクリックします。
[Artifact] ボックスで [Continuous deployment trigger](稲妻のアイコン)をクリックしてデプロイ トリガーを追加します。
[Continuous deployment trigger] で、スイッチを [Enabled] に設定します。
[Save] をクリックします。
必要に応じてコメントを入力し、[OK] をクリックして確定します。
パイプラインは次のようになります。
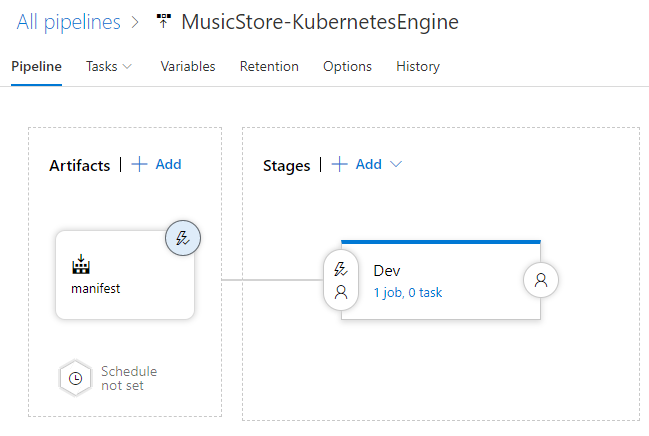
開発クラスタにデプロイする
リリース定義を作成したら、GKE 開発クラスタへのデプロイを構成できるようになります。
- メニューで [Agent job] タブに切り替えます。
[Agent job] をクリックし、次の設定を構成します。
- エージェント プール: Azure Pipelines
- エージェントの仕様: ubuntu-18.04
[Agent job] の横の [Add a task to agent job] をクリックして、フェーズにステップを追加します。
[Deploy to Kubernetes] タスクを選択して、[Add] をクリックします。
新たに追加したタスクをクリックし、以下の設定を構成します。
- Display name:
Deploy - Action: デプロイ
- Kubernetes サービス接続: azure-pipelines-cicd-dev
- Namespace:
default - Strategy: なし
- Manifests:
manifest/drop/deployment.yaml
- Display name:
[Save] をクリックします。
必要に応じてコメントを入力し、[OK] をクリックして確定します。
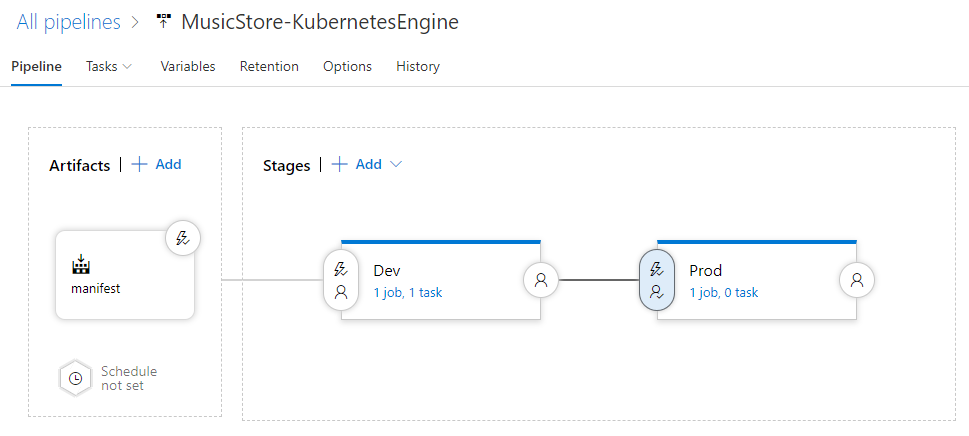
本番環境クラスタにデプロイする
最後に GKE の本番環境クラスタへのデプロイを構成します。
- メニューで [Pipeline] タブに切り替えます。
- [Stages] ボックスで、[Add] > [New stage] の順に選択します。
- テンプレートのリストから [Empty job] を選択します。
- ステージの名前の入力を求められたら、「
Production」と入力します。 - 新たに作成したステージの稲妻のアイコンをクリックします。
以下の設定を構成します。
- Select trigger: After stage
- Stages: Dev
- Pre-deployment approvals: (有効)
- Approvers: 自分のユーザー名を選択します。
パイプラインは次のようになります。
[Tasks] タブに切り替えます。
[Tasks] タブにマウスカーソルを合わせ、[Tasks]、[Production] の順に選択します。
[Agent job] をクリックし、次の設定を構成します。
- エージェント プール: Azure Pipelines
- エージェントの仕様: ubuntu-18.04
[Add a task to agent job] をクリックして、フェーズにステップを追加します。
[Deploy to Kubernetes] タスクを選択して、[Add] をクリックします。
新たに追加したタスクをクリックし、以下の設定を構成します。
- Display name:
Deploy - Action: デプロイ
- Kubernetes service connection: azure-pipelines-cicd-prod
- Namespace:
default - Strategy: なし
- Manifests:
manifest/drop/deployment.yaml
- Display name:
[Save] をクリックします。
必要に応じてコメントを入力し、[OK] をクリックして確定します。
パイプラインを実行する
パイプライン全体の構成が済んだら、ソースコードを変更してパイプラインをテストできます。
ローカルのパソコンで、先ほどクローンを作成した Git リポジトリからファイル
Index.cshtmlを開きます。.NET/Linux
このファイルは
applications\clouddemo\netcore\CloudDemo.MvcCore\Views\Home\にあります。.NET Framework / Windows
このファイルは
applications\clouddemo\net4\CloudDemo.Mvc\Views\Home\にあります。26 行目で、
ViewBag.Titleの値をHome PageからThis app runs on GKEに変更します。変更を commit し、Azure Pipelines に push します。
Visual Studio
- チーム エクスプローラーを開き、[Home] アイコンをクリックします。
- [変更] をクリックします。
- 「
Change site title」といった Commit メッセージを入力します。 - [すべてをコミットしてプッシュ] をクリックします。
コマンドライン
変更されたすべてのファイルをステージングします。
git add -Aローカル リポジトリへの変更を commit します。
git commit -m "Change site title"変更を Azure Pipelines に push します。
git push
Azure DevOps のメニューで [Pipelines] を選択します。ビルドがトリガーされます。
ビルドが完了したら、[Pipelines] > [Releases] の順に選択します。リリース プロセスが開始されます。
[Release-1] をクリックして詳細ページを開き、Development ステージのステータスが [Succeeded] に切り替わるのを待ちます。
Google Cloud コンソールで、[Kubernetes Engine] > [Services と Ingress] > [Ingress] を選択します。
azure-pipelines-cicd-dev クラスタの Ingress サービスを確認して、そのステータスが [OK] に切り替わるのを待ちます。これには数分かかることがあります。
同じ行の [フロントエンド] 列にあるリンクを開きます。ロードバランサが利用可能になるまで数分かかるため、最初はエラーが表示される場合があります。ページが開いたら、CloudDemo がデプロイされ、カスタム タイトルが使用されていることを確認します。
Azure Pipelines で、[Prod] ステージの下にある [Approve] ボタンをクリックして、本番環境へのデプロイをプロモートします。
ボタンが表示されない場合は、まず以前のリリースを承認または却下する必要があります。
必要に応じてコメントを入力し、[承認] をクリックして確定します。
Prod 環境のステータスが [成功] に切り替わるのを待ちます。場合によっては、ブラウザのページを手動で更新する必要があります。
Google Cloud コンソールで、[Services と Ingress] ページを更新します。
azure-pipelines-cicd-prod クラスタの Ingress サービスを確認して、そのステータスが [OK] に切り替わるのを待ちます。これには数分かかることがあります。
同じ行の [フロントエンド] 列にあるリンクを開きます。ロードバランサが利用可能になるまで数分かかるため、この場合も最初はエラーが表示されることがあります。ページが開くと、この場合もカスタム タイトルが付いた CloudDemo アプリが表示されます。ただし、今回は本番環境クラスタで実行されます。
クリーンアップ
このチュートリアルの完了後に請求が発生しないようにするには、作成したエンティティを削除します。
Azure Pipelines プロジェクトの削除
Azure Pipelines プロジェクトを削除するには、Azure DevOps Services のドキュメントをご覧ください。Azure Pipelines プロジェクトを削除すると、すべてのソースコードの変更が失われます。
Google Cloud の開発プロジェクトの削除
- In the Google Cloud console, go to the Manage resources page.
- In the project list, select the project that you want to delete, and then click Delete.
- In the dialog, type the project ID, and then click Shut down to delete the project.
次のステップ
- Container Registry に対するアクセス制御を詳細に構成する。
- Compute Engine に可用性の高い SQL Server グループをデプロイする方法を学習する。
- Google Cloud Platform での .NET についての説明を確認する。
- Cloud Tools for Visual Studio をインストールする。
- Google Cloud に関するリファレンス アーキテクチャ、図、ベスト プラクティスを確認する。Cloud Architecture Center をご覧ください。