This page describes two methods for exporting Security Command Center data, including assets, findings, and security marks:
- One-time exports for existing findings, assets, and security marks
- Continuous exports that automatically export new findings to Pub/Sub
You can export Security Command Center data by using the Google Cloud console, the Google Cloud CLI, or the Security Command Center API.
You can also stream findings to BigQuery. For more information, see Stream findings to BigQuery for analysis.
One-time exports
One-time exports let you manually transfer and download current and historical findings and assets.
For findings, you can use the Google Cloud console to transfer data in JSON, JSONL, or CSV format to a Cloud Storage bucket. You can also download a limited number of findings to your workstation in CSV format.
For assets, you can download the data from the Google Cloud console to your local workstation as a CSV file.
Permissions
To perform one-time exports, you need the following:
The Identity and Access Management (IAM) role Security Center Admin Viewer (
roles/securitycenter.adminViewer), or any role that has the following permissions:resourcemanager.organizations.get(required only for organization-level activations of Security Command Center)resourcemanager.projects.get(required for project-level activations of Security Command Center)securitycenter.assets.groupsecuritycenter.assets.listsecuritycenter.findings.groupsecuritycenter.findings.listsecuritycenter.sources.getsecuritycenter.sources.listsecuritycenter.userinterfacemetadata.get
The Storage Admin role, which lets you store data in Cloud Storage buckets.
The IAM roles for Security Command Center can be granted at the organization, folder, or project level. Your ability to view, edit, create, or update findings, assets, and security sources depends on the level for which you are granted access. To learn more about Security Command Center roles, see Access control.
Data residency and one-time exports
You cannot include any of your data that is subject to data residency control in the filter of a one-time export to Cloud Storage.
If you specify a property that contains controlled data in the finding filter, Security Command Center returns an error message when you attempt the export.
Export data using the Google Cloud console
Using the Google Cloud console, you can do the following:
- Export findings to a Cloud Storage bucket
- Download findings to a CSV file
- Export assets to a CSV file
Export findings to a Cloud Storage bucket
This section describes how to export Security Command Center data to a Cloud Storage bucket. When you click Export on the Findings page in the Google Cloud console, Security Command Center automatically gets credentials or permissions to write to the Cloud Storage bucket.
Findings are exported in separate operations. You can export a JSON file, a JSONL file, or a CSV file to an existing Cloud Storage bucket or create a bucket during the export process.
You can export all current findings, or select the filters you want to use before you export.
Go to Findings page in the Google Cloud console.
On the toolbar, click the project selector, and select your project, folder, or organization.
Select the findings that you need to export by applying filters to the findings query. For more information about creating filters, see Create or edit a findings query in the Google Cloud console.
When you're done creating a filter, click Export, and then, under One-time, click Cloud storage.
On the Export page, configure the export:
- In the Export to section, specify the following fields:
- In the Project name field, specify the project that contains the Cloud Storage bucket.
- In the Export path field, which only appears after you specify a project, click Browse.
- On the Select object panel, select an existing Cloud Storage bucket or create a storage bucket.
- After you select or create a bucket, under Filename, enter a name for the export file.
- Click Select.
- In the Export criteria section, specify the following fields:
- Click Group results by, and select how you want to group the export data.
- Click in the Format field and select JSON, JSONL, or CSV.
- Click in the Time range field and select the time period from which to export findings.
- In the Findings query section, confirm the query appears as you expect.
- Below the query, confirm that the number and type of matching findings are what you expect.
- Click Export.
If you selected an existing file in the bucket, the Confirm Overwrite dialog displays.
- To overwrite the existing file, click Confirm.
- To change the file you're writing to, click Cancel, then click Browse in the Export path box and select or create a different file.
- In the Export to section, specify the following fields:
The configured data is saved to the Cloud Storage bucket that you specified.
Download exported data from a Cloud Storage bucket
To download the exported JSON, JSONL, or CSV data, perform the following steps:
Go to the Storage browser page in the Google Cloud console.
Select your project, and then click the bucket to which you exported data.
Select the checkbox next to the export file, and then click Download.
On the Save File dialog, select the location where you want to save the file, and then click Save.
The JSON, JSONL, or CSV file is downloaded to the location that you specified.
Export findings to a CSV file
To configure the export, you can filter findings by category, severity, and other properties. All findings that match the filter are included in the CSV file.
You can download up to 1,000 findings directly to your workstation. If the number of findings exceeds 1,000, you are automatically redirected to the Export findings to Cloud Storage page, where you can export the data to a Cloud Storage bucket.
The finding records are exported with a default set of columns, which might not match what you see in the Google Cloud console. That is, hiding or unhiding columns using the Column display options doesn't change which columns are exported. Similarly, changing the Rows per page value has no effect on the exported content.
To export findings to a CSV file, perform the following steps:
On the Security Command Center page of the Google Cloud console, go to the Findings page.
On the toolbar, click the project selector, and select your project, folder, or organization.
Optional: To narrow down the findings to be exported, apply a filter.
Click Export, and click CSV. Security Command Center begins exporting the findings.
When the export is complete, a notification appears on the toolbar.
On the toolbar, click the notification icon.
On the Saved export as CSV notification, click Download. The CSV file is downloaded to your local workstation.
Export assets to a CSV file
You can download asset data to a CSV file from the Assets page in the Google Cloud console.
To download asset data to a CSV file, follow these steps:
Go to the Assets page:
On the toolbar, click the project selector, and select your project, folder, or organization.
Use the Quick filters panel or the Filter field of the asset results panel to select the assets you need to export. For more information about filtering assets, see Filtering assets.
Above the displayed assets, click Export and then Download CSV. The data for the assets in the results panel are downloaded to your workstation.
Export data using API methods
You can export assets, findings, and security marks to a Cloud Storage bucket or your local workstation by using the Security Command Center API.
Export asset data using API methods
To export or list asset data, use the Cloud Asset Inventory API. For more information, see Export asset history and metadata.
The asset methods and fields of the Security Command Center API are deprecated and will be removed on or after June 26, 2024.
Until they are removed, users who activated Security Command Center before June 26, 2023 can use the asset methods of the Security Command Center API to list and export asset data, but these methods support only the assets that Security Command Center supports.
For information about using the deprecated asset API methods, see listing assets.
Export finding data using the Security Command Center API
To export findings with the Security Command Center API, follow the guide for listing security findings and then download or export the API responses.
To list findings with any attached security marks, you can use the following API methods:
The methods return findings with their full set of properties, attributes, and associated marks in JSON format. If your application requires data to be in a different format, you need to write custom code to convert the JSON output.
If you specify a value in the groupBy field, you can use the following
methods:
The GroupFindings method returns a list of an
organization's findings, grouped by specified properties.
Export findings using the gcloud CLI
To use Google Cloud CLI commands in the Cloud Shell to export findings to a Cloud Storage bucket, follow these steps:
Open Cloud Shell.
To write findings to a file, add an output string to the gcloud CLI commands for listing findings.
For example, the following command stores listed findings in a text file named
FINDINGS.txt.gcloud scc findings list PARENT_ID --source=SOURCE_ID \ --location=locations/LOCATION --filter="FILTER" > FINDINGS.txt
Replace the following:
FILTER: An optional expression to limit the list of findings printed to those that match the filter expression.LOCATION: If data residency is enabled, specify the Security Command Center location in which the findings are stored.If data residency is not enabled, specifying the
--locationflag lists the findings by using Security Command Center API v2, and the only valid value for the flag isglobal.
PARENT_ID: the ID of any of the following parent resources:- Organization, specified as
organizations/ORGANIZATION_IDorORGANIZATION_ID - Folder, specified as
folders/FOLDER_ID - Project, specified as
projects/PROJECT_ID
- Organization, specified as
SOURCE_ID: the source ID for the finding provider. To find a source ID, see Getting the source ID.FINDINGS.txt: the name and extension of a target file to store the list of findings.
Copy
FINDINGS.txtto your Cloud Storage bucket.gsutil cp FINDINGS.txt gs://BUCKET_NAME
Replace
BUCKET_NAMEwith the name of your bucket.To save
FINDINGS.txtto your local workstation instead of a Cloud Storage bucket, run the following command:cloudshell download FINDINGS.txt
Continuous exports
Continuous exports simplify the process of automatically exporting Security Command Center findings into Pub/Sub. When new findings are written, they are automatically exported to designated Pub/Sub topics in near-real time, letting you integrate them into your existing workflow.
To learn more about Pub/Sub, see What is Pub/Sub?
Continuous exports versus finding notifications
Security Command Center lets you set up finding notifications
for Pub/Sub using the Security Command Center API. The API requires you to
use Google Cloud CLI to set up Pub/Sub topics, create finding filters,
and create NotificationConfigs, files that contain configuration settings to
send notifications. Continuous exports offer the same functionality, but
creating exports is simplified by using the Google Cloud console.
Permissions
To create and manage continuous exports, you need one of the following roles.
roles/securitycenter.adminEditorroles/securitycenter.adminViewer
You can also use any role that has the following permissions:
To view or publish Pub/Sub topics:
pubsub.topics.publishpubsub.topics.list
To view the continuous exports page:
securitycenter.notificationconfig.getsecuritycenter.notificationconfig.list
To manage continuous exports:
securitycenter.notificationconfig.createsecuritycenter.notificationconfig.updatesecuritycenter.notificationconfig.delete
To learn more about Security Command Center roles, see Access control.
Data residency and continuous exports
If data residency
is enabled for Security Command Center, the configurations that define
continuous exports to
Pub/Sub—notificationConfig resources—are subject
to data residency control and are stored in a
Security Command Center location
that you select.
To export findings in a Security Command Center location to Pub/Sub, you must configure the continuous export in the same Security Command Center location as the findings.
Because the filters that are used in continuous exports can contain data that is subject to residency controls, make sure you specify the correct location before you create them. Security Command Center does not restrict which location you create exports in.
Continuous exports are stored only in the location in which they are created and cannot be viewed or edited in other locations.
After you create a continuous export, you can't change its location. To change the location, you need to delete the continuous export and recreate it in the new location.
To retrieve a continuous export by using API calls,
you need to specify the location in the full resource name of the
notificationConfig. For example:
GET https://securitycenter.googleapis.com/v2/{name=organizations/123/locations/eu/notificationConfigs/my-pubsub-export-01}
Similarly, to retrieve a continuous export by using
the gcloud CLI, you need to specify the location either
in the full resource name of the configuration or by using the --locations
flag. For example:
gcloud scc notifications describe myContinuousExport organizations/123 \
    --location=locations/us
Create a continuous export to Pub/Sub
Continuous exports let you automate the export of all future findings to Pub/Sub or create filters to export future findings that meet specific criteria. You can filter findings by category, source, asset type, security marks, severity, state, and other variables.
Your organization can create a maximum of 500 continuous exports.
To create an export for Pub/Sub, do the following:
Go to the Security Command Center Findings page in the Google Cloud console.
On the toolbar, click the project selector, and select your project, folder, or organization.
If data-residency support is enabled, directly below the project selector, select your data-residency location. For example:

In the Findings query results field, select the findings to export by using either of the following methods:
By clicking Add Filter to select the properties of the findings you need to export.
The Select filter dialog lets you choose supported finding attributes and values.
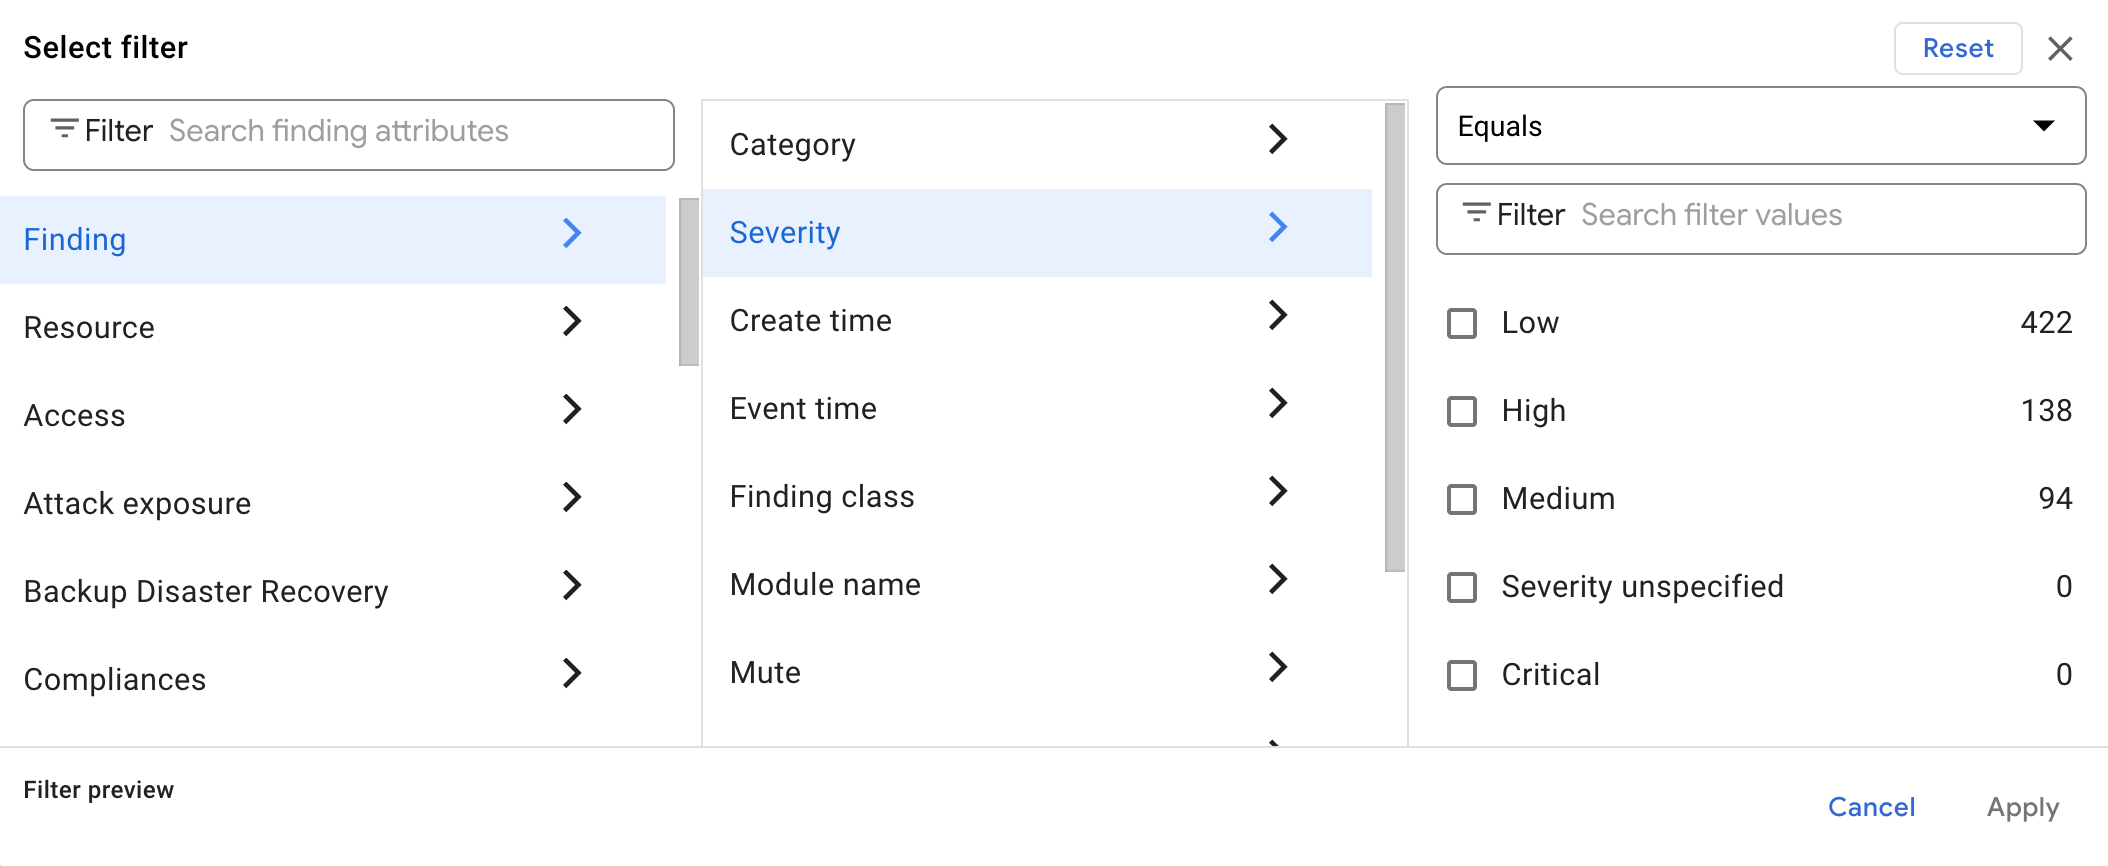
- Select a finding attribute or type its name in the Search finding attributes box. A list of the available sub-attributes displays.
- Select a sub-attribute. A selection field for your evaluation options displays above a list of the sub-attribute values found in the findings in the Findings query results panel.
- Select an evaluation option for the values of the selected sub-attribute. For more information about the evaluation options and the operators and functions that they use, see Query operators in the Add filters menu.
- Select Apply.
The dialog closes and your query is updated.
- Repeat until the findings query contains all the attributes you want.
By manually coding the finding query in the query editor. You can use standard SQL operators
AND,OR, equals (=), has (:), and not (-) to specify the finding properties and values of the findings you need to export.As you type in your query, an autocomplete menu appears, where you can select filter names and functions.
For example, the following query mutes low-severity and medium-severity
anomalous IAM grantfindings inprod-project, and excludes resource types where the name has the substringcompute:severity="LOW" OR severity="MEDIUM" AND category="Persistence: IAM Anomalous Grant" AND resource.project_display_name="prod-project" AND -resource.type:"compute"For more examples on filtering findings, see Filtering notifications.
Review the resulting query for accuracy. To make changes, delete or add properties and filter values as needed.
Click Refresh matching findings. A table displays findings that match your query. For more information about querying findings, see Edit a findings query in the Google Cloud console.
Click Export, and then, under Continuous, click Pub/Sub.
Review your filter to ensure it's correct and, if necessary, return to the Findings page to modify it.
Under Continuous export name, enter a name for the export.
Under Continuous export description, enter a description for the export.
Under Export to, select a project for your export. You can't create a project on this page. To create a new project, see Creating a project.
Under Pub/Sub topic, select the topic where you want to export findings. To create a topic, do the following:
- Select Create a topic.
- Enter a Topic ID, and then select other options as needed:
- Learn about Creating and managing schemas.
- Learn about using customer-managed encryption keys (CMEK) with Pub/Sub.
- Click Create Topic.
Click Save. You see a confirmation and are returned to the findings page.
Follow the guide to create a subscription for your Pub/Sub topic.
The Pub/Sub export configuration is complete. To publish
notifications, a service account is created for you in the form of
service-org-ORGANIZATION_ID@gcp-sa-scc-notification.iam.gserviceaccount.com.
This service account is automatically granted the roles/securitycenter.notificationServiceAgent
role at the organization level. This service account role is required for
notifications to function.
Testing continuous exports
To confirm that an export is working, perform the following steps to toggle findings between active and inactive states.
Go to the Security Command Center Findings page in the Google Cloud console.
Click the Edit query button. The Query editor opens.
Edit the query so that both so that both active and inactive findings are displayed. The following query omits the
stateproperty to display all findings except those that are muted:NOT mute="MUTED"
If necessary, use the Query editor to re-enter filter variables that match the export filter you're testing.
Click the box next to the name of a finding.
Select Change Active State, and then select Inactive.
Re-select the finding that you marked inactive.
Select Change Active State, and then select Active. A notification is sent for the newly active finding.
Go to the Pub/Sub page in the Google Cloud console.
In the list of topics, click the name of your topic.
Select View Messages.
In the Messages panel, select your subscription from the drop-down list to see the finding notification. If necessary, click Pull to refresh messages.
Managing continuous exports
To view, edit, or delete exports, do the following:
Go to the Settings page in Security Command Center.
On the toolbar, click the project selector, and select your project, folder, or organization.
If data-residency support is enabled, directly below the project selector, select your data-residency location. For example:
Select Continuous exports. You see a list of continuous exports for your project, folder, or organization.
On the Continuous exports page in Settings, you can create, view, edit, and delete continuous exports.
Viewing related findings
To see findings that match an export filter, do the following:
- On the Continuous exports page, next to the name of an export, select More , and then click View related filters.
- The Findings page loads with findings that match the export filter.
Editing continuous exports
- On the Continuous exports page, click the name of the export you want to view or modify, or click More .
- Select Edit.
- Enter a new description, change the project that exports are saved to, or enter a new Pub/Sub topic.
- When done, click Save.
Deleting continuous exports
- On the Continuous exports page, click the name of the export you want to delete.
- Click delete Delete.
- In the dialog, click Delete. The export is deleted.
What's next
Learn more about finding notifications.