This tutorial shows how to create a voting service, consisting of:
A browser-based client that:
- Uses Identity Platform to fetch an ID token.
- Allows users to vote for their favorite domestic animal.
- Adds that ID token to a request to the Cloud Run server that processes the vote.
A Cloud Run server that:
- Checks to make sure the end-user has properly authenticated by providing a valid ID token.
- Processes the end-user's vote.
- Using its own credentials, sends the vote on to Cloud SQL for storage.
A PostgreSQL database that stores the votes.
For simplicity, this tutorial uses Google as a provider: users must authenticate using a Google account in order to acquire their ID token. However, you can use other providers or authentication methods to sign in users.
This service minimizes security risks by using Secret Manager to protect sensitive data used to connect to the Cloud SQL instance. It also uses a least-privilege service identity to secure access to the database.
Objectives
Write, build, and deploy a service to Cloud Run that shows how to:
Use Identity Platform to authenticate an end-user to the Cloud Run service backend.
Create a least-privilege identity for the service to grant minimal access to Google Cloud resources.
Use Secret Manager to handle sensitive data when connecting the Cloud Run service to a postgreSQL database.
Costs
In this document, you use the following billable components of Google Cloud:
To generate a cost estimate based on your projected usage,
use the pricing calculator.
Before you begin
- Sign in to your Google Cloud account. If you're new to Google Cloud, create an account to evaluate how our products perform in real-world scenarios. New customers also get $300 in free credits to run, test, and deploy workloads.
-
In the Google Cloud console, on the project selector page, select or create a Google Cloud project.
-
Make sure that billing is enabled for your Google Cloud project.
-
In the Google Cloud console, on the project selector page, select or create a Google Cloud project.
-
Make sure that billing is enabled for your Google Cloud project.
-
Enable the Cloud Run, Secret Manager, Cloud SQL, Artifact Registry, and Cloud Build APIs.
Required roles
To get the permissions that you need to complete the tutorial,
ask your administrator to grant you the
Owner (roles/owner) IAM role on your project.
For more information about granting roles, see Manage access.
You might also be able to get the required permissions through custom roles or other predefined roles.
Setting up gcloud defaults
To configure gcloud with defaults for your Cloud Run service:
Set your default project:
gcloud config set project PROJECT_ID
Replace PROJECT_ID with the name of the project you created for this tutorial.
Configure gcloud for your chosen region:
gcloud config set run/region REGION
Replace REGION with the supported Cloud Run region of your choice.
Cloud Run locations
Cloud Run is regional, which means the infrastructure that
runs your Cloud Run services is located in a specific region and is
managed by Google to be redundantly available across
all the zones within that region.
Meeting your latency, availability, or durability requirements are primary
factors for selecting the region where your Cloud Run services are run.
You can generally select the region nearest to your users but you should consider
the location of the other Google Cloud
products that are used by your Cloud Run service.
Using Google Cloud products together across multiple locations can affect
your service's latency as well as cost.
Cloud Run is available in the following regions:
Subject to Tier 1 pricing
asia-east1(Taiwan)asia-northeast1(Tokyo)asia-northeast2(Osaka)europe-north1(Finland) Low CO2
europe-southwest1(Madrid)europe-west1(Belgium) Low CO2
europe-west4(Netherlands)europe-west8(Milan)europe-west9(Paris) Low CO2
me-west1(Tel Aviv)us-central1(Iowa) Low CO2
us-east1(South Carolina)us-east4(Northern Virginia)us-east5(Columbus)us-south1(Dallas)us-west1(Oregon) Low CO2
Subject to Tier 2 pricing
africa-south1(Johannesburg)asia-east2(Hong Kong)asia-northeast3(Seoul, South Korea)asia-southeast1(Singapore)asia-southeast2(Jakarta)asia-south1(Mumbai, India)asia-south2(Delhi, India)australia-southeast1(Sydney)australia-southeast2(Melbourne)europe-central2(Warsaw, Poland)europe-west10(Berlin)europe-west12(Turin)europe-west2(London, UK) Low CO2
europe-west3(Frankfurt, Germany) Low CO2
europe-west6(Zurich, Switzerland) Low CO2
me-central1(Doha)me-central2(Dammam)northamerica-northeast1(Montreal) Low CO2
northamerica-northeast2(Toronto) Low CO2
southamerica-east1(Sao Paulo, Brazil) Low CO2
southamerica-west1(Santiago, Chile) Low CO2
us-west2(Los Angeles)us-west3(Salt Lake City)us-west4(Las Vegas)
If you already created a Cloud Run service, you can view the region in the Cloud Run dashboard in the Google Cloud console.
Retrieving the code sample
To retrieve the code sample for use:
Clone the sample app repository to your local machine:
Node.js
git clone https://github.com/GoogleCloudPlatform/nodejs-docs-samples.git
Alternatively, you can download the sample as a zip file and extract it.
Python
git clone https://github.com/GoogleCloudPlatform/python-docs-samples.git
Alternatively, you can download the sample as a zip file and extract it.
Java
git clone https://github.com/GoogleCloudPlatform/java-docs-samples.git
Alternatively, you can download the sample as a zip file and extract it.
Change to the directory that contains the Cloud Run sample code:
Node.js
cd nodejs-docs-samples/run/idp-sql/
Python
cd python-docs-samples/run/idp-sql/
Java
cd java-docs-samples/run/idp-sql/
Visualizing the architecture
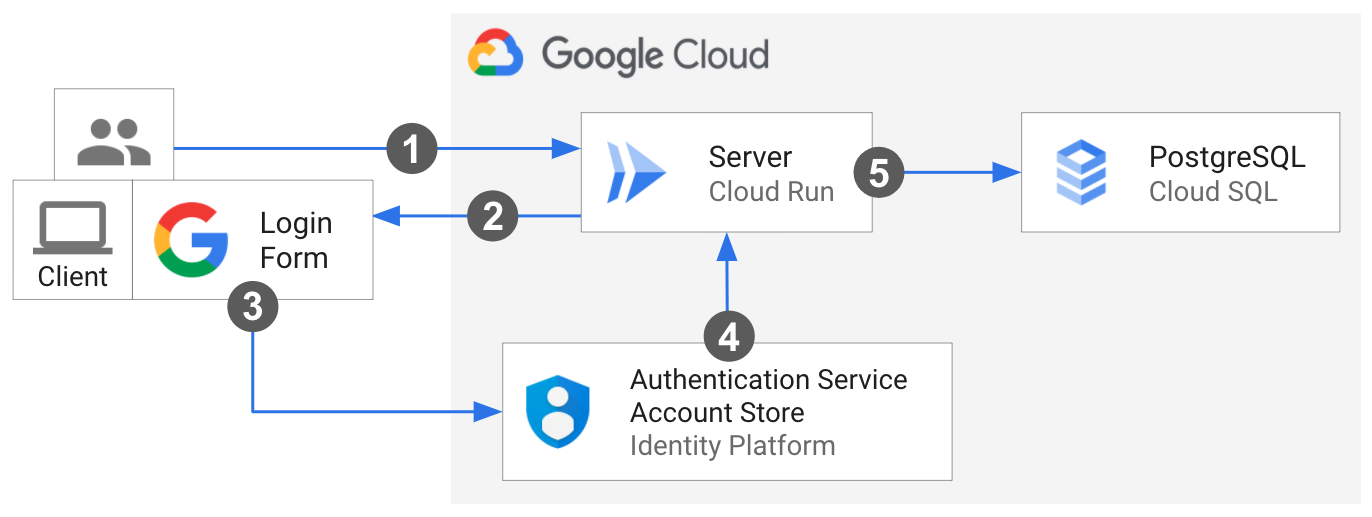
An end-user makes the first request to the Cloud Run server.
The client loads in the browser.
The user provides log-in credentials via the Google sign-in pop-up window from Identity Platform. An alert welcomes the signed-in user.
Control is redirected back to the server. The end-user votes using the client, which fetches an ID token from Identity Platform and adds it to the vote request header.
When the server receives the request, it verifies the Identity Platform ID token, confirming that the end-user is appropriately authenticated. Then server sends the vote to Cloud SQL, using its own credentials.
Understanding the core code
The sample is implemented as client and server, as described next.
Integrating with Identity Platform: client-side code
This sample uses Firebase SDKs to integrate with Identity Platform in order to sign-in and manage users. To connect to Identity Platform, the client-side JavaScript holds the reference to the project's credentials as a config object and imports the necessary Firebase JavaScript SDKs:
The Firebase JavaScript SDK handles the sign-in flow by prompting the end-user to sign-in to their Google Account via a popup window. It then redirects them back to the service.
When a user successfully signs in, the client uses Firebase methods to mint an
ID token. The client adds the ID token to the Authorization header of its request
to the server.
Integrating with Identity Platform: server-side code
The server uses the Firebase Admin SDK
to verify the user ID token sent from the client. If the provided
ID token has the correct format, is not expired, and is properly signed, the
method returns the decoded ID token. The server extracts the Identity Platform uid
for that user.
Node.js
Python
Java
Connecting the server to Cloud SQL
The server connects to the Cloud SQL instance Unix domain socket using
the format: /cloudsql/CLOUD_SQL_CONNECTION_NAME.
Node.js
Python
Java
Use the Spring Cloud Google Cloud PostgreSQL starter integration to interact with your PostgreSQL databases in Google Cloud SQL using Spring JDBC libraries. Set your Cloud SQL for MySQL config to auto-configure aDataSource bean, which, coupled with Spring JDBC, provides a JdbcTemplate object bean that allows for operations such as querying and modifying a database.
Handling sensitive configuration with Secret Manager
Secret Manager provides centralized and secure storage of sensitive data such as Cloud SQL configuration. The server injects the Cloud SQL credentials from Secret Manager at runtime via an environment variable. Learn more about Using secrets with Cloud Run.
Node.js
Python
Java
Setting up Identity Platform
Identity Platform requires manual setup in the Google Cloud console.
Go to the Identity Platform Marketplace page in the Google Cloud console.
Click Enable Identity Platform.
Create your OAuth Consent Screen:
In a new window, go to the APIs & Services > Credentials page
Click Configure Consent Screen.
For testing purposes select External.
Click Create.
In the App information dialog,
- Supply the application name.
- Select one of the displayed user support emails.
- Enter the email you want to use for developer contact.
Click Save and Continue.
In the Scopes and Test Users dialog, click Save and Continue.
Click Back to Dashboard.
Under Publishing status, click Publish App.
Click Confirm
Create and obtain your OAuth Client ID and Secret:
At the top of the page, click Create Credentials and select
OAuth client ID.From Application Type, select Web Application and supply the name.
Note the
client_idandclient_secretfor later use in this procedure.
Configure Google as a provider:
Go to the Identity Providers page in the Cloud console.
Click Add A Provider.
Select Google from the list.
In the Web SDK Configuration settings, enter the
client_idandclient_secretvalues from the previous steps.Under Configure your application, click Setup Details.
Copy the
apiKeyandauthDomainvalues into the sample'sstatic/config.jsto initialize the Identity Platform Client SDK.Click Save.
Deploying the service
Follow the steps below to complete infrastructure provisioning and deployment or automate the process in Cloud Shell by clicking "Run on Google Cloud":

Create a Cloud SQL instance with postgreSQL database using the console or CLI:
gcloud sql instances create CLOUD_SQL_INSTANCE_NAME \
    --database-version=POSTGRES_12 \
    --region=CLOUD_SQL_REGION \
    --cpu=2 \
    --memory=7680MB \
    --root-password=DB_PASSWORD
Add your Cloud SQL credential values to
postgres-secrets.json:Node.js
Python
Java
Create a versioned secret using the console or CLI:
gcloud secrets create idp-sql-secrets \
    --replication-policy="automatic" \
    --data-file=postgres-secrets.json
Create a service account for the server using the console or CLI:
gcloud iam service-accounts create idp-sql-identity
Grant roles for Secret Manager and Cloud SQL access using the console or CLI:
Allow the service account associated with the server to access the created secret:
gcloud secrets add-iam-policy-binding idp-sql-secrets \
  --member serviceAccount:idp-sql-identity@PROJECT_ID.iam.gserviceaccount.com \
  --role roles/secretmanager.secretAccessor
Allow the service account associated with the server to access Cloud SQL:
gcloud projects add-iam-policy-binding PROJECT_ID \
  --member serviceAccount:idp-sql-identity@PROJECT_ID.iam.gserviceaccount.com \
  --role roles/cloudsql.client
Create an Artifact Registry:
gcloud artifacts repositories create REPOSITORY \ --repository-format docker \ --location REGIONREPOSITORYis the name of the repository. For each repository location in a project, repository names must be unique.
Build the container image using Cloud Build:
Node.js
gcloud builds submit --tag REGION-docker.pkg.dev/PROJECT_ID/REPOSITORY/idp-sql
Python
gcloud builds submit --tag REGION-docker.pkg.dev/PROJECT_ID/REPOSITORY/idp-sql
Java
This sample uses Jib to build Docker images using common Java tools. Jib optimizes container builds without the need for a Dockerfile or having Docker installed. Learn more about building Java containers with Jib.
Use the gcloud credential helper to authorize Docker to push to your Artifact Registry.
gcloud auth configure-docker
Use the Jib Maven Plugin to build and push the container to Artifact Registry.
mvn compile jib:build -Dimage=REGION-docker.pkg.dev/PROJECT_ID/REPOSITORY/idp-sql
Deploy the container image to Cloud Run using the console or CLI. Note that the server is deployed to allow unauthenticated access. This is so that the user can load the client and begin the process. The server verifies the id token added to the vote request manually, authenticating the end-user.
gcloud run deploy idp-sql \
    --image REGION-docker.pkg.dev/PROJECT_ID/REPOSITORY/idp-sql \
    --allow-unauthenticated \
    --service-account idp-sql-identity@PROJECT_ID.iam.gserviceaccount.com \
    --add-cloudsql-instances PROJECT_ID:REGION:CLOUD_SQL_INSTANCE_NAME \
    --update-secrets CLOUD_SQL_CREDENTIALS_SECRET=idp-sql-secrets:latest
Also note the flags,
--service-account,--add-cloudsql-instances, and--update-secrets, which specify the service identity, the Cloud SQL instance connection, and the secret name with version as an environment variable, respectively.
Finishing touches
Identity Platform requires that you authorize the Cloud Run service URL as an allowed redirect after it has signed in the user:
Edit the Google provider by clicking the pen icon in the Identity Providers page.
Click Add Domain under Authorized Domains on the right panel, and enter the Cloud Run service URL.
You can locate the service URL in the logs after the build or deployment or you can find it anytime using:
gcloud run services describe idp-sql --format 'value(status.url)'
Go to the APIs & Services > Credentials page
Click the pencil icon beside your OAuth Client ID to edit it and under the
Authorized redirect URIs click theAdd URI button.In the field copy and paste the following URL and click the Save button at the bottom of the page.
https://PROJECT_ID.firebaseapp.com/__/auth/handler
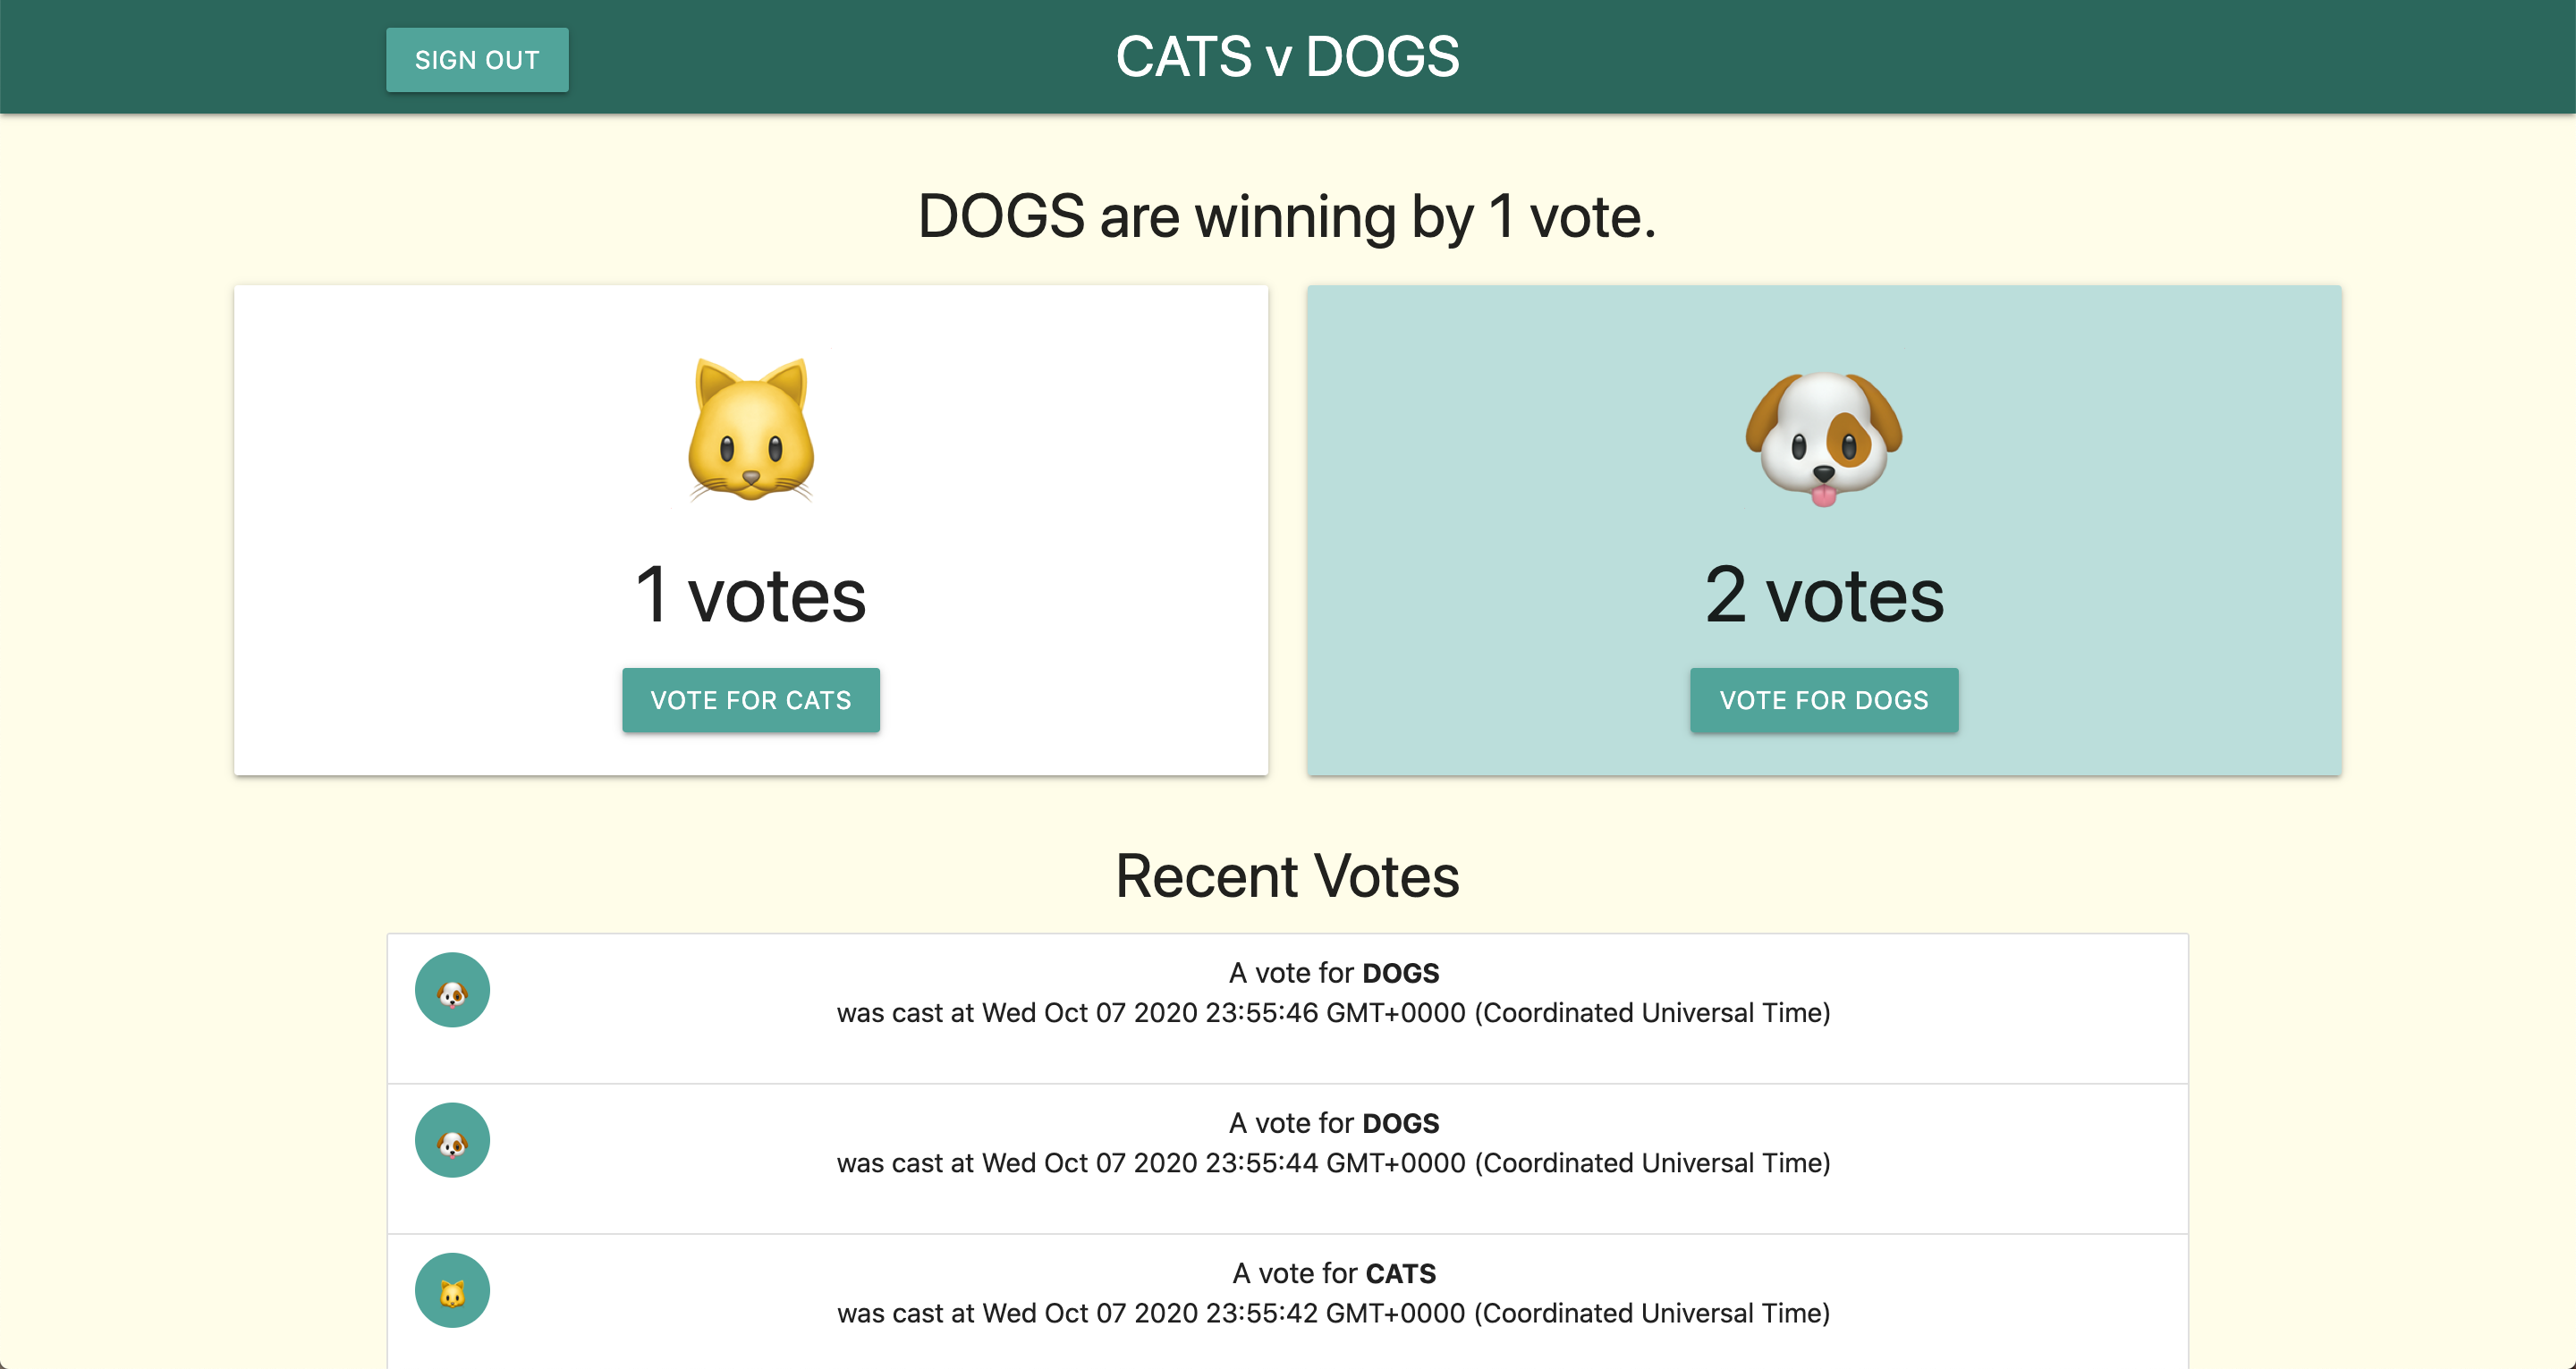
Trying it out
To try out the complete service:
Navigate your browser to the URL provided by the deployment step above.
Click the Sign in with Google button and go through the authentication flow.
Add your vote!
It should look like this:
If you choose to continue developing these services, remember that they have restricted Identity and Access Management (IAM) access to the rest of Google Cloud and will need to be given additional IAM roles to access many other services.
Clean up
If you created a new project for this tutorial, delete the project. If you used an existing project and wish to keep it without the changes added in this tutorial, delete resources created for the tutorial.
Deleting the project
The easiest way to eliminate billing is to delete the project that you created for the tutorial.
To delete the project:
- In the Google Cloud console, go to the Manage resources page.
- In the project list, select the project that you want to delete, and then click Delete.
- In the dialog, type the project ID, and then click Shut down to delete the project.
Deleting tutorial resources
Delete the Cloud Run service you deployed in this tutorial:
gcloud run services delete SERVICE-NAME
Where SERVICE-NAME is your chosen service name.
You can also delete Cloud Run services from the Google Cloud console.
Remove the gcloud default region configuration you added during tutorial setup:
gcloud config unset run/regionRemove the project configuration:
gcloud config unset projectDelete other Google Cloud resources created in this tutorial:
What's next
- Dive deeper into Connecting from Cloud Run to Cloud SQL
- Learn more about sign in methods and managing users with Identity Platform
- Review other ways to authenticate developers, services, and users of services deployed to Cloud Run
- Explore other Cloud Run demos, tutorials, and samples