Migrating a monolith VM - Overview and setup
In this tutorial, you take a look at a sample application not fully modernized yet and go through the steps needed to migrate all of its services to GKE. This application runs some of its services in a GKE cluster and the rest of its services as a monolith in a VM.
This tutorial is divided into four sections:
-
In this section you take a look at the context behind this tutorial, as well as set up the required infrastructure and tooling required to proceed with the rest of the tutorial.
Discovery and assessment (Day 0).
Next, you use discovery tools to assess your VM to see its suitability for migration, as well as create a processing cluster in preparation for migration.
Migration and deployment (Day 1).
Once assessed, you learn how to create a migration plan for your monolith VM, proceed with a full migration of images and data, and deploy your newly created artifacts into Kubernetes.
-
Finally, you learn how to quickly deploy source code changes to your containerized environment, as well as learn about microservices, observability, and modernization best practices.
Context
Still today, a large share of legacy applications in large enterprises are monolithic and running on proprietary technology stacks or compute-heavy virtual machines (VMs). These services are often crucial to the working of a larger application but accrues a lot of operating costs such as operational and licensing fees. Yet, due to their nature, VMs can be difficult to migrate to a more lightweight solution such as containers in a GKE cluster.
In this tutorial, you learn how you can leverage Migrate to Containers to easily and without any code changes move a monolith service and its database from a VM to a GKE environment, thus reducing operational fees and development friction. You then learn how to leverage your newly migrated workload by deploying source code changes and modernization best practices.
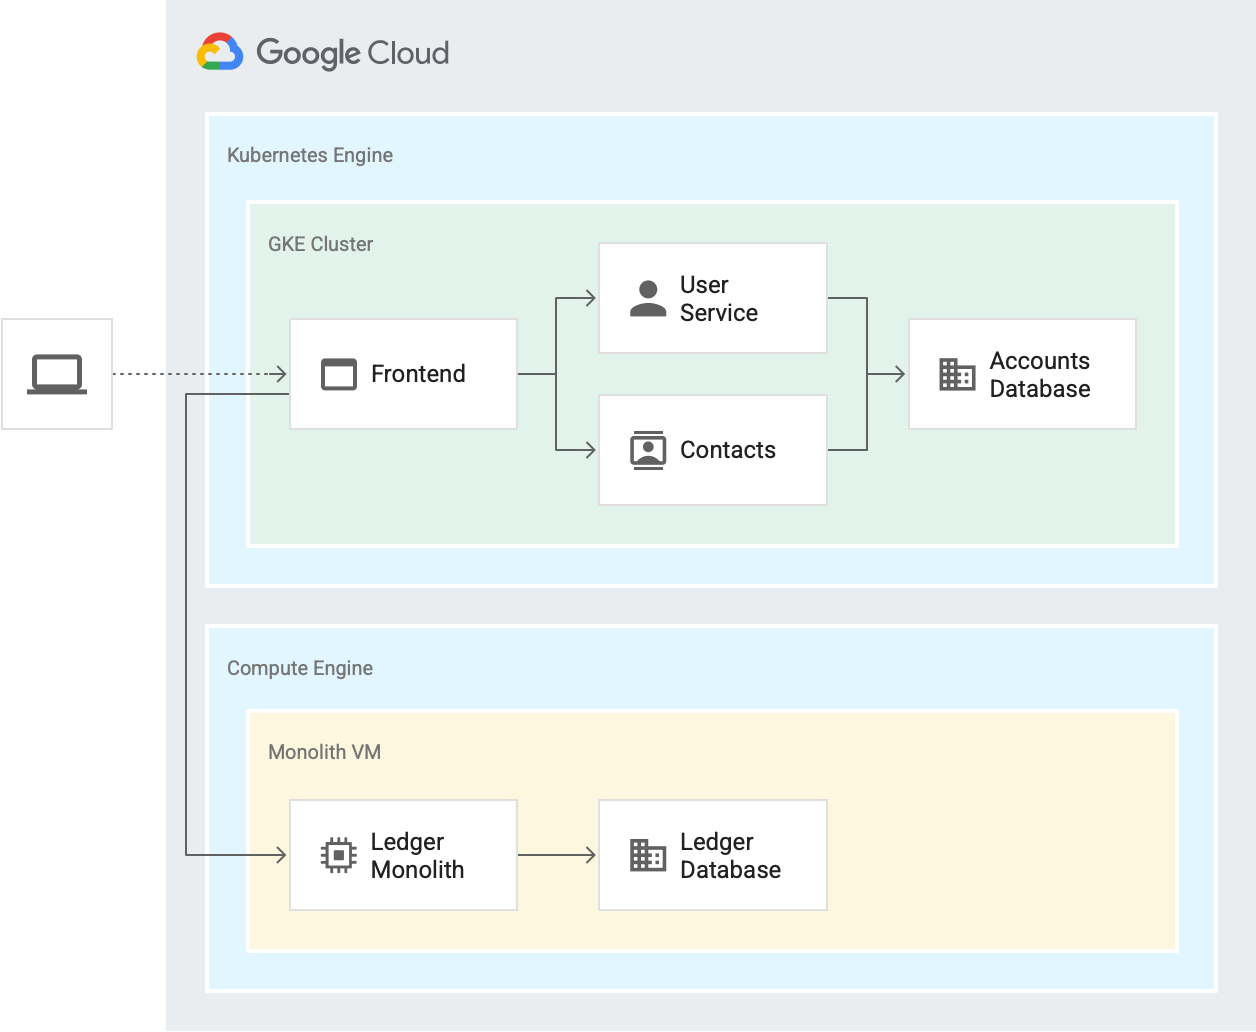
The sample application used is Bank of Anthos, a simulation of a retail banking service, complete with its own transaction processing network and databases.
Bank of Anthos's web-frontend, user, and contact services, along with the account database, are already containerized microservices running in containers on GKE. However, their monolithic transaction ledger and transaction database are still running on a single virtual machine. To cut down on operational costs while not interrupting any current workflow, you need to be able to easily migrate this VM to GKE.
Costs
In this document, you use the following billable components of Google Cloud:
To generate a cost estimate based on your projected usage,
use the pricing calculator.
When you finish the tasks that are described in this document, you can avoid continued billing by deleting the resources that you created. For more information, see Clean up.
Required tools
You can perform this tutorial using Cloud Shell, which comes
preinstalled with the gcloud, kubectl, git, and migctl command-line tools used
in this tutorial. By using Cloud Shell, you don't need to install these
command-line tools on your workstation.
To use Cloud Shell:
- Go to the Google Cloud console.
Click the Activate Cloud Shell
 button at the top of the Google Cloud console window.
A Cloud Shell session opens inside a new frame at the bottom of the Google Cloud console and displays a command-line prompt.

Required APIs
Enable support for Compute Engine
- Sign in to your Google Cloud account. If you're new to Google Cloud, create an account to evaluate how our products perform in real-world scenarios. New customers also get $300 in free credits to run, test, and deploy workloads.
-
In the Google Cloud console, on the project selector page, select or create a Google Cloud project.
-
Make sure that billing is enabled for your Google Cloud project.
-
In the Google Cloud console, on the project selector page, select or create a Google Cloud project.
-
Make sure that billing is enabled for your Google Cloud project.
- Enable the Compute Engine API.
Enable and configure GKE
Before you start, make sure you have performed the following tasks:
- Enable the Google Kubernetes Engine API. Enable Google Kubernetes Engine API
- If you want to use the Google Cloud CLI for this task,
install and then
initialize the
gcloud CLI. If you previously installed the gcloud CLI, get the latest
version by running
gcloud components update.
Deploy Bank of Anthos
In this section you deploy your ledger monolith VM into Compute Engine as well as create the GKE cluster where the remainder of the Bank of Anthos services are going to live in.
Set the environment variables required for the Bank of Anthos monolith deployment.
export PROJECT_ID=PROJECT_ID
export ZONE=COMPUTE_ZONE
Clone the Bank of Anthos repository into your home directory.
git clone https://github.com/GoogleCloudPlatform/bank-of-anthos ${HOME}/bank-of-anthosDeploy the Bank of Anthos ledger monolith to Compute Engine.
cd ${HOME}/bank-of-anthosmake monolith-deployThis command creates a VM in Compute Engine using the Bank of Anthos ledgermonolith image.
Create a firewall rule that allows requests to the VM instance on port 8080, which is used by the frontend service to communicate to the ledger monolith.
gcloud compute --project=PROJECT_ID firewall-rules create default-allow-http \
  --direction=INGRESS --priority=1000 --network=default --action=ALLOW \
  --rules=tcp:8080 --source-ranges=0.0.0.0/0 --target-tags=monolith
Create a GKE cluster that hosts the remainder of the Bank of Anthos services.
gcloud container clusters create boa-cluster \
  --zone COMPUTE_ZONE --project=PROJECT_ID \
  --machine-type=e2-standard-4 --num-nodes=4 \
  --subnetwork=default
Once the cluster has been created, fetch its credentials and set the Kubernetes context to point to it.
gcloud container clusters get-credentials boa-cluster \
  --zone COMPUTE_ZONE --project=PROJECT_ID
Substitute the project ID into the ConfigMap used to describe how the GKE services can talk to the ledger monolith VM.
sed -i 's/\[PROJECT_ID\]/'PROJECT_ID'/g' ${HOME}/bank-of-anthos/src/ledgermonolith/config.yamlView this file to make sure the changes have applied successfully.
cat ${HOME}/bank-of-anthos/src/ledgermonolith/config.yaml | grep ADDRYou should see that the project ID has been interpolated into the ledger service hosts.
TRANSACTIONS_API_ADDR: "ledgermonolith-service.c.PROJECT_ID.internal:8080"
BALANCES_API_ADDR: "ledgermonolith-service.c.PROJECT_ID.internal:8080"
HISTORY_API_ADDR: "ledgermonolith-service.c.PROJECT_ID.internal:8080"
CONTACTS_API_ADDR: "contacts:8080"
USERSERVICE_API_ADDR: "userservice:8080
Apply the various Bank of Anthos services on your cluster.
cd ${HOME}/bank-of-anthos/kubectl apply -f src/ledgermonolith/config.yamlkubectl apply -f extras/jwt/jwt-secret.yamlkubectl apply -f kubernetes-manifests/accounts-db.yamlkubectl apply -f kubernetes-manifests/userservice.yamlkubectl apply -f kubernetes-manifests/contacts.yamlkubectl apply -f kubernetes-manifests/frontend.yamlkubectl apply -f kubernetes-manifests/loadgenerator.yamlYou can verify the Pod states with the following command:
kubectl get pods
It may take a few minutes for all the Pods to be up and running.
NAME                           READY   STATUS    RESTARTS   AGE
accounts-db-0                  1/1     Running   0          51s
contacts-d5dcdc87c-5l9xf       1/1     Running   0          50s
frontend-5768bd978-s6vkq       1/1     Running   0          50s
loadgenerator-8485dfd-wjvst    1/1     Running   0          50s
userservice-8477dfcb46-htw96   1/1     Running   0          51s
Once all the Pods are set to
Running, you can find thefrontendLoadBalancer service's external IP address.kubectl get service frontend
NAME       TYPE           CLUSTER-IP      EXTERNAL-IP     PORT(S)        AGE
frontend   LoadBalancer   10.79.248.161   ##.##.##.##.    80:31304/TCP   4m
Finally, you can open a browser and visit the web page at the external IP address found above (be sure to use HTTP, rather than HTTPS).
http://EXTERNAL_IP
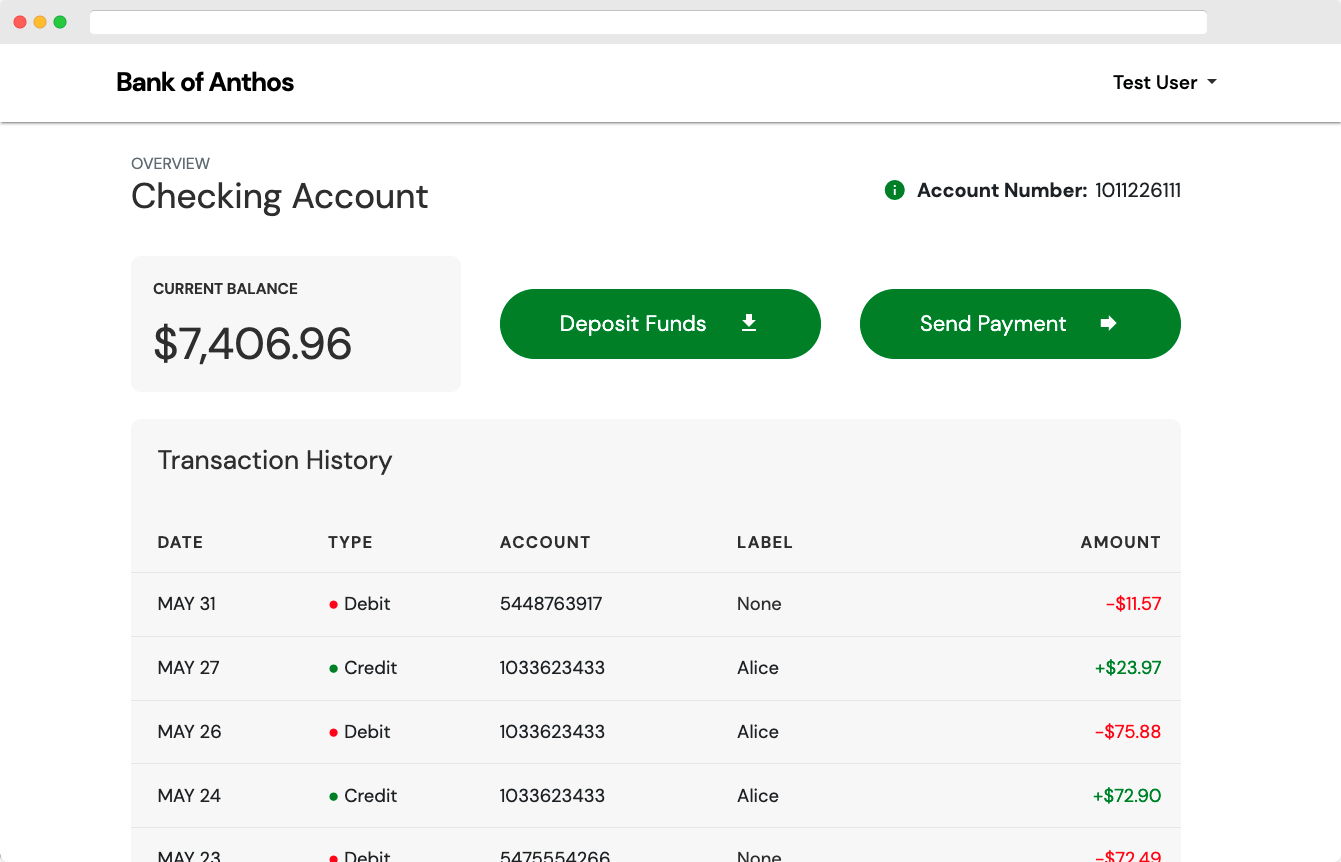
You should be able to log in with the default credentials and see transactions on the dashboard. The transactions listed are coming from the ledger monolith currently hosted in a VM.
Clean up
To avoid unnecessary Google Cloud charges, you should delete the resources used for this tutorial as soon as you are done with it. These resources are:
- The
boa-clusterGKE cluster - The
ledgermonolith-serviceCompute Engine VM
You can either delete these resources manually, or follow the steps below to delete your project, which will also get rid of all resources.
What's next
Now that you have enabled the needed APIs and deployed your setup of Bank of Anthos, you can move on to the next section of the tutorial, Discovery and assessment, where you learn how you can use the migration discovery tools to assess if your VM is suited for migration using the Migrate to Containers tools.
If you end the tutorial here, don't forget to clean up your Google Cloud project and resources.