This page helps you create a public machine image for your product to run on Compute Engine.
An image contains a boot loader, an operating system, and a root file system that is necessary for starting an instance. You can configure the image with a set of apps and services for your product. The image is used by customers to launch a virtual machine (VM) instance in the cloud.
We recommend you start with creating an image in your development project, and then move it to your public project after your Google Partner Engineer has verified the image.
Before you begin
- Download the Google Cloud SDK.
Create the base product VM
To create a custom machine image for Cloud Marketplace, you need to complete these steps (described in the sections that follow):
Use one of Google's supported base public images to create a VM, and install your app-specific packages and configs.
You can choose an image that uses Arm processors or one that uses x86 processors. You can also include multiple images, targeting different machine types, in one VM product. For more information about CPU platforms and the machine types that support them, see CPU platforms.
If you intend to provide support to your customers, install scripts to retrieve the app user credentials.
Create a licensed VM image
Use gcloud to set defaults for the Google Cloud CLI:
gcloud config set project <project_id>
gcloud config set compute/zone <zone>
Create a primary instance that is used to install your software, and later, converted to an image to use on Cloud Marketplace. For more information about creating an instance, see Creating and starting an instance.
gcloud compute instances create ${INSTANCE} --scopes
https://www.googleapis.com/auth/cloud-platform
Install and customize your software. Include any startup scripts required, such as those for creating authorization credentials.
To create authorization credentials using secure randomized passwords, follow the steps in Creating authorization credentials, in the following section.
When you've created and customized the primary instance, prepare the disk which is needed to create a VM image.
Clean up your disk. Creating a VM image directly from your VM also transfers your user directories and SSH keys into your customers' VMs, so you must clean the input disk when creating your VM image.
To clean the disk:
In the Compute Engine VM Instances menu, click the name of the instance you want to clean up, and then click Edit.
Scroll down and clear the Delete boot disk when instance is deleted checkbox and click Save. You use the disk to create the image.
Delete the VM while preserving the disk. You are prompted to confirm the deletion. Do not select Also delete boot disk.
Next, you need to create a new VM Instance. Expand the Management, disk, networking, SSH keys options.
Under disk, attach the disk from your previous instance as an additional data disk. Ensure that Keep disk is selected for When deleting instance.
You can now SSH into the instance and remove any home directories or other temporary files created during the software installation process. You must mount the data disk before you can access it. For more information on mounting disks, see Adding or Resizing Persistent Disks.
When you're done, shut down and delete the instance while preserving your updated data disk. Now you can create a VM image by completing the following steps.
Get the license name for your VM product in Producer Portal by using these steps:
Open Producer Portal in the Google Cloud console:
https://console.cloud.google.com/producer-portal?project=YOUR_PROJECT_ID
Replace YOUR_PROJECT_ID with the ID for either your development or public project. We recommend you start with creating an image in your development project, and then move it to your public project after your Google Partner Engineer verifies the image.
Click the name of your product.
Go to the Deployment Package section. Under VM license, note the name. You use this license name in the following step, when you create your image.
Create a licensed image by running the following
gcloudcommand:gcloud compute images create CREATE_IMAGE_NAME \ --project PUBLIC_PROJECT_NAME \ --source-disk projects/DEV_PROJECT_NAME/zones/SOURCE_DISK_ZONE/disks/SOURCE_DISK_NAME \ --licenses LICENSE_NAME \ --description ADD_DESCRIPTION
Replace the following:
CREATE_IMAGE_NAME: The name of your image and the CPU architectures that it supports, in the format
who-vmOS-image-architecture-date, replacingarchitecturewith eitherArmorx86_64, depending on which CPU architecture the image supports. You must use a new and unique name every time that you update the image for your product.PUBLIC_PROJECT_NAME: The project ID for your public project for Cloud Marketplace. You must have been granted the Compute Storage Admin role (
roles/compute.storageAdmin) for this project.LICENSE_NAME: The license name for your VM product that you noted in the previous step.
DEV_PROJECT_NAME: The project ID for the project that you created for development and testing for Cloud Marketplace. You must have the Compute Image User role (
roles/compute.imageUser) for this project.SOURCE_DISK_ZONE: The zone of the source disk.
SOURCE_DISK_NAME: The name of the source disk.
ADD_DESCRIPTION: An optional, textual description for the image being created.
Make the image public
For non-Terraform products that don't use Marketplace owned images, you must make your image publicly available so that your customers can deploy it to their Compute Engine instances. To make the image public, use the Google Cloud console, or the Google Cloud CLI:
Console
In your public project, under Compute Engine, go to the Images page.
Select your image, as shown below:

If you don't see an info panel on the top-right, click Show Info Panel.
In the info panel, in the Add Members field, enter
allAuthenticatedUsers, and from the Select a role menu, select Compute Image User.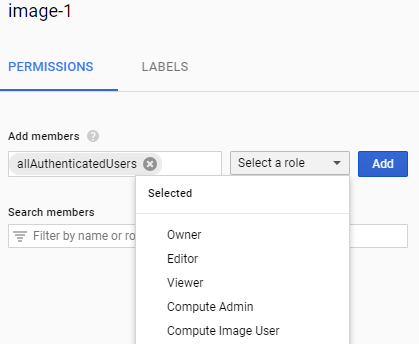
Click Add to make your image public.
Command Line
Use the following gcloud command in
Cloud Shell, or on your local
machine:
gcloud compute images add-iam-policy-binding IMAGE_NAME --member=allAuthenticatedUsers --role=roles/compute.imageUser
Create authorization credentials
If your product is a simple deployment of a single VM instance with basic firewall rules, then you can automatically include a secure randomized password when you configure your deployment package directly.
If you plan to create your deployment package by using the
open source mpdev tool,
which we recommend for most use cases, then you can use mpdev to automatically
include multiple secure randomized passwords.
For steps to create authorization credentials, see Creating your deployment package.
After your product has been deployed, to obtain the values of any passwords that you created, use the following command from within your VM instance:
curl -H "Metadata-Flavor: Google" \
http://metadata/computeMetadata/v1/instance/attributes/PASSWORD_NAME
Test the VM image
Create a VM instance with your newly created image, and verify the functionality.
Also, to verify the license ID, SSH into the instance and verify that valid licenses are attached:
curl -s -H "Metadata-Flavor: Google" http://metadata.google.internal/computeMetadata/v1/instance/licenses/?recursive=true
Verify that Python 2.6 or greater is installed:
python -V
Verify that the following packages are installed:
gcloud --version
gsutil --version
ssh -V
ps aux | grep sshd
curl -V
ps aux | grep dhcp
Check to ensure that there are no other user directories installed on the instance except for your own, and that there are not any remaining user directories and credentials other than your own.