This page describes the requirements for packaging your Kubernetes app, and guidelines for meeting those requirements.
Your app package is a bundle of container images and configuration files that are deployed to users' Kubernetes clusters. To support deploying your app to Google Kubernetes Engine from the Google Cloud console, the app package must include a deployment container. The deployment container pushes the configuration files and display metadata to the Kubernetes API.
Your app package enables Google Cloud users to:
- Discover your app in the Cloud Marketplace catalog
- Deploy the app to their GKE or GKE Enterprise cluster, using the Google Cloud console
- Interact with the running app using Google Cloud console
In addition to supporting deployment via the Google Cloud console, your package must include steps for users to deploy your app through a command-line interface (CLI), using tools like kubectl or Helm.
For examples of app packages, see the GitHub repository for Google Click to Deploy Solutions. The repository contains packages for popular open source apps, such as WordPress and Elasticsearch.
Before you begin
- Make sure that you have set up your Google Cloud environment.
- Create a public Git repository for the configuration files, user guide, and other resources to run your app. You can host the repository with a provider such as GitHub, Cloud Source Repositories, or on your own server. We recommend a dedicated repository for each product that you are distributing.
Overview
The app must meet the following requirements:
Your Git repository must contain a LICENSE file, which contains the open source license for the repository.
Your Git repository must contain a configuration file, which deploys your app. The configuration file can be a Kubernetes YAML manifest, or a Helm chart.
The configuration must include an Application custom resource, which describes the app.
Your app must run on nodes using an x86 processor.
Optionally, if you want your app to be compatible with Istio, review the limitations on clusters that run Istio.
If your app is commercial (non-BYOL), it must report its usage to Google, so that your customers are billed accurately. We recommend integrating your app with the Usage-based Billing Agent, which sends usage reports to Google.
All of your app's container images must be uploaded to your registry in Container Registry. Your registry must also include a deployer image, which pushes the app's configuration to the Kubernetes API when users deploy the app from Google Cloud console.
You must include integration tests for the app.
You must include a user guide, with steps to deploy the app from the command line, configure the app, and use the app.
Requirements for your configuration
You can provide your configuration either as a Kubernetes manifest, or as a Helm chart.
Your configuration must meet the following requirements:
To protect users from unstable APIs, use only beta or generally available Kubernetes resources.
Your configuration must deploy an Application custom resource. The Application resource contains the information that users see when they deploy their app through the Cloud Marketplace UI.
The Application resource is a custom resource, which aggregates the Kubernetes components associated with your app, and lets users manage these resources as a group.
For information on creating an Application resource, and for examples, see the Application GitHub repository.
Your configuration must use parameters that can be substituted, either using
envsubst, or as flags.The following parameters must be able to be substituted:
Namespace: All of your configuration's resources must belong to a single namespace. Cloud Marketplace users configure this namespace when they deploy your app. Avoid hard-coding namespaces in your manifests, so that the resources you specify are created in the namespace that users select. Namespaces sometimes also appear inside resource definitions, such as when referring to a
ServiceAccountin aRoleBinding. Any such reference must be parameterized.App name: The instance name of the Application resource. This string must be included in the name of each of the app's resources, to avoid name collisions if multiple instances of the app are deployed in a single namespace.
Container Images: Every image reference, such as in a
PodSpec, must be substitutable, so that Cloud Marketplace can override them to point to images published in our container registry. It also allows customers to easily substitute modified images.License secret: If your app is performing commercial metering, it must accept the name of a Secret resource as a parameter. The Secret contains the usage reporting credentials, which your app uses to send usage data to Google.
Learn more about configuration parameters on GitHub.
It must be possible to deploy your app using client-side tools. For example, if you are using Helm, the deployment must work with the
--client-onlycommand-line flag.
Limitations on clusters with Istio
If you want your ap to be compatible with Istio, review the limitations described in this section. For an overview of Istio, see What is Istio?.
If your customers run Istio in their clusters, Istio controls the network traffic between your app's Pods by default. This might block network communication in the following scenarios:
If your Pods run
kubectlcommands that use the cluster's IP address, the commands might fail.If your app uses Pod-to-Pod or IP-based communication, the cluster formation step might fail.
External connections to third-party services, such as OS package repositories, might be blocked. Customers must configure Istio egress traffic to enable access to external services.
We recommend configuring incoming connections using Istio Gateway, instead of LoadBalancer or Ingress resources.
If you are using Helm for your configuration, use the
x-google-marketplace ISTIO_ENABLED property in the schema for your
deployment image. If this property is true, your deployer must modify
the deployment, such as by waiting for the Istio sidecar to be ready.
To help your customers set up communication between app Pods, we recommend adding steps to the post-deployment sections of your documentation.
Requirements to integrate the billing agent
If you are selling a commercial app, we recommend integrating your app with the Usage-based Billing (UBB) Agent.
The agent handles authentication and reporting to Google's usage reporting endpoint: Service Control. When you have submitted your pricing model, the Cloud Marketplace team creates a service for your app to report against, and the billing metrics to measure usage.
The agent also manages local aggregation, crash recovery, and retries. For the usage-hour metric, the agent can be configured to automatically report heartbeats.
The agent also exposes reporting status, allowing your app to detect whether the agent is successfully reporting usage data.
Customers purchase the app in Cloud Marketplace to acquire a license, which is attached to the app at deployment time.
When you are integrating with the billing agent, consider how your app behaves when usage reports fail, which might indicate one of the following:
The customer has canceled their subscription.
The customer might have accidentally disabled the reporting channel. For example, customers might inadvertently remove or misconfigure the agent, or the network might prevent the agent from accessing Google's reporting endpoint.
Follow the best practices to report the usage and to handle cases when Google does not receive usage data and customers are not billed.
Integrating the billing agent
You can integrate the agent as a sidecar container, which runs in the same Pod as your app, or by using the SDK.
In the sidecar approach, the agent runs in its own container, in the same Kubernetes Pod as the app container. Your app communicates with the agent's local REST interface.
In the SDK approach, the agent must be compiled or linked into your app binary. The SDK is implemented natively for Go, with bindings for Python.
In general, the sidecar approach requires less integration effort, while the SDK is more robust against being accidentally disabled.
For detailed integration steps, see the README in the Usage-based Billing Agent GitHub repository. To see a sample implementation, see the example app and tools repositories.
Credentials to report usage
The billing agent requires credentials that allow it to send usage reports to
Google. Cloud Marketplace generates these credentials when users deploy
the app from Cloud Marketplace, and ensures that they exist as a Secret
in the target Kubernetes namespace before your app is deployed.
The name of this Secret is passed to your app as the REPORTING_SECRET
schema property.
For an example manifest that uses the reporting Secret, see the WordPress app example in GitHub.
The Secret contains the following fields:
|
An identifier representing the customer's agreement to purchase and use the software. |
|
An identifier associated with the Entitlement that is passed to Google Service Control along with usage reports. |
|
The Google Cloud Service Account JSON key used to authenticate to Google Service Control. |
If your product provides a SaaS component in addition to the app, you can optionally have that SaaS component periodically check the validity of entitlement IDs, using the Cloud Marketplace Procurement service. To get access to the Procurement service, contact your Partner Engineer.
For information on other parameters that are passed to the app, see Parameters passed to your app, later in this section.
Requirements for building your container images
Your app consists of one or more app container images. In addition, your repository must include a deployment container, which is used when customers deploy the app from the Cloud Marketplace UI.
Container images are typically built using a
Dockerfile and the docker
build command-line tool. We recommend that you publish the Dockerfile and
container build instructions in your app's public repository. Publishing them
lets customers modify or rebuild the images, which is sometimes necessary to
certify images for enterprise production environments.
If your app image depends on a base image, such as Debian, or a language runtime image, such as Python or OpenJDK, then we strongly recommend that you use one of Cloud Marketplace's certified container images. Doing so ensures timely updates to your base image, especially for security patches.
After building your app images, push them to the staging registry that you created in Container Registry when you set up your environment.
Your Container Registry repository must have the following structure:
Your app's main image must be in the root of the repository. For example, if your Container Registry repository is
gcr.io/exampleproject/exampleapp, the app's image should be ingcr.io/exampleproject/exampleapp.The image for your deployment container must be in a folder called
deployer. In the example above, the deployment image must be ingcr.io/exampleproject/exampleapp/deployer.If your app uses additional container images, each additional image must be in its own folder under the main image. For example, if your app requires a
proxyimage, add the image togcr.io/exampleproject/exampleapp/proxy.All of your app's images must be tagged with the release track and the current version. For example, if you're releasing version
2.0.5on the2.0release track, all the images must be tagged with2.0and2.0.5. Learn about organizing your releases.
For example, the following image shows the Container Registry repository
for the Grafana Cluster
Kubernetes app. The release track is 5.3, and the app contains the main app
image, the deployer image in its own folder, and the Debian 9 image in
debian9. All of the images in the repository are tagged with the same track,
5.3, and version on that track, 5.3.4. This must also match
the "Version" field of the Custom Resource Definition (CRD) for the Application resource as declared in the deployer.
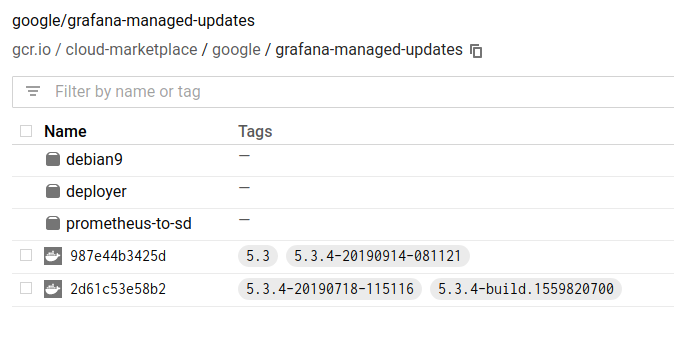
The repository is at gcr.io/cloud-marketplace/google/grafana.
Use the container image identifiers that you selected previously, when choosing your product identifiers.
To upload your images to Container Registry, tag them with the registry name,
and then push the image using gcloud. For example, use the following commands
to push the images for example-pro:
docker build -t gcr.io/my-project/example-pro:4.0 # release track 4.0
docker tag gcr.io/my-project/example-pro:4.0 gcr.io/my-project/example-pro:4.0.3 # release version 4.0.3
docker push gcr.io/my-project/example-pro:4.0
docker push gcr.io/my-project/example-pro:4.0.3
For detailed steps to tag and push images to your registry, see the Container Registry documentation.
Requirements for the deployment container
The deployment container, or deployer, is used when customers deploy your
product from Cloud Marketplace. The deployer image
packages your app's Kubernetes configuration and the
client tools, such as kubectl or Helm, which push the configuration to the
Kubernetes API. The deployer should typically use the same set of
command-line commands that a user would run to deploy your app.
To create your deployer, use one of the base images for deployment containers from the tools repository's marketplace directory:
- If you are using
kubectlfor your configuration, use the kubectl base image. - If you are using a Helm chart for your configuration, use the Helm base image.
The base images have built-in utilities for tasks such as assigning owner references, password generation, and post-deploy cleanup.
For steps to build your deployer image, see Building the Application Deployer.
Parameters passed to your app
Your deployment container must declare parameters that need to be collected from customers when they select your app. These parameters are then supplied to the deployment container when users deploy the app.
To configure these parameters, your deployment container image must include a
JSON Schema, in YAML format, at this
path: /data/schema.yaml.
To learn how to create a schema.yaml, see Deployer schema.
GPU cluster requests
If your app has specific GPU needs, or is GPU intensive, you can specify the type and number of GPUs in the cluster by using your deployer schema. If you specify your GPU needs, assisted cluster creation is disabled.
Your app may request a generic Nvidia GPU, or a specific Nvidia platform.
Requirements for Verification process
Apps are executed in our Verification system to ensure that:
- Installation succeeds: All resources are applied and waited for to become healthy.
- Functionality tests pass: The deployer starts the Tester Pod and watches its exit status. Zero means success, non-zero means failure.
- Uninstallation succeeds: App and all its resources are successfully removed from the cluster.
Successful results are required before an app can be published to the Google Cloud Marketplace.
For details on how to package, execute, and verify these functionality tests, follow the documentation on Verification integration.
Requirements for your user guide
Your user guide must include the following information:
Overview
- A general app overview, covering basic functions and configuration options. This section must also link to the published product on Cloud Marketplace.
One-time setup
- Configuring client tools such as
kubectlor Helm. as applicable. - Installing the Application CustomResourceDefinition (CRD), so that your cluster can manage the Application resource.
- If you are selling a commercial app, steps for acquiring and deploying a license Secret from Cloud Marketplace.
Installation
- Commands for deploying the app.
- Passing parameters available in UI configuration.
- Pinning image references to immutable digests.
If you add custom input fields to your deployer schema, add information about the expected values, if applicable.
Basic Usage
- Connecting to an admin console (if applicable).
- Connecting a client tool and running a sample command (if applicable).
- Modifying usernames and passwords.
- Enabling ingress and installing TLS certs (if applicable).
Back up and restore
- Backing up app state.
- Restoring app state from a backup.
Image updates
- Updating the app images for patches or minor updates.
Scaling
- Scaling the app (if applicable).
Deletion
- Deleting the app.
- Cleaning up any resources that might be intentionally orphaned, such as PersistentVolumeClaims.