Cloud KMS に鍵バージョンをインポートする

このトピックでは、暗号鍵を新しい鍵バージョンとして Cloud HSM や Cloud Key Management Service にインポートする方法について説明します。

鍵のインポートの詳細(制限や制約など)については、鍵のインポートをご覧ください。

このトピックの手順(始める前にの手順は含まない)は 5〜10 分で完了できます。手動でキーをラッピングすると、タスクが複雑になります。

始める前に

この機能をテストしてテスト後のクリーンアップを容易にするために新しいプロジェクトを作成し、鍵のインポートに十分な Identity and Access Management(IAM)権限を確実に付与することをおすすめします。

鍵をインポートするには、プロジェクト、ローカル システム、鍵自体の準備が必要です。

プロジェクトの準備

  1. Google Cloud アカウントにログインします。Google Cloud を初めて使用する場合は、アカウントを作成して、実際のシナリオでの Google プロダクトのパフォーマンスを評価してください。新規のお客様には、ワークロードの実行、テスト、デプロイができる無料クレジット $300 分を差し上げます。
  2. Google Cloud Console の [プロジェクト セレクタ] ページで、Google Cloud プロジェクトを選択または作成します。

    プロジェクト セレクタに移動

  3. Google Cloud プロジェクトで課金が有効になっていることを確認します

  4. 必要な API を有効にします。

    API を有効にする

  5. Google Cloud CLI をインストールします。
  6. gcloud CLI を初期化するには:

    gcloud init
  7. Google Cloud Console の [プロジェクト セレクタ] ページで、Google Cloud プロジェクトを選択または作成します。

    プロジェクト セレクタに移動

  8. Google Cloud プロジェクトで課金が有効になっていることを確認します

  9. 必要な API を有効にします。

    API を有効にする

  10. Google Cloud CLI をインストールします。
  11. gcloud CLI を初期化するには:

    gcloud init
  12. キーリング、鍵、インポート ジョブを作成するには、インポートを実行するユーザーに次の IAM 権限が必要です。ユーザーがプロジェクト オーナーでない場合は、次の 2 つの事前定義ロールをどちらもユーザーに割り当てます。

    • roles/editor
    • roles/cloudkms.importer

    Cloud KMS で使用できる IAM ロールと権限の詳細については、権限とロールをご覧ください。

ローカル システムの準備

次のオプションから 1 つを選択して、ローカル システムを準備します。ほとんどのユーザーには、自動鍵ラッピングが推奨されます。

  • Google Cloud に送信する前に Google Cloud CLI で鍵を自動的にラッピングする場合は、お使いのローカル システムに Pyca 暗号ライブラリをインストールする必要があります。Pyca ライブラリは、Google Cloud に鍵を送信する前に、鍵のラッピングと保護を行うインポート ジョブで使用されます。
  • キーを手動でラッピングする場合鍵の手動ラッピング用に OpenSSL を構成する必要があります。

鍵の準備

鍵のアルゴリズムと長さがサポートされていることを確認します。鍵に使用できるアルゴリズムは、鍵が対称暗号化、非対称暗号化、非対称署名のどちらに使用されるか、鍵がソフトウェア、HSM のどちらに格納されるかによって異なります。鍵のアルゴリズムはインポート リクエストの一部として指定します。

また、鍵のエンコード方法を確認し、必要に応じて調整を行う必要があります。

鍵バージョンの作成後やインポート後に、以下を変更することはできません。

  • 保護レベルは、鍵がソフトウェア、HSM、外部の鍵管理システムのうちどれに保持されるかどうかを示します。鍵マテリアルをこれらのストレージ環境間で移動することはできません。鍵のすべてのバージョンの保護レベルは同じです。

  • 目的は、その鍵のバージョンが、対称暗号化、非対称暗号化、または非対称署名に使用されるかどうかを示します。鍵の目的により、その鍵のバージョンの作成に使用できるアルゴリズムが制限されます。1 つの鍵のすべてのバージョンは、同じ目的を持ちます。

インポートする鍵がないが、鍵のインポート手順を検証する場合は、次のコマンドを使用して、ローカル システムに対称鍵を作成できます。

openssl rand 32 > ${HOME}/test.bin

この鍵はテストでのみ使用してください。この方法で作成した鍵は、本番環境での使用には適していない可能性があります。

鍵を手動でラッピングする必要がある場合は、このトピックの手順を続行する前にラッピングしてください。

ターゲットキーとキーリングを作成する

Cloud KMS 鍵は、0 個以上の鍵バージョンを含むコンテナ オブジェクトです。各鍵バージョンには暗号鍵が含まれています。

鍵を Cloud KMS または Cloud HSM にインポートすると、インポートされた鍵は既存の Cloud KMS または Cloud HSM 鍵の新しい鍵バージョンになります。以降、このトピックではこの鍵をターゲットキーと呼びます。鍵マテリアルをインポートする前に、ターゲットキーが存在している必要があります。

鍵バージョンをインポートしても、その鍵の既存のバージョンには影響しません。ですが、鍵のインポートをテストする場合は、空の鍵を作成することをおすすめします。空の鍵にはバージョンがなく、アクティブではなく、使用できません。

新しく作成された鍵にインポートされたバージョンのみを含めるように指定することもできます。これにより、Cloud KMS で新しいバージョンが誤って生成されないようになります。

鍵は鍵リング上に存在します。このトピックでは、この鍵リングをターゲット キーリングと呼びます。ターゲット キーリングのロケーションによって、鍵マテリアルをインポート後に使用できるロケーションが決まります。一部のロケーションでは Cloud HSM 鍵を作成またはインポートできません。作成した鍵は、別の鍵リングまたはロケーションに移動できません。

Google Cloud CLI または Google Cloud Console を使用して、新しいキーリングに空の鍵を作成する手順は次のとおりです。

コンソール

  1. Google Cloud コンソールで [鍵管理] ページに移動します。

    Key Management に移動

  2. [キーリングを作成] をクリックします。

  3. [キーリング名] フィールドに、キーリングの名前を入力します。

  4. [ロケーション タイプ] で、ロケーション タイプとロケーションを選択します。

  5. [作成] をクリックします。[鍵の作成] ページが開きます。

  6. [鍵名] フィールドに、鍵の名前を入力します。

  7. [保護レベル] では、[ソフトウェア] または [HSM] を選択して、[続行] をクリックします。

  8. [鍵マテリアル] で [インポートした鍵] を選択し、[続行] をクリックします。これにより、初期鍵バージョンが作成されなくなります。

  9. 鍵の [目的] と [アルゴリズム] を設定し、[続行] をクリックします。

  10. 省略可: この鍵にインポートした鍵バージョンのみを含める場合は、[鍵バージョンをインポートのみに制限する] を選択します。これにより、Cloud KMS で誤って新しい鍵バージョンが作成されることを防止できます。

  11. 省略可: インポートした鍵の場合、自動ローテーションはデフォルトで無効になっています。自動ローテーションを有効にするには、[鍵のローテーション期間] フィールドの値を選択します。

    自動ローテーションを有効にすると、新しい鍵バージョンが Cloud KMS で生成され、インポートした鍵バージョンはローテーション後のデフォルトの鍵バージョンではなくなります。

  12. [作成] をクリックします。

gcloud

コマンドラインで Cloud KMS を使用するには、まず Google Cloud CLI の最新バージョンをインストールまたはアップグレードします

  1. ターゲット キーリングを作成します。Cloud HSM 鍵にインポートする場合は、Cloud HSM のサポートがあるロケーションを選択します。

    gcloud kms keyrings create KEY_RING \
      --location LOCATION
    

    詳しくは、キーリングを作成をご覧ください。

  2. ターゲットキーを作成します。

    • 鍵の目的を指定します。
    • 初期バージョンが作成されないようにするには、--skip-initial-version-creation フラグを使用します。
    • 省略可: --import-only フラグを使用して、Cloud KMS で新しいバージョンが作成されないようにします。
    • 省略可: ローテーション ポリシーは指定しません。自動ローテーションを有効にすると、新しい鍵バージョンが Cloud KMS で生成され、インポートした鍵バージョンはローテーション後のデフォルトの鍵バージョンではなくなります。 --import-only フラグを指定した場合は、ローテーション ポリシーを指定できません。
    gcloud kms keys create KEY_NAME \
      --location LOCATION \
      --keyring KEY_RING \
      --purpose PURPOSE \
      --skip-initial-version-creation \
      --import-only
    

    Cloud KMS 鍵または Cloud HSM 鍵の作成方法の詳細をご覧ください。

Go

このコードを実行するには、まず Go 開発環境を設定し、Cloud KMS Go SDK をインストールします。

import (
	"context"
	"fmt"
	"io"

	kms "cloud.google.com/go/kms/apiv1"
	"cloud.google.com/go/kms/apiv1/kmspb"
)

// createKeyForImport creates a new asymmetric signing key in Cloud HSM.
func createKeyForImport(w io.Writer, parent, id string) error {
	// parent := "projects/my-project/locations/us-east1/keyRings/my-key-ring"
	// id := "my-imported-key"

	// Create the client.
	ctx := context.Background()
	client, err := kms.NewKeyManagementClient(ctx)
	if err != nil {
		return fmt.Errorf("failed to create kms client: %w", err)
	}
	defer client.Close()

	// Build the request.
	req := &kmspb.CreateCryptoKeyRequest{
		Parent:      parent,
		CryptoKeyId: id,
		CryptoKey: &kmspb.CryptoKey{
			Purpose: kmspb.CryptoKey_ASYMMETRIC_SIGN,
			VersionTemplate: &kmspb.CryptoKeyVersionTemplate{
				ProtectionLevel: kmspb.ProtectionLevel_HSM,
				Algorithm:       kmspb.CryptoKeyVersion_EC_SIGN_P256_SHA256,
			},
			// Ensure that only imported versions may be added to this key.
			ImportOnly: true,
		},
		SkipInitialVersionCreation: true,
	}

	// Call the API.
	result, err := client.CreateCryptoKey(ctx, req)
	if err != nil {
		return fmt.Errorf("failed to create key: %w", err)
	}
	fmt.Fprintf(w, "Created key: %s\n", result.Name)
	return nil
}

Java

このコードを実行するには、まず Java 開発環境を設定し、Cloud KMS Java SDK をインストールします。

import com.google.cloud.kms.v1.CreateCryptoKeyRequest;
import com.google.cloud.kms.v1.CryptoKey;
import com.google.cloud.kms.v1.CryptoKey.CryptoKeyPurpose;
import com.google.cloud.kms.v1.CryptoKeyVersion.CryptoKeyVersionAlgorithm;
import com.google.cloud.kms.v1.CryptoKeyVersionTemplate;
import com.google.cloud.kms.v1.KeyManagementServiceClient;
import com.google.cloud.kms.v1.KeyRingName;
import com.google.cloud.kms.v1.ProtectionLevel;
import java.io.IOException;

public class CreateKeyForImport {

  public void createKeyForImport() throws IOException {
    // TODO(developer): Replace these variables before running the sample.
    String projectId = "your-project-id";
    String locationId = "us-east1";
    String keyRingId = "my-key-ring";
    String id = "my-import-key";
    createKeyForImport(projectId, locationId, keyRingId, id);
  }

  // Create a new crypto key to hold imported key versions.
  public void createKeyForImport(String projectId, String locationId, String keyRingId, String id)
      throws IOException {
    // Initialize client that will be used to send requests. This client only
    // needs to be created once, and can be reused for multiple requests. After
    // completing all of your requests, call the "close" method on the client to
    // safely clean up any remaining background resources.
    try (KeyManagementServiceClient client = KeyManagementServiceClient.create()) {
      // Build the parent name from the project, location, and key ring.
      KeyRingName keyRingName = KeyRingName.of(projectId, locationId, keyRingId);

      // Create the crypto key.
      CryptoKey createdKey =
          client.createCryptoKey(
              CreateCryptoKeyRequest.newBuilder()
                  .setParent(keyRingName.toString())
                  .setCryptoKeyId(id)
                  .setCryptoKey(
                      CryptoKey.newBuilder()
                          .setPurpose(CryptoKeyPurpose.ASYMMETRIC_SIGN)
                          .setVersionTemplate(
                              CryptoKeyVersionTemplate.newBuilder()
                                  .setProtectionLevel(ProtectionLevel.HSM)
                                  .setAlgorithm(CryptoKeyVersionAlgorithm.EC_SIGN_P256_SHA256))
                          // Ensure that only imported versions may be
                          // added to this key.
                          .setImportOnly(true))
                  .setSkipInitialVersionCreation(true)
                  .build());

      System.out.printf("Created crypto key %s%n", createdKey.getName());
    }
  }
}

Node.js

このコードを実行するには、まず Node.js 開発環境を設定し、Cloud KMS Node.js SDK をインストールします。

//
// TODO(developer): Uncomment these variables before running the sample.
//
// const projectId = 'my-project';
// const locationId = 'us-east1';
// const keyRingId = 'my-key-ring';
// const id = 'my-imported-key';

// Imports the Cloud KMS library
const {KeyManagementServiceClient} = require('@google-cloud/kms');

// Instantiates a client
const client = new KeyManagementServiceClient();

// Build the parent key ring name
const keyRingName = client.keyRingPath(projectId, locationId, keyRingId);

async function createKeyForImport() {
  const [key] = await client.createCryptoKey({
    parent: keyRingName,
    cryptoKeyId: id,
    cryptoKey: {
      purpose: 'ENCRYPT_DECRYPT',
      versionTemplate: {
        algorithm: 'GOOGLE_SYMMETRIC_ENCRYPTION',
        protectionLevel: 'HSM',
      },
      // Optional: ensure that only imported versions may be added to this
      // key.
      importOnly: true,
    },
    // Do not allow KMS to generate an initial version of this key.
    skipInitialVersionCreation: true,
  });

  console.log(`Created key for import: ${key.name}`);
  return key;
}

return createKeyForImport();

Python

このコードを実行するには、まず Python 開発環境を設定し、Cloud KMS Python SDK をインストールします。

from google.cloud import kms

def create_key_for_import(
    project_id: str, location_id: str, key_ring_id: str, crypto_key_id: str
) -> None:
    """

    Sets up an empty CryptoKey within a KeyRing for import.

    Args:
        project_id (string): Google Cloud project ID (e.g. 'my-project').
        location_id (string): Cloud KMS location (e.g. 'us-east1').
        key_ring_id (string): ID of the Cloud KMS key ring (e.g. 'my-key-ring').
        crypto_key_id (string): ID of the key to import (e.g. 'my-asymmetric-signing-key').
    """

    # Create the client.
    client = kms.KeyManagementServiceClient()

    # Build the key. For more information regarding allowed values of these fields, see:
    # https://googleapis.dev/python/cloudkms/latest/_modules/google/cloud/kms_v1/types/resources.html
    purpose = kms.CryptoKey.CryptoKeyPurpose.ASYMMETRIC_SIGN
    algorithm = kms.CryptoKeyVersion.CryptoKeyVersionAlgorithm.EC_SIGN_P256_SHA256
    protection_level = kms.ProtectionLevel.HSM
    key = {
        "purpose": purpose,
        "version_template": {
            "algorithm": algorithm,
            "protection_level": protection_level,
        },
    }

    # Build the parent key ring name.
    key_ring_name = client.key_ring_path(project_id, location_id, key_ring_id)

    # Call the API.
    created_key = client.create_crypto_key(
        request={
            "parent": key_ring_name,
            "crypto_key_id": crypto_key_id,
            "crypto_key": key,
        }
    )
    print(f"Created hsm key: {created_key.name}")

API

これらの例では、HTTP クライアントとして curl を使用して API の使用例を示しています。アクセス制御の詳細については、Cloud KMS API へのアクセスをご覧ください。

  1. 新しいキーリングを作成します。

    curl "https://cloudkms.googleapis.com/v1/projects/PROJECT_ID/locations/LOCATION/keyRings?keyRingId=KEY_RING" \
        --request "POST" \
        --header "authorization: Bearer TOKEN" \
        --header "content-type: application/json" \
        --header "x-goog-user-project: PROJECT_ID" \
        --data "{}"
    

    詳しくは、KeyRing.create API ドキュメントをご覧ください。

  2. インポート専用の空の鍵を作成します。

    curl "https://cloudkms.googleapis.com/v1/projects/PROJECT_ID/locations/LOCATION/keyRings/KEY_RING/cryptoKeys?cryptoKeyId=KEY_NAME&skipInitialVersionCreation=true&importOnly=true" \
        --request "POST" \
        --header "authorization: Bearer TOKEN" \
        --header "content-type: application/json" \
        --header "x-goog-user-project: PROJECT_ID" \
        --data "{"purpose":"PURPOSE", "versionTemplate":{"protectionLevel":"PROTECTION_LEVEL","algorithm":"ALGORITHM"}}"
    

    詳しくは、CryptoKey.create API ドキュメントをご覧ください。

鍵リングと鍵は存在しますが、この鍵には鍵マテリアルが含まれず、バージョンがなく、アクティブではありません。次に、インポート ジョブを作成します。

インポート ジョブを作成する

インポート ジョブは、インポートした鍵の特性を定義します。これには、鍵のインポート後に変更できないプロパティも含まれます。

保護レベルは、このインポート ジョブによってインポートされた鍵が、ソフトウェア、HSM、または外部の鍵管理システムに置かれるかどうを定義します。鍵をインポートした後、保護レベルを変更することはできません。

インポート メソッドは、ローカル システムからターゲットの Google Cloud プロジェクトへの転送中にインポートされた鍵を保護するラッピング鍵の作成に使用されるアルゴリズムを定義します。3,072 ビットまたは 4,096 ビットの RSA 鍵を選択できます。特別の要件がない限り、3072 ビットのラッピング鍵を使用することをおすすめします。

インポート ジョブを作成するには、gcloud CLI、Google Cloud コンソール、または Cloud Key Management Service API を使用します。

Console

  1. Google Cloud コンソールで、[鍵の管理] ページに移動します。

    [鍵管理] ページに移動

  2. ターゲット キーリングの名前をクリックします。

  3. [保護レベル] を [ソフトウェア] または [HSM] に設定します。ターゲットキーに設定したものと同じ保護レベルを使用します。

  4. [インポート ジョブを作成] をクリックします。

  5. [名前] フィールドに、インポート ジョブの名前を入力します。

  6. [インポートの方法] プルダウンで、インポートの方法を 3,072 ビット RSA または 4,096 ビット RSA に設定します。

  7. [作成] をクリックします。

gcloud

コマンドラインで Cloud KMS を使用するには、まず Google Cloud CLI の最新バージョンをインストールまたはアップグレードします

次のようなコマンドを使用して、インポート ジョブを作成します。

gcloud kms import-jobs create IMPORT_JOB \
  --location LOCATION \
  --keyring KEY_RING \
  --import-method IMPORT_METHOD \
  --protection-level PROTECTION_LEVEL
  • ターゲットキーと同じ鍵リングとロケーションを使用します。
  • 保護レベルを software または hsm に設定します。
  • インポート メソッドを rsa-oaep-3072-sha1-aes-256rsa-oaep-4096-sha1-aes-256rsa-oaep-3072-sha256-aes-256,、rsa-oaep-4096-sha256-aes-256rsa-oaep-3072-sha256 または rsa-oaep-4096-sha256 に設定します。

Go

このコードを実行するには、まず Go 開発環境を設定し、Cloud KMS Go SDK をインストールします。

import (
	"context"
	"fmt"
	"io"

	kms "cloud.google.com/go/kms/apiv1"
	"cloud.google.com/go/kms/apiv1/kmspb"
)

// createImportJob creates a new job for importing keys into KMS.
func createImportJob(w io.Writer, parent, id string) error {
	// parent := "projects/PROJECT_ID/locations/global/keyRings/my-key-ring"
	// id := "my-import-job"

	// Create the client.
	ctx := context.Background()
	client, err := kms.NewKeyManagementClient(ctx)
	if err != nil {
		return fmt.Errorf("failed to create kms client: %w", err)
	}
	defer client.Close()

	// Build the request.
	req := &kmspb.CreateImportJobRequest{
		Parent:      parent,
		ImportJobId: id,
		ImportJob: &kmspb.ImportJob{
			// See allowed values and their descriptions at
			// https://cloud.google.com/kms/docs/algorithms#protection_levels
			ProtectionLevel: kmspb.ProtectionLevel_HSM,
			// See allowed values and their descriptions at
			// https://cloud.google.com/kms/docs/key-wrapping#import_methods
			ImportMethod: kmspb.ImportJob_RSA_OAEP_3072_SHA1_AES_256,
		},
	}

	// Call the API.
	result, err := client.CreateImportJob(ctx, req)
	if err != nil {
		return fmt.Errorf("failed to create import job: %w", err)
	}
	fmt.Fprintf(w, "Created import job: %s\n", result.Name)
	return nil
}

Java

このコードを実行するには、まず Java 開発環境を設定し、Cloud KMS Java SDK をインストールします。

import com.google.cloud.kms.v1.ImportJob;
import com.google.cloud.kms.v1.ImportJob.ImportMethod;
import com.google.cloud.kms.v1.KeyManagementServiceClient;
import com.google.cloud.kms.v1.KeyRingName;
import com.google.cloud.kms.v1.ProtectionLevel;
import java.io.IOException;

public class CreateImportJob {

  public void createImportJob() throws IOException {
    // TODO(developer): Replace these variables before running the sample.
    String projectId = "your-project-id";
    String locationId = "us-east1";
    String keyRingId = "my-key-ring";
    String id = "my-import-job";
    createImportJob(projectId, locationId, keyRingId, id);
  }

  // Create a new import job.
  public void createImportJob(String projectId, String locationId, String keyRingId, String id)
      throws IOException {
    // Initialize client that will be used to send requests. This client only
    // needs to be created once, and can be reused for multiple requests. After
    // completing all of your requests, call the "close" method on the client to
    // safely clean up any remaining background resources.
    try (KeyManagementServiceClient client = KeyManagementServiceClient.create()) {
      // Build the parent name from the project, location, and key ring.
      KeyRingName keyRingName = KeyRingName.of(projectId, locationId, keyRingId);

      // Build the import job to create, with parameters.
      ImportJob importJob =
          ImportJob.newBuilder()
              // See allowed values and their descriptions at
              // https://cloud.google.com/kms/docs/algorithms#protection_levels
              .setProtectionLevel(ProtectionLevel.HSM)
              // See allowed values and their descriptions at
              // https://cloud.google.com/kms/docs/key-wrapping#import_methods
              .setImportMethod(ImportMethod.RSA_OAEP_3072_SHA1_AES_256)
              .build();

      // Create the import job.
      ImportJob createdImportJob = client.createImportJob(keyRingName, id, importJob);
      System.out.printf("Created import job %s%n", createdImportJob.getName());
    }
  }
}

Node.js

このコードを実行するには、まず Node.js 開発環境を設定し、Cloud KMS Node.js SDK をインストールします。

//
// TODO(developer): Uncomment these variables before running the sample.
//
// const projectId = 'my-project';
// const locationId = 'us-east1';
// const keyRingId = 'my-key-ring';
// const id = 'my-import-job';

// Imports the Cloud KMS library
const {KeyManagementServiceClient} = require('@google-cloud/kms');

// Instantiates a client
const client = new KeyManagementServiceClient();

// Build the parent key ring name
const keyRingName = client.keyRingPath(projectId, locationId, keyRingId);

async function createImportJob() {
  const [importJob] = await client.createImportJob({
    parent: keyRingName,
    importJobId: id,
    importJob: {
      protectionLevel: 'HSM',
      importMethod: 'RSA_OAEP_3072_SHA256',
    },
  });

  console.log(`Created import job: ${importJob.name}`);
  return importJob;
}

return createImportJob();

Python

このコードを実行するには、まず Python 開発環境を設定し、Cloud KMS Python SDK をインストールします。

from google.cloud import kms

def create_import_job(
    project_id: str, location_id: str, key_ring_id: str, import_job_id: str
) -> None:
    """
    Create a new import job in Cloud KMS.

    Args:
        project_id (string): Google Cloud project ID (e.g. 'my-project').
        location_id (string): Cloud KMS location (e.g. 'us-east1').
        key_ring_id (string): ID of the Cloud KMS key ring (e.g. 'my-key-ring').
        import_job_id (string): ID of the import job (e.g. 'my-import-job').
    """

    # Create the client.
    client = kms.KeyManagementServiceClient()

    # Retrieve the fully-qualified key_ring string.
    key_ring_name = client.key_ring_path(project_id, location_id, key_ring_id)

    # Set paramaters for the import job, allowed values for ImportMethod and ProtectionLevel found here:
    # https://googleapis.dev/python/cloudkms/latest/_modules/google/cloud/kms_v1/types/resources.html

    import_method = kms.ImportJob.ImportMethod.RSA_OAEP_3072_SHA1_AES_256
    protection_level = kms.ProtectionLevel.HSM
    import_job_params = {
        "import_method": import_method,
        "protection_level": protection_level,
    }

    # Call the client to create a new import job.
    import_job = client.create_import_job(
        {
            "parent": key_ring_name,
            "import_job_id": import_job_id,
            "import_job": import_job_params,
        }
    )

    print(f"Created import job: {import_job.name}")

API

これらの例では、HTTP クライアントとして curl を使用して API の使用例を示しています。アクセス制御の詳細については、Cloud KMS API へのアクセスをご覧ください。

インポート ジョブを作成するには、ImportJobs.create メソッドを使用します。

curl "https://cloudkms.googleapis.com/v1/projects/PROJECT_ID/locations/LOCATION/keyRings/KEY_RING/importJobs?import_job_id=IMPORT_JOB_ID" \
    --request "POST" \
    --header "authorization: Bearer TOKEN" \
    --header "content-type: application/json" \
    --data '{"import_method": "IMPORT_METHOD", "protection_level": "PROTECTION_LEVEL"}'

以下を置き換えます。

インポート ジョブの状態を確認する

インポート ジョブの初期状態は PENDING_GENERATION です。状態が ACTIVE の場合、それを使用して鍵をインポートできます。

インポート ジョブは 3 日後に期限切れになります。インポート ジョブが期限切れになった場合は、新しいジョブを作成する必要があります。

インポート ジョブの状態は、Google Cloud CLI、Google Cloud コンソール、または Cloud Key Management Service API を使用して確認できます。

Console

  1. Google Cloud コンソールで、[鍵の管理] ページに移動します。

    [鍵管理] ページに移動

  2. インポート ジョブが含まれる鍵リングの名前をクリックします。

  3. ページの上部にある [インポート ジョブ] タブをクリックします。

  4. 状態は、インポート ジョブの名前の横にある [ステータス] に表示されます。

gcloud

コマンドラインで Cloud KMS を使用するには、まず Google Cloud CLI の最新バージョンをインストールまたはアップグレードします

インポート ジョブがアクティブな場合は、それを使用して鍵をインポートできます。これには数分かかることがあります。このコマンドを使用して、インポート ジョブがアクティブであることを確認します。インポート ジョブを作成したロケーションとキーリングを使用します。

gcloud kms import-jobs describe IMPORT_JOB \
  --location LOCATION \
  --keyring KEY_RING \
  --format="value(state)"

出力は次のようになります。

state: ACTIVE

Go

このコードを実行するには、まず Go 開発環境を設定し、Cloud KMS Go SDK をインストールします。

import (
	"context"
	"fmt"
	"io"

	kms "cloud.google.com/go/kms/apiv1"
	"cloud.google.com/go/kms/apiv1/kmspb"
)

// checkStateImportJob checks the state of an ImportJob in KMS.
func checkStateImportJob(w io.Writer, name string) error {
	// name := "projects/PROJECT_ID/locations/global/keyRings/my-key-ring/importJobs/my-import-job"

	// Create the client.
	ctx := context.Background()
	client, err := kms.NewKeyManagementClient(ctx)
	if err != nil {
		return fmt.Errorf("failed to create kms client: %w", err)
	}
	defer client.Close()

	// Call the API.
	result, err := client.GetImportJob(ctx, &kmspb.GetImportJobRequest{
		Name: name,
	})
	if err != nil {
		return fmt.Errorf("failed to get import job: %w", err)
	}
	fmt.Fprintf(w, "Current state of import job %q: %s\n", result.Name, result.State)
	return nil
}

Java

このコードを実行するには、まず Java 開発環境を設定し、Cloud KMS Java SDK をインストールします。

import com.google.cloud.kms.v1.ImportJob;
import com.google.cloud.kms.v1.ImportJobName;
import com.google.cloud.kms.v1.KeyManagementServiceClient;
import java.io.IOException;

public class CheckStateImportJob {

  public void checkStateImportJob() throws IOException {
    // TODO(developer): Replace these variables before running the sample.
    String projectId = "your-project-id";
    String locationId = "us-east1";
    String keyRingId = "my-key-ring";
    String importJobId = "my-import-job";
    checkStateImportJob(projectId, locationId, keyRingId, importJobId);
  }

  // Check the state of an import job in Cloud KMS.
  public void checkStateImportJob(
      String projectId, String locationId, String keyRingId, String importJobId)
      throws IOException {
    // Initialize client that will be used to send requests. This client only
    // needs to be created once, and can be reused for multiple requests. After
    // completing all of your requests, call the "close" method on the client to
    // safely clean up any remaining background resources.
    try (KeyManagementServiceClient client = KeyManagementServiceClient.create()) {
      // Build the parent name from the project, location, and key ring.
      ImportJobName importJobName = ImportJobName.of(projectId, locationId, keyRingId, importJobId);

      // Retrieve the state of an existing import job.
      ImportJob importJob = client.getImportJob(importJobName);
      System.out.printf(
          "Current state of import job %s: %s%n", importJob.getName(), importJob.getState());
    }
  }
}

Node.js

このコードを実行するには、まず Node.js 開発環境を設定し、Cloud KMS Node.js SDK をインストールします。

//
// TODO(developer): Uncomment these variables before running the sample.
//
// const projectId = 'my-project';
// const locationId = 'us-east1';
// const keyRingId = 'my-key-ring';
// const importJobId = 'my-import-job';

// Imports the Cloud KMS library
const {KeyManagementServiceClient} = require('@google-cloud/kms');

// Instantiates a client
const client = new KeyManagementServiceClient();

// Build the import job name
const importJobName = client.importJobPath(
  projectId,
  locationId,
  keyRingId,
  importJobId
);

async function checkStateImportJob() {
  const [importJob] = await client.getImportJob({
    name: importJobName,
  });

  console.log(
    `Current state of import job ${importJob.name}: ${importJob.state}`
  );
  return importJob;
}

return checkStateImportJob();

Python

このコードを実行するには、まず Python 開発環境を設定し、Cloud KMS Python SDK をインストールします。

from google.cloud import kms

def check_state_import_job(
    project_id: str, location_id: str, key_ring_id: str, import_job_id: str
) -> None:
    """
    Check the state of an import job in Cloud KMS.

    Args:
        project_id (string): Google Cloud project ID (e.g. 'my-project').
        location_id (string): Cloud KMS location (e.g. 'us-east1').
        key_ring_id (string): ID of the Cloud KMS key ring (e.g. 'my-key-ring').
        import_job_id (string): ID of the import job (e.g. 'my-import-job').
    """

    # Create the client.
    client = kms.KeyManagementServiceClient()

    # Retrieve the fully-qualified import_job string.
    import_job_name = client.import_job_path(
        project_id, location_id, key_ring_id, import_job_id
    )

    # Retrieve the state from an existing import job.
    import_job = client.get_import_job(name=import_job_name)

    print(f"Current state of import job {import_job.name}: {import_job.state}")

API

これらの例では、HTTP クライアントとして curl を使用して API の使用例を示しています。アクセス制御の詳細については、Cloud KMS API へのアクセスをご覧ください。

インポート ジョブの状態を確認するには、ImportJobs.get メソッドを使用します。

curl "https://cloudkms.googleapis.com/v1/projects/PROJECT_ID/locations/LOCATION/keyRings/KEY_RING/importJobs/IMPORT_JOB_ID" \
    --request "GET" \
    --header "authorization: Bearer TOKEN"

インポート ジョブがアクティブになるとすぐに、鍵をインポートするリクエストをすることができます。

インポート ジョブの変更を防止する

インポート ジョブによって、鍵のアルゴリズム、インポートした鍵が HSM キーかソフトウェア鍵かなど、インポートされた鍵の多くの特性が決まります。IAM 権限を構成して、ユーザーがインポート ジョブを作成できないようにする一方で、鍵をインポートするインポート ジョブをユーザーが使用できるようにすることが可能です。

  1. importjobs.create 権限を鍵管理者にのみ付与します。
  2. 特定のインポート ジョブの importjobs.useToImport 権限を、そのジョブを使用して鍵をインポートするオペレーターに付与します。
  3. インポート ジョブを作成するときに、インポートする鍵バージョンの保護レベルとアルゴリズムを指定します。

インポート ジョブが期限切れになるまで、importjobs.useToImport 権限を持ち、特定のインポート ジョブの importjobs.create 権限を持たないユーザーは、鍵はインポートできますが、インポート ジョブの特性を変更できません。

キーをインポート

インポート ジョブの状態を確認したら、インポート リクエストを行うことができます。

Google Cloud CLI で鍵を自動的にラップするか、すでに鍵を手動でラップしたかに応じて、異なるフラグを使用してインポート リクエストを作成します。

鍵を手動でラップしたか、自動でラップしたかに関係なく、インポートする実際の鍵の長さに一致するサポートされているアルゴリズムにアルゴリズムを設定し、鍵の目的を指定する必要があります。

  • 目的が ENCRYPT_DECRYPT の鍵は google-symmetric-encryption アルゴリズムを使用し、長さは 32 です。

  • 目的が ASYMMETRIC_DECRYPT または ASYMMETRIC_SIGN の鍵では、さまざまなアルゴリズムと長さがサポートされます。

    鍵の作成後に鍵の目的を変更することはできませんが、後続の鍵バージョンは、最初の鍵バージョンとは異なる長さで作成できます。

鍵の自動ラッピングとインポート

自動ラッピングを使用する場合は、Google Cloud CLI を使用する必要があります。次のようなコマンドを使用します。--target-key-file を、ラッピングしてインポートするラッピングされていない鍵のロケーションに設定します。--wrapped-key-file を設定しないでください。

公開鍵がすでにダウンロードされているロケーションに --public-key-file フラグを設定することもできます。多数の鍵をインポートする場合、このフラグによってインポートするごとに公開鍵がダウンロードされるのを防ぎます。たとえば、鍵をインポートする際に公開鍵を 1 度ダウンロードすると、そのロケーションを提供するスクリプトを作成できます。

gcloud kms keys versions import \
    --import-job IMPORT_JOB \
    --location LOCATION \
    --keyring KEY_RING \
    --key KEY_NAME \
    --algorithm ALGORITHM \
    --target-key-file PATH_TO_UNWRAPPED_KEY

鍵は、インポート ジョブに関連付けられたラッピング鍵でラッピングされ、Google Cloud に送信され、ターゲットキーの新しい鍵バージョンとしてインポートされます。

手動でラッピングした鍵のインポート

手動でラッピングした鍵をインポートするには、このセクションの手順を使用します。--wrapped-key-file を手動でラッピングした鍵のロケーションに設定します。 --target-key-file を設定しないでください。

公開鍵がすでにダウンロードされているロケーションに --public-key-file フラグを設定することもできます。多数の鍵をインポートする場合、このフラグによってインポートするごとに公開鍵がダウンロードされるのを防ぎます。たとえば、鍵をインポートする際に公開鍵を 1 度ダウンロードすると、そのロケーションを提供するスクリプトを作成できます。

Console

  1. Google Cloud コンソールで [鍵の管理] ページを開きます。

  2. インポート ジョブが含まれる鍵リングの名前をクリックします。ターゲットキーが鍵リング上の他の鍵とともに表示されます。

  3. ターゲットキーの名前をクリックし、[鍵バージョンをインポート] をクリックします。

  4. [インポート ジョブを選択] プルダウンからインポート ジョブを選択します。

  5. [ラッピングされた鍵をアップロード] セレクタで、すでにラッピングされている鍵を選択します。

  6. 非対称鍵をインポートする場合は、[アルゴリズム] プルダウンからアルゴリズムを選択します。[鍵バージョンをインポート] ページは次のようになります。

    鍵のバージョンのインポート

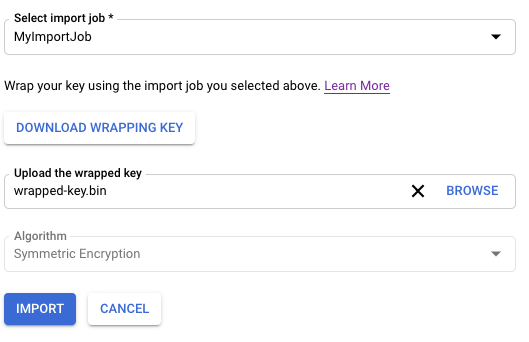
  7. [Import(インポート)] をクリックします。

gcloud

コマンドラインで Cloud KMS を使用するには、まず Google Cloud CLI の最新バージョンをインストールまたはアップグレードします

次のようなコマンドを使用します。

gcloud kms keys versions import \
  --import-job IMPORT_JOB \
  --location LOCATION \
  --keyring KEY_RING \
  --key KEY_NAME \
  --algorithm ALGORITHM \
  --wrapped-key-file PATH_TO_WRAPPED_KEY

詳細については、gcloud kms keys versions import --help コマンドの出力をご覧ください。

Go

このコードを実行するには、まず Go 開発環境を設定し、Cloud KMS Go SDK をインストールします。

import (
	"context"
	"crypto/ecdsa"
	"crypto/elliptic"
	"crypto/rand"
	"crypto/rsa"
	"crypto/sha1"
	"crypto/x509"
	"encoding/pem"
	"fmt"
	"io"

	kms "cloud.google.com/go/kms/apiv1"
	"cloud.google.com/go/kms/apiv1/kmspb"
	"github.com/google/tink/go/kwp/subtle"
)

// importManuallyWrappedKey wraps key material and imports it into KMS.
func importManuallyWrappedKey(w io.Writer, importJobName, cryptoKeyName string) error {
	// importJobName := "projects/PROJECT_ID/locations/global/keyRings/my-key-ring/importJobs/my-import-job"
	// cryptoKeyName := "projects/PROJECT_ID/locations/global/keyRings/my-key-ring/cryptoKeys/my-imported-key"

	// Generate a ECDSA keypair, and format the private key as PKCS #8 DER.
	key, err := ecdsa.GenerateKey(elliptic.P256(), rand.Reader)
	if err != nil {
		return fmt.Errorf("failed to generate keypair: %w", err)
	}
	keyBytes, err := x509.MarshalPKCS8PrivateKey(key)
	if err != nil {
		return fmt.Errorf("failed to format private key: %w", err)
	}

	// Create the client.
	ctx := context.Background()
	client, err := kms.NewKeyManagementClient(ctx)
	if err != nil {
		return fmt.Errorf("failed to create kms client: %w", err)
	}
	defer client.Close()

	// Generate a temporary 32-byte key for AES-KWP and wrap the key material.
	kwpKey := make([]byte, 32)
	if _, err := rand.Read(kwpKey); err != nil {
		return fmt.Errorf("failed to generate AES-KWP key: %w", err)
	}
	kwp, err := subtle.NewKWP(kwpKey)
	if err != nil {
		return fmt.Errorf("failed to create KWP cipher: %w", err)
	}
	wrappedTarget, err := kwp.Wrap(keyBytes)
	if err != nil {
		return fmt.Errorf("failed to wrap target key with KWP: %w", err)
	}

	// Retrieve the public key from the import job.
	importJob, err := client.GetImportJob(ctx, &kmspb.GetImportJobRequest{
		Name: importJobName,
	})
	if err != nil {
		return fmt.Errorf("failed to retrieve import job: %w", err)
	}
	pubBlock, _ := pem.Decode([]byte(importJob.PublicKey.Pem))
	pubAny, err := x509.ParsePKIXPublicKey(pubBlock.Bytes)
	if err != nil {
		return fmt.Errorf("failed to parse import job public key: %w", err)
	}
	pub, ok := pubAny.(*rsa.PublicKey)
	if !ok {
		return fmt.Errorf("unexpected public key type %T, want *rsa.PublicKey", pubAny)
	}

	// Wrap the KWP key using the import job key.
	wrappedWrappingKey, err := rsa.EncryptOAEP(sha1.New(), rand.Reader, pub, kwpKey, nil)
	if err != nil {
		return fmt.Errorf("failed to wrap KWP key: %w", err)
	}

	// Concatenate the wrapped KWP key and the wrapped target key.
	combined := append(wrappedWrappingKey, wrappedTarget...)

	// Build the request.
	req := &kmspb.ImportCryptoKeyVersionRequest{
		Parent:     cryptoKeyName,
		ImportJob:  importJobName,
		Algorithm:  kmspb.CryptoKeyVersion_EC_SIGN_P256_SHA256,
		WrappedKey: combined,
	}

	// Call the API.
	result, err := client.ImportCryptoKeyVersion(ctx, req)
	if err != nil {
		return fmt.Errorf("failed to import crypto key version: %w", err)
	}
	fmt.Fprintf(w, "Created crypto key version: %s\n", result.Name)
	return nil
}

Java

このコードを実行するには、まず Java 開発環境を設定し、Cloud KMS Java SDK をインストールします。

import com.google.cloud.kms.v1.CryptoKeyName;
import com.google.cloud.kms.v1.CryptoKeyVersion;
import com.google.cloud.kms.v1.ImportCryptoKeyVersionRequest;
import com.google.cloud.kms.v1.ImportJob;
import com.google.cloud.kms.v1.ImportJobName;
import com.google.cloud.kms.v1.KeyManagementServiceClient;
import com.google.crypto.tink.subtle.Kwp;
import com.google.protobuf.ByteString;
import java.io.IOException;
import java.security.GeneralSecurityException;
import java.security.KeyFactory;
import java.security.KeyPair;
import java.security.KeyPairGenerator;
import java.security.PublicKey;
import java.security.SecureRandom;
import java.security.spec.ECGenParameterSpec;
import java.security.spec.MGF1ParameterSpec;
import java.security.spec.X509EncodedKeySpec;
import java.util.Base64;
import javax.crypto.Cipher;
import javax.crypto.spec.OAEPParameterSpec;
import javax.crypto.spec.PSource;

public class ImportManuallyWrappedKey {

  public void importManuallyWrappedKey() throws GeneralSecurityException, IOException {
    // TODO(developer): Replace these variables before running the sample.
    String projectId = "your-project-id";
    String locationId = "us-east1";
    String keyRingId = "my-key-ring";
    String cryptoKeyId = "my-crypto-key";
    String importJobId = "my-import-job";
    importManuallyWrappedKey(projectId, locationId, keyRingId, cryptoKeyId, importJobId);
  }

  // Generates and imports local key material into Cloud KMS.
  public void importManuallyWrappedKey(
      String projectId, String locationId, String keyRingId, String cryptoKeyId, String importJobId)
      throws GeneralSecurityException, IOException {

    // Generate a new ECDSA keypair, and format the private key as PKCS #8 DER.
    KeyPairGenerator generator = KeyPairGenerator.getInstance("EC");
    generator.initialize(new ECGenParameterSpec("secp256r1"));
    KeyPair kp = generator.generateKeyPair();
    byte[] privateBytes = kp.getPrivate().getEncoded();

    // Initialize client that will be used to send requests. This client only
    // needs to be created once, and can be reused for multiple requests. After
    // completing all of your requests, call the "close" method on the client to
    // safely clean up any remaining background resources.
    try (KeyManagementServiceClient client = KeyManagementServiceClient.create()) {
      // Build the crypto key and import job names from the project, location,
      // key ring, and ID.
      final CryptoKeyName cryptoKeyName =
          CryptoKeyName.of(projectId, locationId, keyRingId, cryptoKeyId);
      final ImportJobName importJobName =
          ImportJobName.of(projectId, locationId, keyRingId, importJobId);

      // Generate a temporary 32-byte key for AES-KWP and wrap the key material.
      byte[] kwpKey = new byte[32];
      new SecureRandom().nextBytes(kwpKey);
      Kwp kwp = new Kwp(kwpKey);
      final byte[] wrappedTargetKey = kwp.wrap(privateBytes);

      // Retrieve the public key from the import job.
      ImportJob importJob = client.getImportJob(importJobName);
      String publicKeyStr = importJob.getPublicKey().getPem();
      // Manually convert PEM to DER. :-(
      publicKeyStr = publicKeyStr.replace("-----BEGIN PUBLIC KEY-----", "");
      publicKeyStr = publicKeyStr.replace("-----END PUBLIC KEY-----", "");
      publicKeyStr = publicKeyStr.replaceAll("\n", "");
      byte[] publicKeyBytes = Base64.getDecoder().decode(publicKeyStr);
      PublicKey publicKey =
          KeyFactory.getInstance("RSA").generatePublic(new X509EncodedKeySpec(publicKeyBytes));

      // Wrap the KWP key using the import job key.
      Cipher cipher = Cipher.getInstance("RSA/ECB/OAEPWithSHA-1AndMGF1Padding");
      cipher.init(
          Cipher.ENCRYPT_MODE,
          publicKey,
          new OAEPParameterSpec(
              "SHA-1", "MGF1", MGF1ParameterSpec.SHA1, PSource.PSpecified.DEFAULT));
      byte[] wrappedWrappingKey = cipher.doFinal(kwpKey);

      // Concatenate the wrapped KWP key and the wrapped target key.
      ByteString combinedWrappedKeys =
          ByteString.copyFrom(wrappedWrappingKey).concat(ByteString.copyFrom(wrappedTargetKey));

      // Import the wrapped key material.
      CryptoKeyVersion version =
          client.importCryptoKeyVersion(
              ImportCryptoKeyVersionRequest.newBuilder()
                  .setParent(cryptoKeyName.toString())
                  .setImportJob(importJobName.toString())
                  .setAlgorithm(CryptoKeyVersion.CryptoKeyVersionAlgorithm.EC_SIGN_P256_SHA256)
                  .setRsaAesWrappedKey(combinedWrappedKeys)
                  .build());

      System.out.printf("Imported: %s%n", version.getName());
    }
  }
}

Node.js

このコードを実行するには、まず Node.js 開発環境を設定し、Cloud KMS Node.js SDK をインストールします。

//
// TODO(developer): Uncomment these variables before running the sample.
//
// const projectId = 'my-project';
// const locationId = 'us-east1';
// const keyRingId = 'my-key-ring';
// const cryptoKeyId = 'my-imported-key';
// const importJobId = 'my-import-job';

// Imports the Cloud KMS library
const {KeyManagementServiceClient} = require('@google-cloud/kms');

// Instantiates a client
const client = new KeyManagementServiceClient();

// Build the crypto key and importjob resource names
const cryptoKeyName = client.cryptoKeyPath(
  projectId,
  locationId,
  keyRingId,
  cryptoKeyId
);
const importJobName = client.importJobPath(
  projectId,
  locationId,
  keyRingId,
  importJobId
);

async function wrapAndImportKey() {
  // Generate a 32-byte key to import.
  const crypto = require('crypto');
  const targetKey = crypto.randomBytes(32);

  const [importJob] = await client.getImportJob({name: importJobName});

  // Wrap the target key using the import job key
  const wrappedTargetKey = crypto.publicEncrypt(
    {
      key: importJob.publicKey.pem,
      oaepHash: 'sha256',
      padding: crypto.constants.RSA_PKCS1_OAEP_PADDING,
    },
    targetKey
  );

  // Import the target key version
  const [version] = await client.importCryptoKeyVersion({
    parent: cryptoKeyName,
    importJob: importJobName,
    algorithm: 'GOOGLE_SYMMETRIC_ENCRYPTION',
    wrappedKey: wrappedTargetKey,
  });

  console.log(`Imported key version: ${version.name}`);
  return version;
}

return wrapAndImportKey();

Python

このコードを実行するには、まず Python 開発環境を設定し、Cloud KMS Python SDK をインストールします。

import os

# Import the client library and Python standard cryptographic libraries.
from cryptography.hazmat import backends
from cryptography.hazmat.primitives import hashes
from cryptography.hazmat.primitives import keywrap
from cryptography.hazmat.primitives import serialization
from cryptography.hazmat.primitives.asymmetric import ec
from cryptography.hazmat.primitives.asymmetric import padding
from google.cloud import kms

def import_manually_wrapped_key(
    project_id: str,
    location_id: str,
    key_ring_id: str,
    crypto_key_id: str,
    import_job_id: str,
) -> None:
    """
    Generates and imports local key material to Cloud KMS.

    Args:
        project_id (string): Google Cloud project ID (e.g. 'my-project').
        location_id (string): Cloud KMS location (e.g. 'us-east1').
        key_ring_id (string): ID of the Cloud KMS key ring (e.g. 'my-key-ring').
        crypto_key_id (string): ID of the key to import (e.g. 'my-asymmetric-signing-key').
        import_job_id (string): ID of the import job (e.g. 'my-import-job').
    """

    # Generate some key material in Python and format it in PKCS #8 DER as
    # required by Google Cloud KMS.
    key = ec.generate_private_key(ec.SECP256R1, backends.default_backend())
    formatted_key = key.private_bytes(
        serialization.Encoding.DER,
        serialization.PrivateFormat.PKCS8,
        serialization.NoEncryption(),
    )

    print(f"Generated key bytes: {formatted_key!r}")

    # Create the client.
    client = kms.KeyManagementServiceClient()

    # Retrieve the fully-qualified crypto_key and import_job string.
    crypto_key_name = client.crypto_key_path(
        project_id, location_id, key_ring_id, crypto_key_id
    )
    import_job_name = client.import_job_path(
        project_id, location_id, key_ring_id, import_job_id
    )

    # Generate a temporary 32-byte key for AES-KWP and wrap the key material.
    kwp_key = os.urandom(32)
    wrapped_target_key = keywrap.aes_key_wrap_with_padding(
        kwp_key, formatted_key, backends.default_backend()
    )

    # Retrieve the public key from the import job.
    import_job = client.get_import_job(name=import_job_name)
    import_job_pub = serialization.load_pem_public_key(
        bytes(import_job.public_key.pem, "UTF-8"), backends.default_backend()
    )

    # Wrap the KWP key using the import job key.
    wrapped_kwp_key = import_job_pub.encrypt(
        kwp_key,
        padding.OAEP(
            mgf=padding.MGF1(algorithm=hashes.SHA1()),
            algorithm=hashes.SHA1(),
            label=None,
        ),
    )

    # Import the wrapped key material.
    client.import_crypto_key_version(
        {
            "parent": crypto_key_name,
            "import_job": import_job_name,
            "algorithm": kms.CryptoKeyVersion.CryptoKeyVersionAlgorithm.EC_SIGN_P256_SHA256,
            "rsa_aes_wrapped_key": wrapped_kwp_key + wrapped_target_key,
        }
    )

    print(f"Imported: {import_job.name}")

API

これらの例では、HTTP クライアントとして curl を使用して API の使用例を示しています。アクセス制御の詳細については、Cloud KMS API へのアクセスをご覧ください。

cryptoKeyVersions.import メソッドを使用して鍵をインポートします。

curl "https://cloudkms.googleapis.com/v1/projects/PROJECT_ID/locations/LOCATION/keyRings/KEY_RING/cryptoKeys/KEY_NAME/cryptoKeyVersions:import" \
    --request "POST" \
    --header "authorization: Bearer TOKEN" \
    --header "content-type: application/json" \
    --data '{"importJob": "IMPORT_JOB_ID", "algorithm": "ALGORITHM", "wrappedKey": "WRAPPED_KEY"}'

以下を置き換えます。

  • IMPORT_JOB_ID: 対応するインポート ジョブの完全なリソース名。

  • ALGORITHM: インポートする鍵の algorithm。型は CryptoKeyVersionAlgorithm です。

  • WRAPPED_KEY: base64 形式で手動でラップした鍵。

鍵のインポート リクエストが開始されます。このステータスはモニタリングできます。

インポートした鍵バージョンの状態を確認する

インポートした鍵バージョンの初期状態は PENDING_IMPORT です。状態が ENABLED の場合、鍵は正常にインポートされています。インポートが失敗する場合、状態は IMPORT_FAILED です。

インポート リクエストの状態は、Google Cloud CLI、Google Cloud コンソール、または Cloud Key Management Service API を使用して確認できます。

Console

  1. Google Cloud コンソールで [鍵の管理] ページを開きます。

  2. インポート ジョブが含まれる鍵リングの名前をクリックします。

  3. ページの上部にある [インポート ジョブ] タブをクリックします。

  4. 状態は、インポート ジョブの名前の横にある [ステータス] に表示されます。

gcloud

コマンドラインで Cloud KMS を使用するには、まず Google Cloud CLI の最新バージョンをインストールまたはアップグレードします

versions list コマンドを使用して状態を確認します。このトピックの前半で作成したのと同じロケーション、ターゲット キーリング、ターゲットキーを使用します。

gcloud kms keys versions list \
  --keyring KEY_RING \
  --location LOCATION \
  --key KEY_NAME

Go

このコードを実行するには、まず Go 開発環境を設定し、Cloud KMS Go SDK をインストールします。

import (
	"context"
	"fmt"
	"io"

	kms "cloud.google.com/go/kms/apiv1"
	"cloud.google.com/go/kms/apiv1/kmspb"
)

// checkStateImportedKey checks the state of a CryptoKeyVersion in KMS.
func checkStateImportedKey(w io.Writer, name string) error {
	// name := "projects/PROJECT_ID/locations/global/keyRings/my-key-ring/cryptoKeys/my-imported-key/cryptoKeyVersions/1"

	// Create the client.
	ctx := context.Background()
	client, err := kms.NewKeyManagementClient(ctx)
	if err != nil {
		return fmt.Errorf("failed to create kms client: %w", err)
	}
	defer client.Close()

	// Call the API.
	result, err := client.GetCryptoKeyVersion(ctx, &kmspb.GetCryptoKeyVersionRequest{
		Name: name,
	})
	if err != nil {
		return fmt.Errorf("failed to get crypto key version: %w", err)
	}
	fmt.Fprintf(w, "Current state of crypto key version %q: %s\n", result.Name, result.State)
	return nil
}

Java

このコードを実行するには、まず Java 開発環境を設定し、Cloud KMS Java SDK をインストールします。

import com.google.cloud.kms.v1.CryptoKeyVersion;
import com.google.cloud.kms.v1.CryptoKeyVersionName;
import com.google.cloud.kms.v1.KeyManagementServiceClient;
import java.io.IOException;

public class CheckStateImportedKey {

  public void checkStateImportedKey() throws IOException {
    // TODO(developer): Replace these variables before running the sample.
    String projectId = "your-project-id";
    String locationId = "us-east1";
    String keyRingId = "my-key-ring";
    String cryptoKeyId = "my-crypto-key";
    String cryptoKeyVersionId = "1";
    checkStateImportedKey(projectId, locationId, keyRingId, cryptoKeyId, cryptoKeyVersionId);
  }

  // Check the state of an imported key in Cloud KMS.
  public void checkStateImportedKey(
      String projectId,
      String locationId,
      String keyRingId,
      String cryptoKeyId,
      String cryptoKeyVersionId)
      throws IOException {
    // Initialize client that will be used to send requests. This client only
    // needs to be created once, and can be reused for multiple requests. After
    // completing all of your requests, call the "close" method on the client to
    // safely clean up any remaining background resources.
    try (KeyManagementServiceClient client = KeyManagementServiceClient.create()) {
      // Build the version name from its path components.
      CryptoKeyVersionName versionName =
          CryptoKeyVersionName.of(
              projectId, locationId, keyRingId, cryptoKeyId, cryptoKeyVersionId);

      // Retrieve the state of an existing version.
      CryptoKeyVersion version = client.getCryptoKeyVersion(versionName);
      System.out.printf(
          "Current state of crypto key version %s: %s%n", version.getName(), version.getState());
    }
  }
}

Node.js

このコードを実行するには、まず Node.js 開発環境を設定し、Cloud KMS Node.js SDK をインストールします。

//
// TODO(developer): Uncomment these variables before running the sample.
//
// const projectId = 'my-project';
// const locationId = 'us-east1';
// const keyRingId = 'my-key-ring';
// const cryptoKeyId = 'my-imported-key';
// const cryptoKeyVersionId = '1';

// Imports the Cloud KMS library
const {KeyManagementServiceClient} = require('@google-cloud/kms');

// Instantiates a client
const client = new KeyManagementServiceClient();

// Build the key version name
const keyVersionName = client.cryptoKeyVersionPath(
  projectId,
  locationId,
  keyRingId,
  cryptoKeyId,
  cryptoKeyVersionId
);

async function checkStateCryptoKeyVersion() {
  const [keyVersion] = await client.getCryptoKeyVersion({
    name: keyVersionName,
  });

  console.log(
    `Current state of key version ${keyVersion.name}: ${keyVersion.state}`
  );
  return keyVersion;
}

return checkStateCryptoKeyVersion();

Python

このコードを実行するには、まず Python 開発環境を設定し、Cloud KMS Python SDK をインストールします。

from google.cloud import kms

def check_state_imported_key(
    project_id: str, location_id: str, key_ring_id: str, import_job_id: str
) -> None:
    """
    Check the state of an import job in Cloud KMS.

    Args:
        project_id (string): Google Cloud project ID (e.g. 'my-project').
        location_id (string): Cloud KMS location (e.g. 'us-east1').
        key_ring_id (string): ID of the Cloud KMS key ring (e.g. 'my-key-ring').
        import_job_id (string): ID of the import job (e.g. 'my-import-job').
    """

    # Create the client.
    client = kms.KeyManagementServiceClient()

    # Retrieve the fully-qualified import_job string.
    import_job_name = client.import_job_path(
        project_id, location_id, key_ring_id, import_job_id
    )

    # Retrieve the state from an existing import job.
    import_job = client.get_import_job(name=import_job_name)

    print(f"Current state of import job {import_job.name}: {import_job.state}")

API

これらの例では、HTTP クライアントとして curl を使用して API の使用例を示しています。アクセス制御の詳細については、Cloud KMS API へのアクセスをご覧ください。

ImportJob.get メソッドを呼び出して、state フィールドを確認します。statePENDING_GENERATION の場合、インポート ジョブは作成中です。このフィールドが ACTIVE になるまで定期的に状態を確認します。

最初の鍵バージョンがインポートされると、鍵のステータスが有効に変わります。対称鍵を使用する場合は、インポートした鍵バージョンをメイン バージョンに設定する必要があります。

対称鍵: メイン バージョンを設定する

このステップは、対称鍵をインポートする場合に必要であり、非対称鍵の場合は関係ありません。非対称鍵にはメイン バージョンはありません。メイン バージョンを設定するには、Google Cloud CLI を使用する必要があります。

gcloud kms keys set-primary-version KEY_NAME\
    --location=LOCATION\
    --keyring=KEY_RING\
    --version=KEY_VERSION

以前に破棄した鍵を再インポートする

Cloud Key Management Service では、鍵の再インポートがサポートされています。これにより、元の鍵マテリアルを指定して、以前にインポートした DESTROYED または IMPORT_FAILED 状態の鍵バージョンを、ENABLED 状態に戻すことができます。最初のインポートの失敗により元の鍵マテリアルがインポートされなかった場合は、鍵マテリアルを指定できます。

制限事項

  • 再インポートできるのは、以前にインポートした CryptoKeyVersions のみです。
  • バージョンがすでに正常にインポートされている場合、再インポートされる鍵マテリアルは元の鍵マテリアルと完全一致する必要があります。
  • この機能のリリース前に破棄された CryptoKeyVersions は、再インポートできません。バージョンが再インポートに使用できる場合、CryptoKeyVersionreimport_eligible フィールドは true、使用できない場合は false です。

ソフトウェア鍵と Cloud HSM 鍵は再インポートできますが、外部鍵の再インポートはできません。

破棄された鍵を再インポートする

インポート ジョブを作成するの手順に沿って、再インポート用の ImportJob を作成します。保護レベルが元の保護レベルと一致する限り、既存の ImportJob または新しい ImportJob を使用できます。

Console

  1. Google Cloud コンソールで、[鍵の管理] ページに移動します。

    [鍵管理] ページに移動

  2. 再インポートする鍵バージョンの鍵が含まれているキーリングの名前をクリックします。

  3. 再インポートする鍵バージョンの鍵をクリックします。

  4. 再インポートする鍵バージョンの横にある 3 つの点をクリックします。

  5. [鍵バージョンを再インポート] を選択します。

  6. [インポート ジョブを選択] プルダウンからインポート ジョブを選択します。

  7. [ラッピングされた鍵をアップロード] セレクタで、すでにラッピングされている鍵を選択します。 この鍵は、元の鍵マテリアルと一致する必要があります。

  8. [再インポート] をクリックします。

gcloud

コマンドラインで Cloud KMS を使用するには、まず Google Cloud CLI の最新バージョンをインストールまたはアップグレードします

  1. 元の鍵マテリアルを使用して鍵バージョンを再インポートします。

    gcloud kms keys versions import \
    --location LOCATION \
    --keyring KEY_RING \
    --key KEY_NAME \
    --version KEY_VERSION \
    --algorithm ALGORITHM \
    --import-job IMPORT_JOB \
    --target-key-file PATH_TO_KEY \
    

API

これらの例では、HTTP クライアントとして curl を使用して API の使用例を示しています。アクセス制御の詳細については、Cloud KMS API へのアクセスをご覧ください。

  1. cryptoKeyVersions.import メソッドのリクエスト本文で、cryptoKeyVersion フィールドを、インポートするバージョンの鍵バージョン名に設定します。これは暗号鍵の子である必要があります。

  2. リクエスト本文で、インポートする鍵のアルゴリズムを algorithm フィールドに設定します。この値は、元の鍵バージョンのアルゴリズムと一致する必要があります。algorithm フィールドの型は CryptoKeyVersionAlgorithm です。

  3. リクエスト本文で、wrappedKeyMaterial フィールドを、すでにラッピングした鍵マテリアルに設定します。

  4. cryptoKeyVersions.import メソッドを呼び出します。cryptoKeyVersions.import レスポンスの型は CryptoKeyVersion です。鍵が正常にインポートされると、状態は ENABLED となり、Cloud KMS で使用できます。

次のステップ