将密钥版本导入 Cloud KMS

本主题介绍如何将加密密钥作为新密钥版本导入 Cloud HSM 或 Cloud Key Management Service。

如需详细了解如何导入密钥(包括限制和限制条件),请参阅密钥导入

您可以在 5 至 10 分钟内完成本主题中的步骤,但不包括准备工作步骤。手动封装密钥会增加任务的复杂性。

准备工作

我们建议您创建一个新项目来测试此功能,以便在测试后简化清理,并确保您拥有足够的 Identity and Access Management (IAM) 权限来导入密钥。

在导入密钥之前,您需要准备项目、本地系统和密钥本身。

准备项目

  1. 登录您的 Google Cloud 账号。如果您是 Google Cloud 新手,请创建一个账号来评估我们的产品在实际场景中的表现。新客户还可获享 $300 赠金,用于运行、测试和部署工作负载。
  2. 在 Google Cloud Console 中的项目选择器页面上,选择或创建一个 Google Cloud 项目

    转到“项目选择器”

  3. 确保您的 Google Cloud 项目已启用结算功能

  4. 启用所需的 API。

    启用 API

  5. 安装 Google Cloud CLI。
  6. 如需初始化 gcloud CLI,请运行以下命令:

    gcloud init
  7. 在 Google Cloud Console 中的项目选择器页面上,选择或创建一个 Google Cloud 项目

    转到“项目选择器”

  8. 确保您的 Google Cloud 项目已启用结算功能

  9. 启用所需的 API。

    启用 API

  10. 安装 Google Cloud CLI。
  11. 如需初始化 gcloud CLI,请运行以下命令:

    gcloud init
  12. 执行导入的用户需要以下 IAM 权限才能创建密钥环、密钥和导入作业。如果用户不是项目所有者,您可以为该用户分配以下两个预定义角色:

    • roles/editor
    • roles/cloudkms.importer

    如需详细了解 Cloud KMS 的可用 IAM 角色和权限,请参阅权限和角色

准备本地系统

选择以下选项之一以准备本地系统:对于大多数用户,推荐使用自动封装密钥功能。

  • 如果您想要允许 Google Cloud CLI 自动封装密钥再将密钥传输到 Google Cloud,则必须在本地系统上安装 Pyca 加密库。Pyca 库供导入作业使用,该导入作业用于在将密钥发送到 Google Cloud 之前在本地封装和保护密钥。
  • 如果您希望手动封装密钥,则必须配置 OpenSSL 以进行手动密钥封装

准备密钥

验证密钥的算法和长度是否受支持。密钥的允许算法取决于密钥是用于对称加密、非对称加密还是非对称签名,以及密钥是存储在软件还是 HSM 中。您可以在导入请求中指定密钥的算法。

您还必须单独验证密钥的编码方式,并在必要时进行调整。

创建或导入密钥版本的以下内容后,您将无法进行更改:

  • 保护级别指示密钥是存在于软件中、HSM 中还是外部密钥管理系统中。无法将密钥材料从这些存储环境之一移到另一个存储环境。密钥的所有版本都具有相同的保护级别。

  • 用途指示相应密钥的版本是用于对称加密、非对称加密还是非对称签名。该密钥的用途会限制可用于创建该密钥版本的可能算法。密钥的所有版本的用途相同。

如果您没有要导入的密钥,但想要验证导入密钥的过程,则可以在本地系统上使用以下命令创建对称密钥:

openssl rand 32 > ${HOME}/test.bin

仅将此密钥用于测试。以这种方式创建的密钥可能不适合生产用途。

如果您需要手动封装密钥,请先完成此步骤,然后再按照本主题的步骤继续操作。

创建目标密钥和密钥环

Cloud KMS 密钥是一个包含零个或多个密钥版本的容器对象。每个密钥版本都包含一个加密密钥。

将密钥导入 Cloud KMS 或 Cloud HSM 时,导入的密钥将成为现有 Cloud KMS 或 Cloud HSM 密钥上的新密钥版本。在本主题的其余部分中,此密钥称为目标密钥。在导入密钥材料之前,目标密钥必须已存在。

导入密钥版本不会影响该密钥的现有版本。但是,建议您在测试密钥导入时创建空密钥。空密钥没有版本,处于无效状态,且无法使用。

您可以视需要指定新建的密钥只能包含导入的版本,这可以防止在 Cloud KMS 中意外生成新版本。

密钥环中存在密钥;在本主题中,此密钥环称为目标密钥环。目标密钥环的位置决定了导入后密钥材料的可用位置。无法在某些位置创建或导入 Cloud HSM 密钥。创建密钥后,无法将其移至其他密钥环或位置。

请按照以下步骤使用 Google Cloud CLI 或 Google Cloud 控制台在新密钥环上创建空密钥。

控制台

  1. 在 Google Cloud 控制台中,前往密钥管理页面。

    前往 Key Management

  2. 点击创建密钥环

  3. 密钥环名称字段中,输入密钥环的名称。

  4. 地理位置类型下,选择地理位置类型和地理位置。

  5. 点击创建。此时会打开创建密钥页面。

  6. 密钥名称字段中,输入密钥的名称。

  7. 对于保护级别,选择软件HSM,然后点击继续

  8. 对于密钥材料,选择导入的密钥,然后点击继续。 这样可以防止创建初始密钥版本。

  9. 为密钥设置用途算法,然后点击继续

  10. 可选:如果您希望此密钥仅包含导入的密钥版本,请选择限制密钥版本以便仅导入。这样可以防止您意外在 Cloud KMS 中创建新的密钥版本。

  11. 可选:对于导入的密钥,自动轮替默认处于停用状态。如需启用自动轮替,请从密钥轮替周期字段中选择一个值。

    如果启用自动轮替,则新密钥版本将在 Cloud KMS 中生成,并且导入的密钥版本将不再是轮替之后的默认密钥版本。

  12. 点击创建

gcloud

如需在命令行上使用 Cloud KMS,请先安装或升级到最新版本的 Google Cloud CLI

  1. 创建目标密钥环。如果您打算导入到 Cloud HSM 密钥,请选择支持 Cloud HSM 的位置。

    gcloud kms keyrings create KEY_RING \
      --location LOCATION
    

    您可以详细了解如何创建密钥环

  2. 创建目标密钥。

    • 指定密钥的用途
    • 使用 --skip-initial-version-creation 标志阻止创建初始版本。
    • 可选:使用 --import-only 标志阻止在 Cloud KMS 中创建新版本。
    • 可选:不指定轮替政策。如果启用自动轮替,则新密钥版本将在 Cloud KMS 中生成,并且导入的密钥版本将不再是轮替之后的默认密钥版本。如果指定了 --import-only 标志,则不能指定轮替政策。
    gcloud kms keys create KEY_NAME \
      --location LOCATION \
      --keyring KEY_RING \
      --purpose PURPOSE \
      --skip-initial-version-creation \
      --import-only
    

    您可以详细了解如何创建 Cloud KMS 密钥Cloud HSM 密钥

Go

要运行此代码,请先设置 Go 开发环境安装 Cloud KMS Go SDK

import (
	"context"
	"fmt"
	"io"

	kms "cloud.google.com/go/kms/apiv1"
	"cloud.google.com/go/kms/apiv1/kmspb"
)

// createKeyForImport creates a new asymmetric signing key in Cloud HSM.
func createKeyForImport(w io.Writer, parent, id string) error {
	// parent := "projects/my-project/locations/us-east1/keyRings/my-key-ring"
	// id := "my-imported-key"

	// Create the client.
	ctx := context.Background()
	client, err := kms.NewKeyManagementClient(ctx)
	if err != nil {
		return fmt.Errorf("failed to create kms client: %w", err)
	}
	defer client.Close()

	// Build the request.
	req := &kmspb.CreateCryptoKeyRequest{
		Parent:      parent,
		CryptoKeyId: id,
		CryptoKey: &kmspb.CryptoKey{
			Purpose: kmspb.CryptoKey_ASYMMETRIC_SIGN,
			VersionTemplate: &kmspb.CryptoKeyVersionTemplate{
				ProtectionLevel: kmspb.ProtectionLevel_HSM,
				Algorithm:       kmspb.CryptoKeyVersion_EC_SIGN_P256_SHA256,
			},
			// Ensure that only imported versions may be added to this key.
			ImportOnly: true,
		},
		SkipInitialVersionCreation: true,
	}

	// Call the API.
	result, err := client.CreateCryptoKey(ctx, req)
	if err != nil {
		return fmt.Errorf("failed to create key: %w", err)
	}
	fmt.Fprintf(w, "Created key: %s\n", result.Name)
	return nil
}

Java

要运行此代码,请先设置 Java 开发环境安装 Cloud KMS Java SDK

import com.google.cloud.kms.v1.CreateCryptoKeyRequest;
import com.google.cloud.kms.v1.CryptoKey;
import com.google.cloud.kms.v1.CryptoKey.CryptoKeyPurpose;
import com.google.cloud.kms.v1.CryptoKeyVersion.CryptoKeyVersionAlgorithm;
import com.google.cloud.kms.v1.CryptoKeyVersionTemplate;
import com.google.cloud.kms.v1.KeyManagementServiceClient;
import com.google.cloud.kms.v1.KeyRingName;
import com.google.cloud.kms.v1.ProtectionLevel;
import java.io.IOException;

public class CreateKeyForImport {

  public void createKeyForImport() throws IOException {
    // TODO(developer): Replace these variables before running the sample.
    String projectId = "your-project-id";
    String locationId = "us-east1";
    String keyRingId = "my-key-ring";
    String id = "my-import-key";
    createKeyForImport(projectId, locationId, keyRingId, id);
  }

  // Create a new crypto key to hold imported key versions.
  public void createKeyForImport(String projectId, String locationId, String keyRingId, String id)
      throws IOException {
    // Initialize client that will be used to send requests. This client only
    // needs to be created once, and can be reused for multiple requests. After
    // completing all of your requests, call the "close" method on the client to
    // safely clean up any remaining background resources.
    try (KeyManagementServiceClient client = KeyManagementServiceClient.create()) {
      // Build the parent name from the project, location, and key ring.
      KeyRingName keyRingName = KeyRingName.of(projectId, locationId, keyRingId);

      // Create the crypto key.
      CryptoKey createdKey =
          client.createCryptoKey(
              CreateCryptoKeyRequest.newBuilder()
                  .setParent(keyRingName.toString())
                  .setCryptoKeyId(id)
                  .setCryptoKey(
                      CryptoKey.newBuilder()
                          .setPurpose(CryptoKeyPurpose.ASYMMETRIC_SIGN)
                          .setVersionTemplate(
                              CryptoKeyVersionTemplate.newBuilder()
                                  .setProtectionLevel(ProtectionLevel.HSM)
                                  .setAlgorithm(CryptoKeyVersionAlgorithm.EC_SIGN_P256_SHA256))
                          // Ensure that only imported versions may be
                          // added to this key.
                          .setImportOnly(true))
                  .setSkipInitialVersionCreation(true)
                  .build());

      System.out.printf("Created crypto key %s%n", createdKey.getName());
    }
  }
}

Node.js

要运行此代码,请先设置 Node.js 开发环境安装 Cloud KMS Node.js SDK

//
// TODO(developer): Uncomment these variables before running the sample.
//
// const projectId = 'my-project';
// const locationId = 'us-east1';
// const keyRingId = 'my-key-ring';
// const id = 'my-imported-key';

// Imports the Cloud KMS library
const {KeyManagementServiceClient} = require('@google-cloud/kms');

// Instantiates a client
const client = new KeyManagementServiceClient();

// Build the parent key ring name
const keyRingName = client.keyRingPath(projectId, locationId, keyRingId);

async function createKeyForImport() {
  const [key] = await client.createCryptoKey({
    parent: keyRingName,
    cryptoKeyId: id,
    cryptoKey: {
      purpose: 'ENCRYPT_DECRYPT',
      versionTemplate: {
        algorithm: 'GOOGLE_SYMMETRIC_ENCRYPTION',
        protectionLevel: 'HSM',
      },
      // Optional: ensure that only imported versions may be added to this
      // key.
      importOnly: true,
    },
    // Do not allow KMS to generate an initial version of this key.
    skipInitialVersionCreation: true,
  });

  console.log(`Created key for import: ${key.name}`);
  return key;
}

return createKeyForImport();

Python

要运行此代码,请先设置 Python 开发环境安装 Cloud KMS Python SDK

from google.cloud import kms

def create_key_for_import(
    project_id: str, location_id: str, key_ring_id: str, crypto_key_id: str
) -> None:
    """

    Sets up an empty CryptoKey within a KeyRing for import.

    Args:
        project_id (string): Google Cloud project ID (e.g. 'my-project').
        location_id (string): Cloud KMS location (e.g. 'us-east1').
        key_ring_id (string): ID of the Cloud KMS key ring (e.g. 'my-key-ring').
        crypto_key_id (string): ID of the key to import (e.g. 'my-asymmetric-signing-key').
    """

    # Create the client.
    client = kms.KeyManagementServiceClient()

    # Build the key. For more information regarding allowed values of these fields, see:
    # https://googleapis.dev/python/cloudkms/latest/_modules/google/cloud/kms_v1/types/resources.html
    purpose = kms.CryptoKey.CryptoKeyPurpose.ASYMMETRIC_SIGN
    algorithm = kms.CryptoKeyVersion.CryptoKeyVersionAlgorithm.EC_SIGN_P256_SHA256
    protection_level = kms.ProtectionLevel.HSM
    key = {
        "purpose": purpose,
        "version_template": {
            "algorithm": algorithm,
            "protection_level": protection_level,
        },
    }

    # Build the parent key ring name.
    key_ring_name = client.key_ring_path(project_id, location_id, key_ring_id)

    # Call the API.
    created_key = client.create_crypto_key(
        request={
            "parent": key_ring_name,
            "crypto_key_id": crypto_key_id,
            "crypto_key": key,
        }
    )
    print(f"Created hsm key: {created_key.name}")

API

这些示例使用 curl 作为 HTTP 客户端来演示如何使用 API。如需详细了解访问权限控制,请参阅访问 Cloud KMS API

  1. 创建新的密钥环:

    curl "https://cloudkms.googleapis.com/v1/projects/PROJECT_ID/locations/LOCATION/keyRings?keyRingId=KEY_RING" \
        --request "POST" \
        --header "authorization: Bearer TOKEN" \
        --header "content-type: application/json" \
        --header "x-goog-user-project: PROJECT_ID" \
        --data "{}"
    

    如需了解详情,请参阅 KeyRing.create API 文档

  2. 创建一个仅用于导入的空密钥:

    curl "https://cloudkms.googleapis.com/v1/projects/PROJECT_ID/locations/LOCATION/keyRings/KEY_RING/cryptoKeys?cryptoKeyId=KEY_NAME&skipInitialVersionCreation=true&importOnly=true" \
        --request "POST" \
        --header "authorization: Bearer TOKEN" \
        --header "content-type: application/json" \
        --header "x-goog-user-project: PROJECT_ID" \
        --data "{"purpose":"PURPOSE", "versionTemplate":{"protectionLevel":"PROTECTION_LEVEL","algorithm":"ALGORITHM"}}"
    

    如需了解详情,请参阅 CryptoKey.create API 文档

密钥环和密钥现在已存在,但密钥不包含密钥材料,没有版本,且处于无效状态。接下来创建导入作业

创建导入作业

导入作业定义其导入的密钥的特性,包括导入密钥后无法更改的属性。

保护级别定义此导入作业导入的密钥将位于软件、HSM 还是外部密钥管理系统中。最终导入密钥后,无法更改保护级别。

导入方法定义用于创建封装密钥的算法,用于在从本地系统传输到目标 Google Cloud 项目的过程中保护导入的密钥。您可以选择 3072 位或 4096 位 RSA 密钥。除非您有特定要求,否则建议使用 3072 位封装密钥。

您可以使用 gcloud CLI、Google Cloud 控制台或 Cloud Key Management Service API 创建导入作业。

控制台

  1. 转到 Google Cloud 控制台中的密钥管理页面。

    前往“密钥管理”页面

  2. 点击目标密钥环的名称。

  3. 保护级别设置为软件HSM。使用与您设置给目标密钥相同的保护级别。

  4. 点击创建导入作业

  5. 名称字段中,输入导入作业的名称。

  6. 导入方法下拉列表,将导入方法设置为 3072 位 RSA4096 位 RSA

  7. 点击创建

gcloud

如需在命令行上使用 Cloud KMS,请先安装或升级到最新版本的 Google Cloud CLI

使用如下所示的命令创建导入作业。

gcloud kms import-jobs create IMPORT_JOB \
  --location LOCATION \
  --keyring KEY_RING \
  --import-method IMPORT_METHOD \
  --protection-level PROTECTION_LEVEL
  • 使用与目标密钥相同的密钥环和位置。
  • 将保护级别设置为 softwarehsm
  • 将导入方法设置为 rsa-oaep-3072-sha1-aes-256rsa-oaep-4096-sha1-aes-256rsa-oaep-3072-sha256-aes-256rsa-oaep-4096-sha256-aes-256rsa-oaep-3072-sha256rsa-oaep-4096-sha256

Go

要运行此代码,请先设置 Go 开发环境安装 Cloud KMS Go SDK

import (
	"context"
	"fmt"
	"io"

	kms "cloud.google.com/go/kms/apiv1"
	"cloud.google.com/go/kms/apiv1/kmspb"
)

// createImportJob creates a new job for importing keys into KMS.
func createImportJob(w io.Writer, parent, id string) error {
	// parent := "projects/PROJECT_ID/locations/global/keyRings/my-key-ring"
	// id := "my-import-job"

	// Create the client.
	ctx := context.Background()
	client, err := kms.NewKeyManagementClient(ctx)
	if err != nil {
		return fmt.Errorf("failed to create kms client: %w", err)
	}
	defer client.Close()

	// Build the request.
	req := &kmspb.CreateImportJobRequest{
		Parent:      parent,
		ImportJobId: id,
		ImportJob: &kmspb.ImportJob{
			// See allowed values and their descriptions at
			// https://cloud.google.com/kms/docs/algorithms#protection_levels
			ProtectionLevel: kmspb.ProtectionLevel_HSM,
			// See allowed values and their descriptions at
			// https://cloud.google.com/kms/docs/key-wrapping#import_methods
			ImportMethod: kmspb.ImportJob_RSA_OAEP_3072_SHA1_AES_256,
		},
	}

	// Call the API.
	result, err := client.CreateImportJob(ctx, req)
	if err != nil {
		return fmt.Errorf("failed to create import job: %w", err)
	}
	fmt.Fprintf(w, "Created import job: %s\n", result.Name)
	return nil
}

Java

要运行此代码,请先设置 Java 开发环境安装 Cloud KMS Java SDK

import com.google.cloud.kms.v1.ImportJob;
import com.google.cloud.kms.v1.ImportJob.ImportMethod;
import com.google.cloud.kms.v1.KeyManagementServiceClient;
import com.google.cloud.kms.v1.KeyRingName;
import com.google.cloud.kms.v1.ProtectionLevel;
import java.io.IOException;

public class CreateImportJob {

  public void createImportJob() throws IOException {
    // TODO(developer): Replace these variables before running the sample.
    String projectId = "your-project-id";
    String locationId = "us-east1";
    String keyRingId = "my-key-ring";
    String id = "my-import-job";
    createImportJob(projectId, locationId, keyRingId, id);
  }

  // Create a new import job.
  public void createImportJob(String projectId, String locationId, String keyRingId, String id)
      throws IOException {
    // Initialize client that will be used to send requests. This client only
    // needs to be created once, and can be reused for multiple requests. After
    // completing all of your requests, call the "close" method on the client to
    // safely clean up any remaining background resources.
    try (KeyManagementServiceClient client = KeyManagementServiceClient.create()) {
      // Build the parent name from the project, location, and key ring.
      KeyRingName keyRingName = KeyRingName.of(projectId, locationId, keyRingId);

      // Build the import job to create, with parameters.
      ImportJob importJob =
          ImportJob.newBuilder()
              // See allowed values and their descriptions at
              // https://cloud.google.com/kms/docs/algorithms#protection_levels
              .setProtectionLevel(ProtectionLevel.HSM)
              // See allowed values and their descriptions at
              // https://cloud.google.com/kms/docs/key-wrapping#import_methods
              .setImportMethod(ImportMethod.RSA_OAEP_3072_SHA1_AES_256)
              .build();

      // Create the import job.
      ImportJob createdImportJob = client.createImportJob(keyRingName, id, importJob);
      System.out.printf("Created import job %s%n", createdImportJob.getName());
    }
  }
}

Node.js

要运行此代码,请先设置 Node.js 开发环境安装 Cloud KMS Node.js SDK

//
// TODO(developer): Uncomment these variables before running the sample.
//
// const projectId = 'my-project';
// const locationId = 'us-east1';
// const keyRingId = 'my-key-ring';
// const id = 'my-import-job';

// Imports the Cloud KMS library
const {KeyManagementServiceClient} = require('@google-cloud/kms');

// Instantiates a client
const client = new KeyManagementServiceClient();

// Build the parent key ring name
const keyRingName = client.keyRingPath(projectId, locationId, keyRingId);

async function createImportJob() {
  const [importJob] = await client.createImportJob({
    parent: keyRingName,
    importJobId: id,
    importJob: {
      protectionLevel: 'HSM',
      importMethod: 'RSA_OAEP_3072_SHA256',
    },
  });

  console.log(`Created import job: ${importJob.name}`);
  return importJob;
}

return createImportJob();

Python

要运行此代码,请先设置 Python 开发环境安装 Cloud KMS Python SDK

from google.cloud import kms

def create_import_job(
    project_id: str, location_id: str, key_ring_id: str, import_job_id: str
) -> None:
    """
    Create a new import job in Cloud KMS.

    Args:
        project_id (string): Google Cloud project ID (e.g. 'my-project').
        location_id (string): Cloud KMS location (e.g. 'us-east1').
        key_ring_id (string): ID of the Cloud KMS key ring (e.g. 'my-key-ring').
        import_job_id (string): ID of the import job (e.g. 'my-import-job').
    """

    # Create the client.
    client = kms.KeyManagementServiceClient()

    # Retrieve the fully-qualified key_ring string.
    key_ring_name = client.key_ring_path(project_id, location_id, key_ring_id)

    # Set paramaters for the import job, allowed values for ImportMethod and ProtectionLevel found here:
    # https://googleapis.dev/python/cloudkms/latest/_modules/google/cloud/kms_v1/types/resources.html

    import_method = kms.ImportJob.ImportMethod.RSA_OAEP_3072_SHA1_AES_256
    protection_level = kms.ProtectionLevel.HSM
    import_job_params = {
        "import_method": import_method,
        "protection_level": protection_level,
    }

    # Call the client to create a new import job.
    import_job = client.create_import_job(
        {
            "parent": key_ring_name,
            "import_job_id": import_job_id,
            "import_job": import_job_params,
        }
    )

    print(f"Created import job: {import_job.name}")

API

这些示例使用 curl 作为 HTTP 客户端来演示如何使用 API。如需详细了解访问权限控制,请参阅访问 Cloud KMS API

如需创建导入作业,请使用 ImportJobs.create 方法:

curl "https://cloudkms.googleapis.com/v1/projects/PROJECT_ID/locations/LOCATION/keyRings/KEY_RING/importJobs?import_job_id=IMPORT_JOB_ID" \
    --request "POST" \
    --header "authorization: Bearer TOKEN" \
    --header "content-type: application/json" \
    --data '{"import_method": "IMPORT_METHOD", "protection_level": "PROTECTION_LEVEL"}'

替换以下内容:

检查导入作业的状态

导入作业的初始状态为 PENDING_GENERATION。当状态为 ACTIVE 时,您可以使用它导入密钥。

导入作业将在三天后过期。如果导入作业已过期,则必须创建新导入作业。

您可以使用 Google Cloud CLI、Google Cloud 控制台或 Cloud Key Management Service API 检查导入作业的状态。

控制台

  1. 转到 Google Cloud 控制台中的密钥管理页面。

    前往“密钥管理”页面

  2. 点击包含导入作业的密钥环的名称。

  3. 点击页面顶部的导入作业标签页。

  4. 状态将会显示在导入作业名称旁的状态下。

gcloud

如需在命令行上使用 Cloud KMS,请先安装或升级到最新版本的 Google Cloud CLI

当导入作业处于有效状态时,您可以使用它来导入密钥。这可能需要几分钟的时间。使用此命令验证导入作业是否处于有效状态。使用创建导入作业的位置和密钥环。

gcloud kms import-jobs describe IMPORT_JOB \
  --location LOCATION \
  --keyring KEY_RING \
  --format="value(state)"

输出类似于以下内容:

state: ACTIVE

Go

要运行此代码,请先设置 Go 开发环境安装 Cloud KMS Go SDK

import (
	"context"
	"fmt"
	"io"

	kms "cloud.google.com/go/kms/apiv1"
	"cloud.google.com/go/kms/apiv1/kmspb"
)

// checkStateImportJob checks the state of an ImportJob in KMS.
func checkStateImportJob(w io.Writer, name string) error {
	// name := "projects/PROJECT_ID/locations/global/keyRings/my-key-ring/importJobs/my-import-job"

	// Create the client.
	ctx := context.Background()
	client, err := kms.NewKeyManagementClient(ctx)
	if err != nil {
		return fmt.Errorf("failed to create kms client: %w", err)
	}
	defer client.Close()

	// Call the API.
	result, err := client.GetImportJob(ctx, &kmspb.GetImportJobRequest{
		Name: name,
	})
	if err != nil {
		return fmt.Errorf("failed to get import job: %w", err)
	}
	fmt.Fprintf(w, "Current state of import job %q: %s\n", result.Name, result.State)
	return nil
}

Java

要运行此代码,请先设置 Java 开发环境安装 Cloud KMS Java SDK

import com.google.cloud.kms.v1.ImportJob;
import com.google.cloud.kms.v1.ImportJobName;
import com.google.cloud.kms.v1.KeyManagementServiceClient;
import java.io.IOException;

public class CheckStateImportJob {

  public void checkStateImportJob() throws IOException {
    // TODO(developer): Replace these variables before running the sample.
    String projectId = "your-project-id";
    String locationId = "us-east1";
    String keyRingId = "my-key-ring";
    String importJobId = "my-import-job";
    checkStateImportJob(projectId, locationId, keyRingId, importJobId);
  }

  // Check the state of an import job in Cloud KMS.
  public void checkStateImportJob(
      String projectId, String locationId, String keyRingId, String importJobId)
      throws IOException {
    // Initialize client that will be used to send requests. This client only
    // needs to be created once, and can be reused for multiple requests. After
    // completing all of your requests, call the "close" method on the client to
    // safely clean up any remaining background resources.
    try (KeyManagementServiceClient client = KeyManagementServiceClient.create()) {
      // Build the parent name from the project, location, and key ring.
      ImportJobName importJobName = ImportJobName.of(projectId, locationId, keyRingId, importJobId);

      // Retrieve the state of an existing import job.
      ImportJob importJob = client.getImportJob(importJobName);
      System.out.printf(
          "Current state of import job %s: %s%n", importJob.getName(), importJob.getState());
    }
  }
}

Node.js

要运行此代码,请先设置 Node.js 开发环境安装 Cloud KMS Node.js SDK

//
// TODO(developer): Uncomment these variables before running the sample.
//
// const projectId = 'my-project';
// const locationId = 'us-east1';
// const keyRingId = 'my-key-ring';
// const importJobId = 'my-import-job';

// Imports the Cloud KMS library
const {KeyManagementServiceClient} = require('@google-cloud/kms');

// Instantiates a client
const client = new KeyManagementServiceClient();

// Build the import job name
const importJobName = client.importJobPath(
  projectId,
  locationId,
  keyRingId,
  importJobId
);

async function checkStateImportJob() {
  const [importJob] = await client.getImportJob({
    name: importJobName,
  });

  console.log(
    `Current state of import job ${importJob.name}: ${importJob.state}`
  );
  return importJob;
}

return checkStateImportJob();

Python

要运行此代码,请先设置 Python 开发环境安装 Cloud KMS Python SDK

from google.cloud import kms

def check_state_import_job(
    project_id: str, location_id: str, key_ring_id: str, import_job_id: str
) -> None:
    """
    Check the state of an import job in Cloud KMS.

    Args:
        project_id (string): Google Cloud project ID (e.g. 'my-project').
        location_id (string): Cloud KMS location (e.g. 'us-east1').
        key_ring_id (string): ID of the Cloud KMS key ring (e.g. 'my-key-ring').
        import_job_id (string): ID of the import job (e.g. 'my-import-job').
    """

    # Create the client.
    client = kms.KeyManagementServiceClient()

    # Retrieve the fully-qualified import_job string.
    import_job_name = client.import_job_path(
        project_id, location_id, key_ring_id, import_job_id
    )

    # Retrieve the state from an existing import job.
    import_job = client.get_import_job(name=import_job_name)

    print(f"Current state of import job {import_job.name}: {import_job.state}")

API

这些示例使用 curl 作为 HTTP 客户端来演示如何使用 API。如需详细了解访问权限控制,请参阅访问 Cloud KMS API

如需检查导入作业的状态,请使用 ImportJobs.get 方法:

curl "https://cloudkms.googleapis.com/v1/projects/PROJECT_ID/locations/LOCATION/keyRings/KEY_RING/importJobs/IMPORT_JOB_ID" \
    --request "GET" \
    --header "authorization: Bearer TOKEN"

导入作业处于活动状态时,您可以发出导入密钥的请求

防止修改导入作业

导入作业将确定所导入密钥的许多特性,包括密钥的算法以及所导入密钥是 HSM 密钥还是软件密钥。您可以配置 IAM 权限,以防止用户创建导入作业,同时允许用户使用导入作业来导入密钥。

  1. 请仅向密钥管理员授予 importjobs.create 权限。
  2. 向要将使用该作业导入密钥的操作员授予特定导入作业的 importjobs.useToImport 权限。
  3. 创建导入作业时,请为使用该作业导入的密钥版本指定保护级别和算法。

在导入作业到期之前,具有指定导入作业的 importjobs.useToImport 权限但没有 importjobs.create 权限的用户可以导入密钥,但无法修改导入作业的特性。

导入密钥

检查导入作业的状态后,您可以发出导入请求。

您可以使用不同的标志来发出导入请求,具体取决于您是希望 Google Cloud CLI 自动封装密钥,还是您已手动封装密钥

无论您是手动还是自动封装密钥,都必须将算法设置为与要导入的实际密钥的长度匹配的受支持算法,并指定密钥的用途。

  • 用途为 ENCRYPT_DECRYPT 的密钥使用 google-symmetric-encryption 算法,长度为 32。

  • 用途为 ASYMMETRIC_DECRYPTASYMMETRIC_SIGN 的密钥支持各种算法和长度。

    创建密钥后不能更改密钥的用途,但可以使用与初始密钥版本不同的长度创建后续密钥版本。

自动封装和导入密钥

如果您想使用自动封装功能,则必须使用 Google Cloud CLI。使用如下所示的命令。将 --target-key-file 设置为要封装并导入的未封装密钥的位置。切勿设置 --wrapped-key-file

您可以选择将 --public-key-file 标志设置为已下载公钥的位置。导入大量密钥时,这会阻止在每次导入期间下载公钥。例如,您可以编写一个脚本来下载公钥,然后在导入每个密钥时提供其位置。

gcloud kms keys versions import \
    --import-job IMPORT_JOB \
    --location LOCATION \
    --keyring KEY_RING \
    --key KEY_NAME \
    --algorithm ALGORITHM \
    --target-key-file PATH_TO_UNWRAPPED_KEY

密钥由与导入作业关联的封装密钥封装,将被传输到 Google Cloud,并作为目标密钥上的新密钥版本导入。

导入手动封装的密钥

按照本部分中的说明导入已手动封装的密钥。将 --wrapped-key-file 设置为手动封装的密钥所在的位置。切勿设置 --target-key-file

您可以选择将 --public-key-file 标志设置为已下载公钥的位置。导入大量密钥时,这会阻止在每次导入期间下载公钥。例如,您可以编写一个脚本来下载公钥,然后在导入每个密钥时提供其位置。

控制台

  1. 在 Google Cloud 控制台中打开密钥管理页面。

  2. 点击包含导入作业的密钥环的名称。系统会显示目标密钥以及密钥环上的任何其他密钥。

  3. 点击目标密钥的名称,然后点击导入密钥版本

  4. 选择导入作业下拉列表中选择您的导入作业。

  5. 上传封装密钥选择器中,选择已封装的密钥。

  6. 如果要导入非对称密钥,请从算法下拉列表中选择算法。导入密钥版本页面应如下所示:
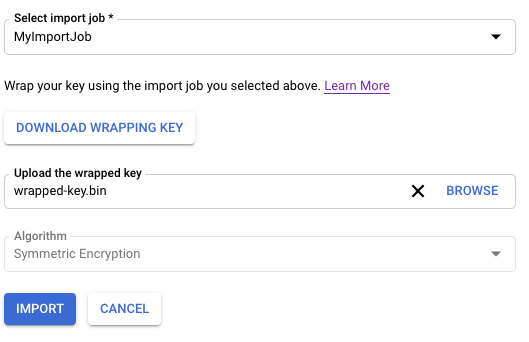
    导入密钥版本

  7. 点击导入

gcloud

如需在命令行上使用 Cloud KMS,请先安装或升级到最新版本的 Google Cloud CLI

使用如下所示的命令。

gcloud kms keys versions import \
  --import-job IMPORT_JOB \
  --location LOCATION \
  --keyring KEY_RING \
  --key KEY_NAME \
  --algorithm ALGORITHM \
  --wrapped-key-file PATH_TO_WRAPPED_KEY

如需了解详情,请参阅 gcloud kms keys versions import --help 命令的输出。

Go

要运行此代码,请先设置 Go 开发环境安装 Cloud KMS Go SDK

import (
	"context"
	"crypto/ecdsa"
	"crypto/elliptic"
	"crypto/rand"
	"crypto/rsa"
	"crypto/sha1"
	"crypto/x509"
	"encoding/pem"
	"fmt"
	"io"

	kms "cloud.google.com/go/kms/apiv1"
	"cloud.google.com/go/kms/apiv1/kmspb"
	"github.com/google/tink/go/kwp/subtle"
)

// importManuallyWrappedKey wraps key material and imports it into KMS.
func importManuallyWrappedKey(w io.Writer, importJobName, cryptoKeyName string) error {
	// importJobName := "projects/PROJECT_ID/locations/global/keyRings/my-key-ring/importJobs/my-import-job"
	// cryptoKeyName := "projects/PROJECT_ID/locations/global/keyRings/my-key-ring/cryptoKeys/my-imported-key"

	// Generate a ECDSA keypair, and format the private key as PKCS #8 DER.
	key, err := ecdsa.GenerateKey(elliptic.P256(), rand.Reader)
	if err != nil {
		return fmt.Errorf("failed to generate keypair: %w", err)
	}
	keyBytes, err := x509.MarshalPKCS8PrivateKey(key)
	if err != nil {
		return fmt.Errorf("failed to format private key: %w", err)
	}

	// Create the client.
	ctx := context.Background()
	client, err := kms.NewKeyManagementClient(ctx)
	if err != nil {
		return fmt.Errorf("failed to create kms client: %w", err)
	}
	defer client.Close()

	// Generate a temporary 32-byte key for AES-KWP and wrap the key material.
	kwpKey := make([]byte, 32)
	if _, err := rand.Read(kwpKey); err != nil {
		return fmt.Errorf("failed to generate AES-KWP key: %w", err)
	}
	kwp, err := subtle.NewKWP(kwpKey)
	if err != nil {
		return fmt.Errorf("failed to create KWP cipher: %w", err)
	}
	wrappedTarget, err := kwp.Wrap(keyBytes)
	if err != nil {
		return fmt.Errorf("failed to wrap target key with KWP: %w", err)
	}

	// Retrieve the public key from the import job.
	importJob, err := client.GetImportJob(ctx, &kmspb.GetImportJobRequest{
		Name: importJobName,
	})
	if err != nil {
		return fmt.Errorf("failed to retrieve import job: %w", err)
	}
	pubBlock, _ := pem.Decode([]byte(importJob.PublicKey.Pem))
	pubAny, err := x509.ParsePKIXPublicKey(pubBlock.Bytes)
	if err != nil {
		return fmt.Errorf("failed to parse import job public key: %w", err)
	}
	pub, ok := pubAny.(*rsa.PublicKey)
	if !ok {
		return fmt.Errorf("unexpected public key type %T, want *rsa.PublicKey", pubAny)
	}

	// Wrap the KWP key using the import job key.
	wrappedWrappingKey, err := rsa.EncryptOAEP(sha1.New(), rand.Reader, pub, kwpKey, nil)
	if err != nil {
		return fmt.Errorf("failed to wrap KWP key: %w", err)
	}

	// Concatenate the wrapped KWP key and the wrapped target key.
	combined := append(wrappedWrappingKey, wrappedTarget...)

	// Build the request.
	req := &kmspb.ImportCryptoKeyVersionRequest{
		Parent:     cryptoKeyName,
		ImportJob:  importJobName,
		Algorithm:  kmspb.CryptoKeyVersion_EC_SIGN_P256_SHA256,
		WrappedKey: combined,
	}

	// Call the API.
	result, err := client.ImportCryptoKeyVersion(ctx, req)
	if err != nil {
		return fmt.Errorf("failed to import crypto key version: %w", err)
	}
	fmt.Fprintf(w, "Created crypto key version: %s\n", result.Name)
	return nil
}

Java

要运行此代码,请先设置 Java 开发环境安装 Cloud KMS Java SDK

import com.google.cloud.kms.v1.CryptoKeyName;
import com.google.cloud.kms.v1.CryptoKeyVersion;
import com.google.cloud.kms.v1.ImportCryptoKeyVersionRequest;
import com.google.cloud.kms.v1.ImportJob;
import com.google.cloud.kms.v1.ImportJobName;
import com.google.cloud.kms.v1.KeyManagementServiceClient;
import com.google.crypto.tink.subtle.Kwp;
import com.google.protobuf.ByteString;
import java.io.IOException;
import java.security.GeneralSecurityException;
import java.security.KeyFactory;
import java.security.KeyPair;
import java.security.KeyPairGenerator;
import java.security.PublicKey;
import java.security.SecureRandom;
import java.security.spec.ECGenParameterSpec;
import java.security.spec.MGF1ParameterSpec;
import java.security.spec.X509EncodedKeySpec;
import java.util.Base64;
import javax.crypto.Cipher;
import javax.crypto.spec.OAEPParameterSpec;
import javax.crypto.spec.PSource;

public class ImportManuallyWrappedKey {

  public void importManuallyWrappedKey() throws GeneralSecurityException, IOException {
    // TODO(developer): Replace these variables before running the sample.
    String projectId = "your-project-id";
    String locationId = "us-east1";
    String keyRingId = "my-key-ring";
    String cryptoKeyId = "my-crypto-key";
    String importJobId = "my-import-job";
    importManuallyWrappedKey(projectId, locationId, keyRingId, cryptoKeyId, importJobId);
  }

  // Generates and imports local key material into Cloud KMS.
  public void importManuallyWrappedKey(
      String projectId, String locationId, String keyRingId, String cryptoKeyId, String importJobId)
      throws GeneralSecurityException, IOException {

    // Generate a new ECDSA keypair, and format the private key as PKCS #8 DER.
    KeyPairGenerator generator = KeyPairGenerator.getInstance("EC");
    generator.initialize(new ECGenParameterSpec("secp256r1"));
    KeyPair kp = generator.generateKeyPair();
    byte[] privateBytes = kp.getPrivate().getEncoded();

    // Initialize client that will be used to send requests. This client only
    // needs to be created once, and can be reused for multiple requests. After
    // completing all of your requests, call the "close" method on the client to
    // safely clean up any remaining background resources.
    try (KeyManagementServiceClient client = KeyManagementServiceClient.create()) {
      // Build the crypto key and import job names from the project, location,
      // key ring, and ID.
      final CryptoKeyName cryptoKeyName =
          CryptoKeyName.of(projectId, locationId, keyRingId, cryptoKeyId);
      final ImportJobName importJobName =
          ImportJobName.of(projectId, locationId, keyRingId, importJobId);

      // Generate a temporary 32-byte key for AES-KWP and wrap the key material.
      byte[] kwpKey = new byte[32];
      new SecureRandom().nextBytes(kwpKey);
      Kwp kwp = new Kwp(kwpKey);
      final byte[] wrappedTargetKey = kwp.wrap(privateBytes);

      // Retrieve the public key from the import job.
      ImportJob importJob = client.getImportJob(importJobName);
      String publicKeyStr = importJob.getPublicKey().getPem();
      // Manually convert PEM to DER. :-(
      publicKeyStr = publicKeyStr.replace("-----BEGIN PUBLIC KEY-----", "");
      publicKeyStr = publicKeyStr.replace("-----END PUBLIC KEY-----", "");
      publicKeyStr = publicKeyStr.replaceAll("\n", "");
      byte[] publicKeyBytes = Base64.getDecoder().decode(publicKeyStr);
      PublicKey publicKey =
          KeyFactory.getInstance("RSA").generatePublic(new X509EncodedKeySpec(publicKeyBytes));

      // Wrap the KWP key using the import job key.
      Cipher cipher = Cipher.getInstance("RSA/ECB/OAEPWithSHA-1AndMGF1Padding");
      cipher.init(
          Cipher.ENCRYPT_MODE,
          publicKey,
          new OAEPParameterSpec(
              "SHA-1", "MGF1", MGF1ParameterSpec.SHA1, PSource.PSpecified.DEFAULT));
      byte[] wrappedWrappingKey = cipher.doFinal(kwpKey);

      // Concatenate the wrapped KWP key and the wrapped target key.
      ByteString combinedWrappedKeys =
          ByteString.copyFrom(wrappedWrappingKey).concat(ByteString.copyFrom(wrappedTargetKey));

      // Import the wrapped key material.
      CryptoKeyVersion version =
          client.importCryptoKeyVersion(
              ImportCryptoKeyVersionRequest.newBuilder()
                  .setParent(cryptoKeyName.toString())
                  .setImportJob(importJobName.toString())
                  .setAlgorithm(CryptoKeyVersion.CryptoKeyVersionAlgorithm.EC_SIGN_P256_SHA256)
                  .setRsaAesWrappedKey(combinedWrappedKeys)
                  .build());

      System.out.printf("Imported: %s%n", version.getName());
    }
  }
}

Node.js

要运行此代码,请先设置 Node.js 开发环境安装 Cloud KMS Node.js SDK

//
// TODO(developer): Uncomment these variables before running the sample.
//
// const projectId = 'my-project';
// const locationId = 'us-east1';
// const keyRingId = 'my-key-ring';
// const cryptoKeyId = 'my-imported-key';
// const importJobId = 'my-import-job';

// Imports the Cloud KMS library
const {KeyManagementServiceClient} = require('@google-cloud/kms');

// Instantiates a client
const client = new KeyManagementServiceClient();

// Build the crypto key and importjob resource names
const cryptoKeyName = client.cryptoKeyPath(
  projectId,
  locationId,
  keyRingId,
  cryptoKeyId
);
const importJobName = client.importJobPath(
  projectId,
  locationId,
  keyRingId,
  importJobId
);

async function wrapAndImportKey() {
  // Generate a 32-byte key to import.
  const crypto = require('crypto');
  const targetKey = crypto.randomBytes(32);

  const [importJob] = await client.getImportJob({name: importJobName});

  // Wrap the target key using the import job key
  const wrappedTargetKey = crypto.publicEncrypt(
    {
      key: importJob.publicKey.pem,
      oaepHash: 'sha256',
      padding: crypto.constants.RSA_PKCS1_OAEP_PADDING,
    },
    targetKey
  );

  // Import the target key version
  const [version] = await client.importCryptoKeyVersion({
    parent: cryptoKeyName,
    importJob: importJobName,
    algorithm: 'GOOGLE_SYMMETRIC_ENCRYPTION',
    wrappedKey: wrappedTargetKey,
  });

  console.log(`Imported key version: ${version.name}`);
  return version;
}

return wrapAndImportKey();

Python

要运行此代码,请先设置 Python 开发环境安装 Cloud KMS Python SDK

import os

# Import the client library and Python standard cryptographic libraries.
from cryptography.hazmat import backends
from cryptography.hazmat.primitives import hashes
from cryptography.hazmat.primitives import keywrap
from cryptography.hazmat.primitives import serialization
from cryptography.hazmat.primitives.asymmetric import ec
from cryptography.hazmat.primitives.asymmetric import padding
from google.cloud import kms

def import_manually_wrapped_key(
    project_id: str,
    location_id: str,
    key_ring_id: str,
    crypto_key_id: str,
    import_job_id: str,
) -> None:
    """
    Generates and imports local key material to Cloud KMS.

    Args:
        project_id (string): Google Cloud project ID (e.g. 'my-project').
        location_id (string): Cloud KMS location (e.g. 'us-east1').
        key_ring_id (string): ID of the Cloud KMS key ring (e.g. 'my-key-ring').
        crypto_key_id (string): ID of the key to import (e.g. 'my-asymmetric-signing-key').
        import_job_id (string): ID of the import job (e.g. 'my-import-job').
    """

    # Generate some key material in Python and format it in PKCS #8 DER as
    # required by Google Cloud KMS.
    key = ec.generate_private_key(ec.SECP256R1, backends.default_backend())
    formatted_key = key.private_bytes(
        serialization.Encoding.DER,
        serialization.PrivateFormat.PKCS8,
        serialization.NoEncryption(),
    )

    print(f"Generated key bytes: {formatted_key!r}")

    # Create the client.
    client = kms.KeyManagementServiceClient()

    # Retrieve the fully-qualified crypto_key and import_job string.
    crypto_key_name = client.crypto_key_path(
        project_id, location_id, key_ring_id, crypto_key_id
    )
    import_job_name = client.import_job_path(
        project_id, location_id, key_ring_id, import_job_id
    )

    # Generate a temporary 32-byte key for AES-KWP and wrap the key material.
    kwp_key = os.urandom(32)
    wrapped_target_key = keywrap.aes_key_wrap_with_padding(
        kwp_key, formatted_key, backends.default_backend()
    )

    # Retrieve the public key from the import job.
    import_job = client.get_import_job(name=import_job_name)
    import_job_pub = serialization.load_pem_public_key(
        bytes(import_job.public_key.pem, "UTF-8"), backends.default_backend()
    )

    # Wrap the KWP key using the import job key.
    wrapped_kwp_key = import_job_pub.encrypt(
        kwp_key,
        padding.OAEP(
            mgf=padding.MGF1(algorithm=hashes.SHA1()),
            algorithm=hashes.SHA1(),
            label=None,
        ),
    )

    # Import the wrapped key material.
    client.import_crypto_key_version(
        {
            "parent": crypto_key_name,
            "import_job": import_job_name,
            "algorithm": kms.CryptoKeyVersion.CryptoKeyVersionAlgorithm.EC_SIGN_P256_SHA256,
            "rsa_aes_wrapped_key": wrapped_kwp_key + wrapped_target_key,
        }
    )

    print(f"Imported: {import_job.name}")

API

这些示例使用 curl 作为 HTTP 客户端来演示如何使用 API。如需详细了解访问权限控制,请参阅访问 Cloud KMS API

使用 cryptoKeyVersions.import 方法导入密钥。

curl "https://cloudkms.googleapis.com/v1/projects/PROJECT_ID/locations/LOCATION/keyRings/KEY_RING/cryptoKeys/KEY_NAME/cryptoKeyVersions:import" \
    --request "POST" \
    --header "authorization: Bearer TOKEN" \
    --header "content-type: application/json" \
    --data '{"importJob": "IMPORT_JOB_ID", "algorithm": "ALGORITHM", "wrappedKey": "WRAPPED_KEY"}'

替换以下内容:

  • IMPORT_JOB_ID:相应导入作业的完整资源名称。

  • ALGORITHM:要导入的密钥的 algorithm,其类型为 CryptoKeyVersionAlgorithm

  • WRAPPED_KEY:手动封装的密钥(采用 base64 格式)。

密钥导入请求已启动。您可以监控其状态

检查已导入密钥版本的状态

已导入密钥版本的初始状态为 PENDING_IMPORT。如果状态为 ENABLED,则表示密钥版本已成功导入。如果导入失败,则状态为 IMPORT_FAILED

您可以使用 Google Cloud CLI、Google Cloud 控制台或 Cloud Key Management Service API 检查导入请求的状态。

控制台

  1. 在 Google Cloud 控制台中打开密钥管理页面。

  2. 点击包含导入作业的密钥环的名称。

  3. 点击页面顶部的导入作业标签页。

  4. 状态将会显示在导入作业名称旁的状态下。

gcloud

如需在命令行上使用 Cloud KMS,请先安装或升级到最新版本的 Google Cloud CLI

使用 versions list 命令检查状态。使用您在本主题前面创建的同一个位置、目标密钥环和目标密钥。

gcloud kms keys versions list \
  --keyring KEY_RING \
  --location LOCATION \
  --key KEY_NAME

Go

要运行此代码,请先设置 Go 开发环境安装 Cloud KMS Go SDK

import (
	"context"
	"fmt"
	"io"

	kms "cloud.google.com/go/kms/apiv1"
	"cloud.google.com/go/kms/apiv1/kmspb"
)

// checkStateImportedKey checks the state of a CryptoKeyVersion in KMS.
func checkStateImportedKey(w io.Writer, name string) error {
	// name := "projects/PROJECT_ID/locations/global/keyRings/my-key-ring/cryptoKeys/my-imported-key/cryptoKeyVersions/1"

	// Create the client.
	ctx := context.Background()
	client, err := kms.NewKeyManagementClient(ctx)
	if err != nil {
		return fmt.Errorf("failed to create kms client: %w", err)
	}
	defer client.Close()

	// Call the API.
	result, err := client.GetCryptoKeyVersion(ctx, &kmspb.GetCryptoKeyVersionRequest{
		Name: name,
	})
	if err != nil {
		return fmt.Errorf("failed to get crypto key version: %w", err)
	}
	fmt.Fprintf(w, "Current state of crypto key version %q: %s\n", result.Name, result.State)
	return nil
}

Java

要运行此代码,请先设置 Java 开发环境安装 Cloud KMS Java SDK

import com.google.cloud.kms.v1.CryptoKeyVersion;
import com.google.cloud.kms.v1.CryptoKeyVersionName;
import com.google.cloud.kms.v1.KeyManagementServiceClient;
import java.io.IOException;

public class CheckStateImportedKey {

  public void checkStateImportedKey() throws IOException {
    // TODO(developer): Replace these variables before running the sample.
    String projectId = "your-project-id";
    String locationId = "us-east1";
    String keyRingId = "my-key-ring";
    String cryptoKeyId = "my-crypto-key";
    String cryptoKeyVersionId = "1";
    checkStateImportedKey(projectId, locationId, keyRingId, cryptoKeyId, cryptoKeyVersionId);
  }

  // Check the state of an imported key in Cloud KMS.
  public void checkStateImportedKey(
      String projectId,
      String locationId,
      String keyRingId,
      String cryptoKeyId,
      String cryptoKeyVersionId)
      throws IOException {
    // Initialize client that will be used to send requests. This client only
    // needs to be created once, and can be reused for multiple requests. After
    // completing all of your requests, call the "close" method on the client to
    // safely clean up any remaining background resources.
    try (KeyManagementServiceClient client = KeyManagementServiceClient.create()) {
      // Build the version name from its path components.
      CryptoKeyVersionName versionName =
          CryptoKeyVersionName.of(
              projectId, locationId, keyRingId, cryptoKeyId, cryptoKeyVersionId);

      // Retrieve the state of an existing version.
      CryptoKeyVersion version = client.getCryptoKeyVersion(versionName);
      System.out.printf(
          "Current state of crypto key version %s: %s%n", version.getName(), version.getState());
    }
  }
}

Node.js

要运行此代码,请先设置 Node.js 开发环境安装 Cloud KMS Node.js SDK

//
// TODO(developer): Uncomment these variables before running the sample.
//
// const projectId = 'my-project';
// const locationId = 'us-east1';
// const keyRingId = 'my-key-ring';
// const cryptoKeyId = 'my-imported-key';
// const cryptoKeyVersionId = '1';

// Imports the Cloud KMS library
const {KeyManagementServiceClient} = require('@google-cloud/kms');

// Instantiates a client
const client = new KeyManagementServiceClient();

// Build the key version name
const keyVersionName = client.cryptoKeyVersionPath(
  projectId,
  locationId,
  keyRingId,
  cryptoKeyId,
  cryptoKeyVersionId
);

async function checkStateCryptoKeyVersion() {
  const [keyVersion] = await client.getCryptoKeyVersion({
    name: keyVersionName,
  });

  console.log(
    `Current state of key version ${keyVersion.name}: ${keyVersion.state}`
  );
  return keyVersion;
}

return checkStateCryptoKeyVersion();

Python

要运行此代码,请先设置 Python 开发环境安装 Cloud KMS Python SDK

from google.cloud import kms

def check_state_imported_key(
    project_id: str, location_id: str, key_ring_id: str, import_job_id: str
) -> None:
    """
    Check the state of an import job in Cloud KMS.

    Args:
        project_id (string): Google Cloud project ID (e.g. 'my-project').
        location_id (string): Cloud KMS location (e.g. 'us-east1').
        key_ring_id (string): ID of the Cloud KMS key ring (e.g. 'my-key-ring').
        import_job_id (string): ID of the import job (e.g. 'my-import-job').
    """

    # Create the client.
    client = kms.KeyManagementServiceClient()

    # Retrieve the fully-qualified import_job string.
    import_job_name = client.import_job_path(
        project_id, location_id, key_ring_id, import_job_id
    )

    # Retrieve the state from an existing import job.
    import_job = client.get_import_job(name=import_job_name)

    print(f"Current state of import job {import_job.name}: {import_job.state}")

API

这些示例使用 curl 作为 HTTP 客户端来演示如何使用 API。如需详细了解访问权限控制,请参阅访问 Cloud KMS API

调用 ImportJob.get 方法并检查 state 字段。如果 statePENDING_GENERATION,表示导入作业仍在创建中。请定期重新检查状态,直到状态为 ACTIVE

导入初始密钥版本后,密钥的状态会更改为有效。对于对称密钥,您必须先将导入的密钥版本设置为主版本,然后才能使用该密钥。

对称密钥:设置主要版本

导入对称密钥时,必须执行此步骤,非对称密钥则无需执行此步骤。非对称密钥没有主要版本。您必须使用 Google Cloud CLI 来设置主要版本。

gcloud kms keys set-primary-version KEY_NAME\
    --location=LOCATION\
    --keyring=KEY_RING\
    --version=KEY_VERSION

重新导入先前销毁的密钥

Cloud Key Management Service 支持密钥重新导入,允许您通过提供原始密钥材料将先前导入的 DESTROYEDIMPORT_FAILED 状态的密钥版本恢复为 ENABLED 状态。如果由于初始导入失败而未导入任何原始密钥材料,则可以提供任何密钥材料。

限制

  • 只有以前导入的 CryptoKeyVersions 才能重新导入。
  • 如果以前已成功导入版本,则重新导入的密钥材料必须与原始密钥材料完全一致。
  • 无法重新导入在此功能发布之前销毁的 CryptoKeyVersions。如果版本符合重新导入条件,则 CryptoKeyVersionreimport_eligible 字段为 true;如果不符合重新导入条件,则值为 false

可以重新导入软件和 Cloud HSM 密钥,但无法重新导入外部密钥。

重新导入已销毁的密钥

请按照创建导入作业中的步骤创建 ImportJob 以进行重新导入。无论是现有的 ImportJob 或新建的 ImportJob,只要保护级别与原始保护级别匹配,您都可以使用。

控制台

  1. 转到 Google Cloud 控制台中的密钥管理页面。

    前往“密钥管理”页面

  2. 点击您要重新导入的密钥版本的密钥所在的密钥环的名称。

  3. 点击您要重新导入的密钥版本的密钥。

  4. 点击您要重新导入的密钥版本旁边的三个点。

  5. 选择重新导入密钥版本

  6. 选择导入作业下拉列表中选择您的导入作业。

  7. 上传封装密钥选择器中,选择已封装的密钥。该密钥必须与原始密钥材料匹配。

  8. 点击重新导入

gcloud

如需在命令行上使用 Cloud KMS,请先安装或升级到最新版本的 Google Cloud CLI

  1. 使用原始密钥材料重新导入密钥版本。

    gcloud kms keys versions import \
    --location LOCATION \
    --keyring KEY_RING \
    --key KEY_NAME \
    --version KEY_VERSION \
    --algorithm ALGORITHM \
    --import-job IMPORT_JOB \
    --target-key-file PATH_TO_KEY \
    

API

这些示例使用 curl 作为 HTTP 客户端来演示如何使用 API。如需详细了解访问权限控制,请参阅访问 Cloud KMS API

  1. cryptoKeyVersions.import 方法的请求正文中,将 cryptoKeyVersion 字段设置为要导入的版本的密钥版本名称。它必须是加密密钥的子级。

  2. 在请求正文中,将 algorithm 字段设置为要导入的密钥的算法。此值必须与原始密钥版本的算法匹配。algorithm 字段的类型为 CryptoKeyVersionAlgorithm

  3. 在请求正文中,将 wrappedKeyMaterial 字段设置为您已封装的密钥材料。

  4. 调用 cryptoKeyVersions.import 方法。cryptoKeyVersions.import 响应的类型为 CryptoKeyVersion。成功导入密钥后,其状态为 ENABLED,您可以在 Cloud KMS 中使用该密钥。

后续步骤