This document describes how to configure and use a canary deployment strategy.
What is a canary deployment?
A canary deployment is a progressive rollout of an application that splits traffic between an already-deployed version and a new version, rolling it out to a subset of users before rolling out fully.
Supported target types
Canary deployment in Cloud Deploy supports all target types, including the following:
- Google Kubernetes Engine
- Cloud Run (services only—not jobs.)
- GKE Enterprise
Canary also works with multi-targets.
Why use a canary deployment strategy?
A canary deployment gives you a chance to partially release your application. In this way, you can ensure the new version of your application is reliable before you deliver it to all users.
If you're deploying to GKE or GKE Enterprise, for example, you would deploy the new version of your application to a limited number of pods. The old version would continue to run, but with more of the traffic being sent to the new pods.
If you're deploying to Cloud Run, Cloud Run itself splits traffic between the old and new revisions, according to the percentages you configure.
Types of canary
Cloud Deploy lets you configure the following types of canary deployment:
Automated
With an automated canary deployment, you configure Cloud Deploy with a series of percentages that express a progressive deployment. Cloud Deploy performs additional operations on your behalf, to apportion traffic percentages between the old and new versions.
Custom-automated
For a custom-automated canary, you can provide the following:
- The phase name
- The percentage goal
- The Skaffold profile to use for the phase
- Whether or not to include a verify job
But you don't need to provide traffic-balancing information; Cloud Deploy creates the necessary resources, as described here.
Custom
With a custom canary, you configure each canary phase separately, including the following:
- The phase name
- The percentage goal
- The Skaffold profile to use for the phase
- Whether or not to include a verify job
Additionally for a fully custom canary, you provide all of the traffic-balancing configuration, as described here.
Phases of a canary deployment
When you create a release for a canary deployment, the rollout is created with
a phase for each canary increment, plus a final stable phase for 100%.
For example, if you configure a canary for 25%, 50%, and 75% increments, the rollout will have the following phases:
canary-25canary-50canary-75stable
You can read more about rollout phases, jobs, and job runs in Manage rollouts.
What happens during an automated or custom-automated canary
To support your canary deployment, Cloud Deploy includes special processing steps when rendering your Kubernetes manifest or Cloud Run service configuration:
GKE/GKE Enterprise (network)
Here's how Cloud Deploy executes a canary deployment in network-based GKE and GKE Enterprise:
You provide the name of the Deployment resource and the Service resource.
Cloud Deploy creates an additional Deployment resource, with the name of your current Deployment plus
-canary.Cloud Deploy modifies the Service to adjust the selector to select the pods in the current Deployment and the canary pods.
Cloud Deploy calculates the number of pods to use for the canary based on the calculation described here. That calculation differs depending on whether you enable or disable pod overprovisioning.
If we're skipping to the
stablephase Cloud Deploy adds the labels to be used to match pods, so they're available for subsequent canary runs.Cloud Deploy creates a Deployment that includes the phase-specific percentage of pods, updating it for each phase. This is done by calculating the number of pods as a percentage of the original number of pods. This can result in an inexact traffic split. If you need an exact traffic split, you can achieve that using Gateway API.
Also, Secrets and ConfigMaps are also copied and renamed with
-canary.During the
stablephase, the-canaryDeployment is scaled down to zero, and the original Deployment is replaced with the new Deployment.Cloud Deploy doesn't modify the original Deployment until the
stablephase.
Cloud Deploy provisions pods to achieve the requested canary percentage as closely as possible. This is based on the number of pods, not traffic to the pods. If you want your canary to be based on traffic, you need to use Gateway API.
For GKE network-based canary, you can enable or disable pod overprovisioning. The following sections describe how Cloud Deploy calculates the number of pods to provision for the canary deployment for each canary phase.
Pod provisioning with overprovisioning enabled
Enabling overprovisioning (disablePodOverprovisioning: false)
allows Cloud Deploy to create enough additional pods to run the
canary percentage you want, based on the number of pods running your
existing deployment. The following formula shows how
Cloud Deploy calculates the number of pods to provision for the
canary deployment for each canary phase, when pod overprovisioning is
enabled:
math.Ceil( percentage * ReplicaCountOfDeploymentOnCluster / (100-percentage))
With this formula, the current replica count (the number of pods you already have, before this canary) is multiplied by the canary percentage for the phase, and the result of that is divided by (100 minus the percentage).
For example, if you have 4 pods aleady, and your canary phase is 50%, then
the number of canary pods is 4. (The result of 100-percentage is used as a
percentage: 100-50=50, treated as .50.)
Pod overprovisioning is the default behavior.
Pod provisioning with overprovisioning disabled
You can disable overprovisioning (disablePodOverprovisioning: true),
to ensure that Cloud Deploy doesn't increase your replica count.
The following formula shows how Cloud Deploy calculates pod provisioning for the canary deployment for each canary phase, when pod overprovisioning is disabled:
math.Ceil( (ReplicaCountOfDeploymentOnCluster + ReplicaCountOfCanaryDeploymentOnCluster) * percentage)
In this formula, ReplicaCountOfCanaryDeploymentOnCluster only exists if
there was already a canary phase. If this is the first canary phase, there
is no ReplicaCountOfCanaryDeploymentOnCluster.
If you begin with 4 pods, that number is multiplied by the canary percentage
(for example, 50%, or .5) to get 2. So the original deployment is now
scaled down to 2, and 2 new pods are created for the canary deployment. If
you then have a 75% canary stage, you have 2 (original deployment) +2
(first canary stage), *.75, to get 3 canary pods and 1 pod running the
original deployment.
GKE/GKE Enterprise (Gateway)
Here's how Cloud Deploy executes a canary deployment in GKE and GKE Enterprise using Gateway API:
In addition to the Deployment and Service references, you provide an HTTPRoute resource, with a
backendRefsrule that references the Service.Cloud Deploy creates a new Deployment, with the name of your original Deployment plus
-canary, and a new Service with the original Service name plus-canary.Also, Secrets, ConfigMaps, and Horizontal Pod Autoscalers are also copied and renamed with
-canary.For each canary phase Cloud Deploy modifies the HTTPRoute to update the weighting between the original Deployment's pods and the canary Deployment's pods, based on the percentage for that phase.
Because there can be a delay propagating changes to
HTTPRouteresources, you can include therouteUpdateWaitTimeproperty in your configuration, so the system waits a specified amount of time for this propagation.During the
stablephase, the-canaryDeployment is scaled down to zero, and the original Deployment is updated to use the new release's Deployment.Also, the HTTPRoute is now reverted to the original which you supplied.
Cloud Deploy doesn't modify the original Deployment or Service until the
stablephase.
Cloud Run
Here's how Cloud Deploy executes a canary deployment for Cloud Run:
For a canary deployment to Cloud Run, don't supply a
trafficstanza in your service YAML.When creating a new rollout for canary, Cloud Deploy splits traffic between the previous revision that was successfully deployed by Cloud Deploy and a new revision.
If you want to see the differences among phases of a canary deployment, you can view changes in the per-phase rendered manifest available in the release inspector. You can do this even before the rollout has started. Also, if you're using parallel deployment, you can also inspect each child's rendered manifest.
Configure a canary deployment
This section describes how to configure your delivery pipeline and targets for a canary deployment.
The instructions here include only what is specific to canary configuration. The document Deploy your application has the general instructions for configuring and executing your deployment pipeline.
Make sure you have the required permissions
In addition to other Identity and Access Management permissions you need for using Cloud Deploy, you need the following permissions in order to perform additional actions that might be needed for a canary deployment:
clouddeploy.rollouts.advanceclouddeploy.rollouts.ignoreJobclouddeploy.rollouts.cancelclouddeploy.rollouts.retryJobclouddeploy.jobRuns.getclouddeploy.jobRuns.listclouddeploy.jobRuns.terminate
See IAM roles and permissions for more information about what available roles include these permissions.
Prepare your skaffold.yaml
As with a standard deployment, your canary needs a skaffold.yaml file, which
defines how manifests and service definitions are rendered and deployed.
The skaffold.yaml you create for a canary deployment does not have any special
requirements beyond what's needed for standard
deployment.
Prepare your manifest or service definition
As with a standard deployment, your canary needs a Kubernetes manifest or a Cloud Run service definition.
GKE and GKE Enterprise
For canary, your manifest must have the following:
A Deployment and a Service.
The Service must define an
appselector, and must select the Pods of the Deployment specified.If you're using a Gateway API-based canary, the manifest must also have an HTTPRoute.
Cloud Run
For canary on Cloud Run, your normal
Cloud Run service definition file is sufficient, but
without a traffic stanza. Cloud Deploy manages splitting
traffic for you between the last successful revision and the new revision.
Configure an automated canary
The following instructions are for Cloud Run and GKE and GKE Enterprise service-based networking targets. If you're using Kubernetes Gateway API with GKE or GKE Enterprise, see this documentation.
You configure the automated canary in your delivery pipeline definition:
GKE and GKE Enterprise
In the pipeline stage, include a strategy property, as follows:
serialPipeline:
  stages:
  - targetId: prod
    profiles: []
    strategy:
      canary:
        runtimeConfig:
          kubernetes:
            serviceNetworking:
              service: "SERVICE_NAME"
              deployment: "DEPLOYMENT_NAME"
        canaryDeployment:
          percentages: [PERCENTAGES]
          verify: true|false
In this configuration...
SERVICE_NAME is the name of the Kubernetes Service, defined in your manifest.
DEPLOYMENT_NAME is the name of your Kubernetes Deployment, defined in your manifest.
PERCENTAGES is a comma-separated list of percentage values representing your canary increments, for example
[5, 25, 50].Also, this doesn't include
100, because 100% percent deployment is assumed in the canary, and is handled by thestablephase.You can enable deployment verification (
verify: true). If you do so, averifyjob is enabled on each phase.
Cloud Run
In the pipeline stage, include a strategy property, as follows:
serialPipeline:
  stages:
  - targetId: prod
    profiles: []
    strategy:
      canary:
        runtimeConfig:
          cloudRun:
            automaticTrafficControl: true
        canaryDeployment:
          percentages: [PERCENTAGES]
          verify: true|false
In this configuration...
- PERCENTAGES is a comma-separated list of percentage
values representing your canary increments, for example
[25, 50, 75]. Note that this doesn't include100, because 100% percent deployment is assumed in the canary, and is handled by thestablephase. - You can enable deployment verification
(
verify: true). If you do so, averifyjob is added to each canary phase.
Configure a custom canary
You can configure your canary manually instead of relying fully on the automation provided by Cloud Deploy. With custom canary configuration, you specify the following, in your delivery pipeline definition:
Rollout phase names
In a fully-automated canary, Cloud Deploy names the phases for you (
canary-25,canary-75,stable, for example). With a custom canary, however, you can give each phase any name, as long as it's unique among all phases for this canary stage, and it honors resource name restrictions. But the final (100%) phase name must bestable.Percentage goals for each phase
Specify the percentages separately, per phase.
Skaffold profiles to use for the phase
You can use a separate Skaffold profile for each phase, or the same profile, or any combination. And each profile can use a different Kubernetes manifest or Cloud Run service definition. You can also use more than one profile for a given phase. Cloud Deploy combines them.
Whether there is a verify job for the phase
Remember that if you're enabling verify, you need to configure your
skaffold.yamlfor verification also.
All target types are supported for custom canary.
Custom canary configuration elements
The following YAML shows the configuration for the phases of fully custom canary deployment:
strategy:
canary:
# Custom configuration for each canary phase
customCanaryDeployment:
phaseConfigs:
- phaseId: "PHASE1_NAME"
percentage: PERCENTAGE1
profiles: [ "PROFILE_NAME" ]
verify: true | false
- …
- phaseId: "stable"
percentage: 100
profiles: [ "LAST_PROFILE_NAME" ]
verify: true|false
In this YAML
PHASE1_NAMEIs the name of the phase. Each phase name must be unique.
[ "PROFILE_NAME" ]Is the name of the profile to use for the phase. You can use the same profile for each phase, or a different one for each, or any combination. Also, you can specify more than one profile. Cloud Deploy uses all of the profiles you specify, plus the profile or manifest used by the overall stage.
PERCENTAGE1Is the percentage to deploy for the first phase. Each phase must have a unique percentage value, and that value must be a whole percentage (not
10.5, for example), and the phases must be in ascending order.verify: true|falseTells Cloud Deploy whether to include a verify job for the phase. Note that for each phase to use verify, Skaffold uses the same profile for verify that is specified for render and deploy for that phase.
stableThe final phase must be named
stable.
The percentage for the last phase must be 100. Phases are executed according
in the order you configure them in this customCanaryDeployment stanza, but if
the percentage values are not in ascending order, the command to
register the delivery pipeline
fails with an error.
Note that the configuration for a custom canary doesn't include a
runtimeConfig stanza. If you include runtimeConfig, it's considered a
custom-automated canary.
Configure a custom-automated canary
A custom-automated canary is similar to a custom canary because you specify the separate canary phases, with custom phase names, percentage values, Skaffold profiles, and verify jobs. But with a custom canary, you don't provide the configurations that define the traffic apportionment—Cloud Deploy does that for you, but you still provide the Skaffold profiles to be used for each stage.
To configure a custom-automated canary, include a runtimeConfig stanza, as
shown here,
and include the customCanaryDeployment stanza, as shown
here.
Configure a canary deployment using Kubernetes Gateway API service mesh
Although you can use a Cloud Deploy canary deployment to deploy your application to Kubernetes service-based networking, An alternative is to use the Kubernetes Gateway API service mesh. This section describes how to do so.
You can use Gateway API with Istio or any supported implementation.
Set up your Gateway API resources:
These are examples only.
In your Kubernetes manifest, provided to Cloud Deploy when you created the release, include the following:
An
HTTPRoutethat references your Gateway resourceA Deployment
A Service
Configure your delivery pipeline and the target that you will canary-deploy to:
Configuration for the target is the same as for any target.
The delivery pipeline configuration, in the progression sequence for the specific target, includes a
gatewayServiceMeshstanza to reference your Kubernetes Gateway APIHTTPRouteconfiguration, as well as your Deployment and Service.strategy: canary: runtimeConfig: kubernetes: gatewayServiceMesh: httpRoute: "ROUTE" service: "SERVICE" deployment: "DEPLOYMENT" routeUpdateWaitTime: "WAIT_TIME" canaryDeployment: percentages: - 50Where...
ROUTE is your httpRoute configuration that defines the routing behavior you want.
SERVICE is your Service configuration, which Cloud Deploy requires for canary deployments to GKE and GKE Enterprise.
DEPLOYMENT is your Deployment configuration, which Cloud Deploy requires for canary deployments to GKE and GKE Enterprise.
WAIT_TIME is an amount of time for Cloud Deploy to wait for changes to the
HTTPRouteresource to finish propagating, to avoid dropped requests. For example:routeUpdateWaitTime: 60s.If you're running canary using Gateway API without Istio, and the Gateway API is connected to a Google Cloud load balancer, a small amount of traffic may be lost when the canary instance is scaled down. You can configure this setting if you observe this behavior.
Use parallel deployment with a canary deployment strategy
You can run a canary deployment using parallel deployment. This means the target you're progressively deploying to can comprise two or more child targets. For example, you can deploy progressively to clusters in separate regions, at the same time.
How is a parallel canary different from single-target canaries
As with single-target canary deployment, if you're deploying to GKE targets, you need a Kubernetes Deployment configuration and a Kubernetes Service configuration in your manifest.
As with single-target canary deployment, your delivery pipeline configuration must include a
strategy.canarystanza inside the stage definition for the applicable stage.Additionally, you need to configure a multi-target, and you need to configure the child targets which that multi-target references.
When you create a release, a controller rollout and the child rollouts are created.
Both types of rollout—controller and child—have separate phases for all of the configured canary percentages, and a
stablephase for the canary 100%.You can't advance a child rollout.
You can advance controller rollouts only. When you advance the controller rollout to the next stage, the child rollouts are advanced too, by Cloud Deploy.
You can't retry failed jobs in the controller rollout.
You can retry a job in child rollouts only.
You can't ignore failed jobs in the controller rollout.
You can ignore failed jobs in child rollouts only.
You can cancel a controller rollout, but you can't cancel child rollouts.
You can terminate job runs under a child rollout only, not a controller rollout.
What to do if a parallel rollout fails in canary
When a child rollout fails, the controller rollout can transition to different states, depending on what happens with the child rollouts:
If one or more child rollouts fail, but at least one child rollout is still
IN_PROGRESS, the controller rollout remainsIN_PROGRESS.If one or more child rollouts fail, but at least one child rollout succeeds, the controller rollout is
HALTEDif there are more phases after the current one.If this is the
stablephase, the controller rollout isFAILED.HALTEDgives you a chance to either ignore, retry failed jobs within the failed child rollout, or cancel the controller rollout and prevent further actions on the child rollouts.If the controller rollout is in a
HALTEDstate because of a failed child rollout, and you ignore the failed job in the child rollout, the controller rollout reverts to anIN_PROGRESSstate.
Execute the configured canary
To run the canary deployment:
Register the configured delivery pipeline and targets.
gcloud deploy apply --file=PIPELINEThe delivery pipeline includes the automated or custom canary configuration, for your chosen runtime.
This command assumes your targets are defined in the same file or have otherwise already been registered. If not, be sure to register your targets too.
Create a release:
gcloud deploy releases create RELEASE_NAME \
                              --delivery-pipeline=PIPELINE_NAME \
                              --region=REGION
The delivery pipeline identified by
PIPELINE_NAMEcontains the automated or custom canary configuration described in this document.Advance the canary:
gcloud CLI
gcloud deploy rollouts advance ROLLOUT_NAME \
                            --release=RELEASE_NAME \
                            --delivery-pipeline=PIPELINE_NAME \
                            --region=REGION
Where:
ROLLOUT_NAMEis the name of the current rollout which you're advancing to the next phase.RELEASE_NAMEis the name of the release that this rollout is part of.PIPELINE_NAMEis the name of the delivery pipeline you're using to manage deployment of this release.REGIONis the name of the region in which the release was created, for exampleus-central1. This is required.See the Google Cloud SDK reference for more information about the
gcloud deploy rollouts advancecommand.Google Cloud console
Click your pipeline shown in the list of delivery pipelines.
The Delivery pipeline details page shows a graphical representation of your delivery pipeline's progress.
On the Rollouts tab, under Delivery pipeline details, click the name of your rollout.
The rollout details page is shown, for that rollout.
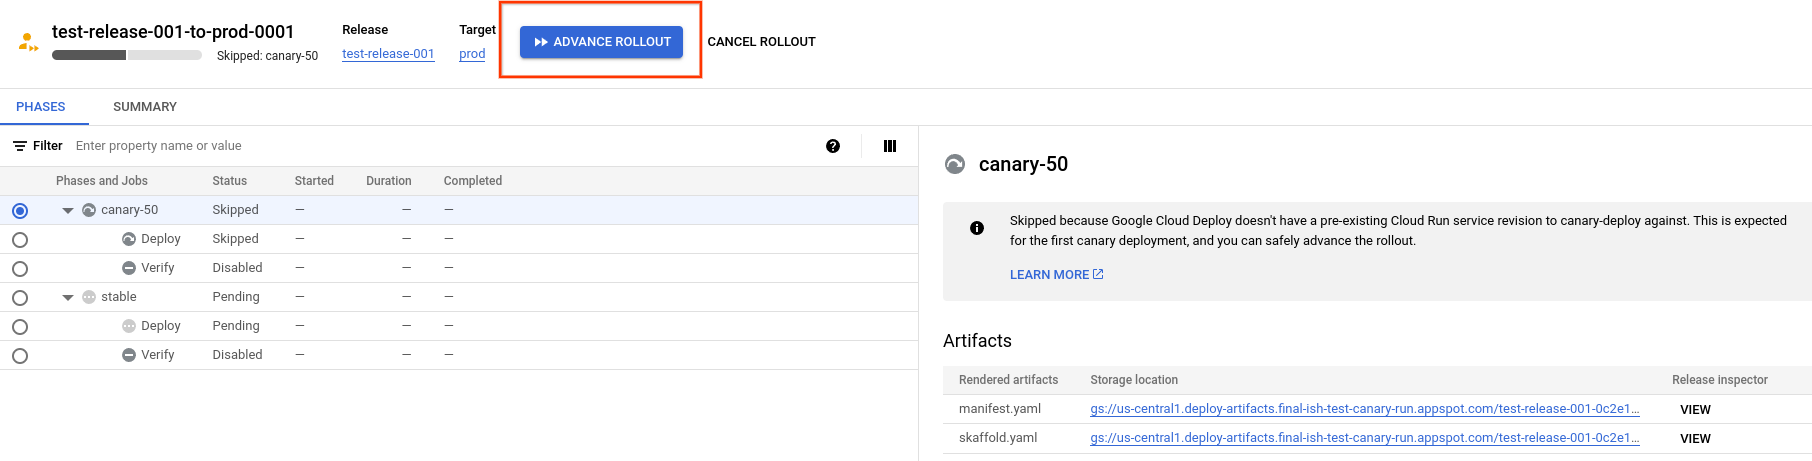
Notice that in this example, the rollout has a
canary-50phase and astablephase. Your rollout might have more phases or different phases.Click Advance rollout.
The rollout is advanced to the next phase.
Skipped phases
If you deploy a canary and your application has not been deployed to that runtime yet, Cloud Deploy skips the canary phase and runs the stable phase. See Skipping phases the first time to find out why this happens.
What's next
Try the canary deployment quickstart.
Find out how to manage the lifecycle of your canary's rollouts.
Learn more about parallel deployment.