In this document, you use the following billable components of Google Cloud:
- Dataproc
- Compute Engine
- Cloud Composer
To generate a cost estimate based on your projected usage,
use the pricing calculator.
Before you begin
Set up your project
- Sign in to your Google Cloud account. If you're new to Google Cloud, create an account to evaluate how our products perform in real-world scenarios. New customers also get $300 in free credits to run, test, and deploy workloads.
-
In the Google Cloud console, on the project selector page, select or create a Google Cloud project.
-
Make sure that billing is enabled for your Google Cloud project.
-
Enable the Dataproc, Compute Engine, and Cloud Composer APIs.
- Install the Google Cloud CLI.
-
To initialize the gcloud CLI, run the following command:
gcloud init
-
In the Google Cloud console, on the project selector page, select or create a Google Cloud project.
-
Make sure that billing is enabled for your Google Cloud project.
-
Enable the Dataproc, Compute Engine, and Cloud Composer APIs.
- Install the Google Cloud CLI.
-
To initialize the gcloud CLI, run the following command:
gcloud init
Create a Dataproc workflow template
Copy and run the commands listed below in a local terminal window or in Cloud Shell to create and define a workflow template.
- Create the
sparkpiworkflow template.gcloud dataproc workflow-templates create sparkpi \ --region=us-central1 - Add the spark job to the
sparkpiworkflow template. The "compute"step-idflag identifies the SparkPi job.gcloud dataproc workflow-templates add-job spark \ --workflow-template=sparkpi \ --step-id=compute \ --class=org.apache.spark.examples.SparkPi \ --jars=file:///usr/lib/spark/examples/jars/spark-examples.jar \ --region=us-central1 \ -- 1000 - Use a managed,
single-node
cluster to run the workflow. Dataproc will create the cluster,
run the workflow on it, then delete the cluster when the workflow completes.
gcloud dataproc workflow-templates set-managed-cluster sparkpi \ --cluster-name=sparkpi \ --single-node \ --region=us-central1 - Confirm workflow template creation.
Console
Click on the
sparkpiname on the Dataproc Workflows page in the Google Cloud console to open the Workflow template details page. Click on the name of your workflow template to confirm thesparkpitemplate attributes.
gcloud command
Run the following command:
gcloud dataproc workflow-templates describe sparkpi --region=us-central1
Create and Upload a DAG to Cloud Storage
- Create or use an existing Cloud Composer environment.
- Set environment variables.
Airflow UI
- In the toolbar, click Admin > Variables.

- Click Create.

- Enter the following information:
- Key:
project_id - Val: PROJECT_ID — your Google Cloud Project ID
- Key:
- Click Save.
gcloud command
Enter the following commands:
ENVIRONMENTis the name of the Cloud Composer environmentLOCATIONis the region where the Cloud Composer environment is locatedPROJECT_IDis the project ID for the project that contains the Cloud Composer environment
gcloud composer environments run ENVIRONMENT --location LOCATION variables set -- project_id PROJECT_ID - In the toolbar, click Admin > Variables.
- Copy the following DAG code locally into a file titled "composer-dataproc-dag.py",
which uses the
DataprocInstantiateWorkflowTemplateOperator.
Airflow 2
Airflow 1
- Upload your
DAG to your environment folder in Cloud Storage. After the upload has
been completed successfully, click on the DAGs Folder link
on the Cloud Composer Environment's page.

Viewing a task's status
Airflow UI
- Open the Airflow web interface.
- On the DAGs page, click the DAG name (for example,
dataproc_workflow_dag). - On the DAGs Details page, click Graph View.
- Check status:
- Failed: The task has a red box around it.
You can also hold the pointer over task and look for State: Failed.

- Success: The task has a green box around it.
You can also hold the pointer over the task and check for State: Success.

- Failed: The task has a red box around it.
You can also hold the pointer over task and look for State: Failed.
Console
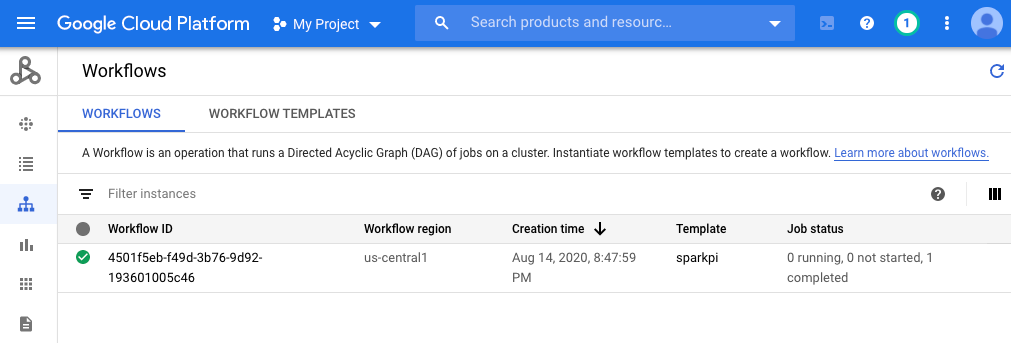
Click the Workflows tab to see workflow status.
gcloud command
gcloud dataproc operations list \
    --region=us-central1 \
    --filter="labels.goog-dataproc-workflow-template-id=sparkpi"
Cleaning up
To avoid incurring charges to your Google Cloud account, you can delete the resources used in this tutorial: