This page describes how to change the Dataproc image version used by your Cloud Data Fusion instance. You can change the image at the instance, namespace, or pipeline level.
Before you begin
Stop all real-time pipelines and replication jobs in the Cloud Data Fusion instance. If a real-time pipeline or replication is running when you change the Dataproc image version, the changes aren't applied to the pipeline execution.
For real-time pipelines, if checkpointing is enabled, stopping the pipelines doesn't cause any data loss. For replication jobs, as long as the database logs are available, stopping and starting the replication job doesn't cause data loss.
Console
Go to the Cloud Data Fusion Instances page (in CDAP, click View Instances) and open the instance where you need to stop a pipeline.
Open each real-time pipeline in the Pipeline Studio and click Stop.
Open each replication job on the Replicate page and click Stop.
REST API
To retrieve all pipelines, use the following REST API call:
GET -H "Authorization: Bearer ${AUTH_TOKEN}" \
"${CDAP_ENDPOINT}/v3/namespaces/NAMESPACE_ID/apps"
Replace
NAMESPACE_IDwith the name of your namespace.To stop a real-time pipeline, use the following REST API call:
POST -H "Authorization: Bearer ${AUTH_TOKEN}" \
"${CDAP_ENDPOINT}/v3/namespaces/NAMESPACE_ID/apps/PIPELINE_NAME/spark/DataStreamsSparkStreaming/stop"
Replace NAMESPACE_ID with the name of your namespace and PIPELINE_NAME with the name of the real-time pipeline.
To stop a replication job, use the following REST API call:
POST -H "Authorization: Bearer ${AUTH_TOKEN}" \
"${CDAP_ENDPOINT}/v3/namespaces/NAMESPACE_ID/apps/REPLICATION_JOB_NAME/workers/DeltaWorker/stop"
Replace NAMESPACE_ID with the name of your Namespace and REPLICATION_JOB_NAME with the name of the replication job.
For more information, see stopping real-time pipelines and stopping replication jobs.
Check and override the default version of Dataproc in Cloud Data Fusion
Click System Admin > Configuration > System Preferences.
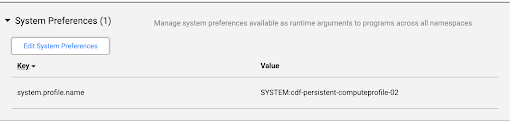
If a Dataproc image is not specified in System Preferences, or to change the preference, click Edit System Preferences.
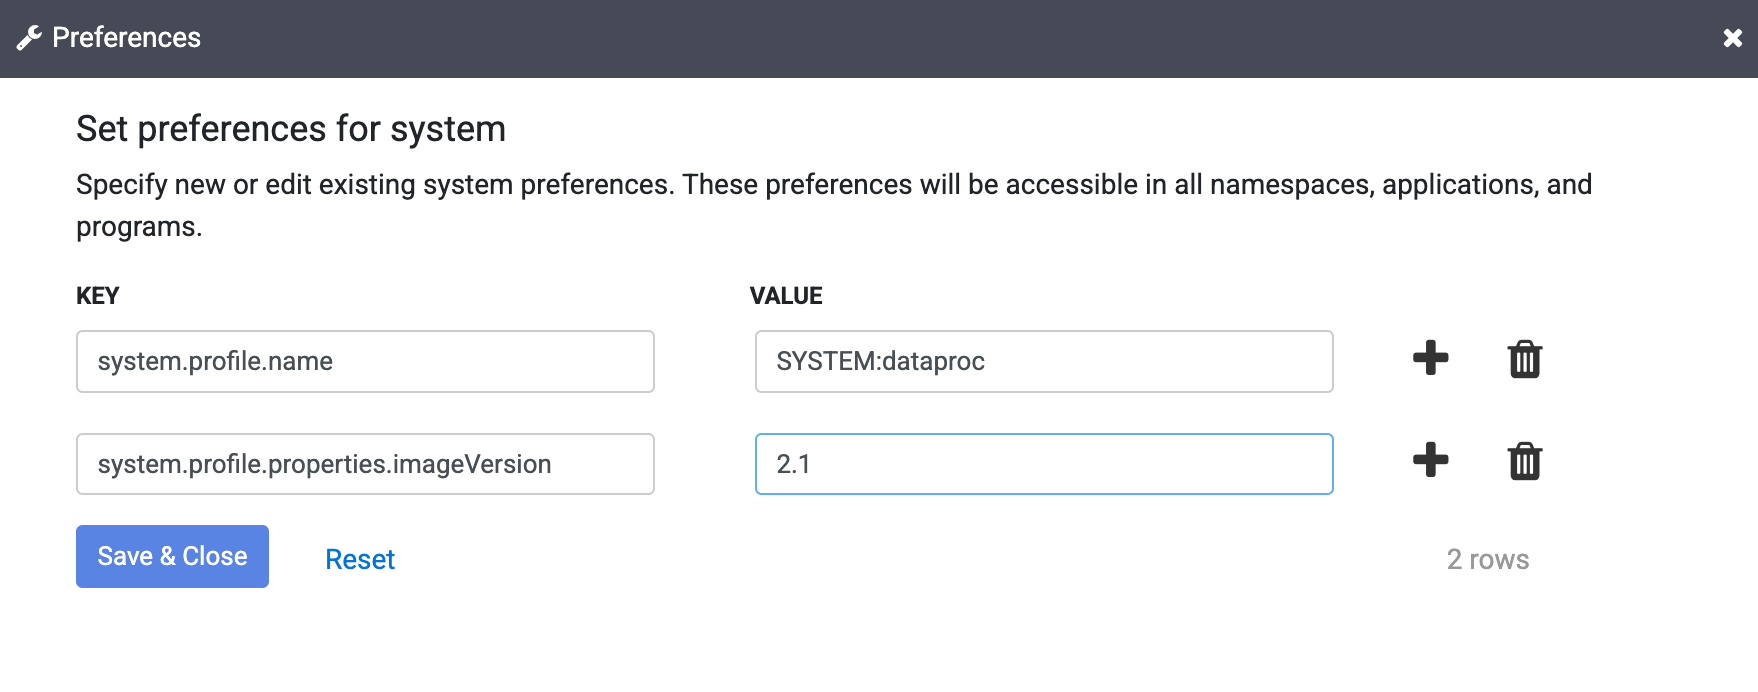
Enter the following text in the Key field:
system.profile.properties.imageVersionEnter the chosen Dataproc image in the Value field, such as
2.1.Click Save & Close.
This change affects the entire Cloud Data Fusion instance, including all its Namespaces and pipeline runs, unless the image version property is overridden in a Namespace, pipeline, or Runtime Argument in your instance.
Change the Dataproc image version
The image version can be set in the Cloud Data Fusion web interface in the Compute Configurations, Namespace Preferences, or Pipeline Runtime Arguments.
Change the image in Namespace Preferences
If you have overridden the image version in your Namespace properties, follow these steps:
Click System Admin > Configuration > Namespaces.
Open each namespace and click Preferences.
Make sure that there is no override with key
system.profile.properties.imageVersionwith an incorrect image version value.Click Finish.
Change the image in System Compute Profiles
Click System Admin > Configuration.
Click System Compute Profiles > Create New Profile.
Select the Dataproc provisioner.
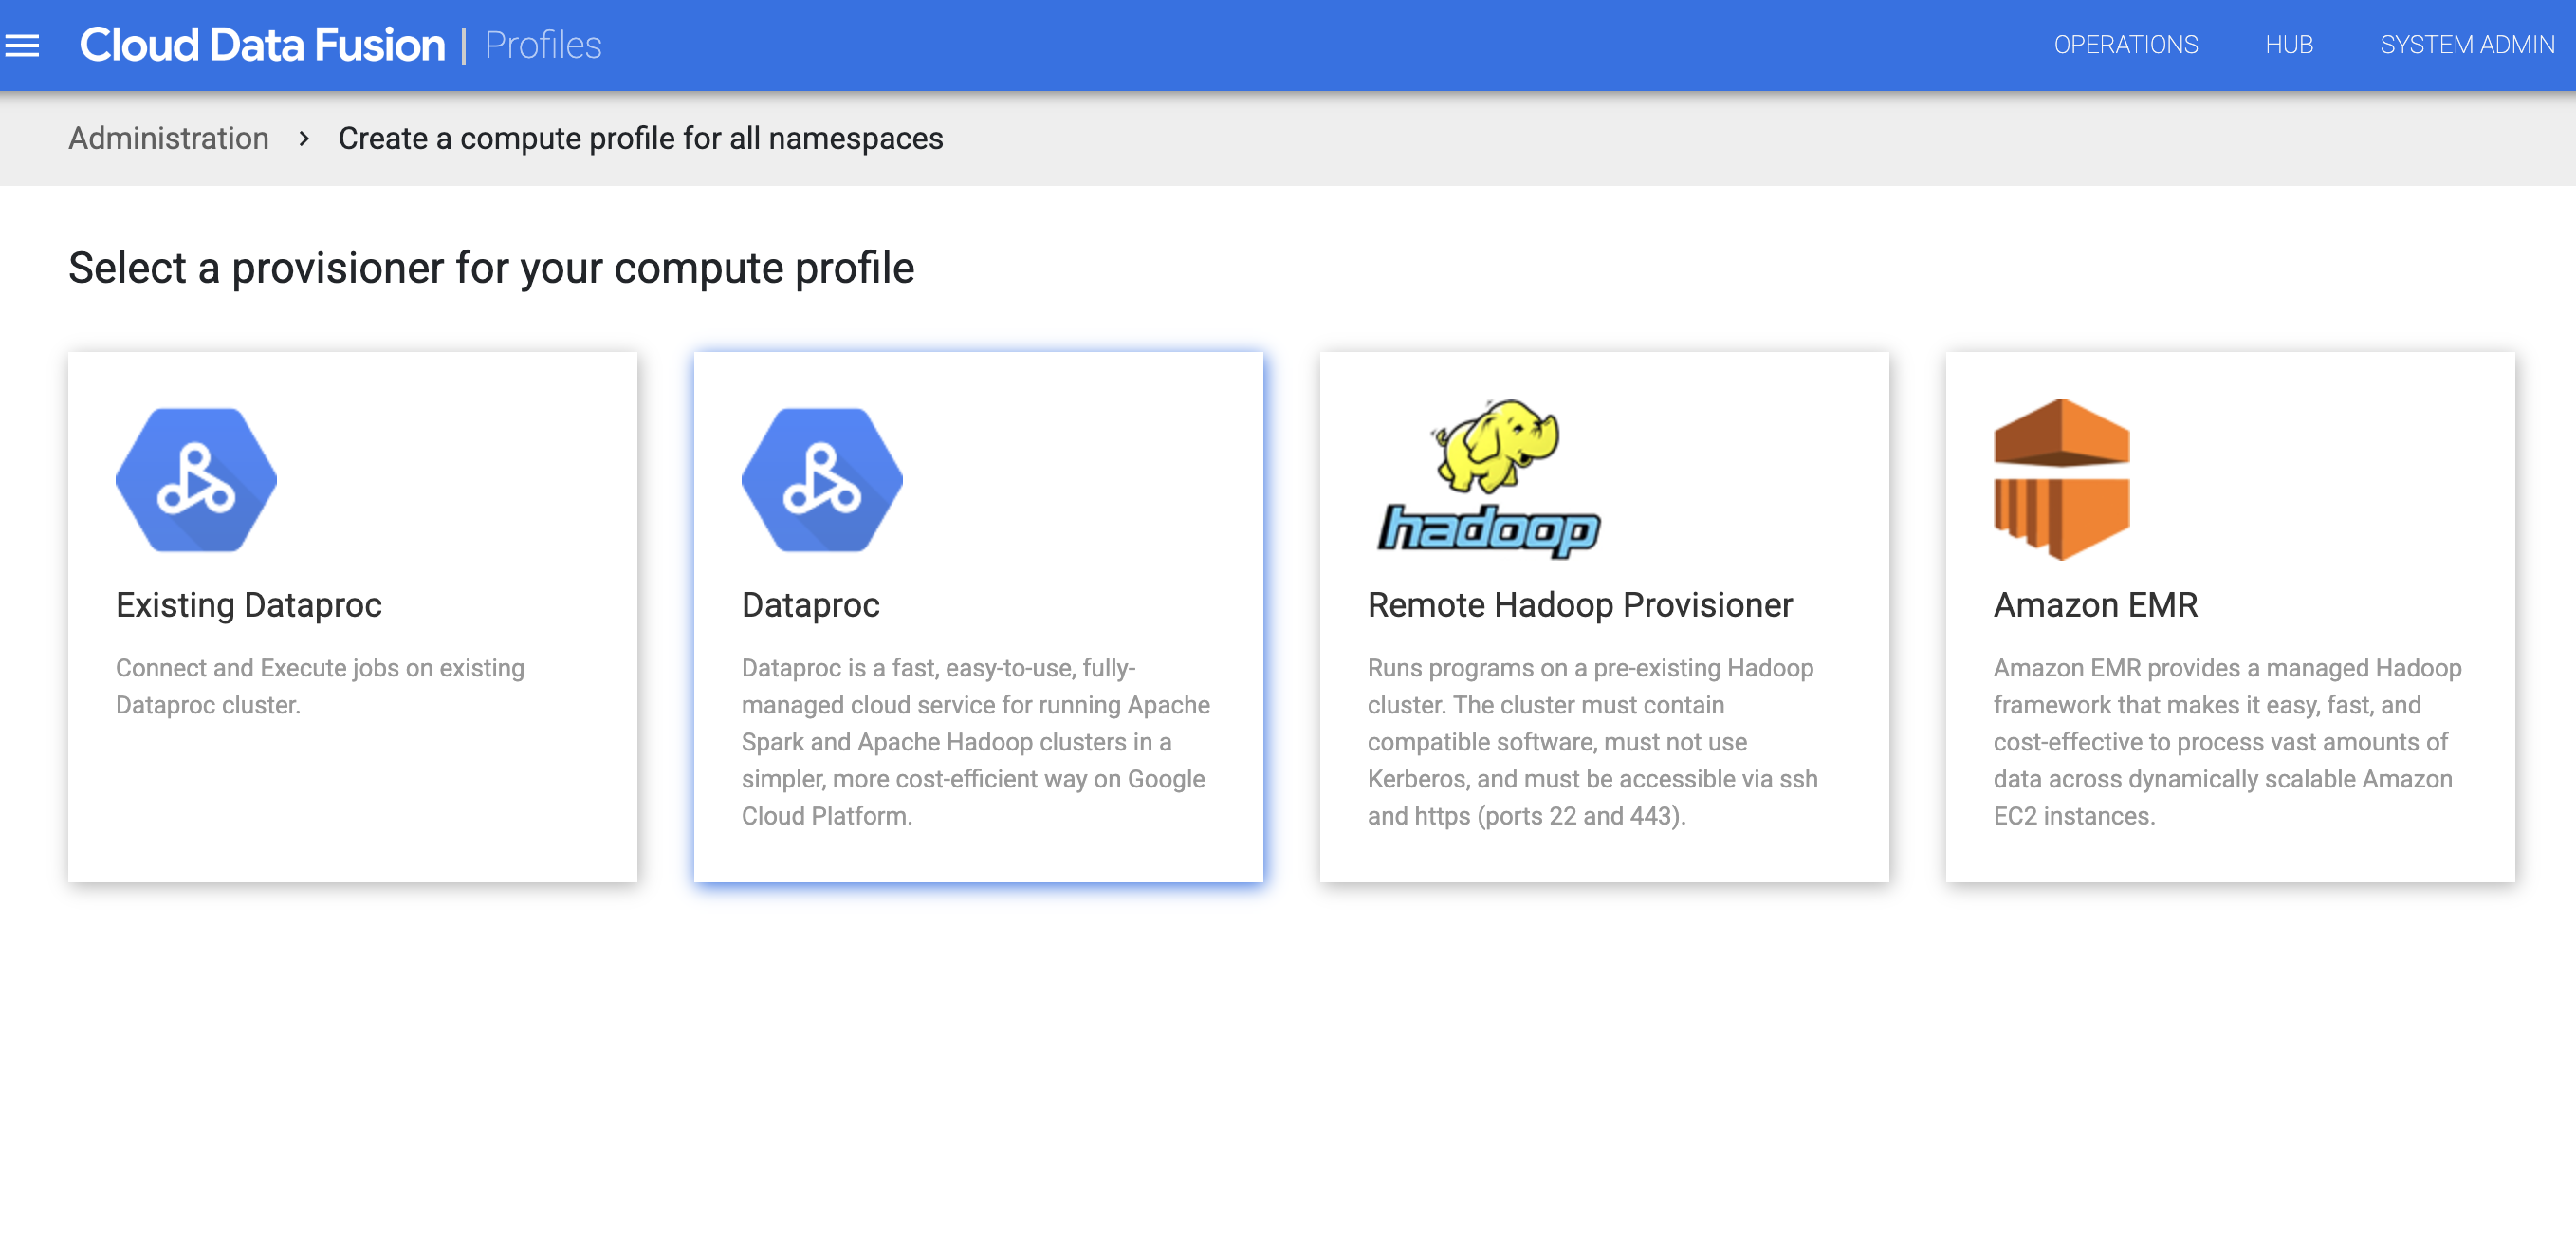
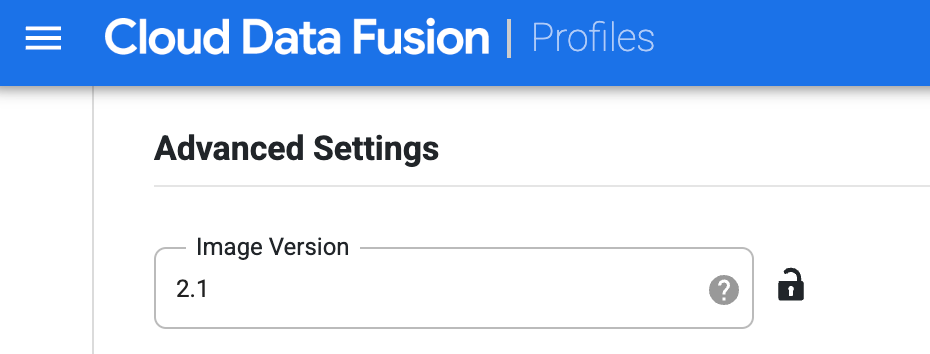
Create the profile for Dataproc. In the Image Version field, enter a Dataproc image version.
Select this compute profile while running the pipeline on the Studio page. On the pipeline run page, click Configure > Compute config and select this profile.
Select the Dataproc profile and click Save.
Click Finish.
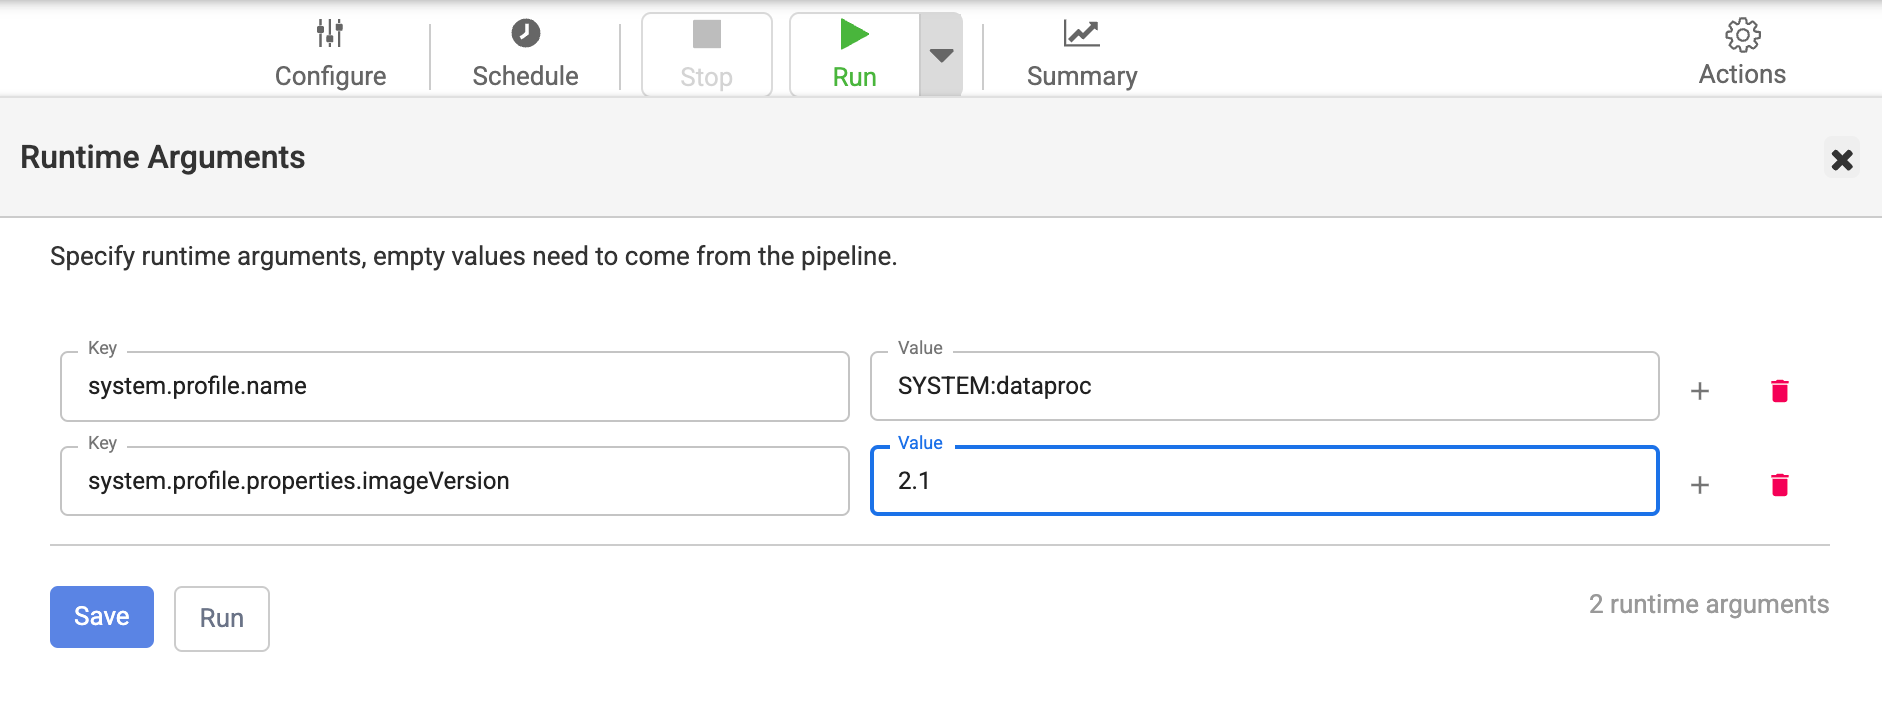
Change the image in Pipeline Runtime Arguments
If you have overridden the image version with a property in the Runtime Arguments of your pipeline, follow these steps:
Click Menu > List.
On the List page, select the pipeline you want to update.
The pipeline opens on the Studio page.
To expand the Run options, click the expander arrow.
The Runtime Arguments window opens.
Check that there is no override with the key
system.profile.properties.imageVersionwith an incorrect image version as the value.Click Save.
Recreate static Dataproc clusters used by Cloud Data Fusion with chosen image version
If you use existing Dataproc clusters with Cloud Data Fusion, follow the Dataproc guide to recreate the clusters with the chosen Dataproc image version for your Cloud Data Fusion version.
Alternatively, you can create a new Dataproc cluster with the chosen Dataproc image version and delete and recreate the compute profile in Cloud Data Fusion with the same compute profile name and updated Dataproc cluster name. This way, running batch pipelines can complete execution on the existing cluster and subsequent pipeline runs take place on the new Dataproc cluster. You can delete the old Dataproc cluster after you have confirmed that all pipeline runs have completed.
Check that the Dataproc image version is updated
Console
In the Google Cloud console, go to the Dataproc Clusters page.
Open the Cluster details page for the new cluster that Cloud Data Fusion created when you specified the new version.
The Image version field has the new value that you specified in Cloud Data Fusion.
REST API
Get the list of clusters with their metadata:
GET -H "Authorization: Bearer ${AUTH_TOKEN}" \
https://dataproc.googleapis.com/v1/projects/PROJECT_ID/regions/REGION_ID/clusters
Replace the following:
PROJECT_IDwith the name of your namespaceREGION_IDwith the name of the region where your clusters are located
Search for the name of your pipeline (cluster name).
Under that JSON object, see the image in
config >
softwareConfig > imageVersion
.
Change the Dataproc image to version 2.1
Cloud Data Fusion versions 6.9.1 and later support the Dataproc image 2.1 Compute Engine, which runs in Java 11. In versions 6.10.0 and later, image 2.1 is the default.
If you change to image 2.1, for your batch pipelines and replication jobs to succeed, the JDBC drivers that the database plugins use in those instances must be compatible with Java 11.
Dataproc image 2.1 has the following limitations in Cloud Data Fusion:
- The IBM Netezza and DB2 11 JDBC drivers are unsupported.
- Image 2.1 won't work with Map reduce jobs.
- JDBC driver versions used in the database plugins in your instance must be updated to have support for Java 11. See the following table for driver versions that work with Dataproc 2.1 and Java 11:
| JDBC Drivers | Earlier versions removed from Cloud Data Fusion 6.9.1 | Java 8 and Java 11-supported versions that work with Dataproc 2.0 or 2.1 |
|---|---|---|
| Cloud SQL for MySQL JDBC driver | - | 1.0.16 |
| Cloud SQL for PostgreSQL JDBC driver | - | 1.0.16 |
| DB2 11 JDBC driver | - | - |
| Microsoft SQL Server JDBC driver | Microsoft JDBC driver 6.0 | Microsoft JDBC driver 9.4 |
| MySQL JDBC driver | 5.0.8, 5.1.39 | 8.0.25 |
| IBM Netezza JDBC driver | - | - |
| PostgreSQL JDBC driver | 9.4.1211.jre7, 9.4.1211.jre8 | 42.6.0.jre8 |
| Oracle JDBC driver | ojdbc7 | ojdbc8 (12c and above) |
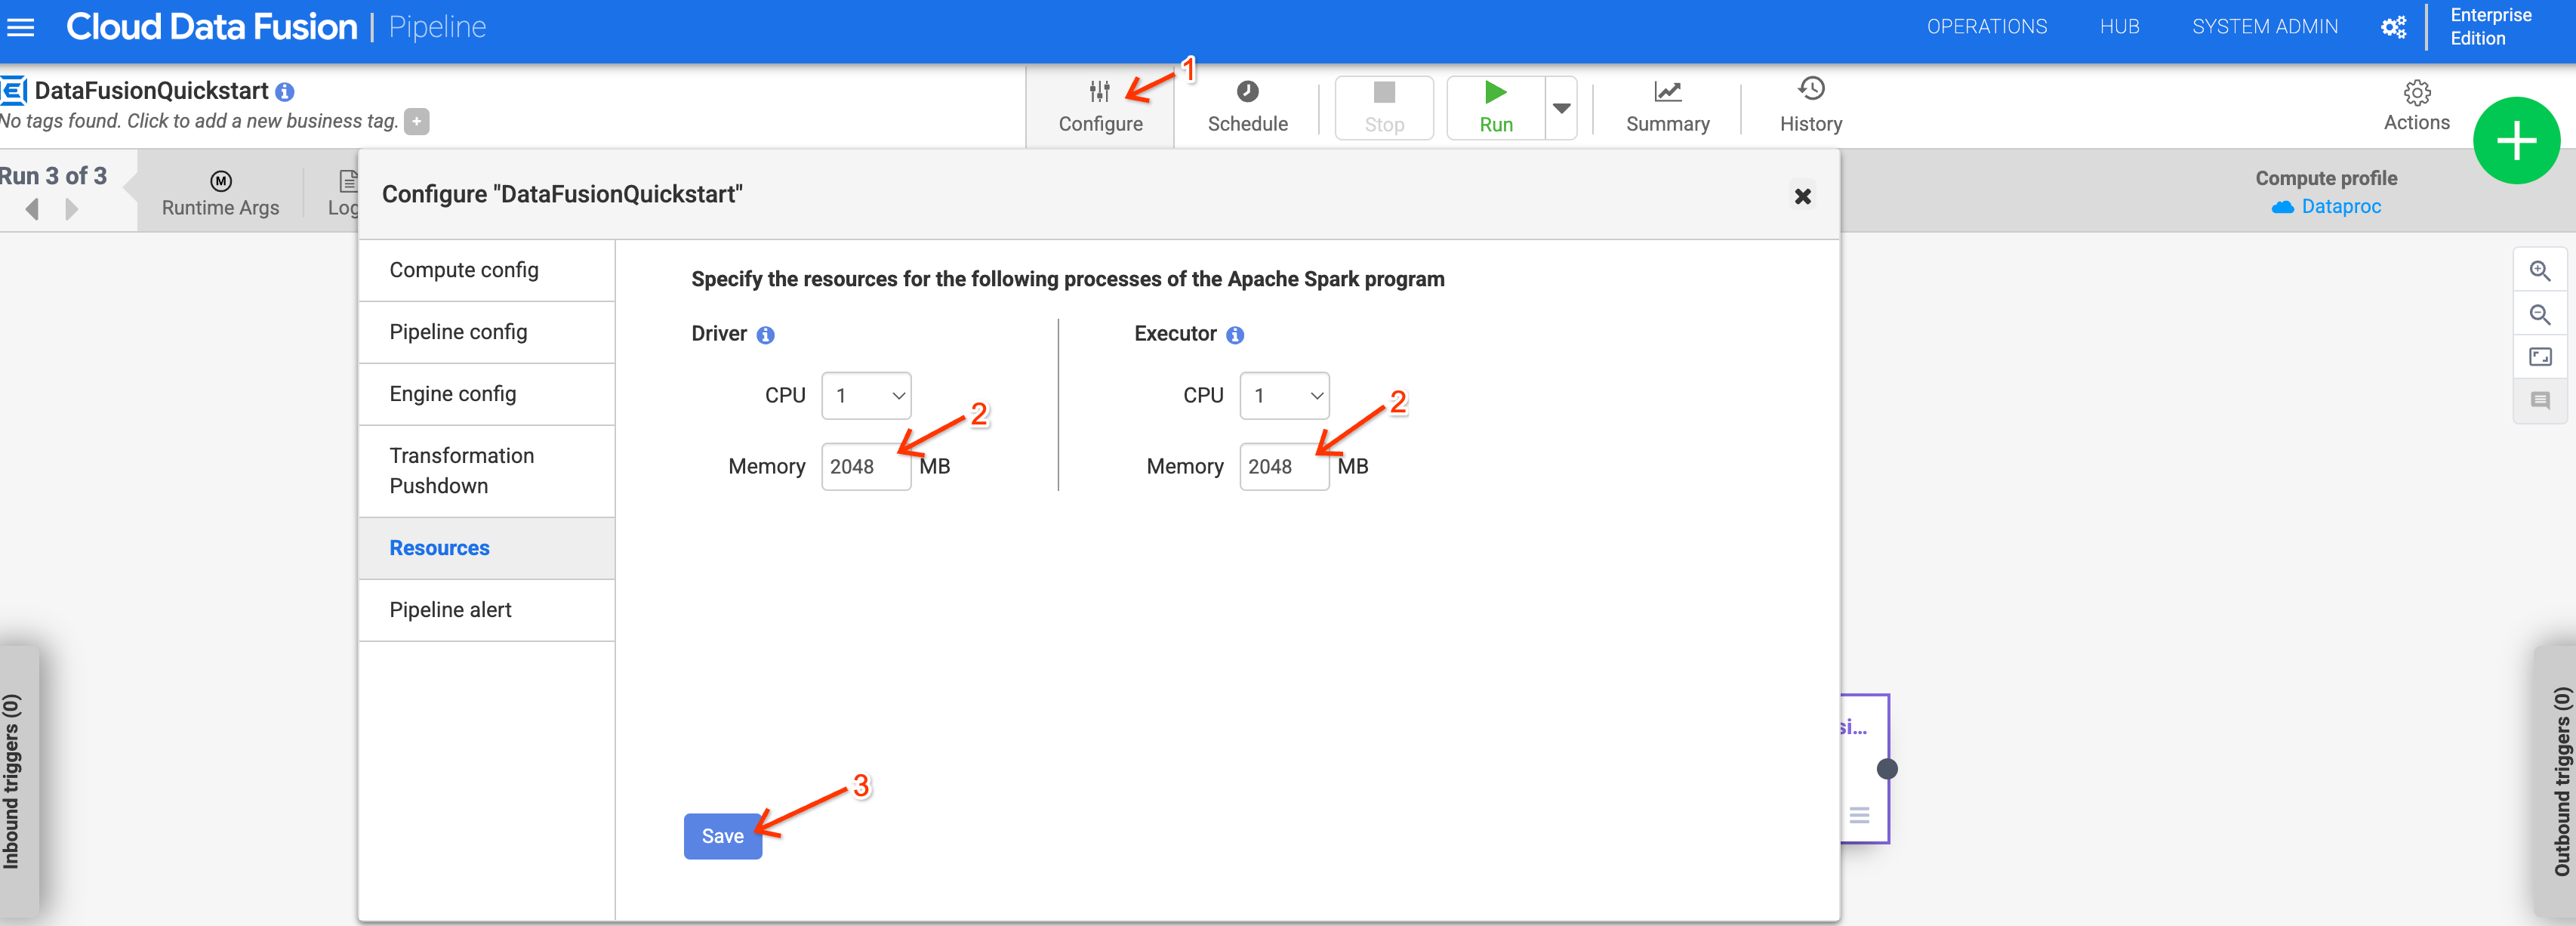
Memory usage when using Dataproc 2.1
Memory usage might increase for pipelines that use Dataproc 2.1
clusters. If you upgrade your instance to version 6.10.0 or later, and
previous pipelines are failing due to memory issues, increase the driver and
executor memory to 2048 MB in the Resources configuration for the
pipeline.
Alternatively, you can override the Dataproc version by setting
the system.profile.properties.imageVersion runtime argument to 2.0-debian10.