This page describes how to get started using role-based access control (RBAC) in Cloud Data Fusion instances. RBAC is available in Cloud Data Fusion instances running in versions 6.5 and later.
For more information, see the role-based access control (RBAC) overview.
Recommended: Unless required for automation purposes, use the Google Cloud console to perform your RBAC tasks.
Enable RBAC for an existing instance
You can enable RBAC for an existing Cloud Data Fusion instance running in version 6.5 or later.
Console
To enable RBAC on an existing Cloud Data Fusion instance:
- Go to the instance details:
In the Google Cloud console, go to the Cloud Data Fusion page.
Click Instances, and then click the instance's name to go to the Instance details page.
- Ensure that the instance has been upgraded to version 6.5 or later. If the instance is earlier than 6.5, upgrade the instance to version 6.5 or later.
- Click Enable RBAC.
- Click Save.
- Wait for the instance update operation to complete.
gcloud
To enable RBAC on an existing Cloud Data Fusion instance, run the following command:
gcloud beta data-fusion instances update --enable_rbac --location=REGION INSTANCE_ID
REST API
Enable RBAC for an existing instance with the
Cloud Data Fusion patch
API. Set the enableRbac flag to true and use the updateMask query
parameter using the following example command:
export PROJECT=PROJECT_ID
export LOCATION=REGION
export INSTANCE=INSTANCE_ID
export DATA_FUSION_API_NAME=datafusion.googleapis.com
alias gcurl='curl --header "Authorization: Bearer $(gcloud auth print-access-token)" -H "Content-Type: application/json"'
gcurl https://$DATA_FUSION_API_NAME/v1beta1/projects/$PROJECT/locations/$LOCATION/instances/$INSTANCE?updateMask=enable_rbac -X PATCH -d '{"enable_rbac": "true"}'
Disable RBAC for an existing instance
If you have an existing instance with RBAC enabled, you can disable RBAC if needed. Disabling RBAC doesn't affect any existing pipelines or configurations in the instance. It just disables security isolation across namespaces.
Console
To disable RBAC on an existing Cloud Data Fusion instance:
Go to the instance details:
In the Google Cloud console, go to the Cloud Data Fusion page.
Click Instances, and then click the instance's name to go to the Instance details page.
Click Disable RBAC.
Click Save.
Wait for the instance update operation to complete.
gcloud
To disable RBAC for an existing instance, use argument --no-enable_rbac instead of --enable-rbac.
gcloud beta data-fusion instances update --no-enable_rbac --location=REGION INSTANCE_ID
Example of usage:
gcloud beta data-fusion instances update --no-enable_rbac --location=us-east1 cdf-test-instance
REST API
Disable RBAC for an existing instance with the
Cloud Data Fusion patch
API. Set the enableRbac flag to false and use the updateMask query
parameter using the following example command:
export PROJECT=PROJECT_ID
export LOCATION=REGION
export INSTANCE=INSTANCE_ID
export DATA_FUSION_API_NAME=datafusion.googleapis.com
alias gcurl='curl --header "Authorization: Bearer $(gcloud auth print-access-token)" -H "Content-Type: application/json"'
gcurl https://$DATA_FUSION_API_NAME/v1beta1/projects/$PROJECT/locations/$LOCATION/instances/$INSTANCE?updateMask=enable_rbac -X PATCH -d '{"enable_rbac": "false"}'
Create a new RBAC-enabled instance
Console
To create a new Cloud Data Fusion instance with RBAC enabled:
Go to the Cloud Data Fusion Instances page.
Click Instances.
Click Create an instance and enter the instance details.
Select the Enterprise edition. RBAC is only supported in the Enterprise edition.
In Advanced options, select Enable Granular Role-Based Access Control.
This feature is available only in instances that use Cloud Data Fusion version 6.5 and later.
Click Create.
gcloud
To create a new RBAC-enabled instance, run the following command:
gcloud beta data-fusion instances create --edition=enterprise \
--enable_rbac \
--location=REGION INSTANCE_ID \
--version=6.5.0
Example of usage:
gcloud beta data-fusion instances create --edition=enterprise \
--enable_rbac \
--location=us-east1 \
--version=6.5.0
REST API
To create an RBAC-enabled instance using the REST API, pass
the enableRbac flag set to true in the instance options as shown in the
following commands:
export PROJECT=PROJECT_ID
export LOCATION=REGION
export INSTANCE=INSTANCE_ID
export DATA_FUSION_API_NAME=datafusion.googleapis.com
curl -H "Authorization: Bearer $(gcloud auth print-access-token)" -H "Content-Type: application/json" https://$DATA_FUSION_API_NAME/v1beta1/projects/$PROJECT/locations/$LOCATION/instances?instanceId=$INSTANCE -X POST -d '{"description": "RBAC CDF instance created through REST", "type": "ENTERPRISE", "enableRbac": "true"}'
Grant predefined Cloud Data Fusion roles to users (required)
After RBAC is enabled, you grant roles to principals to let them perform specific actions in an instance or a namespace. To decide which roles best meet your requirements, see the Predefined Cloud Data Fusion roles and Security recommendations.
Console
To grant predefined Cloud Data Fusion roles to principals:
Go to the Cloud Data Fusion Permissions page.
Click Add .
An Add users' access dialog opens.
In the New members field, enter a list of principals (users, groups, or service account emails) for whom to grant roles.
Select the box next to each instance for which you want to grant these permissions.
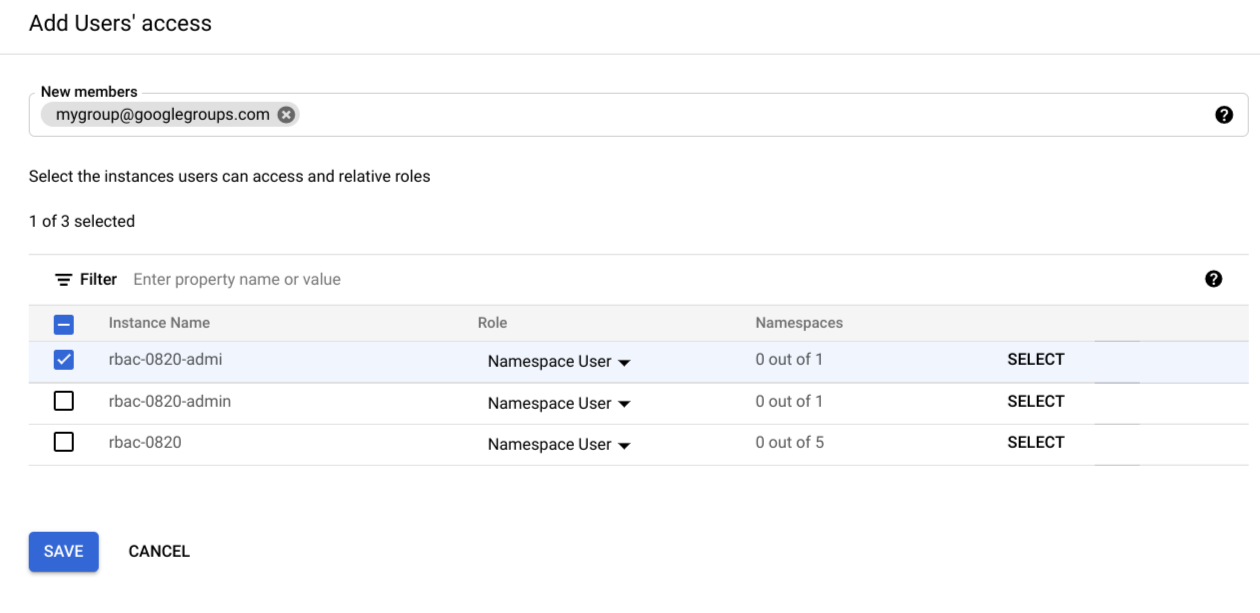
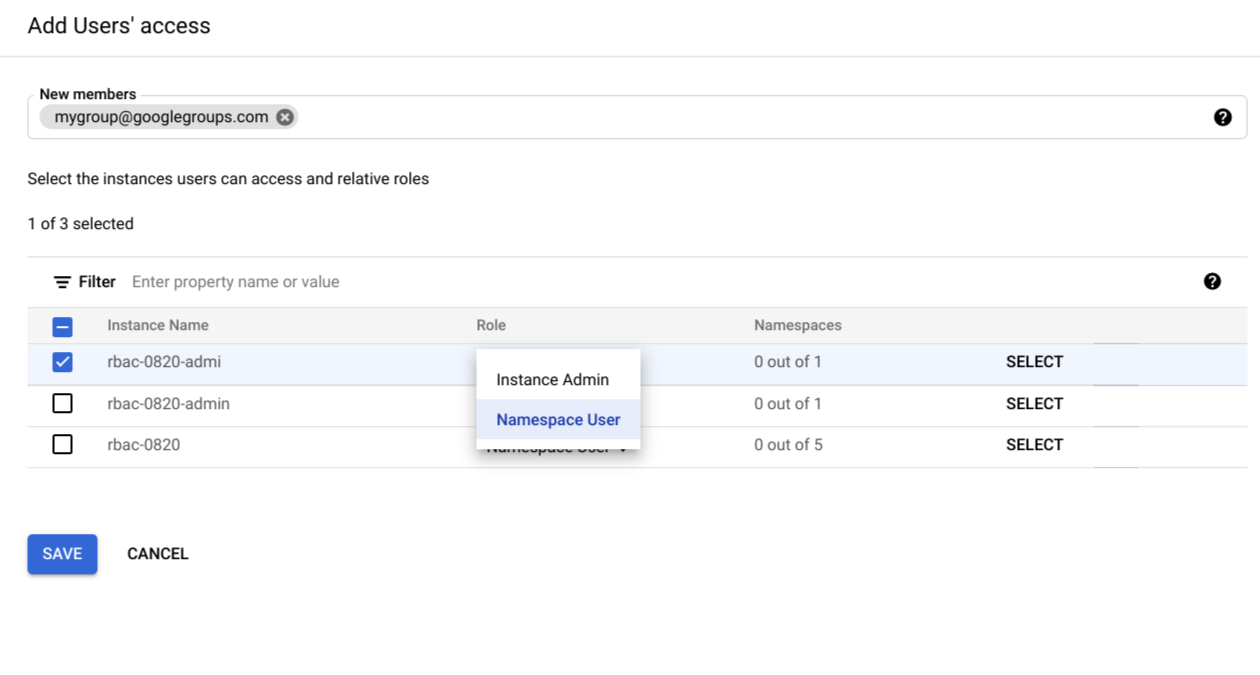
Go to the Role column and select the drop-down next to the desired instances.
To grant instance admin permissions, select Instance Admin.
To grant namespace level permissions, select Namespace User.
If you're granting namespace level permissions, click Select.
An Add access rights dialog opens.
Select a namespace and select the predefined Cloud Data Fusion role you wish to grant for the namespace.
Click Select to save your new settings.
Optional: To grant namespace permissions for other instances, repeat step 5.
Click Save.
To verify the roles that have been granted, see Verify roles in the Google Cloud console.
gcloud
You can use the Google Cloud CLI to control access programmatically.
To grant a role using gcloud CLI, use a comma-delimited list of user identifiers in the following format:
[user|group|serviceAccount][email_address]
Provide the following values:
user:useremail@example.comgroup:groupemail@example.comserviceAccount:serviceaccount@project.iam.gserviceaccount.com
For more examples, see Grant a role.
Grant Instance Accessor role (required)
You must first give a user access to the instance by granting them the Accessor role on an instance:
Export the following variables with the following command, replacing the variables with your own values:
export PROJECT=PROJECT_ID
export INSTANCE=INSTANCE_ID
export REGION=REGION
export USER_ID=EMAIL
export USER_TYPE=USER_TYPE
Replace the following variables with your own values:
- PROJECT_ID: Your project name.
- INSTANCE_ID: The name of your instance.
- REGION: The region the project belongs to.
- EMAIL: The email address of the principal.
- USER_TYPE: User type can be one of: user, group, or serviceAccount.
Run the following command to assign the role:
gcloud beta data-fusion add-iam-policy-binding ${INSTANCE} --project ${PROJECT} --location=${REGION} --member="${USER_TYPE}:${USER_ID}" --role="roles/datafusion.accessor"
Grant roles to a namespace (use-case dependent)
Depending on your use case, grant roles with the following commands:
Export the following variables with the following command, replacing the variables with your own values:
export PROJECT=PROJECT_ID
export INSTANCE=INSTANCE_ID
export REGION=REGION
export NAMESPACE=NAMESPACE
export USER_ID=EMAIL
export USER_TYPE=USER_TYPE
Replace the following variables with your own values:
- PROJECT_ID: Your project name.
- INSTANCE_ID: The name of your instance.
- REGION: The region the project belongs to.
- NAMESPACE: The namespace name.
- EMAIL: The email address of the principal.
- USER_TYPE: User type can be one of: user, group, or serviceAccount.
Run the following command to assign a role to a principal in a given namespace:
gcloud beta data-fusion add-iam-policy-binding ${INSTANCE} --project ${PROJECT} --location=${REGION} --namespace=${NAMESPACE} --member="${USER_TYPE}:${USER_ID}" --role="roles/ROLE_NAME"Replace ROLE_NAME with one of the following values:
- For the Editor role for a namespace, use
datafusion.editor - For the Operator role for a namespace, use
datafusion.operator - For the Developer role for a namespace, use
datafusion.developer - For the Viewer role for a namespace, use
datafusion.viewer
- For the Editor role for a namespace, use
Optional: Revoke namespace roles
To revoke the role granted to a user for a given namespace, use the following command:
export PROJECT=PROJECT_ID
export INSTANCE=INSTANCE_ID
export REGION=REGION
export NAMESPACE=NAMESPACE
export USER_ID=EMAIL
# User type can be one of: user, group, or serviceAccount.
export USER_TYPE=USER_TYPE
export ROLE=ROLE_NAME
gcloud beta data-fusion remove-iam-policy-binding ${INSTANCE} --project ${PROJECT} --location=${REGION} --namespace=${NAMESPACE} --member="${USER_TYPE}:${USER_ID}" --role="${ROLE}"
Optional: List roles granted on a given namespace
To list all the roles granted on a particular namespace, use the following command to fetch the IAM policy:
export PROJECT=PROJECT_ID
export INSTANCE=INSTANCE_ID
export REGION=REGION
export NAMESPACE=NAMESPACE
gcloud beta data-fusion get-iam-policy ${INSTANCE} --project ${PROJECT} --location=${REGION} --namespace=${NAMESPACE}
REST API
Grant Instance Accessor role (required)
You must first give a user access to the instance by granting them the Accessor role on an instance.
Strongly recommended: Use gcloud CLI to grant the Accessor role.
Grant the accessor role on an instance:
export PROJECT=PROJECT_ID
export INSTANCE=INSTANCE_ID
export REGION=REGION
export USER_ID=EMAIL
# User type can be one of: user, group, or serviceAccount.
export USER_TYPE=USER_TYPE
alias gcurl='curl --header "Authorization: Bearer $(gcloud auth print-access-token)" -H "Content-Type: application/json"'
Fetch current IAM policy and save it in a file:
gcurl https://datafusion.googleapis.com/v1beta1/projects/${PROJECT}/locations/${REGION}/instances/${INSTANCE}:getIamPolicy > iam_policy.jsonAdd a binding for the role and the user in the policy. For example:
{
  "policy": {
    "bindings": [
      {
        "role": "roles/datafusion.accessor",
        "members": [
          "${USER_TYPE}:${USER_ID}"
        ]
      }
    ]
  }
}
Update the IAM policy of the instance:
gcurl \
  -d @iam_policy.json \
  https://datafusion.googleapis.com/v1beta1/projects/${PROJECT}/locations/${REGION}/instances/${INSTANCE}:setIamPolicy
Grant roles to a namespace (use-case dependent)
Depending on your use case, grant roles with the following commands:
Export the following variables with the following command, replacing the variables with your own values:
export PROJECT=PROJECT_ID
export INSTANCE=INSTANCE_ID
export REGION=REGION
export NAMESPACE=NAMESPACE
export USER_ID=EMAIL
export USER_TYPE=USER_TYPE
alias gcurl='curl --header "Authorization: Bearer $(gcloud auth print-access-token)" -H "Content-Type: application/json"'
Replace the following variables with your own values:
- PROJECT_ID: Your project name.
- INSTANCE_ID: The name of your instance.
- REGION: The region the project belongs to.
- NAMESPACE: The namespace name.
- EMAIL: The email address of the principal.
- USER_TYPE: User type can be one of: user, group, or serviceAccount.
Fetch current IAM policy and save it in a file:
gcurl https://datafusion.googleapis.com/v1beta1/projects/${PROJECT}/locations/${REGION}/instances/${INSTANCE}/namespaces/{NAMESPACE}:getIamPolicy > iam_policy.jsonReplace iam_policy.json with your own file name.
Add a binding for the role and the user in the policy file. For example, the policy file may look like the following:
{
  "policy": {
    "bindings": [
      {
        "role": "roles/ROLE_NAME",
          "members": [
          "${USER_TYPE}:${USER_ID}"
        ]
      }
    ]
  }
}
Multiple role bindings may be specified for a given policy, and multiple principals may be specified in the members list for a given role binding. For a given principal, replace ROLE_NAME with one of the following values:
- For the Editor role for a namespace, use
datafusion.editor - For the Operator role for a namespace, use
datafusion.operator - For the Developer role for a namespace, use
datafusion.developer - For the Viewer role for a namespace, use
datafusion.viewer
- For the Editor role for a namespace, use
Run the following command to update the policy file:
gcurl -d @iam_policy.json \
https://datafusion.googleapis.com/v1beta1/projects/${PROJECT}/locations/${REGION}/instances/${INSTANCE}/namespaces/{NAMESPACE}:setIamPolicy
Replace iam_policy.json with your own file name.
Verify roles in the Google Cloud console
Review and edit existing roles on the Cloud Data Fusion Permissions page.
Verify roles with the Policy file
Verify that the roles are granted to the correct users in the IAM Policy file using either gcloud CLI or the REST API.
In the following IAM Policy file example, the user
alice@example.com has the Data Fusion Developer role:
bindings:
- members:
  - user:alice@example.com
  role: roles/datafusion.developer
- members:
  - user:bob@example.com
  - serviceAccount:myserviceaccount@myproject.iam.gserviceaccount.com
  role: roles/datafusion.operator
- members:
  - user:james@example.com
  - user:mike@example.com
  - group:mygroup@googlegroups.com
  role: roles/datafusion.editor
etag: BwXA8BAHYmw=
Get the IAM Policy for an instance
gcloud
export PROJECT=PROJECT_ID
export INSTANCE=INSTANCE_ID
export REGION=REGION
gcloud beta data-fusion get-iam-policy ${INSTANCE} --project ${PROJECT} --location=${REGION}
cURL
export PROJECT=PROJECT_ID
export INSTANCE=INSTANCE_ID
export REGION=REGION
curl -H "Authorization: Bearer "$(gcloud auth print-access-token) \
https://datafusion.googleapis.com/v1beta1/projects/${PROJECT}/locations/${REGION}/instances/${INSTANCE}:getIamPolicy
Get the IAM Policy for a namespace
gcloud
export PROJECT=PROJECT_ID
export INSTANCE=INSTANCE_ID
export REGION=REGION
export NAMESPACE=NAMESPACE
gcloud beta data-fusion get-iam-policy ${INSTANCE} --project ${PROJECT} --location=${REGION} --namespace=${NAMESPACE}
cURL
export PROJECT=PROJECT_ID
export INSTANCE=INSTANCE_ID
export NAMESPACE=NAMESPACE
export REGION=REGION
curl -H "Authorization: Bearer "$(gcloud auth print-access-token) \
https://datafusion.googleapis.com/v1beta1/projects/${PROJECT}/locations/${REGION}/instances/${INSTANCE}/namespaces/${NAMESPACE}:getIamPolicy
What's next
- Learn more about role-based access control in Cloud Data Fusion.